Hello!
In the last article I talked about how to make a paper snowflake easily and beautifully. Today I want to continue the theme of paper beauties. Only this time they will be voluminous. These will decorate any interior.
Many, of course, will say: “Why do anything?” Let's go and buy it. This is of course always easier.
However, for some reason we try to do some things with our own hands. Firstly, it is working together with children. We all get great pleasure from it. And parents probably more. Because our little snub noses are sitting next to each other, puffing, trying.
DIY paper snowflake for the New Year: step-by-step instructions with a cutting template
Another very nice option for making voluminous ice cubes. Paper has one great virtue. It can easily take any shape. And now we will consider options for voluminous beauties cut from A4 sheet.
In order to learn how to make complex structures. We all know this, we need to start with easier and simpler options.
We will need:
- scissors.
- A4 sheet
- glue
Let's look at it step by step:
On the prepared sheet we mark squares with a side of 10.5 cm (can be made in any size). We will need 6 of these figures to make the fluff.
Then we cut them out. These are the blanks for the future fluff.
Connect the top corner with the opposite one diagonally. Using a pencil, mark points on all sides with a distance of 1 cm.
And apply even stripes in 1 cm increments using a pen and ruler. It turned out 10 stripes.
Next, we make cuts on one side.
Important! Do not cut to the fold line of 5 mm or more.
We unfold the workpiece. And we begin to conjure.
Glue the 2 bottom strips together. And so we skip 1 row, connecting the petals first on one side. Then turn it over and continue on the other side.
And we do this with all the stripes of this figure.
And we connect the resulting figures together into one whole. To do this, apply drops of glue to the base of each piece in turn and connect it to the base of the other part. And we will do this with all the details.
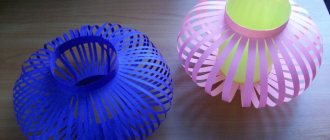
The result is a magnificent fluff.
Fluffy snowflake made of squares
Another option from the great variety of voluminous paper snowflakes that you can make with your own hands for the New Year is snowflakes from squares. For one cute New Year's beauty you need 6 squares. We make them from colored paper.
PHOTO: Snowflake made from a square sheet of paper
But first, let's get everything ready for work:
- For one snowflake you need 1.5 sheets of colored double-sided paper;
- scissors;
- glue.
Let's start the manufacturing process:
- We make 6 squares. From one sheet you will get 4 and from the other 2 squares. Fold a sheet of paper in half lengthwise, bend the top corner toward the center, and cut off the folded triangle. And so we make 6 squares.
- Now we cut the squares folded into a triangle into strips of 1 centimeter towards the center, but cut off the strips so that the center remains uncut.
- This is how we got the fluffy rays of a snowflake. All that remains is to glue them together. We glue each ray separately. First we glue the tip, then the rays in one direction through each other, turn the remaining rays over in the other direction.
- When all the rays are formed, glue 3 rays in the center and then connect 3 and 3 rays to each other in the center. The snowflake is ready.
This multi-colored beauty can decorate your home, a classroom at school, and a group in kindergarten. You can make them together with your children, the process is not at all complicated, you just need to explain the procedure to the child and do everything carefully
.
? Video:
How to make a large paper snowflake easily and beautifully
A very impressive piece of ice is made from one-sided colored paper.
You will need:
- colored paper - 6 squares;
- scissors;
- stapler;
- Ruler and pencil;
- glue.
Progress:
Crafts made from multi-colored sheets look very beautiful.
Progress:
Take the first square and draw a line connecting the two corners. Then on one side we draw three triangles, at a distance of 1 cm from each other, without connecting the lines. You can see this more clearly in the diagram.
Fold the square in half.
Let's make cuts on each side, not bringing them to the end of 1 cm.
Let's expand the figure and first connect the corners of the smallest, inner square and glue them together.
Turn the square over and fasten the ends of the next square. We repeat the whole process 2 more times. We received only one detail of the future craft.
From the remaining 5 squares we will make more rays in a similar way.
All that remains is to connect all the pieces together. I recommend assembling first one half from three parts, then the second. And only after that glue the whole one from 2 parts.
A voluminous beauty suspended on a thread will create a feeling of New Year's snowfall in the interior!
I hope you find the step-by-step instructions for making frosty beauties useful.
Volumetric 3-D paper snowflakes with protrusions
Very beautiful patterned snowflakes with vytynanka, and, moreover, unusual and voluminous. Everything is quite easy to do.
What is remarkable about vytynanki? Firstly, this is oriental art, which we have successfully adopted. Secondly, such patterns will not leave any “creative workshop” indifferent.
I present to you step-by-step, fairly detailed instructions for making a simple volumetric protrusion. Follow the scheme strictly and you will definitely succeed.
For production we will need:
- A4 paper
- Scissors
- Pencil
- Glue stick
We need to make a square from an A4 sheet, so we bend one of the upper corners to the opposite side (we should get a right angle). Cut off the excess part.
Without unfolding the resulting figure, fold it in half again and get an isosceles triangle.
Now we bend the part on one side and smooth it and do this on 2 more sides.
As a result, we get this triangle. Next, draw an inclined line on it with a pencil and cut along it.
We make 2 deep cuts along the figure.
Now draw 3 semicircles and cut along the lines.
Unfold the half-finished snowflake. This is what it should look like in the photo above.
We slightly bend the edge of the middle petal, coat it with glue and glue it into the middle of the figure.
In this way we glue the remaining three petals.
Now we need exactly the same snowflake. Glue one part into the other and the snowflake is ready!
Watch the video of voluminous paper snowflakes: 4 simple 3-D snowflakes:
I think now you can see that making a three-dimensional snowflake with your own hands is not difficult, but even interesting and exciting! After all, decorating a home (office/office/classroom/kindergarten group) for the New Year already feels like that magical holiday. And when we don’t buy ready-made jewelry, but make it ourselves, putting all our creativity, imagination and imagination into it, such things are valued the most. Therefore, I propose to “soak” yourself with pleasant New Year’s chores.
Happy New Year 2021 everyone!
Author of the publication
offline 1 year
New Year's snowflake - fluff
In my opinion, the simplest New Year's craft is Pushinka. Therefore, in this master class I will tell you in detail how to make it.
We will need a minimum of time. And the result is always amazing.
Let's make a square blank. To do this, connect the short and long sides of the A4 sheet.
Step 2. Cut off the excess along the edge.
Now let's bend the triangle in half.
And in half again.
This is what happened!
Let's add it up again.
And cut the resulting figure along the line marked with a dotted line.
You need to cut it so that after the first turn you get a diamond like this.
Let's return the figure to the triangle and start creating the fringe.
Now we begin to unfold.
The result will be a wonderful fluffy beauty.
To create a volume of such blanks you will need at least 3. If desired, the number can be increased. For example, for hanging in the interior, linings can be made on 2 sides. Then you will need 5 of them.
A little hint. If the largest one uses A4 sheet, then the next one can be made from A5. And crumbs from the strip remaining from the A4 sheet.
All preparations are ready. You can start assembling: put the largest part down, then the smaller ones, and the smallest on top.
At the end of this master class, I would like to add. Don't be afraid to experiment. Use colored paper in your work - it looks no less “frosty” than white.
And in the end we get amazing beauty.
Let's do a lot and we'll get a whole snowfall!
Volumetric snowflakes for decoration and decoration of the hall
Of course, when it comes to the moment when we need to decorate the premises for the holiday, we again think about how to do it. And here are some ideas that may be useful in this matter. You just need... look at the materials yourself, and your desire to create.
See the entire work process on these slides.
Well, now pay attention to this New Year's multi-colored beauty. Bravo to the master!
And a few more options to choose from, they are made from stripes.
Very simple snowflake flower
What happens on New Year's Eve? Even snowflakes turn into flowers.
We will need:
- paper (white or colored)
- simple pencil
- ruler
- eraser
- threads
- glue stick
- stationery scissors
First, let's prepare 2 square sheets of paper (can be multi-colored or double-sided). We will make this fluffy from two identical parts. Then glue them together.
We make the first part of the square blank. Therefore, we fold the sheet in half diagonally. Then 2 more times. And we draw a picture. Next we will cut through it.
Do not cut all the way from the fold side. And this will be the main part of our fluffy.
You must first make the first piece from a square. To do this, fold it in half diagonally. Fold the resulting triangle in half two more times.
On such a blank you need to apply a design that will be cut through. It is very important that it is from the fold side that the cuts do not reach the end of the part, since this will be the central part of the frosty flower.
Using scissors, we cut along the lines of the drawing and then look at what kind of pattern we got.
We bend the petals that are in the middle and glue them to the center.
After the reversal, I got such a miracle!
We do the same with the second part. We glue the two pieces together, arranging them so that we get an 8-sided piece of ice.
To do this, we shift the details and wow. This is the flower we got.
Volumetric snowflake made from strips of paper
To make a New Year's decoration you need:
- scissors,
- paper,
- threads,
- glue,
- shiny ball.
Step 1. Fold the sheet lengthwise three times. Then fold it into two equal parts in the middle.
Cut off sharp corners at the ends of the strips.
Step 2. Tie in the middle with thread. Cut two slits on both sides of the strip to the middle. Next, bend two strips on both sides.
Step 3. After this, unfold the snowflake and straighten it to the desired shape. After receiving a beautiful product, glue a shiny ball into the center.
It doesn't take long to make, so you can make a lot.
Snowflake 3d accordion
Any child can make the following pointed ornaments.
Progress:
To work you will need a sheet with an aspect ratio of 2:1. That is, it could be 20 to 10; 30 to 15; 40 to 20, etc.
Fold it along the short side like an accordion. Next, we’ll bend it in the middle, so we’ll mark the center of our future piece of ice. We’ll fold the long edges inward and return it to the accordion. In order for the edges of the beauty to be sharp, you need to turn the corners inward.
It should turn out to be a fence. All that remains is to fold it along the previously marked center and secure the edges together with a bent corner and glue.
What a miracle it turned out to be!
Such decorations are always in demand, as they create a New Year's mood. They can decorate the Christmas tree and windows. You can make a beautiful multi-colored garland from crystals.
3-D snowflake
This decoration looks very unusual, impressive, airy. Adds a New Year's touch to the interior.
Required:
- White or colored paper
- Stapler
- Scissors
- Simple pencil
- Ruler
- PVA glue
Instructions:
- It is recommended to make a 3D paper snowflake template to quickly make several of these decorations. To do this, take a sheet of cardboard or thick paper, make a square out of it, fold it diagonally, draw 6 straight lines at a right angle at a distance of 1 cm from one another. You will get a stencil.
- Take 5 sheets intended for making snowflakes, also fold each of them diagonally and, using a stencil, draw lines. There should be several triangles inside the paper squares.
- Unfold the workpiece, connect the corners of the smallest triangles located in the center and fix them together in parts of the corners using glue or a stapler.
- Unfold the workpiece on the other side, connect the corners of the other central triangles.
- You need to do the same action until the snowflake runs out of triangles. This way, one part of the decoration will be ready. You will also need to make the remaining 5 blanks.
- At the final stage, it is necessary to glue all parts of the snowflake together at the bottom and along the edges.
It’s very easy to make a voluminous paper snowflake if you follow all the stages of the work step by step.
DIY paper Christmas angel
Various miracles happen at Christmas. And even snowflakes look like angels... In this master class I will tell you how to make wonderful angels.
You will need:
- A4 sheet
- scissors
- glue stick
- 2 paper tapes
Progress:
So everything is prepared and colored paper (I like double-sided) lies on the table. The next step is to fold it into an accordion. Even a child can handle this. So call your little helpers!
In order for the angel to turn out to be openwork light, we will make slits on the folds.
Let's unfold the resulting part like a book. The basic rule is that the spread should be in the middle of the sheet. Now cut along the fold into 5-7 cm. These will be the wings of the Christmas decoration. They need to be bent and glued to the “skirt”.
If you use two sheets of paper, then there is no need to cut anything. Just glue 2/3 of the length of the accordions together. And bend the remaining “wings”.
Now let's make the angel's head. To do this, roll the paper strip into a ring. To prevent the workpiece from spreading, we will secure it with glue. The second paper tape is glued to the wings.
Christmas craft is ready!
Ready-made patterns for printing openwork paper snowflakes
Now I’m giving you ready-made layouts, all you have to do is print them out and create. Cut out 3 identical snowflakes according to any pattern you like and sew them in the center with thread.
So, choose the model you like. Just fold it before cutting it like this.
Or you can not sew the blanks, but simply decorate them with any cotton balls for volume.
How to make a voluminous snowflake in the shape of a heart - instructions
You should always confess your love for loved ones. And especially on holidays. I suggest expressing your feelings with hearts.
The first thing to do is cut out a circle. To do this, we will use a plate, pencil and scissors.
Next, bend the workpiece in half. And, starting from the edge, fold the accordion. Make sure that the fracture lines are parallel to the middle of the circle.
Now let's return the workpiece to the accordion and bend it in half. All that remains is to fasten the middle with glue.
Our wonderful heart is ready!
Snowflake paper heart: beautiful and voluminous
A piece of ice in the shape of a heart will look very impressive. Such a beauty will add romance to the festive mood.
To make such an openwork heart you need seven multi-colored stripes. 3-4 cm wide. One strip can be made narrower - 2 cm - we will hang it from it.
The strips are cut. Now we will leave 2 as the longest (29.7 cm), shorten 2 by 3 cm, and shorten two more by six. The main work has been done.
Now all that remains is to fasten our icy heart with a stapler.
A very original decoration, isn’t it?
Do-it-yourself voluminous snowflake made of thick paper or cardboard for the New Year
I really like these types of ice cubes. They look impressive in the interior. A variety of decor will make them unique. You can create such a masterpiece from thick paper, cardboard and even plywood.
First you need to cut out the template. We will make it out of paper. Remember how to get 6 rays? Here's the addition diagram!
The drawing can be anything. I don’t recommend it to be very openwork - it will be difficult to cut out neatly from cardboard!
Once the template is ready, trace it on cardboard. Let's cut it out and make a cut to the center - it will be needed for assembly.
You can decorate the template with napkins, lace or food foil.
Have you already guessed how to assemble it?
Such 3D pieces of ice can come in various sizes and shapes. This is how you get giant beauties.
And if you have a good tool at hand and you love vytynanki, then you might get such a miracle!
Video on how to make large voluminous snowflakes with your own hands
Here is another way to cut out a voluminous snowflake. Simple and affordable. Preparing for the New Year is always fun and promising. Children love to decorate the house for the holidays.
Cut and glue this beauty along with them. It's very interesting and fun. For clarity, I have selected a suitable video for you, thanks to which you will not have any difficulties in production.
Now, after watching this video with your children, you can easily make a beautiful three-dimensional snowflake using scissors and glue.
Spiny snowflake - Kusudama's ball
Another master class on making thorns. This ball is very similar to kusudama, isn’t it? But unlike her, making such a ball is as easy as shelling pears!
Kusudama is a spherical figure made of modules of various shapes and sizes. The word kusudama is translated from Japanese as “medicine ball”.
Will be needed
- A4 sheet
- scissors
- needle
- threads
Progress:
We make a square (circle), then fold it into triangles 3 times. And then we make cuts along the fold lines.
It is very important not to cut to the end. The result is triangles. And we will roll them into little balls.
We make cute caps with a pointed end. We bend the tip into the middle. This is how we consolidate our creation. We do this with all the elements.
As a result, we get an 8-pointed star or a circle with needles. And we need to make 10 such figures. When we have done all the elements.
We begin to assemble the figure. Take a needle and thread and a button. You can also use a school eraser to cut off a small square.
We pass the needle and thread through the button so that the knot holds and the craft does not tear. And we string our figures onto it, bottom down.
First, we collect 5 pieces in a checkerboard pattern, then we pin the next 5 circles, with the inside facing down.
Try to arrange the needles in a checkerboard pattern. At the end there is a button again. Then we tighten the thread. And we fix it. We get this cute prickly ball.
What if you make several of these hedgehogs? You can make a beautiful garland. And decorate any room with them - at home, in kindergarten or at school.
Volumetric round craft
Making a three-dimensional snowflake is a rather labor-intensive process that will take a lot of time. If you don’t have one, but want to decorate your house with an original product, then you can choose a simpler option for making a snowflake . It will have a round shape and will perfectly complement your interior. To create it you need the following materials and tools:
- a sheet of white thick paper;
- compass;
- needle and thread;
- Ruler and pencil;
- colored fabric (preferably red or yellow).
How to make a round paper snowflake:
- We take a previously prepared sheet of paper and draw four circles of equal diameter on it. If you want to make a small snowflake, you should choose a diameter of five centimeters, a large one - ten or more.
- Using scissors, cut out the finished circles. Next, we divide each of them into eight equal parts. We cut the workpiece along the drawn lines.
- We bend the ends of the resulting petals into the middle and glue them together.
- We make three more blanks in a similar way. After this, we fasten them together with glue or a needle and thread.
- Take pieces of fabric and cut out small circles from them. Glue these parts to the center of the snowflake.
Scandinavian snowflake made from strips of paper - assembly diagram
Making the next winter beauty will take a little time. It can be hung on the Christmas tree or on door handles.
Such products are called Scandinavian or Norwegian.
We cut the sheet into strips 0.7-1.5 cm wide. There should be 12 paper strips.
We take 2 ribbons and put them crosswise and glue them together. Add 2 more vertical stripes to create a weave.
The distance between the paper strips is arbitrary, but not greater than the width of the workpiece.
Now let's add 2 more ribbons to the braided line so that we get a cross with a braided middle. Don't forget to glue the joints.
Let's add some openwork - connect the outer rays of the cross. There should be two such blanks.
Now we place one face down and cover it with the second. We thread the unbraided tails of one into the loops of the other. Secure with glue.
All that remains is to cut off the protruding tails and hang them on the tree!
Now let's use a little imagination. This is the kind of ice you get if you make it from different colors and add curls.
Don't be afraid to fantasize!
Add stripes and curls! Intertwine!
Snowflake for garland
You can make a beautiful, festive garland using paper snowflakes. To decorate, you need to prepare products of an unusual type. Let's look at how to make a large snowflake out of paper, photos with examples will help you with this.
To make parts for the future garland you will need paper of any color, scissors and a stapler. You can start working:
- take the selected paper and fold it like an accordion;
- we find the middle of the folded strip and secure the paper with a stapler in two places;
- cut off one of the corners on one side of the strip and on the other;
- fold the strip in half to see where the central part of the future snowflake is located;
- straighten the edges of the strip on each side, forming petals;
- We fasten each edge together using a stapler.
The snowflake for the garland is ready. Make a hole, thread several of these snowflakes and you can decorate the house. By the way, such a snowflake can also be used to decorate a wall, and if you make it small, it will work as a toy for a Christmas tree.
A simple and beautiful snowflake using modular origami technique
Modular origami is gaining popularity every day. To make crafts, you need to make blanks - modules and assemble them. You can assemble without glue or a stapler, in the provided spike-pockets.
The modules in the chosen scheme are shaped like crystals.
We will need:
- colored paper
- glue
- scissors
- pencil
Progress:
Let's start with making modules. As always in origami, first you need to prepare a basic shape - a square.
I propose to consider the module folding scheme.
Left a little! Be patient!
This is how the parts are connected to each other.
Liked? I really like it!