Dragons are amazing fairy-tale creatures, known to all children and adults thanks to old fairy tales, legends and modern cartoons. They can be both good and evil, but they are always portrayed as proud and majestic creatures that inspire admiration.
Therefore, having a fantastic pet at home is the dream of many dreamers. Why don't you try to tame him?
There are many tutorials on how to make this fabulous beast: modular dragons, many different types of origami dragons for which you don’t need any glue or scissors, and just adorable children’s crafts in the form of appliques.
Origami
It will not be difficult to make and it will become the basis for creating an origami dragon with wings. But first, let's look at the main material of our fake - paper.If you are familiar with such a technique as origami, then you have probably come across the classic Japanese crane, which plays a significant role in the culture of Japan.
Material selection
To create a magical pet, it is better to choose origami paper, which can be found on the shelves of stationery stores. An alternative to such material can be simple thick paper.
To make your dragon come to life, it is better to choose a base with silver or golden colors that resemble the iridescent scales of a dragon; if there is none, then you can print a suitable texture.
For children, origami can be made from white paper. This way they can color their winged friend themselves and create a unique animal.
For the little ones
For beginners and parents with small children, it’s best to start with the basics. The easiest way to make a paper dragon is applique.
Find dragon templates on the Internet, print them out, or draw the creature yourself. Cut out individual parts (body, wings, tail) and glue them together. Paint the product, attach a ribbon to your head and hang it in any suitable place.
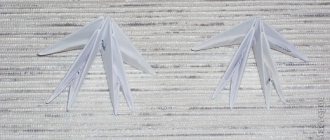
You can add liveliness to your work if you create a three-dimensional dragon. To do this, you need to cut out 2 identical dragon figures, glue them together and make a shallow cut approximately in the middle. Install the wings into the resulting slot perpendicular to the body.
Note! Making a swan out of paper using the origami technique - a master class for beginners. Photo and video lessons on assembling a modular structure
Another simple secret to creating a mythical pet is to fold a long strip of paper like an accordion. Attach a pre-cut dragon head to one end with glue, and the tail part to the opposite end. You can control and move the toy by attaching thin wooden sticks to the joints.
Such different dragons...
There are an incredible amount of instructions on how to make a dragon.
You can create good old Gorynych from Russian fairy tales, Ender from the famous computer game, or just a small charming dragon that will become the guard of your bookshelf.
To create a dragon, use a square of colored or white construction paper. The square must be folded so that diagonals are formed.
Having smoothed the paper well, the square must be unfolded so that it should have eight rays. Then, using half the scientific lines, from the original position of the sheet, fold a rhombus. Place the part so that the resulting folds face up
The edges of the resulting diamond must be bent inward, so the figure will resemble a kite. The triangle of the upper part of the part must be bent to one side and smoothed well.Check it out here too!
How to make an origami paper butterfly with your own hands: a step-by-step master class on making original crafts with photos and videosOrigami paper machine - instructions on how to make it yourself. The best master class with photos and videos
Tank made of paper using the origami technique (100 photos): a simple master class on creating an unusual craft with your own hands. Instructions + description
Straighten the shape of the kite; if everything is done correctly, the inside of the part will resemble a triangle. Bend the upper part of the diamond from bottom to top, so the part will take the shape of a boat. Do the same on the other side. The result will be an elongated diamond.
Bend the top of the workpiece to the bottom. Bend the top of the workpiece along the folded line. Do this from the beginning in one direction, then in the other direction. Pull the narrow corners. This will give your toy volume.
Push the top of the resulting pyramid, which is located at the top of the part, inward. Bend the outer parts towards the center so that the part again takes on the shape of a kite.
Bend the corners located at the top of the rhombus towards the top of the part. Bend the bottom corner upward. This must be done on both sides.
Turn the piece inside out, turning the edge over. Bend the bottom corners up. Turn the part out again.
Check it out here too!
Paper rose (origami) - the best master class from the pros! See photos of finished crafts as well as simple instructions with detailed descriptionsDo-it-yourself modular origami - step-by-step instructions on how to make a beautiful modular craft at home (110 photos + master class)
How to make an origami owl - a review of the best ideas for creating exclusive crafts with your own hands. See photos and videos of owls using origami technique
Bend two sharp triangles located on different sides of the part. At the base of the wings you will notice fold lines; fold the parts along them on both sides. Two triangles are formed in the middle, as well as legs.
To create the head and tail of the dragon, align the triangle that is closest to you to the bottom twice, so that the fold in the middle is parallel to the entire figure. Do the same on the other side.
Bend the second triangle to the bottom so that it is parallel. Fold small triangles to the bottom. Bend some of them down to make dragon legs.
Point the animal's head in the same direction as its paws. Rotate your neck upward. Bend your head back and bend the horn from an acute angle.
When forming the wings, bend them back a little, and use the folded tips to create claws. Unfold the tail and create several small folds on it. Turn the mold inside out to reveal your dragon.
Check it out here too!
How to fold an origami “jumping frog” with your own hands? See the instructions and master class with detailed descriptions and photos!- Paper cat (origami) - simple instructions, detailed description, diagram, drawings, recommendations, photos, videos, secrets and tricks
Volumetric toys using the origami technique - review of the best templates, instructions, master class, photos, videos, secrets and tricks from the masters
The work will take on average 45 minutes. The dragon turns out to be very relief and detailed, which gives the figure a special charm. For a small child, this scheme is quite complicated, so it is better to create a dragon together.
Modules
Modular paper dragons are one of the varieties of origami. The difficulty lies not in assembling the modules, but in forming a figure from them.
Creators who have been passionate about this craft for quite a long time have been creating masterpieces of incredible complexity. The Chinese dragon pattern is very simple and perfect for children and beginners.
How to train your paper dragon: 12 models for 2012
We continue to actively prepare for the New Year! I hope you have already decided on the main symbol of the holiday itself in its tabletop - paper and cardboard - version. If not yet, then perhaps you will need a selection of 3D models of paper Christmas trees or a master class on making an amazing origami Christmas tree according to the design of designer Francesco Guarnieri. However, in no case should we forget about the symbol of the coming 2012, which, as you know, is the Dragon. A great way to “appease” him is to make this mythical creature the main guest of the New Year’s celebration. And if you also create it with your own hands, then such a sign of attention, I’m sure, will help you earn the favor of the Dragon for the whole coming year.
We will, of course, make a dragon out of paper. To make your choice easier, I bring to your attention my selection of paper dragons, baby dragons and dragonets that I liked the most. There are exactly 12 of them. They all have different levels of complexity, but detailed instructions and master classes clearly show how to make a dragon out of paper , so absolutely everyone can recreate the proposed models. So choose the dragon you like best and go for it. Or you can go even further and make all 12 paper dragons - for each month of the year
To make this big-eyed monster, you will need to print just one part on an A4 sheet, punch it along the marked lines, trim it a little with scissors, slightly glue the body and tail (if desired) and fold it.
Source
In this case, it is better to use thicker paper (from 200 g/m2) or even cardboard. For most of the models presented below, matte photo paper with a density of 120-160 g/m2 is optimal.
Green Dragon
756.1 KiB
Downloads: 3832
How to open a pdf file? Instructions.
The next paper dragon is also one of the simplest models, but only consists of several parts. The assembly procedure is described in English, but figuring it out is not a problem. As a last resort, Google Translator is always at hand.
Red Dragon
736.6 KiB
Downloads: 3701
The author of the blue dragon did not create instructions for assembling it. But, I hope, looking at the photo collage with images of the finished product from different angles, it will not be difficult to understand what and how to fold and where to glue.
Source
If you have watched the American cartoon How to Train Your Dragon, then these three dragons are very familiar to you. It will be even more interesting to collect their 3D models.
You can download the patterns and read step-by-step instructions here.
Another 3D model from the category of simple ones is the Chinese dragon from Canon “CREATIVE PARK”. All you need is to print 1 sheet of A4, fold and glue the unfolded paper.
Download/print patterns and instructions
But here you will have to work hard. The components of this Chinese dragon (Canon “CREATIVE PARK”) will have to be printed on 17 sheets. That's a lot of work :). Although if you get together with the whole family, the assembly process will definitely be more lively. The main thing is not to get confused in numerous details. To do this, when you cut out, be sure to mark them on the wrong side.
The result will be a very realistic paper figurine that will look great against the background of the festive surroundings on the occasion of the coming of the Year of the Dragon.
Download/print patterns and instructions
Another gorgeous dragon that can be done sitting or flying. Assembly will take a fair amount of time, but the results are definitely worth it.
Source
Download patterns and instructions:
winged dragon
10.0 MiB
Downloads: 5717
The following paper dragons are prominent representatives of products made using the modular origami technique. This is a task for the most patient, those for whom the need to fold several hundred identical paper modules does not extinguish the sparkle in their eyes, but, on the contrary, ignites them with creative excitement.
Even if for you the words “modular origami” are still the same as Chinese letters (figuratively speaking), then you still shouldn’t be afraid to try. Detailed master classes will guide you through every step of the assembly, from the first to the last module. Moreover, there should be just enough time to master this “titanic” work in order to be in time for the New Year
Fire Red Dragon
Master Class
Three-headed dragon , aka Serpent Gorynych
Master Class
And finally, a funny little dragon, which is not at all as simple as it seems at first glance. All its hidden capabilities will be revealed to you after you collect it.
And believe me, it’s simply impossible to take your eyes off him, and he won’t leave you unattended
This paper dragon , demonstrating a stunning optical illusion, was invented quite a long time ago (by Jerry Andrus), but, on the eve of the Year of the Dragon, it is quite worthy of giving it a new life. And it will certainly cheer you and your loved ones up.
Download the patterns (in blue, green and red), print the one you want (or change the color tone in a graphic editor, for example, Adobe Photoshop Elements), cut and fold according to the instructions.
Dragon illusion
416.2 KiB
Downloads: 1737
Good luck in your creativity! And see you again in KARTONKINO!
PS. Do you want to be the first to know about new lessons and master classes, as well as when new box templates and other useful and entertaining cardboard crafts appear on the site? Receive announcements directly to your email!
Chinese dragon
Very often, artists come up with designs themselves, relying on intuition and vision. Before creating your own magical dragon, it is best to rely on the work of other artists in the photo of origami dragon.
Count the number of rows in the fake, this will help you figure out how many modules you will need and what colors. On average, such work will require collecting from 700 to 1000 pieces, so the whole family is often involved in the creation of this painstaking masterpiece.
Beginners are advised to glue the dragon's paws to the body with a glue gun, this will make the part much more stable.
It is better to make the dragon’s neck wider and more massive, since if the hand is not yet filled enough, it will be difficult to create a stable figure with a narrow neck circumference.
Origami dragons are quite a difficult task not only for children, but also for adults, so it is better to start with easy figures or consider other options for creating a fantastic creature, for example, cutting out an applique and making a card or bookmark.
Three-headed fire-breathing dragon
Having mastered the one-headed dragon, let's move on to the three-headed one. It will become a real highlight not only of an adult interior, but also of a children's room. The work here will be more difficult than the previous one, but the result will be stunning.
Adults and children will be able to fold the figure, making sure to adhere to the original diagram.
Take the paper and place it with the colored side down.
- Fold the sheet diagonally and unfold it;
- Next we bend it vertically and straighten it back;
- We bend the top and bottom edges towards each other;
- We bend the paper according to the pattern;
- Unbend the leaf;
- We bend and unbend the folds;
- We bend the corner;
- We do the same on the opposite side;
- Unbend the figure;
- Turn the sheet;
- We bend the corners;
- We do the same with the other part;
- We fully reveal the craft;
- We bend the side folds towards the middle;
- We take out the corners;
- Open the resulting pocket and flatten it;
- We bend and unbend again;
- We form a petal on the tail;
- We bend and unbend everything;
- Open the element and flatten it. Further all actions according to the given scheme.
Related article: Crochet beret with a pattern of embossed columns
The arrows show the sequence of work.
Well, the three-headed dragon is ready. Congratulations on completing your work.
Photo of paper dragons
Read here - How to make three-dimensional origami - see simple instructions and original options in the photo! Options for beginners and professionals here.