Useful tips
How to make an origami module
How to make a triangular module (diagram)
How to make a paper module (video)
What can be done from modules
Modular origami is a special technique for making various three-dimensional figures from paper triangular modules
. It was invented in China.
To make, for example, a swan, a snake or a Christmas tree using this technique, you need to prepare many paper triangular modules
and then connect them to get the desired shape.
Origami modules are triangular in shape and are made from rectangular pieces of paper
. These rectangles can be of different sizes, for example 53x74mm or 37x53mm. To get the right size, you need an A4 sheet.
How to make an origami module
Prepare A4 paper (standard paper from a sketchbook, or paper for printing or copying).
1.
Fold the paper in half, then again and again - if you unfold the paper, you will have 16 divisions.
* You can fold the paper one more time, then there will be 32 divisions, and they will be smaller.
2.
Cut the paper into 16 or 32 rectangles.
* You can use either scissors or a stationery knife for this; the latter will be faster.
3.
Fold one of the resulting rectangles in half in width.
4.
Now fold it in half lengthwise and return to its original position (go back to step 3). In the middle you now have a line with which you can fold the module evenly.
5.
First fold one side of the rectangle towards the middle, then the other (similar to folding an airplane).
6.
Now bend the edges of the pieces that protrude.
7.
You need to bend the protruding sections upward.
8.
Bend your structure in half (connect the 2 sides of the module).
Ready!
You need to make as many such modules as needed to assemble the desired structure.
Origami modules - step-by-step instructions
- Fold the rectangular piece in half along the long side. The number of sheets required depends on the complexity of the craft itself and the size of the modules from which it is made. To create small modules, rectangular sections measuring 37x53 mm are used, and large ones are using blanks measuring 53x74 mm. In both cases, the sides of the rectangle will have a ratio of 1:1.5. (two schemes: for 16 and 32 modules) As a result, we get 32 identical blanks measuring 37x53 mm.
- We bend the part folded in half along the short side, marking for ourselves the line of the middle of the workpiece.
- We unfold the workpiece, placing the second fold (mountain) towards us.
- We bend the edges of the rectangle folded along the long side towards the middle, forming a triangle.
- We turn the folded triangle over, and bend the lower edges of the part in the “reverse” direction.
- We turn away the corners of the workpiece sticking out and fold them again along the resulting folds, but do not “wrap” the triangle with them, but bend them on the front side of the part.
- Fold the resulting triangle in half.
By threading the corners of some modules into the pockets of others, we can create voluminous paper crafts of any shape and size.
Modular origami. How to make a module.
The main thing you need for modular origami is paper and great patience.
.
Due to the fact that the figures in modular origami are not very small, you need to prepare many modules for them, from several hundred to several thousand
.
Each module has 2 pockets. With their help you can connect modules.
Typically, when folding modules, no glue is used, since the friction force prevents them from falling apart. But it happens that in some places the paper structure is not stable, then it is strengthened by gluing several modules with PVA glue
.
You can use both pure white and colored paper
. Office paper will do, but you can also use pages from magazines and even candy wrappers. Regular colored paper is quite thin and tears at the folds. It can be used to create small modules (if you divide A4 paper into 32 parts).
To connect modules, simply insert them into each other. This can be done in several ways.
For example, like this:
We make origami modules according to the scheme with video accompaniment
Classic module
The assembly diagram with a description of the module is presented below
- bend a rectangular sheet (approximately 7.5x5 cm) in half lengthwise;
- bend and straighten the workpiece, marking the fold line;
- bend the corners down on both sides, aligning the upper edges with the central bend;
- turn the workpiece over to the other side;
- fold the bottom edges up along the cut;
- turn the workpiece over and fold the protruding corners over the edges;
- turn the workpiece over again and bend the curved edges along with the corners;
- hiding the corners inside, return the bent edges to their original position;
- bend the workpiece in half - ready.
Triangular module
The triangular module is universal - models of a wide variety of shapes are created from it. However, there are other types of origami modules that can be used to create all sorts of shapes and models. In particular, a paper cube, as well as geometric kusudama, are assembled from Sonobe modules.
To do this, you need to prepare a square sheet of paper and follow simple steps:
- fold the sheet in half and unfold it;
- fold the side edges to the intended central bend;
- turn the workpiece the other side up;
- bend the top corner diagonally to the left, repeat for the bottom corner (bend it to the right);
- bend the resulting corners to the central bend (align the side edges with the middle);
- turn the resulting square over and bend the previously folded corners (step 5).
Module "Shamrock"
Flowers and maple leaves are made from the Trefoil module. Folding origami is quite simple.
To do this, you need to follow these steps step by step:
- put the sheet at an angle towards you and fold it in half, straighten it out;
- align the upper edges with the central axis;
- bend the bottom corner to the center and set it inside the figure;
- fold the bottom corners to the central axis;
- unfold the left side completely;
- align the lower left corner with the central axis;
- take the inner fold with your fingers, pull it down and align it with the lower corner of the figure;
- reproduce steps 5-7 for the right edge;
- turn the workpiece 180 degrees and bend the upper corners down, turn it over;
- Fold the edges towards the middle, turning the layer of paper inside out at the back - done.
Kusudama module “Superball”
Using the “Superball” kusudama module, you can assemble a flower arrangement in the form of a ball. Each detail resembles a separate inflorescence.
Step-by-step instructions for creating a kusudama element include 17 steps:
- put the square at an angle towards you and bend it;
- fold it in half again, aligning the side edges;
- bend the top layer and flatten it to form a square;
- turn the figure over and perform the same steps as in step 3 (you get the basic “double square” figure);
- lifting the top layer of the workpiece on one side, flatten it so that the fold is aligned with the central axis;
Handicraft workshops
Hello!
I’m with you again, Natalya Khomenko.
I am very glad to everyone who came to visit my blog
"Modular origami"!
In this lesson, using the example of assembling a vase, we will learn how to add and subtract modules.
Adding modules.
1 way.
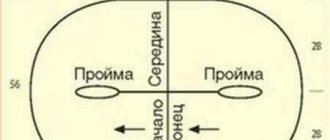
We assemble 3 rows of 10 modules (we place the modules on the short side) and close them in a circle.
Now we simply insert the modules between the modules of the third row (do not put them on the corners). The third row already has 20 modules. The added modules in the photo are green.
And we make the 4th row, putting the modules on with one pocket on the corner of the green module, and with the other pocket on the corner of the orange one. Row 4 also has 20 modules. We have doubled the number of modules.
Method 2.
In the 4th row we put all the modules in one pocket on one corner. And we again double the number of modules.
This photo shows that we have 10 modules in 3 orange rows, and 20 modules in 2 green rows.
Let's repeat adding modules. In the 6th row we put yellow modules on one corner each.
In the next 7th row we put it on 2 corners as usual. We already have 40 modules in the yellow rows.
Reducing modules.
To reduce the number of modules, in the next 8th row the modules must be put on 3 corners of the 7th row at once. Moreover, this must be done evenly in a circle. In our case, we put 2 modules on 3 corners each. We leave 2 corners free between them in the 7th row.
We add yellow modules in the 8th row, putting them on the free corners of the 7th row in the usual way.
In this photo you can see that all the green modules are put on 3 corners each. And yellow ones - for 2 corners each. As a result, the number of modules decreased by 10 and we were left with 30 modules.
By adding and subtracting the number of modules, you can give the product different shapes. This is what we will see at the master class on assembling a vase.
Vase.
For a vase we will need 515 modules (267 orange and 248 green).
In this master class, the size of the modules is 1/16 A 4.
We assemble 3 rows of 15 modules each.
We place the modules of the first row (green) on the long side, and the modules of the second and third row (orange) on the short side ( Photo 1 ). When there are 15 modules in the first row, we begin to close the circle ( Photo 2, 3, 4 ).
In photo 5 there is a circle of 3 rows. In photo 6 - add the 4th row (15 orange modules). The first green row is practically invisible.
Gently pressing on the corners, we lower them down ( Photo 7 ). Photo 8 is a top view. This is the bottom of our vase.
Turn the corners upside down ( Photo 9 ).
We make the first addition of modules. We insert 4 rows of green modules between the modules ( Photo 10 ).
We secure the green modules with the orange modules of the fifth row. We put them with one pocket on the green corner of the fourth row, and with the other pocket on the orange one ( Photo 11 ).
In the 4th row you will get 30 modules (15 orange and 15 green). In row 5 we have 30 orange modules. ( Photo 12 )
6 row . We put on 30 green modules in the usual way ( Photo 13 ).
7th row. We use the second method of addition. Evenly, every four green modules we put on 2 orange modules on one corner of each. We will get 36 modules (12 orange and 24 green) ( Photo 14, 15 ). The orange modules will be the beginning of the flowers.
8 row . Between the orange modules we put on green ones. On the sides of the green ones are orange modules. Fill the remaining space of the eighth row with green modules. There are a total of 36 modules in the 8th row (12 orange and 24 green) ( Photo 16, 17 ).
9 row . We finish the flowers with two orange modules. There are 36 modules in row 9 (12 orange and 24 green) ( Photo 18 ).
10 row. 36 green modules. 11 row. 36 orange modules. ( Photo 19 )
12 row. Let's start decreasing. The modules are all green. Evenly, every 3 modules we put 2 modules on 3 corners each. We do this over the flowers. In the 12th row there are 30 green modules (12 placed on 3 corners each and 18 placed on 2 corners each) ( Photo 20 ).
13 row. 30 orange modules ( Photo 21 ).
14 row. We make a strong decrease. We put all the modules on 3 corners each. In the 14th row you will get 20 orange modules ( Photo 22 ).
15 row. 20 green modules ( Photo 23 ).
16th row. 20 green modules with the short side facing out ( Photo 24 ).
17th row. 20 orange modules with the short side ( Photo 25 ).
18th row. 20 modules short side. We alternate orange and green modules ( Photo 26 ).
Row 19 . In the last row we make an extension. We put each orange module in one pocket on one corner. There are a total of 40 modules in row 19 ( Photo 27 ).
So, by increasing and decreasing the number of modules, we gave the product the shape of a vase. The height of the vase is 15.5 cm.
In the next lesson we will learn how to make flat shapes and learn different ways to design the edge of a flat shape. We will also make a butterfly.
For the butterfly we need 409 modules (brown 135, red 152, blue 62, green 36, yellow 24).
Goodbye! See you!