Tools and materials
To create a simple butterfly model you will need:
- fantasy;
- desire to create a miniature;
- multi-colored paper of any shades, pages from books, magazines, packaging material, office or metallized paper;
- scissors or stationery knife.
For complex designs, add additionally:
- glue;
- wire.
Also, select a hard object needed to smooth out the seams. Let it be a ruler, pen or book.
Options for making paper butterflies
The graceful insect is created in different ways. There are at least 5 known techniques for making an origami butterfly. These could be variations such as:
- simple origami figurine for beginners;
- classic folding technique;
- voluminous butterflies;
- modular;
- bookmarks.
It is recommended to start with simple models, gradually developing folding skills. Even children 3-4 years old can create a butterfly if they are shown the 2-fold technique.
Making outline butterflies
Let's start with the simplest option on how to make contour butterflies. Main stages of the creative process:
- It is better to cut butterfly stencils for the wall from medium-density cardboard. A suitable material would be cereal or tea packaging.
- The original moth can be selected and printed from the templates below.
- The silhouette you like is applied to cardboard and cut out. A wall with butterflies of different shapes on it looks more colorful.
Some useful tips for decorating paper butterflies:
- For cutting, use the entire figure; if you want to achieve perfect symmetry, the workpiece is folded in half.
- Specimens with minor asymmetrical deviations look more natural on the wall.
- If there is a need to obtain moths of different sizes, the template is converted through a graphic editor.
Simple paper shapes for beginners
Simple blanks are often used to create more complex origami structures based on them. But a small child or a beginner can start learning with just such models.
You will need a sheet of colored paper. If you don’t have anything like this at hand, then take a white sheet and decorate it with felt-tip pens, bright pencils or paints.
The sheet must have a square shape, that is, all sides of the workpiece must be equal. Fold the sheet in half diagonally.
Carefully fix the fold using a ruler or just your fingers. The result is a triangle, rotate it so that the fold is closer to you.
Connect the left edge to the right. Make another fold 1.5 cm from the fold line, which will be parallel to the fold. Do this manipulation on the other side as well.
This will create a simple origami butterfly with your own hands; decorate it with additional applique: stripes or circles made of paper of a different color.
Preparing for work
A design solution such as the use of butterflies for interior decoration has become one of the popular trends in modern society. These decorative elements add lightness and romance to the atmosphere. paper butterfly templates for interior decoration on the Internet
Before starting work, you should clearly decide on the following actions:
Choose the right wall to place your butterflies. To do this, find the widest and most open part of the apartment. Butterflies placed in such a place will be the most visible and attractive.- Calculate the size and shape of the future product. This is necessary in order to know exactly what your decor will be like: attaching small elements to the wall, a three-dimensional panel, hanging butterflies in a frame, or hanging them from the ceiling and chandelier.
- Choose the material from which you will make insects. Consider its compatibility with the design and interior of the room.
- Think carefully about the color of the future product. The most attractive will be hanging bright butterflies on a light wall and vice versa.
- Prepare all the necessary tools and materials to create paper butterflies for the wall with your own hands.
Don't bother creating intricately shaped butterflies. This will only create additional difficulties, but will not greatly affect the final result. In addition to the fact that templates for butterfly stencils for DIY decoration can be downloaded on the Internet, you can also make them yourself. To do this you need to have imagination and basic artist skills.
Classic models
Classic origami butterflies are more difficult to make than the first option. Let's take the same square of paper, the side of which is 15-20 cm. Bend the sheet diagonally, then in half to make a rectangle. Fold it in half into a square.
Open the sheet and you will have guide lines to make wings for the butterfly. The fold lines that divided the square in half should go inward. Try to make a triangle. Its top points upward, and at this time you bend the lower ends towards the top. You have a square.
Turn the shape over with the top down and the back side facing you. Lift the bottom corner up and let the tip catch a little on the edge. Now all that remains is to connect the left wing to the right to form a clear fold. Your simple origami butterfly in the classic model is done.
Model for the little ones
Starting at the age of 4, children can be introduced to the magnificent origami technique. There are special instructions for preschoolers, where each action is described step by step down to the smallest detail. And the number of operations is kept to a minimum, so children, with the support of adults, will definitely cope.
Here, for example, is a diagram of an origami butterfly:
We fold the base square diagonally, and the resulting triangle is doubled. We position the workpiece with the open edge facing us so that the right angle is in front of us on the left. We bend the upper part as shown in the diagram.
Turning the workpiece inside out, we bring the bent part inward. We straighten the wings of the model. Children will be happy to finish painting it with gouache and decorate it with curled mustaches.
Volumetric origami figures
The ingenuity of people has brought it to the point that it is possible to make a voluminous butterfly, which can be conveniently used as a tie or decoration for a picture. Follow the instructions and you will quickly complete the task.
NOTE!
Origami airplane: master class on making beautiful models with your own hands (125 photos and videos)- Origami vase - manufacturing technique and step-by-step instructions for assembling a modular paper vase (100 photos)
Origami boat - types, manufacturing methods and features of use in decoration (110 photos)
This time we will bend 2 rectangles. Select 2 sheets of colored paper that contrast with each other in shade. For example, yellow and blue. They can be the same size or one of them can be smaller.
Next we do this:
- Fold the yellow rectangle in half, from left to right.
- Use scissors to cut off the sharp corners on the right side, top and bottom. This is a blank for butterfly wings.
- Let's unfold the paper.
- Let's start rolling the accordion. It is enough to make folds from 5 mm to 1 cm.
- Let's repeat the procedure with blue paper.
- We connect the 2 parts to each other using a stapler, wire, glue, or any adhesive.
Origami moth
This model is more suitable for experienced craftsmen, however, after studying the basic forms and techniques, even a beginner can handle it.
Step-by-step scheme:
- Fold a square sheet of paper in half in all directions.
- Fold the corners towards the center to form a basic “pancake” shape.
- Turn the workpiece over.
- Form the basic pancake shape again.
- Expand everything back to the original square.
- Fold the right side toward the midline, then the left.
- Holding the workpiece in the center along the fold lines, open the top flaps and lower the top part to the middle. You get the letter T.
- Repeat the last steps for the bottom part. Smooth out the product.
- Fold the workpiece in half into a mountain.
- Lower the upper corners of the first layer down along the midline.
- Fold the side corners towards you.
- Fold the workpiece in half to the right.
- Fold the small corner at the top left to the right.
- Unfold the wings of the butterfly and place the selected corner vertically.
- Spread your wings slightly to the sides and up.
- The butterfly is ready.
Editorial Voice
Irakli
Lord of Paper Sheets
Ask a Question
To avoid problems during assembly, it is important to make the folds clearly and evenly at the very beginning - at the stage of folding the “pancakes”. Due to these folds, all subsequent folds are easily formed.
Vintage origami butterfly
Do you want to make an exclusive vintage figurine? Then you will need step-by-step instructions for making an origami butterfly. For production you will need special paper. Now a newspaper sheet or a page from an old book will come in handy.
We make a square from a book page, as was shown in the diagram for making a classic butterfly. We add everything exactly the same way.
Let's tint the resulting butterfly using dark paint. The edges of the moth's wings will become more expressive after treatment with paint.
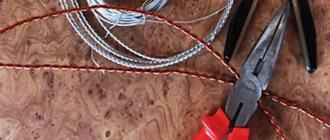
We will make antennae from thin wire and attach them to the base, where the body of the butterfly should be. The product is ready.
NOTE!
Origami bird - the best diagrams and recommendations on how to easily assemble beautiful origami with your own hands (90 photo ideas)- Origami flower - a review of the best patterns and models for a paper flower. 115 photos of the best flowers and features of how to assemble them yourself
Origami envelope - patterns for beginners and tips for choosing the best envelope models (100 photos and videos)
Crafts made from fabric and metal
Moths made from fabric are perfect for walls with liquid wallpaper etc. To make such butterflies, an image is applied to the fabric and cut out. Attach the finished insects using glue. To add volume to the composition, use a thin cloth soaked in a soap solution. The moth is given the desired shape and dried. Fabric butterflies add lightness and warmth to the interior.
The absolute opposite are moths made from tin cans. It will take a lot of effort and patience to give the desired shape to the workpiece. The cut out figures are painted with golden spray paint and given the desired pattern. Such moths will perfectly complement the interior of a men's room .
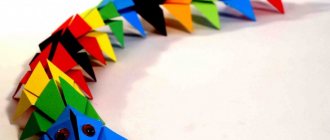
Modular paper butterflies
Modular figures are no longer just an origami butterfly for beginners, but a work of art. Such work can be shown at exhibitions, or brought to schools and kindergartens as a family craft. It will not be possible to make such a product quickly, but if you show diligence and patience, everything will come out easily.
Master how basic modules are made and connected, and then you will make not only butterflies, but also swans. Use different colors of paper for the modules, add beads, rhinestones, and decorate the butterfly as you wish.
Cardboard moths
It is much more difficult to make a butterfly from cardboard than from paper. The advantage of this material is the ability to create more complex and bizarre shapes. Cardboard moths can be easily reshaped. It is enough to moisten them with water and secure them with a weight. After drying, the workpiece will have the desired shape.
It is best to place such butterflies on the wall in flocks, flying from one end to the other. A heart made of moths or a large insect made from small parts will also look beautiful. Before placing it on the wall, you should draw the future pattern with a pencil, and then attach the finished moths along it.
Bookmarks and postcards in the form of a butterfly
Don't forget that a simple paper product can become part of a whole picture. If you glue a small origami butterfly to a thin strip of cardboard, you will get a great bookmark.
Take a sheet of A4 size, fold it in half, glue a few small butterflies on the side and you will get a card for your loved one.
Write a few nice words and give it to your mother, grandmother, or close friend. You can decorate everything that catches your eye with butterflies: a present, a wall in the room, and curtains. Let your imagination be unlimited.