How to draw a bird in a cage with a pencil step by step?
The most simple option, for which you will need:
- one soft pencil, or two - hard and soft;
First, either with a hard pencil or with a soft one - but “barely pressing” - we randomly shade/tint the sheet. without trying too hard. (Fig. A)
Then we draw the profile of the bird and the perch. The profile must also be shaded - either in several passes with a hard pencil, or with a soft one - but with pressure. (Fig. B)
Of course, we try not to tear the paper.
The final approach is to take an eraser and carefully “draw” a cell with it. (Fig. C)
Sometimes there is a need to draw not just a separate bird and a separate cage. And depict them together. This drawing is not particularly difficult. Follow the steps in the pictures and you will certainly succeed.
If everyone has decided to get creative))
Then I’ll post my version of the bird in paint or pencil in a couple of minutes.
It only takes a few steps and the drawing will be ready:
- First of all, let's draw a circle, attach an oval to it, then a rhombus, draw a strip,
- let's start drawing the little things: the eye, paw, beak, crest, wing and bushy tail,
- remove unnecessary lines,
- let's draw the bars of the cage,
- Let's decorate it with yellow, beige, purple, blue.
Step-by-step photo instructions: how to draw a bird in a cage
Basic work process
To weave a cage with your own hands, you first need to select a shape of the desired size. To make the task easier, the bottom of the future cage can be cut out of thick paper or cardboard. Based on the size of the mold, for flying around you need to prepare two identical parts. In our case these will be circles. Eight tubes are glued to one of the circles. Of the seven, the base of the side surface will be created and one is needed for the braid. A second circle is placed on top, well coated with glue. At this moment it is better not to rush, wait a little until the glue dries. The bottom of the cage is ready!
Next, the selected shape is installed on the bottom. All seven tubes must be lifted up and secured along the edge of the mold using clamps or clothespins. Now you can start creating the side surface. Each of the vertical posts must be braided horizontally to the required height. It is better to braid the shape as tightly as possible, for greater strength of the product.
During the weaving process there will be a need to grow the paper vine. We cut off the excess piece and glue it on the inside. Having retreated the required distance, we begin to make the transverse bars of the cage. Their number and height of location depend only on the intended result. Now you can complete the top. It's simple, you just need to gather all the rods together and fasten them. If the vertical rods are not long enough, they can be extended to the required height. The cage made from newspaper tubes is ready!
Related article: How to make a sheep from plasticine and cotton swabs with your own hands: master class
Below are photos of the weaving process:
Paper craft - bird
For production you will need
- colored paper or thin cardboard
- thick thread
- double sided tape
- scissors
- hole punch (or awl)
- a lid from a jar
Step 1. Cut paper strips 30 x 0.7 cm in the amount of 4 pieces
Step 2. Use a small hole punch or awl to make a hole in the middle of each strip.
Step 3. Download, print and cut out the bird template. You can do it from here, or from a children’s coloring book, if you have a suitable one...
Step 4. Cut 35 cm thread. Tie the bird, and make another knot at a height of 4 cm above it.
Step 5. Thread the thread through the holes in the strips of paper.
Step 6. Secure the paper with brads (if you have one). If not, then you can fix it with another knot on top.
Step 7: Apply tape around the edge of the lid.
Step 8. Move the paper strips apart so that there is approximately the same distance between them (like the rays of the sun). Lowering them down, glue them to the lid.
Possibility of use
Objects and products made from tubes can be called a striking example of how useful things can be created from simple paper and newspapers. The weaving technology described in the presented master class can be used to create a variety of objects. It could be a simple storage box, basket, fruit bowl, photo frames, watch frames. Some craftswomen even learned to make a variety of decorative crafts, paintings, toys and even original hats.
Next, we will take a closer look at the process of creating a cell.
What we need:
- Newspapers. They can be found in every home. To be used in weaving, the newspaper sheet must be intact, even, and free of bends. It is best if there are large format newspapers;
- Magazines. From pages with bright color drawings it is possible to get some pretty interesting tubes. But due to their high density and smoothness, they are difficult to use in work. It will be difficult to weave from them and a layer of paint will not adhere well to them;
- Office paper. It is also quite dense, but it can be easily painted in the desired color;
- Cardboard or any thick paper. In some products it will be required to create a base;
- Glue. You can choose any one designed for working with paper. The main thing is to choose something that is not too liquid. It will be necessary for fastening the tube, gluing elements, and subsequent decoration;
- Spoke. You can replace it with a long thin pencil or a wooden skewer. Will help to twist a thin and even tube;
- Scissors;
- Stationery knife;
- Form. It is selected depending on the size and shape of the product being created. It is better if its surface is smooth;
- Decor elements. You can use beads, rhinestones, lace, decorative stones, ribbons, flowers and more;
- Stationery clips or clothespins. Will be required for intermediate fixation of elements;
- Dye. It is better to choose acrylic, gouache or wood stain. They retain color and brightness well on paper;
- Varnish for woodworking. Necessary for securing the weave in the finished product and giving it a beautiful look.
Related article: Soutache jewelry for beginners: master class with photos and videos
To do this, you need to cut the newspaper into strips approximately 7 centimeters wide. Using a knitting needle, twist the tube tightly, coating it with glue. After waiting a little for the glue to set, you can pull the knitting needle out of it.
Recommendation. In the process of creating a tube, it is better to hold the knitting needle at an angle of about 45 degrees.
If flat tubes are needed to weave a product, then round tubes can be easily turned into flat ones using an iron or a round object.
It is recommended to paint before starting work, since it will be difficult to paint all the connections in the finished product.
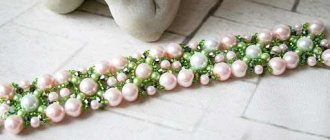
DIY birds in a paper cage
Aren't they adorable? Great decor for a branch or small window. Be sure to invite your children to help you. Joint creativity will delight the whole family.
YOU WILL NEED:
- lids from wooden or cardboard boxes with a diameter of 5.5 cm • figured hole punch with a flower motif with a diameter of 1.6 cm
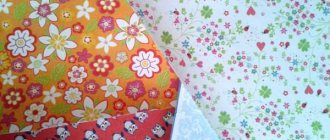
- cardboard with linen texture (yellow, pink and lilac)
- waxed cotton cord with a diameter of 1 mm and a length of 20 cm and 1 m
- various floral self-adhesive tapes
- wooden beads (white, yellow, light blue and linden leaf colors) with a diameter of 6 and 10 mm
- small glass beads with a diameter of 4 mm
- breadboard knife
- cutting mat
- circle or compass templates
- transparent superglue
- thick darning needle
- perlon (or other strong) thread
- hole puncher
- figure composter
STEP 1
Using a breadboard knife, cut out 4 strips measuring 0.5 x 20 cm for each cell on a cutting board made of cardboard of a suitable color. For the bottom of the cell, cut out two circles of a suitable color corresponding to the diameter of the box lid. Cut out birds and wings from cardboard with a linen texture, 2 parts for each house according to the templates from the sheet of motifs. Use a figured hole punch to cut out small flowers, and use a regular stationery hole punch to cut out circles from paper of a matching color.
STEP 2
Glue a colored circle of paper onto the inside of the box lid, and cover the inner edge of the box with multi-colored floral tape. Then fold the strips according to the template, glue them in the middle with a drop of glue and let the glue dry completely.
STEP 3
Before gluing the strips, make a hole in the middle of their crossing with a figured composter. Then stick eight strips one at a time onto the outer edge of the lid. At the same time, constantly place two strips opposite each other, glue and let the glue dry. Then weave a horizontal strip through the vertical stripes and secure with glue.
STEP 4
Now cover the outer edge of the lid twice with multi-colored floral tape and glue the wings to the body of the bird.
STEP 5
Glue both parts of the bird's body together, placing a folded perlon thread or sewing thread in the middle between the parts. Draw eyes with a thin marker. Thread a bead onto a thin cord and stretch the ends to the same length. Thread the perlon thread glued between the parts of the bird’s body a little further into the bead and tie it in a knot = half the height of the cage. Then thread the cord from the inside into the hole of the cage, helping yourself with a long needle. If necessary, tighten the cord a little, then string two wooden beads, fix the last bead on the cord with glue.
Source: My favorite hobby, 2/2016
handmadeguru.ru