- November 15, 2018
- Crafts
- Natalia Penchkovskaya
A voluminous paper house may be needed for crafts for an exhibition at school or kindergarten. Such products can be placed in a traffic corner, filling the space on the side of the road, making large buildings for playing with dolls or a fortress for fights between knights. There are many options for the purpose of such crafts.
It’s not difficult to learn how to make three-dimensional paper houses; you need to follow the step-by-step instructions given in our article. Look at the sample photos carefully, this will make it easier to imagine the finished result. There are several options for making paper crafts. This includes making a pattern and gluing pieces together, folding paper using the origami technique, or cutting crafts from ready-made shoe boxes or corrugated packaging cardboard.
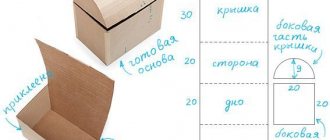
Scheme of a three-dimensional paper house
To assemble a house from thick paper, you need to draw a similar diagram on a large sheet. The first part of the image consists of the side wall of a house in the shape of a rectangle. On top, add a detail for the roof with an extra strip for spreading glue. You don’t have to draw the bottom part, then the craft will not have a floor base. If you want to make a completely three-dimensional house out of paper, then draw a trapezoid at the bottom of all parts of the pattern. The edges are drawn truncated so that they do not interfere with the folding of the house when gluing.
The second part of the pattern is the front side of the house. It can be made of any size - narrow, as in the sample, or the same as before. Then the house will be square. The roof is depicted as triangular; additional strips are drawn on the legs for gluing. On the paper house diagram they are indicated by dotted lines.
The rest of the pattern repeats the drawing of the first and second parts. When all the elements are completed, all parts are carefully cut out along the contours with scissors. In the places indicated by the dotted line, you need to make neat and even folds of the paper by running your finger or a ruler.
The gluing strips are coated with PVA glue with a brush and all the parts are assembled together. It turns out to be a rustic one-story house with a sloping roof. You can decorate the craft with applique or paints. It is more convenient to do this before assembling a three-dimensional house from paper with your own hands, when the development is on the surface of the table.
How to make an architectural model
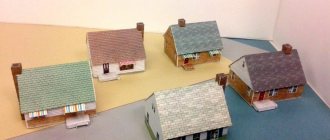
Architectural models are three-dimensional images of structures that are designed by architects or an existing area of the city or building. The production of such models is painstaking, complex and time-consuming work. However, if you have conscientiousness and accuracy, then you can always make an architectural project or model with your own hands.
So, in order to make architectural models of buildings you will need the following things:
- Map of the area (topographic), having a scale of 1:1000;
- Foam board. Should be approximately 3-5 mm thick;
- Liquid glue;
- Thick and thin cardboard;
- Plain paper, paints and aerosol primer;
- Foam rubber;
- Styrofoam;
- PVA glue;
- Stationery knife;
- Computer and scanner.
In order for your manufactured architectural model, which will reflect the actual situation on the ground, to accurately correspond to reality, you will need a topographic map of the area of interest. The map must be selected at a scale of 1:1000-1:2000. The map must contain existing roads, their surfaces, area vegetation, including individual trees, as well as all structures or structures. They all must be accurately reflected in accordance with regulatory symbols, and also have a mark on the number of storeys of buildings. If you only have a paper diagram, then it is advisable to scan it and convert it into electronic form.
Using any ordinary graphic editor, you need to make a copy of the existing diagram, leaving only the necessary contours, i.e. roads, buildings, coverings, lawns and structures. Change the scale, reducing it for your tasks and be sure to stick to it in subsequent operations. Print out a copy of the diagram with the contours applied and stick it on a thick piece of cardboard that will serve as the base. Using the drawn contours from paper and foam board, cut out roads, sidewalks, driveways and paint them with gray paint and glue them to the base. Cut out lawns and flower beds from thin cardboard painted green. Also stick on the right places.
Next, you need to cut out structures and buildings from foam plastic, which should be in accordance with the scale in which the model is made. The actual approximate height can be determined by increasing the number of floors marked on the diagram by 2.7 meters, i.e. average floor height of residential buildings. The manufactured structures can be painted in any colors and each one can be placed in its proper place on the base, which you have marked with contours.
If you have a color printer, you can make building facades with paper windows and doors printed on them, and then stick them onto foam blanks. You can make trees from dried flowers by painting them with green spray paint. They can also be made from dry twigs with covered pieces of foam rubber. Also place them on your model according to the diagram and contours, using plasticine to strengthen them.
postroy-prosto.ru
House made from juice cartons
For a travel corner in a kindergarten, you can make voluminous houses out of paper, using store-bought ready-made packaging for milk, juice or other dairy products as a basis. The plastic cover is carefully cut off. The bag needs to be washed and dried. Then the blank is covered with plain colored paper around the entire perimeter. The roof is done on the top of the package as it has a similar appearance. First, draw the tiles on paper with a marker or make an applique of ovals. Then bend it in half and attach it to the bag. You can leave it the same size, or you can lengthen it so that the roof stands out against the background of the walls.
All that remains is to separately cut out the doors and windows from paper and attach them with PVA glue to the surface of the walls of the house. Such crafts are durable. The child will be able to play calmly, without fear that the thin walls will fall apart in his hands. The package is quite dense, reinforced with plastic film on the inside. The baby will be able to pick up the toy and move it from place to place.
Ideas for making a paper house
As noted above, there are a great many options for manufacturing various designs. What kind of paper house to make depends on the desires and capabilities of the child. Very young children 2-3 years old will be able to participate in creating an applique or coloring a finished sample. Older preschoolers can already be actively involved in creating crafts based on drawings.
Boys will be interested in the process of making a real knight's castle, and girls will be interested in a palace for a princess or a fairy refuge.
They can be made from the same paper house templates, but decorated differently.
On New Year's Eve, construction of snow-covered forest huts, elf huts or Santa Claus will generate interest. They can be made small in size and used as Christmas tree decorations. Christmas houses are given a special charm by the lights of Christmas tree garlands attached from the inside or on the back side of the facade.
Strength out of the box
If you still have a box of cookies or household appliances left over, don’t rush to throw it away. It can be useful for creating a three-dimensional paper house. Using a stationery knife, windows are cut out along the drawn contours. You can make a semicircular cut in the center by lowering the cut paper onto the table surface. These will be the opening doors of the fortress. If you stretch the ropes from both sides into the holes on the walls, you will get a drawbridge for the entry of knights on horses.
The top lids of the box are cut off with scissors and the entire perimeter of the craft is designed like a real fortress. These can be square elements or thin rectangular teeth. You can add towers of toilet paper rolls to the edges. You need to make cuts on them on opposite sides and simply press them onto the wall. It will be interesting for both boys and girls to play with such a wonderful house.
Paper airplane models
If you already have some skills in building paper figures, you will probably enjoy constructing a paper and cardboard model of the Tu-104 passenger aircraft.
- Print out the airplane drawings on thick paper.
- Glue the elements of the internal frame of the product onto thin cardboard - they are marked with red numbers.
- The parts marked with a cross - frames or frame - are transferred to the cardboard using a compass. In this case, you can calculate the radius of the circle by placing the needle of a compass in the middle of the cross and a pencil on the circle. Patterns of paper frames need to be glued to these cardboard blanks.
- After developing the frame, start creating the fuselage, or body of the aircraft. Please note that, unlike previous products, fuselage sections #1-8 do not have white securing flaps. They are connected to each other with special ribbons, represented on the patterns by the corresponding numbers in blue.
- The frames are glued into the joints between the fuselage sections.
- While the glue in the airplane body is drying, glue the tail parts together.
- The engines of the device are assembled like a fuselage.
- Next, the wings are formed using cardboard and paper.
- Connect together the parts of the hull, wings, bow and cockpit.
- The chassis is assembled in several stages - initially the wheels and their components are formed, after which the chassis is glued to the wings in a specially designated place.
- You can also use the pattern to cut out a wooden chassis - it will be stronger and last longer than paper and cardboard.
To avoid bends and creases on the body and tail, stuff the parts with cotton wool during assembly. Decorate the plane as desired using decoupage sprays and paints.
You can make a simpler model of a paper airplane with your own hands, following this video.
Antique bushing lock
Craftsmen never throw away rolls from kitchen napkins and toilet paper, because this is a wonderful material for crafts. The next version of a paper house is made only from them. The castle has several towers of different heights, so the excess strips on the bushings are cut off with scissors and arranged in order of decreasing size.
You can connect them together either with a stapler or by gluing them with thick PVA glue. Cone roofs are attached to the tallest towers. Other parts can be covered with thick colored paper, making square teeth on top. Small details are simply drawn with a marker or made in the form of an applique.
Paper tank models
Designing military equipment from paper is somewhat more difficult than creating civilian vehicles because the guns consist of many small parts that form the body.
To see this, try to create a difficult but very interesting model of the German Panther tank.
- On a thick A4 sheet, print drawings of the tank components using a color printer. It is better to cut out small parts from thin cardboard so as not to bend the narrow curled elements.
- You need to cut out the parts with sharp scissors to make the work easier.
- It is better to glue in blocks - separately connect the parts of the hull, propulsion system and turret, and then fasten the large elements together.
To glue the parts of the tank in the correct order, follow this video tutorial during assembly.
Sometimes the joints are connected with small errors, which is why white paper stripes appear on the model. You can get rid of them using felt-tip pens or pencils of a similar color to the armor.
House made of newspaper tubes
The idea of creating crafts from tubes rolled from sheets of newspaper or magazine appealed to many craftsmen. They also paid attention to the making of the house. For such a craft, you need to first make a lot of tubes. To roll, prepare sheets of newspaper and a knitting needle. You can also use a wooden barbecue skewer. The page is placed on the table at an angle towards the master and the knitting needle is laid out on it. Then wind tightly to the end of the page. Its edge is glued to the last turn with PVA glue.
Then the parts are cut into sticks of the required size and fastened together with glue. To create the roof of the house, it is best to use a cardboard base, bending the sheet in half. A tube is then glued along the fold. The craft looks interesting on cardboard or on a base specially assembled from the same tubes. You can supplement it with a low fence around the house.
Origami house
The house can be created by folding paper according to origami patterns. For the next sample, take a rectangular piece of colored construction paper and fold it in half horizontally.
Then fold in half vertically. Each half is folded again into two equal parts. Then unfold the paper. The bends were made to determine the outer quarters of the workpiece. It is with them that we will continue to perform actions. Bend it upward with your fingers and, putting your hand inside, push its edges in different directions, smoothing the fold with your hands. The result was a triangular roof and two walls.
With the opposite quarter, perform similar actions. The result should be a house like the one in the photo. The windows and door can be completed with markers.
