Bear head mask made of paper
The brown bear is the hero of all Russian folk tales.
And of course, not a single children’s party is complete without his image. If you don't want to waste time looking for a bear mask for your little one, just download the template on this page. You can choose color or black and white and print on a printer. Now all that remains is to glue the future mask onto cardboard (after all, the paper will quickly tear), and figure out how to attach it to the child’s head. This is easy to do with a paper ring or rubber band. In addition to brown and polar bears, we have also prepared an exotic panda bear mask. So, the choice is yours! Happy matinee!
new-year-party.ru
how to make one from improvised materials in minutes
You can purchase various carnival masks in the store. But there are also situations when exactly the one you need at the moment is not available. In this case, we advise you to make it yourself. If you need a Bear mask, then you are reading the right article.
Varieties
Before you get started, you need to decide what kind of mask you want to make. The following types exist:
- In the form of a hoop with the image of some animal or fairy-tale hero. Attached to the forehead. This type of mask resembles a kokoshnik. Usually used for children's productions.
- A hat with the face of an animal. It is worn on the face up to the eyebrows. It fits well on the head and is quite comfortable.
- Mask-bandage. Sewn from fabric.
- Carnival. Worn completely over the face. There are also half masks - only up to the mouth. Attached to the head with an elastic band.
- Hard mask with handle.
Making a bear mask with your own hands is not difficult at all. First of all, decide on the type of product and type of fabric.
What material are they made from?
It is usually recommended to make it from papier-mâché, cardboard, or fabric. At the moment, isolon is very popular. This is the material from which travel rugs are made. It is also used for insulation during construction work. It is durable and holds its shape perfectly. The main thing is that it is not as hard as cardboard. The capabilities of isolon are much wider compared to other materials. The mask is quite easy to make. They cut out the parts from isolon and connect them with a heat gun, or a stapler.
Adviсe
Before you start making a mask, pay attention to the following recommendations. If your role in the play requires you to sing or speak a lot, then it is better to make a half mask that will cover only your cheeks and nose, while your mouth and chin will remain open.
The eyes on the mask should be on the same line. The larger the incision, the better the view. But first, try the template with the cut-out eye holes on your face. The main thing is that everything fits.
As for attaching the product to the head. If you plan for the mask to be held in place by an elastic band, then make the holes through which it will be threaded at a distance of 1.5 centimeters from the edge of the mask. Shoelaces or braid should not be used as ties, as during the performance the ropes may come undone and the mask will slide off the face.
It is best not to make bulky masks. Although they are very spectacular, they have poor visibility, and they also make movement and breathing difficult.
Is your child having a party or a themed corporate party coming up? The main attribute of a fairy-tale hero or carnival costume is a mask. We advise you to do it yourself. After all, you will kill two birds with one stone. First of all, you will save money. Secondly, show your imagination.
Paper "Bear" mask
Need to do it in a matter of days? The fastest option is to cut it out of paper. Everything is very simple.
Print it out or draw the bear's face yourself. Cut to the office. Use thick paper, or best of all, glue the template onto cardboard. Cut it out. Then color it. It is best to use gouache. It fits well on paper and dries quickly. To ensure that the Bear mask stays well on your head, make holes on the sides and insert an elastic band. You can do without cutting, just attach with staples. To make the mask voluminous, you can, for example, make eyebrows from foam rubber or fabric. Make the black tip of the nose from cotton wool, rolling it into a ball. Cut a small piece from the black bag. Wrap it around the ball. Screw tightly to create a plug. Secure with tape. Insert the twisted end into the hole intended for the nose. Secure with tape from the inside. This is how the charming bear mask turned out, made with your own hands. You can also cut it out of colored paper.
This exciting activity is good to do together with children. To make the outfit seem more realistic, pair it with brown trousers and a turtleneck of the same color.
Polar bear mask
If you make such a product, you will greatly delight little fans of the cartoon about the Umka bear. You can make a polar bear's face from an ordinary paper plate. You will also need cotton wool, white corrugated paper, a plastic cup, a stationery knife, tape, a thin elastic band, and colored paper (black and pink).
Make holes in the plate for the eyes. Then proceed to the nose. Use a knife to cut holes in the plate, the diameter of which should be equal to the bottom half of the cup. Take some tape. Insert the cup into the hole and secure it from the inside out. Tear the corrugated paper into small pieces and crumple them. Cover the front side of the mask with scraps. Use black paper to make the tip of the nose. Draw ears on cardboard and cut them out. Glue on pink paper and cover the edges with pieces of corrugated paper. Make holes on the sides of the mask and tie an elastic band. Ready! This is how the wonderful “Bear” mask turned out. Complete the look with white clothes, and sew a tail made of cotton wool to your pants.
A handmade bear mask will definitely attract the attention of others. And most importantly, the process of creating it will bring you a lot of pleasure! Good luck!
fb.ru
What material are they made from?
It is usually recommended to make it from papier-mâché, cardboard, or fabric. At the moment, isolon is very popular. This is the material from which travel rugs are made. It is also used for insulation during construction work. It is durable and holds its shape perfectly. The main thing is that it is not as hard as cardboard. The capabilities of isolon are much wider compared to other materials. The mask is quite easy to make. They cut out the parts from isolon and connect them with a heat gun, or a stapler.
Before you start making a mask, pay attention to the following recommendations. If your role in the play requires you to sing or speak a lot, then it is better to make a half mask that will cover only your cheeks and nose, while your mouth and chin will remain open.
The eyes on the mask should be on the same line. The larger the incision, the better the view. But first, try the template with the cut-out eye holes on your face. The main thing is that everything fits.
As for attaching the product to the head. If you plan for the mask to be held in place by an elastic band, then make the holes through which it will be threaded at a distance of 1.5 centimeters from the edge of the mask. Shoelaces or braid should not be used as ties, as during the performance the ropes may come undone and the mask will slide off the face.
It is best not to make bulky masks. Although they are very spectacular, they have poor visibility, and they also make movement and breathing difficult.
Is your child having a party or a themed corporate party coming up? The main attribute of a fairy-tale hero or carnival costume is a mask. We advise you to do it yourself. After all, you will kill two birds with one stone. First of all, you will save money. Secondly, show your imagination.
DIY bear mask and mouse mask: patterns, master classes
Costumes have long been an integral part of children's parties, so thinking through every detail is very important for a child. Modern children prefer costumes of superheroes, fairy-tale princesses or fairies, but the images of kind forest animals: foxes, bears, bunnies and others do not lose their relevance.
But in order to create a full-fledged costume, it is important to pay attention not only to clothes, but also to accessories, for example, hats, various jewelry. If you decide to dress up your children for a holiday party in the costume of a kind forest bear or a sneaky little mouse, the following master classes will help you make your own bear and mouse mask with your own hands.
Contents of the material
Making a mask using templates
The easiest way to make a suitable mask for a carnival holiday is to use a ready-made template. Today, when most people have free access to the Internet, it is enough to simply enter the desired query into a search engine, select the template you like, and then print it out on an ordinary sheet of paper. Of course, in this case it is best to use a color printer, but if you can only use black and white, do not despair: choose a coloring template and give it the desired colors using pencils or paints. You can also involve your child in this task.
So, to make an accessory using a template, follow these instructions:
- Choose the mask you like and print it using a printer.
- Using a utility knife or small scissors, carefully cut out holes for the eyes, as well as small holes on the sides.
- If you have chosen a colorless template, pick up felt-tip pens, pencils, paints and begin to carefully paint the mask without going beyond the contours.
- Let's make ties that will allow the accessory to stay on the face. Insert two laces into the side holes, one in each hole. Make a knot in them by securing the lace to the mask.
- If you need an accessory to be worn on the head, which are often used not only at holidays, but also in children's performances, print out a mask, and then cut out a wide strip from thick white paper or cardboard and make something like a wreath, fastening the ends with glue. Glue the base of the accessory onto the white strip. Now the head mask is ready!
Gallery: DIY bear and mouse mask (25 photos)
Paper and cardboard masks
The easiest way is to make various products from paper and cardboard. These materials are available in every home, so you don’t have to spend much on them. In addition, paper products are easy to make and take up little free time, for which they are valued by many people.
Bear mask
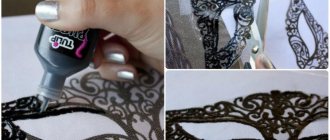
The next bear head mask is made from paper. The product turns out to be quite realistic, which will make the costume even more interesting and give it a special charm. Meanwhile, it’s easy to make such an accessory with your own hands; the following master class will help you with this:
- Use the patterns below to help you cut out all the parts correctly. Please note that the sizes are selected individually, so before redrawing the patterns, find out the child’s parameters and adjust the patterns to them.
- For work, you can use paper or cardboard. Both materials have their advantages and disadvantages: cardboard, for example, is quite durable, but working with it may seem a little difficult, but with paper the opposite is true. Whatever you choose, the accessory is made one way. First of all, take the half mask in your hands, the part with cutouts for the eyes, and the edges of the darts located in the forehead area, carefully place one after the other. You will get two small bumps on the forehead of the accessory, which need to be secured with a very small amount of glue.
- Do the same work with the ears, forming small tubercles on the back side of each ear.
- Let's start working on the bear's face. Bend all the flaps so that you get a three-dimensional model, and then glue them together. Attach the resulting muzzle to the half mask by inserting it into a special armhole.
- From black paper or a special self-adhesive film, cut out a triangle, similar to a nose, and glue it to the end of the muzzle.
Now you know how to make a bear mask out of paper, and you can make it yourself to make your child's carnival costume interesting.
Mouse mask
If your child goes to a party in a mouse costume, invite him to complement the costume with an interesting mask. The accessory can easily be made with your own hands, and the result will please both you, the child, and other children in the kindergarten. A mouse mask is made from paper as follows:
We also recommend reading:
- Use the pattern to cut out the half mask for the mouse. Do the same work with the darts as for the bear, that is, bring one edge after the other, forming small protruding tubercles. Secure the bridge of the nose to the accessory with a stapler from the wrong side.
- Roll the remaining sheet below into a cone and glue it with a half mask to create a real three-dimensional mouse muzzle.
- Cut out the ears, perform the same manipulations with them as with the frontal part. Glue smaller pink ear-like parts inside. Glue a pink circle to the end of the muzzle - the mouse's nose.
- Make holes on the side, insert an elastic band into them and tie both edges tightly in the holes.
Felt mask
Felt masks are distinguished by their softness and durability from their paper counterparts. Such products are not only pleasant to the touch, but will also last for many years, so the accessory can be used repeatedly. To make such an accessory with your own hands, you do not need to have special skills or spend a lot of time.
Bear mask
The next master class will help you make a bear mask on your head in a short time. This mask is perfect for a carnival, a cute accessory will perfectly complement the costume:
- Transfer the proposed patterns onto paper (or directly onto a sheet of felt), and then cut out all the details.
- As shown in the picture, cover the holes with black felt, highlighting the eyes. Don't forget to stick on the nose and decorate the bear's ears.
- Using glue, connect the edges of all the darts on the mask. To make them more firmly attached to each other, secure the parts with ordinary office clips.
- Take a piece of wire and attach them to the backs of your ears. Mask the wire with a piece of brown felt, and then carefully glue the ears to the accessory itself. Your DIY bear mask is ready!
Mouse mask
To make such an accessory for a festive costume, use materials from the following master class:
- Use the pattern and cut out the parts for the accessory. Cut out the muzzle itself twice, make holes for the eyes in both copies.
- Sew pink details onto the ears, and sew a nose into a special recess. Use black thread to sew short strips that will act as antennae.
- Measure a piece of elastic and apply it to the wrong side. Place the second copy of the muzzle on top, and then sew both parts. Your DIY mouse mask is ready!
Bear ears
When there is no opportunity or desire to make a mask, you can replace it with a headband with bear ears. This is easy to do if you put in enough effort.
- First of all, take a piece of fur and cut out all the necessary parts for the ears. Cut out liners from padding polyester.
- Trim the fur on the front parts of the ears, and then begin to sew them in pairs with the back parts, turning them wrong side out.
- Insert prepared synthetic padding inserts inside the ears, which will help maintain the shape of the ears in the future.
- Take an ordinary hairband and, using a hidden seam, sew the ears to it.
A mask is a great addition to a festive costume. This is easy and quick to make, and the result will definitely impress you and your child.
Attention, TODAY only!
1igolka.com
Cheerful bear
The mask resembles a kind bear from a cartoon beloved by children. The bear's head is suitable not only for children, but can also be a prop for children's animators.
The size of the cap mask is designed for five years of age. If necessary, you can calculate your own size.
To work on the product you will need:
- foam;
- glue Moment (yellow);
- scissors;
- pen or pencil;
- gouache, brushes.
First, a rectangle measuring 20x56 cm is cut out of foam rubber. The first measurement here indicates the height of the hat, the second - the circumference of the child’s head.
Along the upper part of the foam sheet, identical triangles appear, the height of which is 9 cm, and the width at the base is 6 cm.
Triangles are cut on both sides. Their foundations remain intact.
Glue is applied to the short sides of the rectangle and the edges are joined.
The next step is to align the triangular teeth. To do this, triangular sections are coated with glue and joined together, forming a cap.
The resulting blank can become the basis for any masks of this type.
A rectangle with sides of 30 and 22 cm is cut out of a separate foam rubber sheet. The rectangle is divided into two equal parts with a pencil, after which a dome-like detail is drawn in the upper part.
Glue is applied to the places marked with crosses in the photo. You will need it later for an internal connection.
Related article: Knitted hat for a round face: diagram with photos and videos
The dome-shaped part is cut out, and its sides are glued together.
The protruding part of the workpiece is treated with glue along the seam to a height of 5 cm, and then folded inside the cylinder and finally glued there.
The places where glue was previously applied (cross marks) are glued together, forming a three-dimensional figure. This will be a bear's nose.
For the lower part of the lip-shaped mask, cut out a 13x12 cm rectangle.
It is divided in two, after which two smooth arcs in the form of a tick are drawn with a pencil, connecting in the center.
The part is cut out and the sections of the “tick” are fixed with glue. It should look like a “boat”. The blanks for the nose and lower lip are glued together.
The resulting figure is attached to the base cap of the product.
Separately, foam ears are formed in the form of semicircles. Ear height – 7 cm, length – 10 cm.
The eyebrows are cut out: two short semicircles, equal in base length to 10 cm.
Small elements are fixed to the base of the mask. The cheeks of the bear are made. To do this, take two foam circles with a diameter of 12 cm.
A quarter of the circle bends inward. The resulting end parts are carefully glued to both sides of the bear’s nose.
All that remains is to paint the mask with gouache in accordance with the usual color scheme of the forest animal. The eyes are drawn with a brush.
This bear mask is placed on the child’s head in the form of a hat. The product can be created quickly and easily using colored paper.
On a brown sheet of paper, draw the shape of the future mask in the form of a bear’s muzzle with slits for the eyes. The part is cut out.
Two yellow circles decorate the bear's ears. They are glued using PVA glue.
In yellow, the cheeks of the bear are cut out, after which they are attached to the main part.
A triangular nose, cut in advance from black paper, is also glued here.
On the back of the mask there are ties or a thin elastic band.
Related article: Do-it-yourself fairy-tale characters made from pine cones
To get a product that is not completely flat, you can use corrugated cardboard and make the bear’s nose convex.
To create such a nose, you need to take a rectangle, fold it along the long side into three equal parts, and then connect it in half in width. Unbend the part. Make perpendicular cuts in the center on the outer parts. Fold the workpiece at a slight angle so that the cut parts overlap each other.
In this form, glue the part to the base of the product. Secure the outer part of the nose element with a black circle. The product will look attractive if you use felt rather than paper.
The fabric has rich colors, and the slight volume added by the darts at the top of the mask will make it more interesting. At the same time, due to the stitched fabric parts, the felt mask will last more than once, and you can complement the image of the bear with felt pads for the child’s hands.
How to make a bear mask out of paper with your own hands
Print Thank you, great lesson +6
In addition to the costumes of bunnies and foxes, you can also see a bear at a children's party. Such a character can often be seen in fairy tales and cartoons. Therefore, if the child chose a bear as his costume, make a mask with him from paper and other materials.
Necessary materials:
- Half cardboard brown, yellow, black
- Black waxed cord
- Stationery glue
- Scissors
- Pencil
Step-by-step photo lesson:
On a brown sheet of paper we draw the silhouette of a bear's face. At the bottom we will make a hole for the nose, and at the top we will add small round ears.
Then we cut out the bear mask according to the intended silhouette.
In the middle of the mask, mark the places for the eyes with a simple pencil. Cut it out.
Decorate the ears with the centers. To do this, take yellow or orange paper and cut out two circles.
Glue each yellow circle to the middle of the ear.
Let's start decorating the muzzle, or rather its lower part. First of all, cut out the element for the cheeks from yellow paper. To make it fit, trace the lower silhouette of the mask on yellow paper, then remove it and draw the upper part yourself.
Glue the bottom part of the muzzle.
Then cut out the nose from black paper.
Glue the nose to the bottom of the bear's face above the notch.
Finally, add some ties to the mask. Various materials can be used. For example, cord or ribbons. So choose according to your taste. We glue both ends to the sides of the mask from the back side.
The paper bear mask is ready and the child can already wear it for a children's party.
papermix.ru
We make animal masks: wolf, fox, bear, hare
In the store today you can buy any children's animal masks. But they are unlikely to be original. And it’s much more interesting for a child to dance around the Christmas tree wearing a homemade mask.
Mask made of paper and cardboard
Masks for children do not have to be hard and reusable. For one themed party in kindergarten, you can glue together the simplest three-dimensional animal masks for children and teachers. We only need a set of colored paper, glue, scissors, a pencil and a small piece of elastic.
A bear or fox mask can be made in just an hour. Cut out a muzzle from paper. Having folded the blank in half for complete symmetry, mark the holes for the eyes and correct the outline. Trim the edges.
The most important thing is to cut out and glue the voluminous nose with your own hands. Its drawing can be borrowed from the next section. After the wolf or fox mask is glued, paint it and sew on an elastic band to attach it to the head.
A bear mask made from cardboard, made according to the same pattern, looks great.
Mask-hat
This necessary accessory for a carnival costume made of paper or cardboard does not cover the face, but is put on the head in the form of a cap. This approach easily and quickly solves the problem of how to make a wolf or bear mask.
Before starting work, measure the head circumference and calculate the perimeter of the workpiece in the drawing. Based on the obtained dimensions, calculate the size of the cells.
For example, the circumference of your baby’s head is 54 cm, and in the drawing of a wolf mask it consists of 8x2+7x2=30 cells. This means that each cell should have a size of 54/30 = 1.8 cm. Now we draw the pattern according to the cells, based on our calculations.
Next, the blank is cut out and the wolf or bear mask is glued together. You can color the mask, but it is better to use colored paper. These disposable children's hats and masks are made from paper or cardboard with your own hands in one evening together with the child.
Felt masks
Felt is a fertile material. Not only does it not fray, it is processed well and is easy to stitch. Felt masks are pleasant to the skin, do not scratch children's faces and fit perfectly. These children's masks are cut out from felt using paper patterns for any flat paper masks. For example, a paper hare mask can be successfully used to create a felt pattern.
Bear mask
We will need:
- ruler.
- pencil;
- scissors;
- glue;
- textile;
- thin padding polyester or felt;
- foam;
- cardboard;
- We measure the distance between the pupils and, based on this size, draw a sketch of the future mask. We cut out the blank from cardboard and then from foam rubber, gluing the two materials together. We put fabric on the foam side and, folding the edges, glue it to the cardboard.
- We cut out the bear’s nose and thin padding polyester according to the drawing in the photo and also cover it with fabric.
- Using the same principle, we make ears for the bear, securing them with a stapler, glue, or sewing them to the mask.
- Glue the bangs and attach the nose. Cut out two crescent moons for the eye sockets from white felt. Glue them along the diameter. We sew on the sides an elastic band or ribbon cut from the same material as the muzzle.
The most important thing in this work is to correctly mark and then cut out the holes for the eyes. This voluminous mask for children does not restrict freedom of movement, it is not hot, convenient and comfortable.
We recommend
www.toysew.ru
Felt mask
Felt masks are distinguished by their softness and durability.
from paper counterparts. Such products are not only pleasant to the touch, but will also last for many years, so the accessory can be used repeatedly. To make such an accessory with your own hands, you do not need to have special skills or spend a lot of time.
Bear mask
The next master class will help you make a bear mask on your head in a short time. This mask is perfect for a carnival, a cute accessory will perfectly complement the costume:
- Transfer the proposed patterns onto paper (or directly onto a sheet of felt), and then cut out all the details.
- As shown in the picture, cover the holes with black felt, highlighting the eyes. Don't forget to stick on the nose and decorate the bear's ears.
- Using glue, connect the edges of all the darts on the mask. To make them more firmly attached to each other, secure the parts with ordinary office clips.
- Take a piece of wire and attach them to the backs of your ears. Mask the wire with a piece of brown felt, and then carefully glue the ears to the accessory itself. Your DIY bear mask is ready!
Mouse mask
To make such an accessory for a festive costume, use materials from the following master class:
- Use the pattern and cut out the parts for the accessory. Cut out the muzzle itself twice, make holes for the eyes in both copies.
- Sew pink details onto the ears, and sew a nose into a special recess. Use black thread to sew short strips that will act as antennae.
- Measure a piece of elastic and apply it to the wrong side. Place the second copy of the muzzle on top, and then sew both parts. Your DIY mouse mask is ready!
How to make a bear mask | Blog of graphic artist Marina Novikova A small book of nonsense
How to make a bear mask
Bear masks are very popular - and they are useful for carnivals and carols - a bear paired with a goat is a classic, and in performances based on Russian folk tales, too, Mikhailo Potapych - not their last.
In general, we need a bear mask. Previously, I made it based on the model described HERE, but then I decided that this was a mask of a small bear cub, and for serious bear achievements a hero with much larger and clearer facial features is required. For example, this:
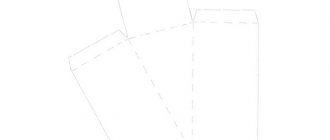
Here is the pattern for this bear mask:
In fact, I avoid specifying sizes (they are very individual). On the drawing I indicated the dimensions of the mask for me, and you can adapt it to your actor.
The sequence of making a bear mask is as follows:
On the half mask, we slightly draw the edges of the darts on the forehead one after another and glue them together. If you are working with cardboard, it is better to use a heat gun - it holds elastic and rigid parts together well. In any case, you should avoid water-soluble adhesives such as PVA. Here it is important not to overdo it - just a little, for us it is enough for the forehead to become only slightly convex. The same goes for the darts on the ears; when you glue them, follow the measure - half a centimeter is enough.
On the parts of the nose, we turn the flaps on the sides inward and glue the nose precisely above the armhole of the nose. The matter is complicated, it is better to put the mask on a mannequin so that it is curved to the shape of the person’s face. I glue such details in stages - first on the bridge of the nose, then one wing of the nose and then the second, all the time making sure that the nose is symmetrical.
We bend the valves at the end of the nose tightly and glue them together. The ears must be glued from the inside of the mask quite widely and, most importantly, symmetrically. At the end of the nose I glued a triangle of self-adhesive black film with cutouts for the nostrils. The bottom of the mask is open, so it does not impede the actor’s breathing and does not distort the voice.
Bear mask
Marina Novikova told you how to make a bear mask.