A very significant day is coming soon - May 9th. For Russians, this is a very important event - the Great Victory Day, the end of the war in 1945.
In memory of the heroic deeds, dedication and courage of our defenders, competitions and tasks for thematic crafts are announced in all educational institutions.
It is very important to instill in our children respect for this day and remind us that peace is possible when there is unity and respect. Personally, this holiday always brings tears to my eyes and means more than New Year and Birthday.
I have selected different options for crafts that you can make with your child, telling him how our grandparents fought for freedom. After all, there are fewer and fewer of them, but the memory of this should live in our hearts and minds.
There are also wonderful ideas that you can use to participate in school competitions.
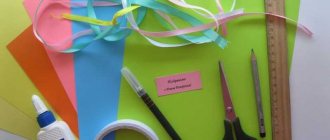
DIY crafts for May 9th for kindergarten
It is difficult to convey to preschoolers why this day is so important, but by creating the right atmosphere, you will already help them understand that it is good when there is no strife. Every year there are always concerts and fireworks dedicated to the Great Victory Day.
Let's translate the main images into crafts. For example, you can make a tank from scrap materials, and then show pictures of real equipment.
Fireworks always evoke a lot of emotions, so make an applique on a dark background.
For the background you will need a sheet of blue cardboard. We cut out the outlines of houses from black paper and glue them to the base.
Fireworks can be drawn with wet crayons or regular watercolors.
You can use plasticine or glue colored cotton balls onto glue.
Using semolina, PVA glue and paints you will get terry, textured fireworks.
Here's another idea made from threads.
Take a lot of bright colors, this will make the craft more cheerful and colorful!
Cut many short strips of thread.
And marking the necessary places with PVA glue, sprinkle the application with the prepared pieces.
You can roll napkins into balls and also glue them with glue. To make the drawing even, first draw the outlines with a pencil on the base. You can glue artificial flowers to the sides. Most often, carnations are given as gifts on this holiday.
A fairly simple idea for the Eternal Flame, which children in the senior kindergarten group can repeat. For the base, take a circle of silver, golden or gray cardboard. He is the basis. To make the craft stable, I bend this circle in the middle.
The remaining parts are cut out separately and glued with glue.
The child may not be able to carefully cut out the parts himself, so an adult will need to supervise these actions and provide assistance.
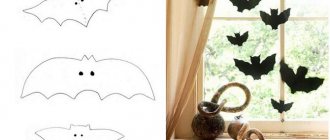
Paper cutting template for May 9 Victory Day
In order to make a beautiful craft for May 9 step by step with your children, you don’t have to be an artist. Just choose a template and you can start creating. There are several options that can be printed at any scale.
You can make interesting and beautiful crafts for May 9 with your children in kindergarten or school. But don’t forget that the main task is patriotic education, so tell your children why they should be proud of their grandfathers and great-grandfathers and why this holiday is so important for the whole country.
Applications “Dove of Peace”
One of the symbols of the holiday is the Dove of Peace. Most often it is depicted in white with a twig in its beak. But a twig can be replaced by a carnation or St. George's ribbon.
Let's start with the simplest option for making these cute birds. To create it you need to trace a child’s palm. All fingers need to be well extended so that the thumb is away from the index finger.
We add a beak and eyes to it. We will need two of these parts, because we will insert a stick in the middle. It can be replaced with a straw for cocktails or a skewer for kebabs. Write a wish for veterans on your palm.
Another option is pigeon. The scheme is the same, a stick is used. But for the body we took the usual template and also made two parts. They were connected to each other, and a stick was fixed in the middle. The wings need to be folded back.
Take this template option. The wings are separately fixed to the body. The dotted lines indicate the bend locations.
You can also make simple little doves from disposable plates.
You will need two wing pieces. To make the beautiful plumage visible, grab the ribbed edging of the plate.
A simpler variation from disposable tableware.
One plate yields one bird.
Nowadays there are many materials for creativity; you can use foamed soft sheets or cardboard.
Use this diagram.
Transfer it to cardboard and cut out all the details.
The wings are inserted into the slot. They can be covered with braid or ribbons to hide small defects and the design itself.
I liked the knitted dove. Praise and honor to the craftswoman who created it.
For little ones, you can make the task easier and offer to make an applique.
Baby birds can be decorated with napkin balls, cereal, cotton wool or foil balls.
Also, any of the above ideas can be used in postcards or wall newspapers.
Paper cards with children
Of course, we are used to giving cards to our loved ones. Homemade gifts are very valuable for each recipient, because they thought about him and wanted to do something nice. And it doesn’t really matter what occasion you make them for, whether it’s a birthday or Easter. Therefore, today we will make such crafts for grandparents. They can also be taken to an exhibition in a kindergarten or school.
Use numbers. Nine denotes the date; you can use the war years and 1941-1945. Look at the emphasis placed on the number itself.
All parts are cut out separately, then a composition is formed from them.
We also associate carnations, stars and St. George's ribbons with the holiday.
Using only these symbols you can quickly issue a congratulation.
A military helmet is also often found in images of the Great Patriotic War, so it can also be used.
Another option is to use flowers, a red star and a ribbon. You can specifically find shiny or velvet paper sheets in art and craft stores.
To make the letters seem three-dimensional, attach them with double-sided tape!
During the war, a map of the area was necessarily used, on which tactical actions were noted. This moment became a good subject for arranging congratulations.
Now let's take a closer look at how you can make cloves. I will show you several options and you will choose the one that suits you. We will make the first option from ordinary white napkins.
Open it and tear it off in the middle to make two rectangles. We wrap each one vertically in an accordion.
Fix with wire or thread in the center.
We paint the edges with a water marker or watercolor. And let them dry. Do not use a lot of water, otherwise the workpiece will become soggy and turn into porridge.
Now we straighten the accordion, forming petals.
We will make the second option from prepared parts. Use a cotton pad to measure out an even circle.
Trace it and cut out 4 circles. Each of which you fold several times in the middle. Using scissors, give the edge of the workpiece a jagged shape.
We take the wire and string our levels onto it. Look at the instructions, it shows the sequence of actions.
Another option for a simple postcard using a number and a flower.
I’ll tell you in more detail how to make such an application. You will need a white piece of cardboard for the base and colored paper in orange, green, black and red.
The highlight of this composition is the carnations, so let's start with them. The scheme is similar to that described above. Only for one flower we use 2 circles. It will be more beautiful if you use corrugated or crepe paper for the petals, then the petals can be curled and fluffed a little.
Glue the finished flower.
The entire craft will stick well to PVA glue, especially since it is considered the most harmless.
For the ribbon you will need one wide strip (it is better to take it about 3 centimeters wide) and three black narrow ones of the same length.
All that remains is to fix it in the right place and write down memorable years.
Look at the options for placing the inscription: horizontally, vertically, diagonally.
Volumetric cards also always attract attention.
If you are into quilling, you will love the following idea.
First, modules are made, then they are assembled into flowers.
This card has tulips glued on it using the origami technique. I wrote how to make them here.
You can depict a laurel branch as a sign of victory and spring. And also a red three-dimensional star, which was a symbol of the USSR army.
An interesting double craft.
Of course, you can use not only paper, but also improvised materials. For example, it is now popular to use buttons in creativity. They can be of different sizes and colors.
More ideas from first and second grade students.
My child and I often make plasticine applications using the stretching technique. When a small piece fills a small element on the paper. For example, you can print themed coloring pages and fill them out.
Or just color it.
Cut out patterns from them that you can use in your creativity.
You can also fill them with colored semolina, which is glued to PVA.
Stars, a tank, shoulder straps, orders and many more symbolic images can become the center of your composition.
Stained glass painting
Recently, there are more and more goods for creativity and handicrafts.
Among them there are also those that were previously used only by professionals, but are now available to any student. If desired, each child can do glass painting. Stained glass requires special paint and some kind of utensils.
An original craft for Victory Day in the form of a painted plate
In this interesting way, a child can create a very original craft for Victory Day in the form of a painted plate or glass. If you don’t want to use dishes, you can use glossy or plain paper. This will create just a beautiful drawing with a small volume.
The topic must be chosen accordingly. It can be absolutely any image: a bouquet of carnations with a St. George’s ribbon, festive fireworks. Working with stained glass paints is no more difficult than with others, so if a child has good artistic abilities, he will be able to make a very interesting picture for May 9th.
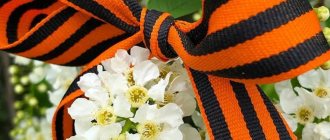
Beautiful brooch “St. George’s Ribbon” made of satin ribbons
I used to see that they tied the St. George ribbon themselves and pinned it to the collar with a pin. Nowadays, craftswomen and needlewomen create beautiful brooches using the kanzashi technique. Satin ribbons are used for this.
Ribbons of black and orange colors or ready-made St. George ribbons are used as a basis. These tones are required because they symbolize the fire and smoke that fills war.
But for decoration you can take the tricolor of our Russian flag: red, blue and white.
Or stick to one color scheme.
I also liked the idea of a beautifully folded ribbon that has a badge in the center.
You can roll it up according to this pattern.
Now see how you can make individual modules from satin ribbons using the kanzashi technique. Most often it is suitable for creating flowers.
Each module is made of squares that are rolled into a petal. There are a lot of folding schemes, I will give two.
The middle can be stitched, or it can remain with a hole.
You can use a sewing machine to connect the tips and sides of the petal, but it takes a long time; it’s easier to glue them together with hot glue.
And the second option for collapsing the module.
Another idea is to use the primary colors of the state.
There are a lot of decoration ideas, including ready-made artificial flowers, live carnations, a lot of beads and even bead embroidery. The flight of fancy is not limited by anything.
How to draw a postcard for May 9th - drawings for children
For this section, I was looking for something interesting that would be easy for both a child and an adult to draw. Among the almost template options, I liked this one: dot drawing technique. The card looks decent and is easy to make.
Author
1. Cut out the base 22 by 14 cm. We bend it in half.
3. Absolutely randomly, as far as your talents allow, we draw:
- Stars on top. This is fireworks.
- Below – “MAY 9”.
4. We outline everything that we have drawn. But this needs to be done not with straight lines, but with small dots.
5. Once the drawing has been completed, you can erase the pencil sketch.
6. Fill in the space between the fireworks and the inscription with dots.
Complete freedom in what to draw and what color to “circle”. I thought that the fireworks could even be outlined with markers of different colors. What do you think?
A few more templates that can be traced from the screen and painted using the technique I described above. More templates here.
Crafts for a competition at school
The best works are taken to the competition and exhibition. They are often quite voluminous, large in size and labor intensive.
I would like to offer you a few ideas so that you, too, can take part in this venture, and even win a prize. And joint creativity with the child will benefit the whole family if the parents are patient.
We will need a cardboard base in the shape of a star.
We cover it with green leaves.
And filled with corrugated paper roses.
Another very painstaking but beautiful idea using pasta. We have long realized that the various forms of these products allow us to make very beautiful crafts.
Use unusual objects, such as a vinyl record. After all, it is so characteristic of those years.
And create a whole composition as a fragment of a story or a certain event.
A battle of soft tanks. The basis is taken from dishwashing sponges.
Various equipment also directly relates to war times. The cardboard tank is made very carefully and can easily be sent to the competition.
It is done according to these step-by-step instructions.
The orderlies' car is also made very realistically.
A similar plane was made in this article.
Of course, we will not forget the sailors and call their ships memorable names.
You can use a military helmet as a basis for a competitive craft. The easiest option is to use the papier-mâché technique.
The basis will be an inflated balloon, onto which you will apply pieces of newspaper using glue.
The theme of the eternal flame is also perfect for an exhibition. A cardboard box or polystyrene foam is suitable for the pedestal.
I was impressed by the cute plasticine craft. All lines and transitions are very carefully observed.
The 4-layer volumetric screen is also interesting in its idea.
First, an ornament is applied to each A4 sheet. The width of the frame is the same everywhere. The number and the tank are cut out immediately from a single sheet, and are not glued on separately.
The base is made of a white sheet on which fireworks are depicted. We bend the edges like an accordion, each bend is 1 centimeter.
These are the preparations we should be able to achieve.
Decorate the front frame.
and begin gluing the edges of the frame onto the sides of the accordion.
Also don’t forget the option of wall newspapers. a lot of them have also been invented. I liked this one, assembled from different fragments in the form of a symbolic number.
I remember that every year at school we made very colorful wall newspapers, and my classmate composed poems especially for this holiday. It's a pity that we didn't think about taking pictures of them, I would love to look at them now.
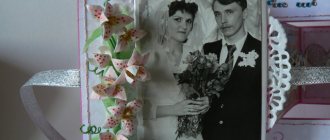
Postcards using scrapbooking technique
Postcards and albums made using the Scrapbooking technique are decorated with photographs, newspaper clippings, notes, drawings and other memorabilia, thus conveying a story or story.
Using Scrapbooking techniques and elements, you can make original postcards for Victory Day with your own hands, because this day holds the stories of millions of people...
You can see the detailed process of creating various scrap cards here.
Before starting work, you need to decide what decoration elements you have available. Perhaps you have old, unused May 9 greeting cards lying around, or you have the opportunity to print out elements to decorate the card.
Strict postcard...
…Darling…
...and retro
A red star can be cut out of cardboard or felt, or a three-dimensional star can be glued together from paper and combined with other elements:
Star with leaves...
...roses...
...Ribbon of St. George...
...and other decor
Even a small wooden airplane clothespin can be used to decorate a card. Everything is very simple and original!
St. George's ribbon made of any materials (fabric, paper) in combination with clippings, floral elements, aged paper will always add brightness and symbolism to the author's postcard:
You can also use a ribbon with the colors of the Russian flag:
You can “scrape” using glue or sew elements of your story onto a postcard (using a sewing machine or by hand):
Battle maps, military documents such as the “Act of Unconditional Surrender” and others will all draw children's attention to our history when creating a holiday card:
How and from what materials to make such a postcard is clearly shown in his master class MASTER FOREVER :
You can see how to artificially age military documents or maps in the master class Ideas for creativity DIY HANDMADE CRAFTS :
Decorative elements can be anything that reminds us of the Great Patriotic War and Victory Day: camouflage fabric, stars for shoulder straps, small cartridge cases, patriotic poems, old military letters or artificially aged notes.
In his master class, Podarki.ru shows how to make a scrap card with a gift using camouflage fabric:
Images of soldiers or military equipment will very organically complement the postcard for May 9:
Or photos of war heroes, perhaps your close relatives, grandparents...
Don’t forget that May 9 is a holiday, so your postcard can be decorated with joyful moments of Victory Day
Step-by-step instructions for crafts using the origami technique (patterns for beginners)
Origami is a very popular technique. A lot of shapes are made from it, for example, for this holiday you can make a star, carnation or cap using this technique. They can be used as independent crafts, or they can be added to the overall composition. this will make it more interesting and voluminous.
Any schoolboy can make such caps.
To do this, I have selected easy instructions for you that show each step.
Often at the front they wrote letters and folded them into triangles. Let's reproduce this moment in creativity.
You can fold the paper according to this pattern.
You can make a tank using the modular origami technique. This technique is interesting because many identical modules are made, from which the entire composition is assembled.
Another idea to make a three-dimensional congratulation is to cut out a design with a stationery knife. Depending on the background color below, you will see different color schemes.
The cap can also be put on the head, as was done before.
Interesting paper ideas to congratulate WWII veterans
It has already become a tradition to congratulate our dear grandparents who fought with such triangular cards. This is a front letter.
To make it, you need to fold a sheet of paper into a triangle. On this sheet it is best to write kind words and congratulations on Victory Day to veterans of the Great Patriotic War.
Oh, how our glorious warriors at the front waited for news from family and friends. Each such letter warmed them every day and gave them strength to fight for freedom from fascist oppression.
Such leaves deliberately age and make them look unsightly. So that they certainly correspond to real letters from the front. And you can decorate the front side again with the St. George ribbon, flowers, stars or the victorious Soviet emblem.
I will show you ways to decorate news cards.
Each such letter will delight and touch the veterans. Especially from children's hands.
Here the decoration is with ribbon and dahlias.
Simple news from sheets of checkered notebooks.
Let's watch a short video about how to make an interesting craft. Good luck in your creativity!
Ideas on how to make an eternal flame for Victory Day
The eternal flame symbolizes eternal honor and memory of those who defended the Fatherland. Not all heroes are recognized; there are those who are missing. But we remember them when we come to the fire on Victory Day and lay flowers.
You can also depict it in different ways. Some people will be able to draw it, while others will like to make it out of plasticine.
Volumetric pedestals are made of cardboard and colored paper. It is better to take double-sided sheets for such crafts.
More ideas on how to reproduce this symbol.
Or simply collect all the products on one flat surface. Below I will show you how to make a 3D star.
Another option is to use corrugated cardboard for the fire, and candy molds for the carnations.
We previously discussed how to make a tank, so you can also place it near the Eternal Flame.
There can be a lot of ideas. The main attributes will be a star located horizontally and fire above it.
How to quickly make a three-dimensional star
In many of the crafts above we used the element - a star. Now it’s time to look at several options on how to make it voluminous.
Firstly, you can use the same origami technique. How to do this is shown in the diagram.
If you want to glue it to the base, as shown in this photo, then you need to make allowances.
To save your time, I provide a template. Dotted lines indicate fold locations.
To draw a star evenly, you need to draw a circle. And divide it with a compass into five equal segments.
When you connect all the ends you will have a star. Now you need to fold this blank along the dotted lines.
Do this using a ruler so that the folds are all even.
Then we bend each beam.
This is how it turns out in the end.
I offer another option on how to quickly make a three-dimensional star. Using a flat piece, you trim the edges a little and tuck them under. This creates allowances on which glue can be applied.
You can make a star in different ways; I liked another option, which is described in the video. Here we describe in detail how to correctly fold all the parts.
It is not necessary to make a voluminous craft from paper; you can make it from felt and fabric.
It will also make a very elegant and bright gift. Use satin ribbons or braid for decoration.
Installation
By making military-themed crafts for school with your own hands, you can create an entire installation from existing crafts. It is recommended to use a thin, medium-sized board as a base. Place several crafts on it, simulating some event or battle. Smoke can be added using cotton wool, distributing it evenly throughout the installation.
It’s easy to make a military-themed craft; you only need a little free time and a few materials (cardboard boxes, plasticine, paper, glue and paints).
https://youtu.be/JAqK4UEHSXQhttps://youtu.be/JUUFgcDIzXY
_