The symbol of travel has always been a ship cutting through the waves. Immersing yourself in thoughts about long voyages to new countries, you begin to feel the light touches of the sea breeze on your skin, and breathe in the fresh air of the open sea with your chest. Having trained your hand in modular art, I propose to create an origami boat; the diagram will help you make it as realistic as possible.
Here are the simplest options for beginners:
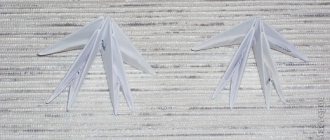
And more experienced craftsmen can create such a masterpiece:
Video: crafts from modules - ship from the author My World
1349 | 1 year. back | 10 – 00
Download the image (preview) for the video by selecting the quality
Video content called “ crafts from modules - ship ” was posted by the author of “My World” for 1 year. ago, it was already watched 349 times. The video was liked by 0 and disliked by 0 users.
Description:
crafts from modules - ship Interesting channel MODULAR ORIGAMI
This video about modeling can be viewed online, as well as downloaded absolutely free and without registration in almost any video format: mp4, x-flv, 3gpp and so on. You just need to click on the “Download” button at the top of the site and move the slider to the right. In addition, you can watch other educational videos about modeling from plasticine, salt dough, clay, etc. from the author of My World, which are also posted on our website, as well as other similar educational videos about modeling, crafts, materials, art, etc. similar. If you need a mobile version of this video, then our website has a modern responsive design and is suitable for any mobile device: tablets, smartphones, phones, and so on.
Watch also educational and developmental videos on the topic:
Clay decorations Crafts made from pine cones Halloween crafts
Don't forget to bookmark educational and educational videos for children and adults! To return to watching again.
Attention! If the slider for downloading the video does not appear, try reloading the page. As soon as the slider appears, move it to the right all the way and download the video with modeling lessons for free and without registration, in the desired format: mp4, webm, 3gpp or mp3.
Link to page with video:
HTML link to video page:
How to make a triangular module
As mentioned earlier, for production you need medium-weight paper. A4 landscape sheets are suitable. Each will be divided into 16 or 32 equal parts in the form of rectangles.
It is worth remembering that each module must be dense and even; stiffening ribs are of great importance, due to which the structure will be more stable. Modular origami assembly diagram:
- The rectangular part is first folded horizontally. Next, an even bend appears in the middle.
- The sheet is straightened and folded into two identical squares.
- Next, the sheet is straightened again, two triangles are assembled along the resulting lines, their ends should be proportional to each other.
- Smaller triangles are made from the remaining part, after which the structure is connected by placing the corners in the formed pockets.
The number of elements will depend on the figure that the master plans to make. Beginners are recommended to use ready-made diagrams, where the number of elements is indicated in detail. Everything is quite simple, first the modules are created, after which they are simply connected into a figure.
modular origami ship diagram
This is an astromech repair module. Here is another product of this phenomenon.
Copying site materials is prohibited.
Of course, you can just lay long planks, but it will look quite rough. Well, after the hull is completed, we proceed to the rigging. If the set does not include a stand, then here you can give free rein to your imagination. And these knots are simply countless!
Well, what would a sailboat be without, in fact, sails, we will make them from a bill folded in half and then into a triangle. For the stern we need two of them, bend each one in half lengthwise and one-third across.
Com if you make sure this block is a mistake. Attach this page content in your email.
Walk around the world, without a certificate of happiness there is no! This award is of a humorous nature: a dedication is read to each teacher, and his most expressive character traits are indicated in the nomination.
But all these stamens and petals are for girls. The time will come, designers will grow up and learn how to make models turn into working mechanisms. Fighter aircraft will turn into majestic fighting machines. It doesn’t matter that young designers are still using diagrams and videos, guided by which they can use origami techniques to make a fighter plane that fits in the palm of their hand.
You can give such a craft to a graduate and let this ship become a ship of good luck for him. In the fifth row, continue to expand the ship in the same places. To make a flag, insert 3 modules into each other with two corners in two pockets: 1 blue, 1 yellow, 1 blue. Give the sail a curved shape.
This must be done repeatedly, carefully, holding the entire figure with runes, but firmly enough so that the upper modules on opposite sides touch. In addition, if desired, you can additionally glue a cardboard bottom underneath. Boys will surely have fun doing this craft.
At the same time, we bend the remaining corners behind the triangle. On one side it has a pocket, which we will need during assembly. When assembling, the module is placed on the short side, as shown in the picture.
When four yellow additional modules are added in the fifth point, the red additional modules from the fourth point are not visible. Time passed and my niece needed a craft related to birds, and I remembered your swan. Will it be difficult for a beginner to do it? Already started making it!
Gently bend the finished sail. Fix the sail in a stable position between the modules on the sides of the ship, then attach the mast with the modules. For the bottom of the ship you will need approximately 138 modules. When making the bottom, try it on the ship so that it fits.
Thus, following the detailed diagram, you can assemble this ship, even if you decided to make a detailed design for the first time. So go for it! The size of the modules can be selected at your discretion and depending on the size you want to receive.
Make three rows of 47 modules each and close the chain into a ring. In those rows where 8 modules are fixed, place the outer modules on the corners of the two previous rows.
Origami ship diagram - Paper Origami
Origami ship is one of the most popular paper origami. If you don’t know how to make an origami ship, then on this page you will find everything you need to assemble this simple paper figurine.
In the first photo you can see what you will get if you follow the assembly diagram below. The second photo of the origami ship was taken by one of our site users. His ship is made of white paper, and its design is similar to those many made in school. If you have photos of the origami you collected, send them to This email address is being protected from spambots. You must have JavaScript enabled to view it.
Assembly diagram
Below is a diagram of the assembly of an origami ship from the famous Japanese origami master Fumiaki Shingu. If you strictly follow the instructions, then assembling the origami ship will not take much time, and the result will be the same as in the picture. After doing what is described in the diagram several times, you will understand how to make an origami ship quickly and without looking at the diagram.
Video master class
Assembling an origami ship may seem like a daunting task for beginners. Therefore, we advise you to enter the query “origami ship video” on the largest video hosting site on the Internet, YouTube. There you will find many different videos about an origami ship, which clearly show the steps to assemble the ship. We hope that after watching the assembly master class video, you will have no more questions about how to make an origami ship.
This video lesson will teach you how to make a slightly different paper ship:
And here is a tutorial video on how to make a simple origami ship with two pipes:
Symbolism
The ship has quite a lot of symbolic meanings. For example, one of the main meanings of a ship is hope. Previously, it was the ship that gave hope to sailors marooned on a desert island. The ship also symbolizes a transition to a better place or to other phases of existence.
origamiizbumagi.ru
Master class Crafts for boys Origami Chinese modular Ship of fortune Paper
A ship sailing with raised sails reminds us of long journeys, beautiful dreams and hopes. Let it bring a fresh wind of change to your home. So if you already have some experience with modular origami, try creating a new model. This craft will definitely be fun for boys to make. In addition, men's holiday is coming very soon.
The ship will need 1027 modules. The size of the modules depends on the desired size of the ship. Modules made of rectangles 38x60 mm (or 4x6cm) were used here. You can show your imagination in coloring - make it more strict, or, conversely, with ornaments.
simple and modular diagram and master class with photos and videos
The symbol of travel has always been a ship cutting through the waves. Immersing yourself in thoughts about long voyages to new countries, you begin to feel the light touches of the sea breeze on your skin, and breathe in the fresh air of the open sea with your chest. Having trained your hand in modular art, I propose to create an origami boat; the diagram will help you make it as realistic as possible.
Here are the simplest options for beginners:
And more experienced craftsmen can create such a masterpiece:
Where to begin?
First of all, we need to prepare the modules for the future ship. As blanks for the triangles, I used pieces of paper measuring 4x6 cm. As for the color scheme of the ship, it is left only to your discretion. In the first couple, in order not to get confused in the scheme, you can use the same colors as I did.
So, the scheme for adding blank modules:
The total number of triangular elements is 1027.
Step-by-step master class
In the modular origami ship technique, we start by building three rows of the base. In each row we should have 47 red modules:
After the rows are closed into a ring, give the figure a slightly oval shape and turn the workpiece over. Starting from the 4th row, we can gradually increase the number of modules. To do this, in 4 places of the base (on the sides of the future stern and bow of the ship), we will need to put on not 1, but 2 modules:
In the fifth row of the model we again repeat the increase in the number of triangles. Now we add 4 yellow modules to the same “corners” of the ship:
In total, at this stage of work we got 55 modules in a row.
In rows 6 and 7 of the ship we maintain the number of modules. Those. just add 55 triangles. In parallel with this, we maintain the oval shape of the ship. To do this, you need to periodically carefully bring the sides together. It is important to ensure that the figure does not “spread” in other places. Therefore, control the process and stick to the model. Please note that the shape of the ship's bow should be sharper.
The eighth row is performed similarly to the 7th row. But in the 9th row we place our modules with the short base facing outwards. Due to this arrangement of elements, the shape of the ship will have a stronger structure:
In the 10th row, on each side of the bow and stern, we place 8 triangles symmetrically. We place these elements strictly between the modules of the previous row, without putting them on the corners themselves. They need to be positioned with the pockets facing outward and the long base facing the inside of the ship. To form the bow and stern, we attach the modules in the usual way, the long base should be on the outside.
Now let's move on to the design of the stern. We insert the modules in the same way as on the sides of the ship, i.e. between the corners of the previous row. The long base should be outward.
For decoration at the stern, you can make a small side from modules of a contrasting color. To do this, you need to insert a module into every 2 adjacent triangle pockets (pocket up):
Let's move on to shaping the bow of the ship. To do this, we determine by eye the extreme point of the nose and begin the symmetrical addition of modules. In the 11th row we should have 9 elements, in the 12th - 6, and in the 13th row - only 3 corners. We continue decorating the nose with a edging of 22 contrasting modules
colors:
As a finishing touch, finishing can be done as on the stern. Show your imagination in decorating the bow of the ship:
Now we begin to form the bottom of the ship. It will require about 138 modules. If you are making a ship the same size as mine, then follow me in the day's construction. If the sizes are different, then you will have to independently calculate the number of modules so that the bottom fits your shape.
So, in the 1st row of the day we will have 3 modules, in the 2nd row - 4, and in the 3rd row - 5. We need to increase the number of modules by 1 in each subsequent row. When the number of modules reaches 8, you need to make 9 more rows without increases. Please note that in these 9 rows the number of modules should alternate: 8-7. This is necessary so that the edges of the bottom are even. In the last 6 rows you need to decrease the elements. Those. in the 17th row we should have 7 modules, in the 18th row - 6, etc. We continue until we have 1 corner left in the 22nd row. The finished bottom should look like this:
Let's move on to the most important attribute of the ship - the sail. To do this, prepare 252 modules. We start with 17 corners in the 1st row. We continue connecting the modules in the next 16 rows, alternating the number of modules: 16-17. The principle of constructing a sail is the same as that of a flag. Starting from the 12th row, we make decreases, that is, we remove 1 module from each side of the sail. We reduce to the 16th row, in which we should have 12 modules, located with the short base outward. We bend the finished sail a little, giving it a more realistic shape:
A wooden skewer 20 cm long is suitable as a mast. It is best to paste it with a strip of paper that matches the bottom of the ship. The mast must be inserted between the modules at the bottom of the ship. We ended up with this design:
Next we attach the sail to the mast. Please note that the sail must rest on the sides of the ship, so try to find a more stable position. If the structure is not very stable, then use transparent glue to fix it.
And the final stage will be the production of the flag and portholes. The flag is obtained by nesting modules inside each other:
And to make portholes, we first need to open the module, then bend the side edges back, and the upper corner forward. Open the inner pocket of the workpiece and round the edges:
We fix the portholes on board the ship:
Our ship is ready to set off on its first voyage around the world:
I hope that the master class helped you find the answer to the question: how to make an origami boat. This model is quite complex to execute, and you may have to spend a lot of time on it. But any creative activity does not take up your time, but only gives you moments of relaxation. By the way, in Eastern culture, a ship is a symbol of success and prosperity.
To simplify working with modular origami, I recommend relying on video master classes. But in the absence of one, I tried to fill my MK with detailed photos with a description of the work. I really hope that my tutorial was useful and helped you master a new level in the art of origami.
webdiana.ru