04/07/2020 Bender Rodriguez Homemade Any child can make paper tulips with their own hands. Especially when there are instructions on how to make them. This article offers easy-to-follow diagrams, templates and instructions with step-by-step photos. They are suitable for kids who are just starting to handle paper, and for older children.
A simple way to make a paper tulip for children
This master class is perfect for children aged 4 years and older.
What you need for the craft:
- colorful stickers.
Sequencing:
Thanks to the stickers, the buds are made from squares that do not need to be cut out.
- Take a sticker of any bright shade you wish. Fold diagonally. A triangle will appear, the middle of which should be conditionally marked.
- Fold the right and left sides so that the corners protrude slightly beyond the border of the triangle.
- Bend the bottom corner of the triangle and carefully hide it inside the bud. The flower is ready.
- After this you need to make a stem. Take a green sticker and fold it diagonally. Expand.
- Bend the corners of the turn towards the fold line to form a cone.
- Fold the resulting workpiece along the center fold line.
- Bend the bottom part of the part upward to form a leaf.
How to make a bouquet of tulips
This simple cute bouquet will be a great gift for mom. The master class offers diagrams and templates.
What you will need for the case:
- wooden stick;
- glue or tape;
- sheets of double-sided colored paper;
- scissors;
- sample.
The work process is step by step:
- First of all, you need to print the template using double-sided colored paper, preferably thick paper.
- If the printer does not accept the selected paper, you can print everything on regular paper, then cut it out and transfer it to colored paper.
- Next, you need to cut out the template and make cuts along the lines of the petals. You need to fold and glue it so that the end result is a tulip bud. You can glue them using glue or double-sided adhesive tape.
- Take plain yellow paper and cut out a long rectangle from it. Make cuts from frequent strips (fringe) to the middle, following the instructions in the photo below.
- The paper must be twisted and glued, wrapping the stick.
- Flatten the resulting tulip and trim it if necessary to give it the most presentable appearance.
- Insert the stick with the core into the bud.
- The yellow center also needs to be straightened, without harming the flower itself.
In the same way you need to make a bouquet by putting as many flowers in it as you like.
How to make an origami tulip: diagrams and work execution
Origami is an ancient art with which you can create original and amazingly beautiful crafts. Flowers are the most popular among beginning craftsmen. A bouquet of paper tulips made with your own hands can be a wonderful gift.
Origami tulip: diagram and implementation
A tulip is one of the simple crafts that even a beginner can do; the main thing is to strictly adhere to the work scheme below:
Take paper of any color (20x28 cm), it is important that it is thick and strong enough, otherwise the flower will disintegrate very quickly and will not have time to please with its beauty. To make a tulip as similar as possible to a real one, you need to choose natural colors.
We take the paper and form a regular triangle out of it, all excess paper needs to be cut off and put aside for a while, since it will be useful later. You should only use sharp scissors so that they cut and do not chew the paper, otherwise the tulip will look sloppy.
The resulting triangle unfolds, and then folds again, but only in the other direction. The result will be a square with equal diagonals.
To form a paper bud, you need to fold the paper again and carefully iron all the folds with your fingers so that they are as even as possible. The paper is turned over to the other side and now its central part is facing up.
The paper is folded in half and one corner is folded in the direction of the fold - a new triangle is obtained. This procedure is also performed with the second corner.
While working, you need to carefully work out the folds, as they must be very clear, without unnecessary folds. As a result, the sheet of paper looks like the one shown in the figure.
All edges of the tulip are connected and thoroughly leveled, the following figure is obtained.
The resulting triangle is rotated - the base should look up.
The upper parts of the triangle are folded so that they end up facing each other.
The figure is turned over to the other side and the procedure described in the previous step is performed.
One part turns to the right. The same actions are performed on the other side.
One side of the wing needs to be tucked into the other. You need to work very carefully and take your time so that unnecessary creases do not appear.
The same procedure is performed on the second side, then the entire part is carefully ironed. The resulting blank begins to resemble the shape of a tulip, but it will be slightly flattened.
You need to grab the edges of the workpiece with your index fingers and gently press with your thumb.
There is a small hole in the central part that you need to hit sharply - as a result, the craft inside is filled with air. For this purpose, you can also use a simple pencil.
At the end, the petals are carefully folded back to create the impression that the flower has blossomed.
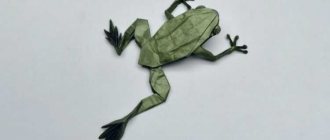
Now take a strip of previously cut paper and make a stem, which is fixed in the lower hole. The result is a beautiful paper tulip, as in the photo.
Origami tulip: diagram for children
- Take the basic shape (how to make it was described above) and form a double triangle.
- Then its sides are carefully folded up on both sides. One layer of the mold is turned over.
- The top parts fold towards the center. The same procedure is performed on the second side.
- The resulting folds are carefully inserted into each other.
- The upper corners are slightly bent, and from below you need to blow into the remaining hole to fill the bud with air.
- A stem is made from green paper.
Modular origami tulip is somewhat more complicated to make, but it will be available to you after several lessons. It’s better to start with simple and detailed master classes, in which the basics of the art of origami are presented in the most accessible way.
lucky-girl.ru
Origami tulips
The complexity of this circuit is quite low, so it is good for beginners. To introduce school-age children to the origami technique.
What you will need for work:
- colored paper;
- scissors.
Sequencing:
- The color of the paper can be whatever you want. But one of the leaves must be green - for the stem and leaves.
- The first step is to create a bud. To do this, fold the square diagonally and press the fold line well with your fingers.
- Combine the corners from the closed side to form a triangle again. Bend these adjacent sides approximately halfway in the opposite direction so that the corners are located below the border of the workpiece.
- Open the part, again obtaining a triangle. The corners must be folded inward, focusing on the fold line. The end result should look like the next picture.
- Make a couple more fold lines on each side. The first one must be bent so that the lower side forms a strip upward. And the second is the angle to this very strip.
- Fold the piece along the fold lines. It should turn out like this.
- Turn the workpiece over. The protruding corners need to be tucked in approximately halfway, reaching the fold line.
- Fold the bottom corner in the same direction and turn it over again. The bud is complete.
- Now you need to make a stem with a leaf. To do this, you need to take green paper, fold it diagonally, mark the fold line and unfold it back. Fold both sides towards the center to form another triangle.
- Place the side corner to the fold in the center. Smooth the fold line. Place the second corner on the fold above the first corner.
- Bend the second folded fragment so that the top line intersects with the adjacent one.
- Bend the figure lengthwise along the center fold line. Combine the side of the leaf with the side of the stem and smooth it.
- Turn the part the other way around. Fold one edge so that you get a completely straight line. Bend the bottom edge up so that the corner comes out even. Then expand.
All that remains is to combine the bud with the stem.
DIY paper tulips using origami technique: 4 step-by-step instructions
Origami is a very popular technique. It captivates because it allows you to create so many different crafts without using scissors and glue. It also develops fine motor skills, finger sensitivity and attentiveness.
Flowers can also be made using this technique. Moreover, they can be completely different. I have prepared 4 diagrams for you, following which you can fold a tulip.
So, for work you will need a sheet of paper. Its shape should be square.
If you are making such a craft for the first time, I advise you to take a large sheet of paper so that you can make a test version and understand the scheme.
Using double-sided sheets you can make a whole bouquet of bright flowers.
If you couldn’t figure out the diagram, even though it’s detailed, then watch the video, in which a craftswoman creates a flower. She shows each step in detail and slowly, I think you will definitely succeed.
Now let's move on to easier options. For example, a panel made of such paper tulips looks very spring-like.
They are made very simply. Therefore, immediately prepare squares of the desired colors with sides of 3 centimeters.
Another simple option for younger children. Under the supervision of their parents, they will definitely be able to repeat this simple scheme. A flower made according to this pattern looks good in applications where cardboard is used as a basis.
The fourth diagram is provided so that you can make this kind of craft.
Paper tulips are voluminous and look unusual.
For good fixation, use glue. Of course, you can do without it, but we want to attach our buds to the surface. Therefore, I advise you to glue both ends. Also, if the ends hold well, the convex front side will not dangle.
I would like to introduce you to the technique of modular origami. Its meaning is that first many identical parts are made according to the same pattern, and then they are inserted into each other, creating the necessary shape.
This type of origami is not for everyone, because it involves painstaking small work. But I know that some masters create entire paintings using this technique.
Volumetric tulip
This is another version of the tulip, made using the Japanese origami technique.
What you will need for work:
- glue;
- scissors;
- colored paper.
What do we have to do:
- Production must begin with a bud. Take a rectangular sheet of paper, fold it diagonally and cut off the excess.
- Fold the square diagonally again so that the fold lines intersect. It should look like a pyramid.
- Now two parallel triangles need to be bent inward so that a triangular “toad” is obtained.
- Fold the two bottom sides to the top corner of the triangle. You will get a rhombus. The same thing needs to be done with the second side.
- The diamond needs to be “flipped over”. The result should be the same rhombus, but smooth, without joints.
- The corners of the workpiece must be carefully bent towards the center fold line, slightly overlapping. Do the same on the other side.
- Then, on both sides, one corner must be tucked into the other.
- Cut off the bottom corner and inflate the bud through the resulting hole.
- Next, bend the four resulting petals. Everything needs to be done carefully and slowly, so as not to accidentally tear the paper.
- The stem is very easy to make - just roll a sheet of green paper into a tube and glue it together. Then cut out long leaves and glue them to the stem.
Now all that remains is to carefully insert the stem into the hole in the bud, and the flower is ready.
Classic 3D model
This is exactly the kind of beautiful three-dimensional origami tulip that many people made in their childhood. Following the step-by-step instructions with photos, it will be quite easy to assemble it today. You will need two square sheets of paper 15x15 cm, one of any bright (tulip) shade, the other green.
Assembly algorithm:
Fold the square sheet in half lengthwise and transversely. We open the workpiece. Turn it over to the reverse side. Now we fold the square along two diagonals and open it again. We bend the workpiece from top to bottom, while we “hide” the side corners inward, bringing them towards the center. We get the “water bomb” figure.
Fold the right and left corners to the top point of the triangle. Turn the workpiece over to the reverse side. We repeat point 5. We see the result in the photo.
We “flip” the right side to the left, like a book. We turn the model over. Again we “close” it from right to left. We fold the right side of the top layer towards the center line and move it slightly beyond it.
We do the same with the left side. We insert one formed valve into the other. Repeat steps 12 – 14 on the reverse side. We bend the triangle at the bottom up and return it to its original position.
We turn the model over. We grab the “pockets” at the bottom and pull them in different directions, while simultaneously blowing air into the hole in the center of the model. The flower acquires volume and a characteristic shape. We bend the upper petals down and twist them a little. For example, using scissors. The tulgan is ready, now it needs to make a stem and leaves.
For greenery you will need another 15x15 cm square.
We place it with the wrong side up, with an angle towards us. And make a diagonal fold. Then we bend it towards the center of the sidewall, getting a “kite”. Its open part should “look” down. We bend the outer corners of the workpiece again towards the center line, as shown in the figure. Now we fold the left and right edges of the workpiece towards the middle. We combine the lower point with the upper one.
Fold the resulting workpiece in half “valley”. We push both parts apart, separating the leaf and stem. All that remains is to combine the greenery with the flower.
One flower is good, but the bouquet looks much more impressive. Step-by-step video instructions for assembling a composition from origami tulips:
Postcard with tulip
A beautiful homemade card is the best thing a child can give as a gift. A postcard with a flower and pleasant wishes will definitely lift your spirits both on a holiday and on an ordinary day.
What you will need:
- double-sided colored cardboard;
- double-sided colored and white paper;
- pencil;
- glue;
- scissors.
How to make a postcard:
- For the base of the postcard, you can take thick colored paper, but for reliability it is better to use cardboard.
- Fold the card base in half, draw half a heart at the fold and cut it out.
- In the same way, cut out a smaller heart from white paper. Then paste it into the colored one.
- Cut out a small thin rectangle from green paper and a couple of drops - these will be the stem and leaves of the tulip. Glue the stem in the center of the white heart, closer to the bottom. Next glue the leaves.
- The bud should have three petals. It’s easy to make a template - using the same pattern as the hearts. It is important to have symmetry.
- The remaining buds can be cut out by simply tracing the template with a pencil.
- Bend each bud in half. Glue them together with a “book”.
- Glue half of the tulip onto the card in the center. Then coat the other half of the flower with glue, close the card and press well.
Unfolding the heart again, you can see that the applique is voluminous.
Corrugated paper tulips
These paper flowers are sure to lift your spirits. After all, a bouquet made of corrugated paper looks very realistic, and can serve as a room decoration for a very long time.
What you will need:
- corrugated paper;
- wooden stick;
- glue;
- scissors;
- thread;
- foil.
What to do:
- Roll a small ball out of foil and pierce it with a stick. To be secure, add a little glue to the puncture and place the ball on the stick.
- Cut a strip of paper 12x4 cm. Twist it in the middle one turn, wrap it around a ball of foil, and wrap the ends of the paper with thread.
- Cut 6 strips 4x7 cm. Fold each in half lengthwise. Use scissors to shape them into petals. Stretch the sides a little to make them more rounded.
- The flower leaf is made from green paper. It can be made in any size. Fold the strip in half lengthwise, sharpen the end and smooth out the corners.
- Cut a small strip of green paper about a centimeter wide and stretch it a little.
- Glue the petals one at a time under the ball, hiding the thread. It is better to glue with an overlap. After the glue has set, it is better to cut off the protruding ends.
- Cover the base of the bud with a green stripe. Then cover the stick with green paper and glue the leaf.
You can also watch the video.
Applique with tulip
One of the best ideas that will definitely arouse the interest of kids.
What do you need:
- colored paper (preferably double-sided);
- colour pencils;
- glue.
How to make an application quickly and easily:
- Fold the paper diagonally to form a triangle.
- Fold the left corner at the base up and to the left of the center. Do the same with the right corner.
- Turn the workpiece over. Bend the side and bottom corners slightly. This will make the flower more rounded.
- You can draw stems and leaves on the base sheet, or you can cut them out of green paper and glue them on.
- Attach the buds to the stems, applying glue not only to the inside, but also to the bent corners.
Kindergarten teachers should take note.
Origami tulip and diagrams in a detailed photo-video master class
The content of the article:
The technique of creating three-dimensional paper figures has been known for a very long time. Origami appeared in ancient China, and has now become popular again around the world. Both beginning craftswomen and experienced needlewomen can make various animals, bouquets or crafts. It all depends on your imagination and skill level.
Today we will make a beautiful origami flower “Tulip” using the example of two master classes that differ in execution technique and level of difficulty.
Making a classic tulip using origami technique
In this master class we will look at a classic paper tulip using the origami technique. This spring flower is always associated with the holiday of March 8, so it will be a wonderful gift. This option is quite simple, so it is suitable for beginner needlewomen or children.
At the end of the work, we will get such a beautiful origami tulip, as in the photo:
You can create as many tulips as you like using the example of one, which we will analyze in detail in the work. We don't need glue, just colored paper (one sheet in the shape of a square, preferably double-sided) and a stick or rolled green paper for the stem.
Step-by-step description of the work:
- In order for us to get a real flower, we need to collect the bud correctly. To do this, bend the sheet in half horizontally and unbend it. Then we do the same thing vertically. Thus, we outlined two lines.
- Next, you need to fold the sheet in the same way only in the direction of the diagonals. To make the origami tulip neat, control the connection of the corners when folding.
- Following the assembly diagram, we fold the upper and lower middles at the same time, and set the side parts inward. As a result, we get a module in the form of a triangle with pockets, as in the photo:
- Now we fold the corners of the top layer of the paper triangle towards the top:
- We turn the workpiece over and do the same on the other side, you get a rhombus with a cut in the middle.
- We bend the right side of the diamond to the left side. Turn over and repeat the steps on the other side. So, we have a rhombus, but with a fold in the center.
- Next we will make folds using the top layer. First, we bend the left corner down so that it extends slightly beyond the center line. We do the same with the right corner.
- Now you need to open the right corner and tuck the left one in there, as in the picture:
- Now we need to do the same on the other side of the workpiece.
- We are close to finishing our origami paper tulip. We just have to bend four petals.
- Find a small hole at the bottom of the tulip and inflate the flower. Having given it volume, our bud is ready. All that remains is to fasten the leg, and the work is ready.
Now you can make such beautiful paper tulips yourself. Collect them in a bouquet or give them separately, in any case, it will be a wonderful homemade gift for March 8th.
Video accompaniment to the photo master class
https://youtu.be/KO_KV0psjPYhttps://youtu.be/rUfn8o1XTk8
_
Assembling modular 3D tulips
In this MK we will look at how to make a tulip out of paper using modules. The work will turn out to be more voluminous, it is a little more complicated, but if you follow the assembly diagram, even a novice needlewoman can handle it. As a result, we will get a wonderful origami tulip as in the photo:
To work, you will only need 120 rectangles of double-sided paper to make triangular modules. To do this, cut the A4 sheet into 32 identical pieces.
Step-by-step instructions for work:
- First, make modules or you can assemble them as you go. A simple triangular blank is used, which is made according to the following template:
- Next, we will assemble each row step by step. In the first and second, you assemble 15 modules into a ring. It will look like in the photo:
- We do the third and fourth rows in the same way. Then we turn the workpiece with the short side of the modules outward. And we collect the fifth and sixth rows of 15 pieces each.
- Next, we need to narrow our bud. Therefore, we assemble the seventh row according to the instructions: 4 modules, then skip 1, 4 more and skip again, and repeat this again.
- We assemble the eighth row as follows: 3 modules – skip – 3 modules – skip – 3 modules. In the ninth row we do the same, but 2 modules each, in the tenth row one at a time. As a result, we get three petals of our paper tulip:
For the stem, a wooden skewer wrapped in green corrugated cardboard works best.
And we simply cut out the leaf in any shape according to our invented idea. According to this plan, you can make several multi-colored origami tulips for March 8th, it will turn out like in the picture: You can create as you want, experimenting with the colors of the modules, the sizes of the petals, or use other templates, in any case, a homemade paper gift will be the best for March 8th.
If you have any questions during the creative process, you can additionally watch a video on creating modules or flowers for the holiday.
Video on the topic: “Modular tulip using origami technique”
We looked at how to create an origami tulip simply from paper or assemble it from modules. You can use any colors, but it is better that the paper is double-sided. If you follow all the recommendations, the work will not seem difficult and is suitable for beginner needlewomen.
A selection of diagrams for assembling a tulip
vishivashka.ru