Varieties of frog models
There are several types of origami crafts, and the patterns for folding frogs are very different. Novice paper creators can create:
- classical;
- jumping;
- frog princess.
Any option will perfectly complement the interior of the room or become an interesting children's toy. From the presented models, you can choose the most suitable type of paper figurine.
diagram for children and video
Origami is an excellent exercise for children’s motor skills and thinking. Kindergartens and schools practice folding paper figures. Speech therapists and psychotherapists advise parents to teach their children the art of origami, which helps children with speech development problems eliminate their defect. In addition, paper figures can jump, fly, and move their limbs, which will amuse kids. To understand how to make crafts, watch the video about an origami paper frog in our article.
Paper frogs can be either simple folds or more complex. Start building figurines of these animals with your child with a simple layout.
The simplest option
- Fold the square sheet diagonally and straighten it.
- Fold the sides towards the center and align along the diagonal fold line.
- Also align the sides of the opposite corner along the diagonal line.
- Turn the corners out as shown in step 5.
- Tuck the obliquely elongated corners.
- Tuck the tail three times.
- Bend the workpiece in half and turn it up at the obtuse angle of the triangle.
- Fold the right corner inward as shown in step 9.
- Fold the corner back and make the frog's face blunt. Fold the corners of the muzzle so that it is more rounded. Fold the legs and the frog is ready.
Such a figurine can be placed on a child’s desk so that he can admire his work. And a video tutorial to help you:
There is also a jumping frog made of paper using the origami technique - more about it below.
jumping frog
This product will be able to jump when performing certain manipulations:
- Take a square shaped sheet. Fold in half horizontally.
- Straighten the square and fold it vertically.
- On the upper half it is necessary to make bends: diagonal, bending the upper corners in turn, and horizontal.
- Using the folds you made, bend the top of the workpiece to form a triangle.
- Bend the bottom of the product in half and straighten it out.
- Fold in the sides. It will turn out to be a mushroom.
- Fold the bottom up, then straighten it.
- Pull the inner layer and pull out the corners. Pull and fold as shown in step 10, 11.
- Fold the top and bottom corners as shown in the diagram.
- Fold the workpiece. Fold down half of the folded side.
- Turn it over and you can admire your work. By pressing on the back with your finger, then quickly releasing it, you can make the frog jump.
First, learn for yourself how to make an origami paper frog for kids, and then do the folding with your child. It will be interesting for him to watch how the frog jumps from his finger. Watch the video for more details.
Stages of creation
A colored rectangular sheet is marked with a ruler and pencil to create an even square.
A drawn blank for the future frog is cut out of paper. The piece of paper is folded diagonally so that a line runs from each corner. Next, the sheet is straightened.
The side fold lines are aligned to the center and folded to one of the diagonals. After which you get a triangle with 2 compartments. This creates a croaking frog on which you can draw a face.
We recommend reading:
Modular origami vases - a simple DIY assembly diagram. Step-by-step instructions for beginners + 125 photos of the best ideasOrigami fish: step-by-step instructions for creating a fish using the origami technique. Many photos of finished works, diagrams, master class, video
Origami rose - instructions on how to make a beautiful rose with your own hands. The best schemes for beginners to create and assemble (photo + video)
Cheerful orange option
Let's try to make another frog from a rectangular sheet of paper. In this example, it is a cheerful orange color.
Cut out a rectangle 10 by 20 cm. Fold it in half to see the middle. Next, bend the corners towards this middle to make 2 triangles. This is where we outline the fold lines. Let's straighten the sheet again and bend the sides towards the middle.
This is what the blank came out like.
Next, our workpiece needs to be folded along the intended fold lines to form a diamond.
Let's bend all the corners towards the middle.
And then you need to bend them in the opposite direction again.
Related article: Beading: necklace patterns for beginners with photos and videos
Let's turn the future frog over and bend the corners again on all sides, as in the pictures.
We will bend the bottom corner towards the middle and insert the corners that were folded earlier into it.
The final step is to make a fold on the finished frog for its jumping. On the reverse side you can bend the corners to create paws.
And another fun toy is ready!
Doing crafts together with your child trains fine motor skills and arouses great interest among children of different ages. A 6-7 year old child can easily make such a frog himself; you just need to help him read the instructions.
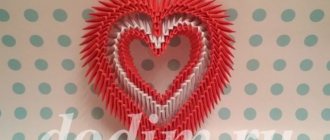
Princess Frog
A voluminous paper toy is made using a different technique. The frog is made from modules and looks beautiful. To make this craft you need 350 green and 95 white blocks.
An A4 sheet of paper allows you to create approximately 30 such modules. Then the entire set is assembled into a figurine using regular glue.
How to make a frog out of paper: 41 DIY ideas
I am very interested in creativity together with my child.
We have already tried so many things: we made crafts from cotton pads, from buttons and made paper flowers. But there are so many ideas, you can’t implement everything. So, at one time my child was interested in rockets, I didn’t think that a girl could be interested in this. They occupied it for about a month, and then smoothly gave way to croaking amphibians (I don’t know why, don’t ask). Naturally, I had a question about how to make a frog out of paper, as from the most affordable and budget material.
So I started looking for all kinds of ideas and now I want to share this selection with you.
Let's start simple
Take a square sheet of paper.
As practice shows, in order to make a very high jumping frog, you need to make it as small as possible and from thick paper.
You need to fold the sheet vertically and make bends at the top on both sides.
Fold the paper into a triangle along the resulting fold lines.
Now let's make the frog's legs. To do this, you need to fold the side corners diagonally.
We bend the lower part of the future frog in half.
Now you need to bend the sides towards the middle.
Fold the bottom part in half again.
Bend the corners from the bottom into a boat shape.
Then these corners need to be pulled down.
Let's bend the corners diagonally to make the hind legs.
Next, fold the toy in half to make the body.
The next step is to bend the bottom part down.
Let's turn the product over. The frog is almost ready.
For a more lively image, you can glue or draw eyes on the frog with a felt-tip pen.
Related article: Sofa cushions. Photos - ideas for creativity
Now we try to click on the frog so that it jumps. Press your finger on the lower part of the body.
The frog is ready!
And the following diagram shows the entire process of making such a frog.