Origami is an ancient Japanese arts and crafts art of folding various paper figures. Initially, origami figures were intended for religious rituals, but today they have become part of the Japanese cultural tradition and simply a fascinating activity.
Origami develops imagination, perseverance, memory and attention to detail. If you want to master origami, start with the simplest figures, for example, a dove. You can fold a paper dove in different ways, but to do this you need to get acquainted with the basics of origami.
Conventions and origami techniques
Even if we are making such a simple figure as an origami dove, we need to know the basic symbols and techniques of this technique. This will make it easier to understand a drawing like a diagram. It should be added that in such a simple origami as ours, simple patterns are used, the number of folds is small, it is permissible not to strictly observe symmetry and it is not necessary to have too smooth edges. But if there is more than one paper dove, your origami figures will all be different, unlike one another. So, here are the basic notations and techniques of origami technique:
More origami techniques: this will help you understand how origami folds and opens:
Origami rules
Since we are making a dove with our own hands in classic origami, it must be said that the classic option is to use only square sheets of paper. The paper does not have to be white, it can be any color, but only plain. In the classics, gluing and cutting during work is not allowed. Origami is a very ancient creativity, and over time, new techniques began to appear, such as wet folding, modular origami, and pattern folding. Basic rules for simple DIY origami:
- Prepare several square sheets of paper at once so you don’t get distracted in case you ruin the first sheet.
- Learn the alphabet of symbols, it is important when reading diagrams.
- The most convenient way to do origami with your own hands is on a smooth and stable table surface.
- Fix the folds with your fingernail - then all subsequent work will be neater and more beautiful.
- Stick to the plan strictly.
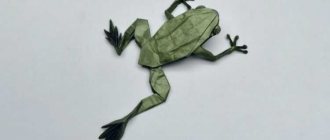
Dove of Peace (step by step)
This is the kind of beautiful dove we should make, made with our own hands. We hope that our master class will be useful not only for children, but also for adults.
We will make origami according to this scheme. Unfortunately, we did not find exactly the diagram we needed, so it corresponds to the master class only starting with picture number 3:
For the craft, take a square sheet of plain paper, 20/20 centimeters in size.
We bend the square diagonally, we get a triangle.
And fold it in half again and press the cut with your fingernail. We combine all the corners clearly.
We open the last addition of the triangle back - we only need a line. We take our large triangle again, apply the lower side (base) of the triangle to the top point of the triangle. Smooth it with your fingernail.
We do the same on the left: we wrap the bottom side to the top point.
The result is this figure. With our right hand we take the upper corner and bend it down. We run it with our fingernail and return it to its place. We need a fold.
We do the same with the left side: we bend it, fix the fold and return it to its place. Bend the right corner towards the center of the figure.
Next, we also bend the left corner towards the center. We get a figure as in the diagram, figure number 3. Then we must bend the corners inward, as in figures 4 and 5.
Next, bend the workpiece in half, as in picture number 6. Take it by the tail and bend it upward, as in picture number 7. Turn it over to the other side, and do the same on the other side. These will be the wings of our origami dove.
We turn the workpiece over with its wings down, bend the tail, as in Figure 8. Then bend the wings up again, as in Figure 9.
Next, we shape the head: we turn the tip of the workpiece from right to left, open the head and press it with our fingers to make it more voluminous.
We make folds on the tail and wings with our own hands for beauty. So our pigeon is ready.
The video shows the design of the tail in detail:
DIY origami dove of peace made from paper Dove of Peace Paper
options and ideas for where to use crafts, do-it-yourself paper dove template
Are you trying to find new ideas for interesting things to do with your child? Paper crafts can be done together with your child if you choose an easy method of work. Make unusual jewelry. Teach your kids a new skill. This is a necessary, wonderful and exciting chance to spend time. So, how to make a dove out of paper?
Main types of application “Dove”
This paper craft can be made in different ways: from a pasted flat design. With large parts created by folding and gluing auxiliary elements (tail, wings). Made from a material with a textured surface made from napkins. From details in quilling technology. As you have already noticed, there is far more than one method for creating a product. Even small children can handle the first one if you give them a cut out template. The last method is suitable for an older child or for working together with parents.
Using paper birds
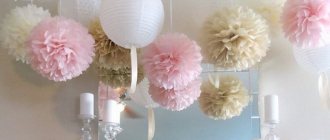
If you approach your work with joy and a good mood, you will get a rather interesting “Dove” paper applique. You can make a postcard yourself, a beautiful panel to decorate your apartment, or decorate a simple box using this idea. What holidays should you make this beautiful bird for:
- The theme may be suitable both for decorating congratulations for Defender of the Fatherland Day and, for example, for Mother’s Day.
- The bird, as an addition to a bouquet of roses, may also appear on a postcard for the lovely holiday of the Eighth of March.
- At home, you can give your child this type of work to create a present for someone in the family or for your friends for a wedding.
These paper birds symbolize peace, goodness and love - they can decorate any celebration.
Materials and accessories
Before work, you should always be well prepared. To create a beautiful bird, you need to take the following:
- White paper.
- Napkins.
- Pencil and eraser.
- Sharp scissors.
- Glue gun.
- Sample.
To work in quilling technology, you will need to take strips about five mm wide, as well as a device for twisting them. For this task, you can take a knitting needle, a toothpick or something similar. It turns out that there is nothing difficult, so you can safely entrust the work to your child. All you need to do is find templates - make an outline or print a picture.
We also recommend reading:
Simple option
Now it will be disassembled, a master class on creating a simple dove. The easiest way to create a bird can be created in the following way : Take a piece of white or multi-colored cardboard or paper as a base (background).
Leave it flat or try folding it into a fold-out card. Prepare bird templates made from white cardboard using any method. Glue the birds onto the base.
Draw or glue beautiful eyes and beak, you can also glue part of the wings or tail on top. It is good to decorate such a craft with ordinary flowers, an image of the earth, children's palms or people holding hands.
For an older child, you can make the work more difficult: Take napkins and tear them into small pieces. The smaller the pieces, the more interesting the applique will be. Place all the material in a plate or other similar container and pour in some water. When the napkins are wet, wring out the unnecessary material and add simple glue to the material. Glue the paper products onto the dove template you cut out earlier.
After drying, the surface of the product will become textured and slightly voluminous. Thus, you can even create something similar to a relief, demonstrating the shape of the wings. Using this principle, it’s easy to work with crumpled material.
Volumetric pigeon
To make such a bird, use one of the methods shown below.
Method #1 starts with the following steps: Take a dove template. Make different squares from white napkins (choose the size yourself so that they fit the size of the dove). Twist the made parts into cone-shaped bags. To do this, you can use a simple pencil. Dip the thin parts of the product in glue so that the napkin does not get wet, and glue it to the surface of the product. After completing all the steps, you will have a bird with very cute openwork plumage.
Method No. 2 is to prepare or make with your own hands the desired bird template, from which you can make the entire shape, and then, using the folds of the elements, make a three-dimensional bird.
The surface of such a craft can easily be decorated using any of the methods discussed above. To make a more lively craft, make individual feather elements in the form of scales from paper. Stick them all over the product. The elements may be larger on the wing, but smaller on the sternum and body. This option, of course, is quite difficult, but older children can cope with it.
Cardboard bird applique is made in various ways. Choose the right method based on the age of the children and their ability to work with crafts. Do different jobs with the guys and teach them something new.
Templates for work
To quickly make a dove out of paper, cutting templates will be very useful. The first image below shows the easiest version of the bird design. This craft is perfect for children's entertainment with the smallest kids. The shape here is light, and it will not be difficult to fill it with a mass of material.
The second picture shows a paper dove, a three-dimensional template. You can work with the second template both to create children's leisure activities and to decorate a wedding celebration. Children can cut out auxiliary parts that will repeat the shape of the wing and tail. The parts glued with an auxiliary layer will give the effect of relief to the craft. Many people wonder how to properly make a paper dove with their own hands. Patterns and the silhouette of a bird help in creating any craft and simplify the work.
handmeid.guru
Stencils and templates
Such stencils and templates with the image of a dove will be useful to you for cards, crafts, holiday table decorations, and so on. Many homemade templates and stencils are suitable for cutting out and then painting with paints. It is better to make stencils and templates not on thin paper, but on cardboard - this way it is more convenient to work with them.
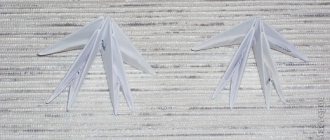
Volumetric pigeons for graduation
Paper silhouettes of birds are suitable for all kinds of designs, for example, the body of a dove can be flat, and the tail and wings can be made embossed or voluminous, using the same napkins or any other material. As a result, you will get a very original craft.
Volumetric dove using a template
- Take the proposed template, print it on thick paper or cardboard and cut out all the details - wings, body with head and tail, and crest of the bird.
- Carefully cut along the dotted lines the parts of the tail and wings.
- Then use scissors to make feathers for the pigeon from both edges.
- Bend the main element - the body of the bird along the dotted line, then take glue to glue its head, glue the wings and crest, and then beautifully straighten the figure.
- To hang a dove, you will need to stretch a thread or thin rope between the wings. Make a lot of these doves and you will have a real themed composition.
INTERESTING: DIY scrapbooking album for a baby