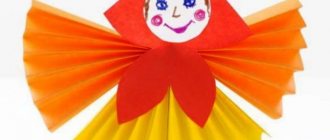
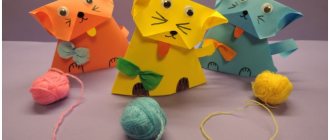
Paper butterfly
The butterfly is a bright companion of summer, a symbol of beauty and lightness. Each butterfly is unique and inimitable in its own way. Nature has tried to celebrate each winged beauty with bright colors and patterns. These beautiful insects decorate flower lawns, and in today's lesson we will try to decorate a room with a butterfly, which we will make with our own hands from paper. Making paper crafts helps children develop attentiveness, accuracy, perseverance and imagination. And what a surprise the baby will experience as he watches how an ordinary leaf turns into an amazing creature before his eyes!
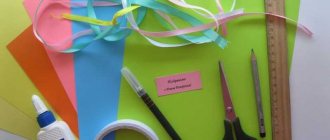
In order to make a paper butterfly we will need:
- Paper;
- Scissors;
- Paints;
- Fantasy and great mood.
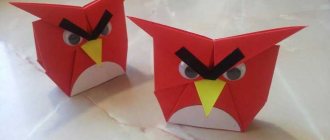
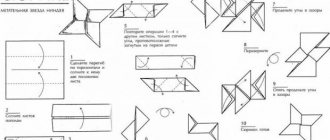
For this craft, a regular landscape piece of paper will do, but first you need to make it square. To do this, bend the upper left corner diagonally, and cut off the remaining section of paper with scissors. We have a square with one diagonal fold. You need to make another diagonal fold on the other side. To do this, bend the upper right and lower left corners.
Next, bend the upper right corner outward towards the lower right. We do the same on the left side. As a result, we will get a double triangular figure.
We bend the lower ends of the resulting triangle upward. Then we turn the figure over with the wide side up and bend the top of the triangle so that its tip extends slightly beyond the edges.
We wrap the protruding end. Fold the future butterfly in half a little.
The butterfly figurine is ready, but for now it is white and inconspicuous. Therefore, it’s the children’s turn to show their imagination and decorate the butterfly to their own taste, using watercolor paint or felt-tip pens. The drawing can be the most unimaginable: from flowers, as in our example, to complex geometric patterns, the main thing is that the child enjoys the creative process. If desired, you can make a few more butterflies, allowing your child to make crafts without your help.
Photos of cardboard crafts
Read here - Crafts from pompoms: a master class on creating original jewelry and products with your own hands (95 photos)
Did you like the article?
0
A boat made of colored paper
Of course, each of us loves when he succeeds at something. And especially, it was made by hand. And you do it simply for yourself, for the soul, without even thinking about the specific benefit. Although she will still be there. Crafts are a great way to show yourself that this activity is interesting and brings a lot of benefits. Especially when there are no costs and you can make something beautiful from scrap materials. And for children it’s a great joy to make something on their own, even if it’s not interesting to an adult, but to do it. And the task of every parent is to support their child, to praise him for what he himself was able to create. And also help, suggest and in no case scold if what you plan doesn’t work out. By doing such work, the child tries to understand the world himself, with the help of his imagination. He remembers everything he has ever seen and tries to reflect it in his products. For lovers of marine themes, we have prepared a lesson on how to make a simple boat. Feel like a real captain of the most beautiful ship, and even made with soul and love. All we need is:
- empty matchboxes;
- colored cardboard and colored paper;
- scissors;
- glue;
- tube
Let's take matchboxes and stack them so that two are lying next to each other, and the third is on top of them. To give the boat the desired appearance and the advertising inscriptions on the boxes do not spoil the future product, cover the craft with plain paper, as shown in the picture.
After this we will make the stern of our ship. Cut out the base from cardboard, and use two strips to build the bow of our ship. Then, we will use a tube to build sails. Take a rectangular piece of cardboard and attach it to the tube as shown below. Let's complete the image with a small red flag at the end of the tube.
All that remains is to decorate the craft on the side so that the matchboxes are not visible. If you have small lego toys, they can take their place proudly on our beautiful deck.
Our boat is ready, it's time to hit the road!
Zoo
It's amazing how many different things you can come up with from 1 piece of cardboard! Or bushings, which in most cases go into the trash bin after using the items screwed onto them. It will be interesting for children to make their own zoo with many animals and then play with it.
There are many photos and videos posted on the Internet with original thoughts. Elements made from colored leaves are glued onto a cylinder of the required length: muzzles, paws, tails, eyes, noses, and so on.
Before collecting the animal, the roll is coated with paint: blue, yellow, green, or not, at the discretion of the master.
Russian oven made of paper
The stove was the main attribute in the house: it heated the house, food was cooked in it, and it was given a special place. Therefore, the stove is always associated with satiety, warmth and comfort. In many Russian fairy tales we come across a Russian stove. Let’s remember Emelya, the fairy tale “Geese-Swans”, Baba Yaga. The stove is also found in ancient proverbs and sayings. And if a child is asked to make a product - a Russian stove, then this is not a problem at all. A real stove is built from brick, but we propose to create it from cardboard. A child can easily cope with this. A small Russian oven made of paper turns out to be very realistic.
For everything to work, you need to take:
- a small package left over from toothpaste;
- colored paper (white, orange and black);
- a little cotton wool;
- black marker;
- scissors;
- glue.
1. First, cut the toothpaste package into two halves, make one larger and the other smaller.
2. The larger one will stand vertically; we will attach the smaller half to the larger one horizontally.
3. Secure the structure of the craft with glue.
4. After it dries a little, cover it with white paper, simulating whitewashing.
5. Prepare a pipe for the stove; to do this, cut out a strip of cardboard, bend it to form a small pipe, and glue it to the base.
6. You need to cut out a small rectangular sheet of white paper. Prepare a firebox from black paper; an orange stripe will frame the firebox.
7. Carefully glue it all onto a white sheet. We wait until the glue dries.
8. Glue it to the oven in the appropriate place. Now we have a stove with a firebox!
9. The pipe must be covered with orange paper.
10. For naturalness, draw small bricks on the pipe with a black marker and insert a small piece of cotton wool into the pipe, straighten it, depicting smoke. For strength, so that it does not fall out, it is better to glue the cotton wool to the inside of the pipe.
Here's a Russian oven made from paper! I already want to warm my sides on it and remember my childhood, village, grandmother. The advantage of a paper stove is that it is small, light and does not take up half the house, but gives a touch of comfort and warmth.
Chicken made from disk and paper
How nice it is to receive gifts made by our loved ones and relatives. Moreover, do them yourself, including imagination and creativity. With our own hands, from available materials, we can prepare a wide variety of crafts and toys. This is a very exciting activity. And if you make crafts with your family members or friends, then you will definitely get a lot of pleasure from communication and the result of joint work. Today we will try to make a chicken from a disk and colored cardboard. It will not be bulky, and therefore it can be hung above the table or even on the Christmas tree in the New Year. Let's start!
For our toy we will need:
1. Old music or video disc,
- colored cardboard, we will need four colors - blue, white, yellow, red;
- scissors;
- pencil;
- glue;
- a small skein of yellow or beige wool threads.
2. The first thing we’ll start with is to cut the threads finely and more. They will replace the chick's feathers for us.
3. Then, coat the disk well with glue and sprinkle it thickly with threads. After the disc has dried, shake it to remove any remaining hair.
4. Cut out oval eyes from cardboard paper - they will be white and blue. Let the beak and paws be red. And we’ll make the wings yellow. Oh, and don't forget the comb. Our chicken may be small, but he already has a comb. You can see every step in the photo.
The job is done, our chicken is ready. You can hang it on a string, as we said earlier. Ask dad to make a hole in the disk, stretch the thread and that’s it. The craft turned out to be unusual and joyful. The chick seems to be taking off, wanting to see what’s happening up there! Or maybe he wants to see where his friends are?
Similar to this craft, we can make a mother chicken or father rooster. And if you fantasize, then a bunny, a pig, a hedgehog, a bear cub, and other cartoon characters, for example. Moreover, we did not spend a lot of time and money on this activity. All that remains is to find a place for her. Or maybe we can give our chick as a gift to someone?
Paper ball
The creative process of creating various crafts and designs from paper will captivate both adults and children. After reading the instructions below, anyone can assemble a figure in the form of a beautiful multi-colored paper ball.
Colored paper (two colors that can contrast with each other, but without disturbing the harmonious combination, for example, blue and purple).
Quantity: for each of the eight modules (circles) that make up the final shape of the craft, you need five parts (if you plan to make the ball not large, you can cut out 2-3 such parts from one sheet of colored paper approximately the size of A4).
Total:
- 24 blue parts and 16 purple parts or equally divided - twenty parts of each color;
- Pencil;
- Ruler (to draw the sides of the cardboard template);
- A piece of cardboard (its size will depend on how large the wonderful paper ball shape is needed;
- A beautiful rope (not thick - with its help a finished three-dimensional figure can be attached to almost any place in the interior to decorate it);
- Scissors (preferably with sharp tips, especially if the figure is small, otherwise cutting will be difficult).
At the first stage of the creative process, you need to draw a sketch on cardboard with a pencil, according to which all the details for the ball figure will soon be cut out. It should be noted that the side parts of the depicted figure should be straight (use a ruler for accuracy), and the top and bottom should also be completely identical.
Both parts of the template figure look like a chef’s hat or a cake with cream, but the main thing is that the edges of the upper and lower parts, respectively, should form convenient “ears” for subsequent coupling into a three-dimensional figure. After completing the sketch, the pencil must be put aside, now it is time to carefully cut out the template figure from cardboard along the contour.
You need to take colored paper and draw the required number of figures and cut them out.
Next, you need to interlock the cut out figures so that they alternate in color, with each subsequent figure turning approximately ninety degrees from the previous one so that with its narrow side it can be inserted into the grooves of the long side of the previous part. Thus, you need to link five such parts into one circle.
If two purple and three blue parts were used to construct the circle, now you need to connect the two purple parts together (provided that the order rule was followed).
All modules are connected so that in each recess there are five “roundings”, that is, places where parts are connected.
Card for mom
The most memorable and expensive gift is a gift made with your own hands. An original postcard will be an excellent gift for your mother, grandmother or sister, because in addition to a handmade postcard, you are giving a part of your soul; according to the belief of many peoples, we put a piece of our soul into every thing we create. And this is the most valuable thing!
And so let's start, for the craft we will need the following materials:
- Glue, preferably paper;
- Colored paper;
- Scissors;
- Marker;
- Unnecessary magazines with pretty pictures.
We make a postcard blank from cardboard, draw a pattern in the form of semicircles along the edges of our postcard. You can come up with another ornament, show your imagination.
Carefully cut out our blank along the lines.
On our blank, glue a sheet of colored paper, distribute the glue carefully so that the colored paper adheres well to the cardboard.
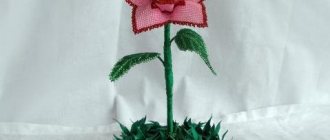
It is necessary to make preparations of daisies. We cut out two small circles from white cardboard - these will be the petals of our future chamomile, and from yellow cardboard we need to cut out two circles of smaller diameter for the middle of our flower.
We collect our daisies and glue the yellow center of the daisy to our white petals. In this way we collect four flowers.
Now for our daisies, we need to make stems. We will make them as follows: on a sheet of cardboard, green, draw lines at a distance of 2-4 centimeters, we have three daisies, therefore we need to draw three lines.
We cut out our stripes exactly along the contour. The stems for our daisies are ready.
Next comes the fun part, assembling and decorating the postcard. To our cardboard blank, we glue the daisies and stems that we made earlier, we place the flowers slightly at an angle so that they fit on our card.
We cut out beautiful pictures from old magazines to decorate the craft. We glue the ornament found in the magazine to the corners of the card. And on the right edge we’ll plant a beautiful butterfly.
Now is the most important moment, we make an inscription with wishes for a loved one. From pink colored paper we cut out a blank in the shape of a “cloud”. We make the inscription “To Mommy” on it and glue it to our postcard.
The original card is ready, all that remains is to give it as a gift.
How to make a tank
Frame: VALYASHKI / YouTube
What you will need
- Corrugated cardboard, painted green;
- 4 wine corks;
- cocktail straw;
- red acrylic paint;
- green acrylic paint;
- glue.
How to do
Paint the corks green.
Frame: VALYASHKI / YouTube
Glue three corks together with their sides.
Frame: VALYASHKI / YouTube
Attach the fourth across them so that it lies in the middle of the parts glued together, and its end is flush with the edge of the first.
Frame: VALYASHKI / YouTube
Cut out two strips of cardboard 1 cm wide. Cover the three bottom plugs with a cardboard piece on one side to make a tank caterpillar.
Frame: VALYASHKI / YouTube
Cover the other side of the corks with a second cardboard strip.
Frame: VALYASHKI / YouTube
Cut 7 cm from the cocktail tube. Glue the resulting part to the top cork. You'll get a tank cannon.
Frame: VALYASHKI / YouTube
Draw a red star on the tank's turret.
Frame: VALYASHKI / YouTube
This video shows the work step by step:
What other options are there?
You can make a more complex tank from corrugated cardboard:
And this craft is made of colored paper:
A tank made of candies would be a good souvenir for February 23rd:
Paper pencil using origami technique
Origami is a fascinating technique that can interest all family members. It’s amazing how a familiar object suddenly appears from one flat sheet of paper at the next fold, without glue, scissors, or anything else.
You will need a little perseverance and accuracy, and you will definitely be able to create a voluminous paper craft, for example, a pencil.
Necessary materials:
- Colored Double Sided Square Sheet
We used yellow and green colors so that it was clearly visible that this was a pencil. And you can also make the first option so as not to get confused in the description, and then, when you learn how to do it, you can use any colors. Or use single-sided colored paper, then the pencil back and lead will be colored, and the core will be a contrasting white color.
Place the sheet on the table with the yellow side up. We apply the right corners of the sheet to the left, and making sure that the line is straight, make a fold. Without changing the position of the sheet, we unbend it again with the yellow side up.
In the same way, carefully apply the two upper corners to the lower corners and bend the sheet in half, carefully forming a fold line.
Unfold the sheet again, yellow side up. Now our square is divided into four equal squares by perpendicular fold lines.
Again we take the square by the upper corners and bend our upper small squares in half. Pull the upper corners to the central fold strip on the square. Again, straighten the full square with the yellow side up. And again we bend the upper corners, so that the green color does not even reach the very top fold strip. We get a yellow square with a thin green stripe on top, as in the picture below.
Let's pay attention to one fold that runs vertically through the center of the leaf. We take the sheet by the squares on the left and bend it towards this center. We repeat these steps with the right corners. Now in front of us lies a green rectangle with two horizontal fold lines.
We take the upper inner corners (which are at the vertical fold) and bend them to the edges. Yellow pieces with green stripes along the edges should appear. As shown in the picture below, we bend these strips to the sides as far as the paper will allow.
Now we bend the right and left upper squares diagonally back. The pencil is ready.
Such pencils can be used in many different ways: used as a bookmark, as a decorative element when decorating a school office, as a children's toy, etc.
Boxes without glue
Using the origami technique, you can fold cute paper boxes with and without lids. You need to prepare 2 square sheets of thick paper, one of which should be slightly larger than the other. Also required are scissors, a ruler and a pencil.
Progress:
- Take a smaller sheet of paper and carefully draw two thin lines diagonally with a pencil.
- Fold the right corner towards the center.
- Fold the bottom of the sheet in half so that the corner coincides with the drawn line.
- Unfold the folded figure and do the same steps on all other corners.
- In the center of the square, use scissors to make two small cuts along diagonal lines.
- Bend all side corners evenly to the middle.
- Fold all the edges of the box inward.
From a larger sheet of paper, fold the lid of the box using exactly the same method.
You might be interested in this. The differences between slime and slime, chewing gum for hands - which is cooler?
In such boxes you can store all sorts of small things, for example, buttons, paper clips and other small parts. It is best to decorate the craft with a satin ribbon and hide a gift in it.
Boxes
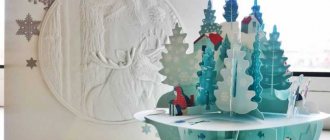
Christmas tree made of paper
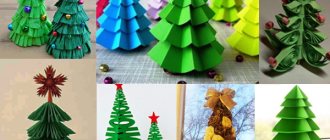
The main attribute of the New Year is the Christmas tree. Everyone decides for themselves whether to dress up an artificial or living forest beauty. But in addition to the main Christmas tree, you can make several small paper Christmas trees with your own hands. With the help of such a craft, we can decorate rooms or present it as a small souvenir that will certainly lift the festive mood.
Required equipment:
- colored paper;
- glue;
- wire;
- stand;
- pencil;
- ruler;
- scissors;
- compass;
- beads for decoration.
Twist one end of the wire into a spiral and attach it with glue to a small, stable block.
Using a compass, draw circles on the back of the colored paper. The diameter of the largest should be 20 cm, and the smallest - 6 cm. Reduce the size of the circles in increments of 2 cm. In total, you should get 16 circles, plus one circle, the diameter of which will be 5 cm. It will be needed to make the top in the form of a cone .
Each of the blanks must be divided into segments. And inside, draw a circle, the diameter of which will be on average equal to the radius of the workpiece. The centers of the circles must coincide. Using scissors, make cuts reaching to the beginning of the inner circle.
Take the edges of the segment and roll it into a tube, securing the ends with glue. Hold each section with your fingers until the glue sets. We do the same with each section. Make a hole in the center of each piece for threading onto a metal frame. Assemble the Christmas tree, starting from larger to smaller diameter.
Cut a segment from the remaining circle and roll it into a cone, securing the edges with glue. Place the cone on top of the tree. Now it’s time for the most creative part of the process – decorating the Christmas tree. Children really like this procedure, so you can safely involve the children in this activity.
For decoration, use bright beads, seed beads, tinsel, rhinestones and other colorful elements. You can secure them with glue; silicone glue is perfect for this procedure; it sets as quickly as possible and has a transparent texture, which makes it completely invisible.
New Year's garland made of paper
New Year is a bright and long-awaited holiday for all children and for many adults. The smell of pine needles hanging in the room, gifts under the fir tree and a decorated house. A large number of people buy New Year's decorations because it's faster and easier, but you can show your creativity and decorate your home with your own hands. For example, make a New Year's garland out of paper. Many people remember garlands and flags from childhood; they are light, convenient, easy to make yourself and easy to store after the holidays. A cheerful colorful garland will help decorate a simple gloomy wall, a long curtain and an ordinary chandelier.
1. What we need to make a paper garland:
- colored paper;
- scissors;
- compass;
- glue;
- rope.
2. Using a compass, draw neat circles of different sizes on the back of the colored paper. Some circles will be larger, others smaller.
3. Using scissors, cut out the resulting multi-colored circles.
4. We combine several circles of the same shape, but different colors. They need to be laid on top of each other and bent in the middle. It turns out to be one large and dense circle.
5. Now let's prepare a circle of the largest shape.
6. Carefully use scissors to make three small holes in it. We make sure that the roundels do not move.
7. We thread the rope into the resulting holes.
8. We have the base of the garland ready.
9. Next, we do the same with the remaining circles: stack them on top of each other, make holes and thread a rope through them.
10. String circles on a rope in descending order from largest to smallest.
11. Let’s fluff up the garland so that all the colors of the paper are visible and it seems more voluminous.
12. We stretch the balls along the rope evenly, at the same distance from each other.
13. You can also decorate the garland with paints - put bright dots in the form of multi-colored scattered confetti. It is better to do this on large circles, since on small ones it may not be noticeable.
14. We ended up with a cheerful, fluffy and colorful garland. Now you can hang it on the wall at home and admire it throughout the New Year holidays!
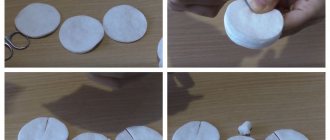
Volumetric paper snowflake
Outside the window there is a magical winter, the New Year is approaching, the most favorite holiday of children. Everyone, especially children, lives in anticipation of a miracle, and it is in your power to give it to them. It's simple - you need to pay more attention to them, spend time together, do pre-holiday chores together. Children will really enjoy working with their parents on festive New Year's decor, one of the integral elements of which is snowflakes. Everyone can cut them out, but for children who definitely want to participate, it will be more interesting to make voluminous snowflakes that would be appropriate to decorate a Christmas tree, or make a mobile out of them, adding different figures (Christmas trees, balls, angels, etc.) or combine them into a garland. The craft is simple to make and can be done by a 4-5 year old child.
For work you will need: a sheet of double-sided blue paper (can be any shade), a ruler, scissors, glue. Colored paper needs to be cut in half. Then each half needs to be folded like an accordion: put a ruler on the edge of the sheet and make a fold - this is the first strip, align the rest along it (you should get an accordion of 7 strips 3 cm wide). We cut the accordions and get 14 strips. From each strip we form a “needle”: as shown in the photo.
We cut off the protruding ends of the strips. You will get a cone with a sharp protrusion. For the base, cut out a circle of paper with a diameter of 3 cm.
Glue the “needles” onto the base with a cone towards the center, as shown in the photo. First on one side, then, when the glue dries, on the other, making sure that the “needles” are placed in a checkerboard pattern. You should get a snowflake with a diameter of about fourteen centimeters.
Give free rein to your imagination: use white paper or paper of two different shades, additionally decorating the snowflake with sparkles, sequins, etc. If you want a larger snowflake, take two landscape sheets, doubling the width of the stripes.
Make New Year's crafts with your children, give them and yourself the joy of communication, and then this New Year will become truly unforgettable for both you and them.
White paper dove
A delicate white dove will be a wonderful homemade gift and room decoration. There are many ideas and tutorials for making paper doves. You need to put in effort and patience, and then you will get a simple, but very beautiful craft. You will need a sheet of thick white paper, a printer, scissors and tape.
Dove, pattern
Step-by-step master class:
- Print the template and cut it out of paper.
- Bend the workpiece along the dotted lines.
- Make cuts along solid lines on the tail and wings. The tail itself is also folded along the dotted line.
- Carefully tape the tail and wings together with tape.
You may be interested in this: Crochet toy baby dolls, large and small
This toy is not made using the origami technique, but from a template. You can experiment with the design of the wings and tail and come up with new figures.
Dove