Easy way
On a straightened napkin, the top edge is bent a couple of centimeters. With your left hand you pinch the right corner with two fingers, and with your right hand, with a deft movement of the magician, the napkin is wrapped around these fingers, forming an even tube.
With one hand, the tube is pinched immediately under the fingers of the left hand, the upper corner of the napkin is bent to the side - this is the petal of the bud. The napkin is quickly curled to the middle, the lower corner is raised, straightened, and the napkin is twisted to the end, forming a stem. Depending on how long you have to wait for an order, you can make a whole armful of these roses and go sell them to the bored visitors of an unlucky cafe.
Paper napkin rose
Paper napkin rose
can be done in a few minutes. When choosing a material for work, you need to take into account that a finished flower made from a thick and multi-layered napkin will better retain its shape, but curling such paper will be more difficult.
1. Spread the napkin on a flat surface.
2. On the side where the bud will be, fold the edge of the napkin up about 4 cm (photo 2). Position the model so that the fold line is on the left.
3. Fold the upper left corner upwards of the model by 1 cm. This edge of the napkin will then end up in the core of the bud.
4. Hold the top edge of the model with the extended middle and index fingers of your left hand and wrap both fingers with a napkin several times (photo 5) so that the model takes the shape of a scroll. Fix the free edge of the paper with your left thumb.
5. With the palm of your right hand, tightly clasp the model at the tips of the index and middle fingers of your left hand and compact the paper evenly. A rosebud formed on the fingers of his left hand.
6. Now, with the fingers of your right hand, twist the paper several times in the same direction in which you wrapped your fingers with the napkin.
7. Remove the model from the fingers of your left hand and continue twisting the paper to the middle of the stem length.
8. With your left hand, firmly fix the stem at the border of twisting. Using the fingers of your right hand, carefully bend the outer corner of the napkin from bottom to top, give it the shape of a leaf and press the base of the leaf well against the stem.
9. Continue twisting the stem until the end of the paper roll.
10. Carefully, in the direction from the periphery to the center of the bud, turn the upper edge of the petals outward a few millimeters.
11. The edge of the outer petal can be hidden under the fold of the previous turn of the spiral.
Queen of Flowers
Red and green napkins make a spectacular rose, which can be used to decorate a plate on a holiday table.
The third part is cut off from the red paper napkin. The remaining part is folded in half. The cut piece is placed in the middle and the napkin is twisted around the finger. There is no need to twist tightly. A bud is formed from the resulting cylinder. The corner of the green napkin is wrapped around the stem of the bud and twisted in a spiral. Along the way, one of the corners turns up in the form of a petal.
Rose is ready!
For a romantic dinner, you can decorate the table with a rose from a three-layer napkin in a glass.
We will analyze another method step by step with a photo.
The spread out napkin is wrapped around a pencil, about 1/3 of the way, squeezed from the sides, and the pencil is removed.
At least 4 of these leaves are made. The more petals, the more magnificent the flower. They are collected by twisting at the bottom one after another.
Related article: Topiary from fruits and berries: master class with photos and videos
At the base, the bud is tied with a ribbon; if desired, it is decorated with a napkin of a different color.
You can collect balls from these roses.
Note! When the ball is assembled from roses of different colors and sizes, it looks more elegant.
You can fill a vase with flowers from napkins.
Congratulate Happy Valentine's Day with an original heart.
DIY roses from napkins with step-by-step photos:
1. For roses, the best colors are plain napkins: pink, white, red and yellow. Unfold the napkin on the table.
2. Fold the edge over on one side. The size of the folded edge is approximately 5-6 cm. This is the future rose bud. Important : Try not to smooth the folded edge with your hand so that the rose will be more voluminous in the future.
3. Turn the napkin over and roll it into a tube with your hands.
4. View of the finished napkin tube.
5. Now you need to press with your hands where the double part of the napkin ends.
6. Twist the napkin a little, giving it the appearance of a stem. Twist about 1.5-2 cm.
7. Form a petal. To do this, you need to unfold one lower corner of the napkin and pull it up.
8. Now twist the stem from the bottom, moving upward towards the petal.
9. Twist the whole stem one more time.
10. A DIY napkin rose is ready and will surely surprise your guests.
Author: ermilova
How nice it is to receive a large bouquet... Even the simplest and most uncomplicated flowers in large quantities take on a chic look... And if it’s a bouquet of roses, 45-50 is already a chic bouquet! But if it is made with your own hands, even if it is made of paper and there will be a sweet surprise inside each flower, this gift or addition to a gift will greatly delight your loved one... In this Master Class I will show you how to make a rose from corrugated paper, so that in the future you can make your own bouquet from sweets Now, on the eve of the holidays, bouquets made of paper and sweets are very popular.
Candy bouquets step by step photo:
[/td]
Bouquets of candies in a basket You will need: - corrugated paper (pink, green) - scissors - candies - skewers - tape - tape (thin)
In general, there are different ways to attach candy to sticks; as you work, you yourself will understand what is convenient for you. Many Master Classes suggest using not ordinary thin tape, but double-sided tape, after packing the candy in colored foil or cellophane.
So, straighten one end of the candy wrapper and insert the stick.
Next, we tightly wrap one end with a stick with tape; if you fasten it tightly, the candy will not fly off when placing it in a bouquet and subsequently it can be unwrapped without violating the integrity of the bouquet.
We attached the candy to a stick.
Next, prepare 2 identical pieces of pink corrugated paper. The height depends on the desired result; here I got more elongated roses (bouquets of candy in a basket).
Fold two leaves in half vertically and cut with scissors on one side (not where the fold is) smoothly diagonally.
It turns out like this.
Two rose petals.
Now we stretch the resulting petals with our hands in the middle, before moving one petal up relative to the other.
Place our candy attached to a stick into the prepared petals.
We wrap the candy attached to the stick in corrugated paper petals.
We secure the resulting bud with thin tape.
Take another skewer and twist the ends of the resulting bud.
Cut a rectangle of green corrugated paper and fold it several times.
It turns out like this tube of green corrugated paper.
Use scissors to cut diagonally.
We unfold it - this is what we get for the leaves of our rose.
We secure the green leaf blank with thin tape around the stick. We also wrap part of the stick with tape so that the bud does not fall off when forming the bouquet.
This method guarantees a strong design of a bouquet of roses.
Next, use a skewer to twist the ends of the leaves, if desired. It’s beautiful if you twist them inside.
Candy bouquets step by step photo
We wrap the entire stick with green tape.
These are the roses I got. I repeat, but it’s better to do the same type of work at once, this way you’ll be able to collect a bouquet of roses much faster. Having made several dozen of these roses at once, making a bouquet of sweets yourself will not be difficult.
Bouquets made of paper and sweets Look like real roses.
Bud and flower ball
To make an unopened rosebud, the personification of purity and innocence, you will need a napkin, wire, thread and glue.
The napkin is cut into 4 parts, of which one part is still in two. One of the small pieces is wound onto the end of the wire in the form of a ball. The other half is wrapped around this ball, lowering it down a little. The remaining three squares are shaped like a petal using scissors and pressed lightly with your fingers. Then they stick to the resulting ball, forming a bud. At the base the petals are tied together with a thread. After this you can decorate the stem.
Napkins folded in four are fastened in the center using a stapler, then the corners are trimmed with scissors, forming a circle. Roses are formed from the blanks. Each layer needs to be lifted and slightly crushed. The base of the ball is made from crumpled newspaper, which is rolled into a ball and tied with threads. Then the ball must be covered with napkins so that the roses stick better. The flowers are glued to the ball in the order the craftswoman wants.
You can decorate such a ball with ribbons and lace, decorative leaves - it all depends on your imagination.
From napkins you can make a rose like this, consisting of roses:
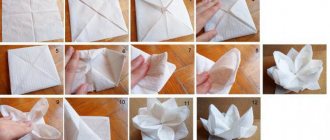
Making a lotus flower from napkins
- We take a simple square napkin, the size is not important, but it is better to choose a gentle and natural color;
- the napkin must be completely expanded into a large square;
bend all corners to the center (as in the photo);
then the workpiece must be turned over; (it is important to ensure that your product is folded as evenly and correctly as possible);
fold the corners again towards the center;
Now you no longer need to turn the napkin over, but rather pick up a corner, as shown in the photo, and lift one corner;
now you need to quietly pull this corner up;
and at the same time, so that the inside of the napkin does not unfold, it must be held;
We straighten the remaining petals in the same way as in the photo.
your lotus is ready.
This lotus can be used to decorate plates when setting the table for a gala lunch or gala dinner.
And in this video there is a slightly more complicated version: A flower napkin holder, which will not only decorate the festive table, but the napkins can also be used for their intended purpose, because... they come out easily.
If you don’t understand a little from the photo how to twist such a rose, then look at the video, here it is shown in more detail:
Option 3: this is a very simple rose that everyone can handle:
Step-by-step guide on how to make voluminous poppy flowers from ordinary napkins:
- prepare everything you need - red, pink and green napkins, a black bag, wire, green corrugated paper, scissors and pliers;
- to make a large poppy, on napkins folded in four (as they are in the package) you need to mark the shape of future poppies, for this we take our napkin and fold it in half, and then in half again;
To make your bouquet look more expressive, make flowers with your own hands in different sizes
;
we cut out the petal in the same way as we cut out snowflakes in childhood, and unfold the workpiece;
from a pink napkin we do the same, only the petals can be cut smaller, 5 millimeters shorter than from a red one;
we fold the green napkin in the same way as the previous ones, but we will cut it differently, we need a circle about 4 cm in diameter;
cut 12 cm from the black bag and fold it according to the same principle, and cut out a circle about 6 cm;
take 3-4 thin layers of red napkin and lay them as in the photo, and on top of that another 3-4 similar layers of pink;
we make the middle, cut the resulting black and green circles every 7 mm, not cutting to the middle about 1 cm, and sew them to the flower in the center;
Now you need to carefully separate each layer, crush it with your fingers and fluff it so that the bud takes on volume;
- if you want to make a stem and leaves, then do this: cut the wire into equal pieces - these will be the stems of future poppies;
- At one end of each wire, make a loop or a decorative knot - this is the middle of the poppy;
- string poppy heads onto wires;
- cut out several flower leaves from green corrugated paper and string them on a wire;
- we collect ready-made poppies into a bouquet - straighten the petals and leaves, bend the stems;
- The unusual decoration is ready.
- ordinary white napkins;
- pencil;
- invisible;
- wire for stems (a floral sleeve or special stems for flowers will do);
- corrugated paper for making leaves or ready-made leaves from fabric;
- felt-tip pens, markers, colored ink, watercolor or liquid acrylic - just a little.
I’ll be honest, in my opinion, carnations are the most beautiful napkin flowers you can think of, and making them couldn’t be easier. They turn out beautiful and lush, they can be used to decorate the room, and a bouquet of such carnations is difficult to distinguish from real ones, especially since they are very easy to make. Here are my step-by-step instructions for making beautiful carnations with a colored border from ordinary white napkins.
To make flowers from napkins you will need:
Let's start making flowers from napkins with our own hands:
- you need to take a napkin and fold it like an accordion, as in the photo and temporarily fix it in the center with an invisible one;
then you need to use your hands on both sides of the invisible tear off the ends of the napkin, the petals will be jagged, this is what we need;
casually paint the folded blank along the edge with red or pink paint, or any other paint you wish (if you have liquid paint or ink, you can take a flat brush or a cotton swab, and in the case of a marker or felt-tip pen, you just need to paint the edge well), but there is no need to try to draw straight lines; the more careless the line, the more natural the color of the flower will be;
For the sake of experiment, you can try the following - wet the painted edges a little with water, then the paint will spread and look very unusual;
remove the bobby pin and tie the middle with a thread, then fluff the petals with your fingers to make a realistic bud from the blank - each layer from the center to the edges must be crumpled
;
- pierce each workpiece with wire twice;
- the wire is pulled through the hole and fixed under the future bud;
straighten all the layers and make the remaining flowers using the same principle.
Watch the video tutorial to see how this is done in more detail:
Carnations are good for beginners - they are simple and expressive flowers. They can be used to make flower garlands (especially if made from bright napkins), they will also look good in a pot, and a bouquet of such flowers can be placed on the table as decoration. Also, paper flowers can be used to make three-dimensional figures - for example, for decorating a hall.
Now you know how to make a flower from a napkin with your own hands. Don’t forget that a craftsman can make both a realistic bouquet and simple stylized flowers from napkins.
Do you want to learn how to make large or unusual flowers from napkins for decoration? Watch this video:
Are you interested in a detailed master class about flowers made from napkins? Look at simple diagrams and pictures, learn how to make unusual flowers and decorate any holiday with flowers made by yourself - it always looks solemn and incredible!
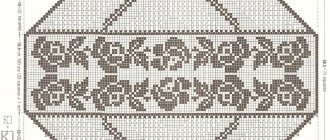
Trying decoupage
You can make a picture using three-layer napkins with a rose pattern.
The crumpled white layers are moistened with water and dry in their natural environment.
The base is coated with colored varnish.
Then colored layers of napkins are laid and covered with colorless varnish.