Benefits of the art of origami
Step-by-step creation of original figures - fish, frogs or beautiful flower buds - allows children and adults to develop memory and creative thinking.
A strict sequence of actions when assembling a particular figurine contributes to significant concentration and perseverance.
In addition, using this technology, you can create the most unusual fish models for crafts, souvenirs, or home interior decoration.
Techniques for creating fish
The fish figurine is one of the basic figures in the Japanese art of origami. More complex models and crafts can be created on its basis. But the fish can also act as an independent paper toy or souvenir.
There are several techniques that are used to create fish-shaped crafts:
- Classic origami. For work, ordinary colored paper is used.
- Sandwich technique. A sheet of colored paper is glued to foil material to create original models with intricate patterns.
- Wet origami. The paper is wetted with water during operation (special types of high-density material are used).
- Modular origami. The figurine is created from a large number of paper modules.
There is also kirigami, a technique in which a figure is folded using a ruler and templates.
We recommend reading:
Modular origami vases - a simple DIY assembly diagram. Step-by-step instructions for beginners + 125 photos of the best ideas- Origami rose - instructions on how to make a beautiful rose with your own hands. The best schemes for beginners to create and assemble (photo + video)
Origami bird - 100 photos of the best patterns for creating a bird with your own hands using the origami technique. Step-by-step master class with description
Progress
An arsenal of tools in the work process is a key link. After all, nothing can be built without available tools. With the right selection of tools, you are guaranteed a positive result in the end.
Usually, at home, a rectangular aquarium is made, and this is done in this way:
For example, let’s take the manufacture of an aquarium with a capacity of 20 liters. The first step is to measure the glass for the side walls, the bottom and the two remaining sides (back and front).
It is necessary to prepare an action plan so that the glass for the bottom remains inside the vertical glass walls. The glue bonds better in tension.
Popular articles Photo frame
All sides of the glass in places of gluing should be taped with masking tape. This prevents the glass from getting dirty between each other.
Note!
A few drops of silicone should be spread on the bottom glass. After some time, you need to cut off the frozen layer of silicone.
The connection of the front and back parts should be carried out on a table that is covered in advance with large-sized plastic film.
Excess silicone should be squeezed out between the connected glasses carefully and carefully so as not to damage the glass. After all the parts are glued, leave them alone for 2-3 hours
After 2-3 hours, an additional layer of silicone glue is applied to the joints so that the structure is a durable, finished aquarium. At the end, remove excess from the seams using a razor blade.
After all the parts are glued, leave them alone for 2-3 hours. After 2-3 hours, an additional layer of silicone glue is applied to the joints so that the structure is a durable, finished aquarium. Finally, remove excess from the seams using a razor blade.
You can decorate the background in the aquarium in different styles. But many resort to ideas of a marine motif, to patterns of algae, to blue and turquoise tones.
Note!
It happens that people hire specialists to develop an individual design for their aquarium.
It is ideal when the background of the aquarium is combined with the fish that swim in the aquarium, as well as with the style of the aquarium. You can decorate the aquarium externally, but in such a way that this decor does not interfere with the inhabitants of the aquarium.
Master classes on creating a fish
Before starting work, it is worth properly organizing the workspace for the master: the table and chair should be as comfortable as possible, because working with origami takes quite a lot of time.
You also need to prepare materials (paper, a ruler, optional beads for the eyes) and step-by-step diagrams for folding the fish.
The most famous models for beginning craftsmen are:
- Classic fish model.
- Gold fish.
- Aquarium fish.
- Koi model.
Each of the presented models can be done together with children, having previously familiarized themselves with educational video lessons on how to carry out the work.
Application using the “Goldfish” template (Master class)
Applique is a very useful activity for children. They learn to use glue and scissors, practice accuracy, imagine by combining colors in a picture, develop hand motor skills and abstract thinking. Working with bright colors and creating images from small details is also good fun for children over 4 years old.
To create an application you will need:
Creating an application using a template includes several stages:
1. Take one of the simple fish stencils and outline the details, prepare cardboard templates for the child.
Fish pattern details
2. Find thick cardboard for the background and several sheets of colored paper. First, outline the body of the fish, cut it out and glue it to the cardboard. Make the tail and fins the same color, carefully glue them next to each other.
Glue the body and tail
3. Make the scales - this is the most interesting part of creating a goldfish. Trace the prepared template, and on it with a simple pencil, draw several scales, placing them evenly over the part.
Drawing scales for cutting
4. After cutting out the scales, bend them at a right angle. Apply glue to the part and glue it on top of the fish. The scale will add volume to the future craft and a touch of originality. Unusual crafts are a guarantee that your child will be interested in working with you.
Glue the fins and the part with the scales
5. Of course, a fish needs an eye. After cutting out a circle from white paper, place it proportionally on the heroine of the applique. Make a pupil out of black paper in the same way. Next is a matter of taste and flight of fancy.
Glue the eye
6. Decorate the background. You can also cut out seaweed or stones from colored paper.
Glue the details in the form of algae and stones
The goldfish is ready. This is how easy it is to make a little sea creature from colored paper. Your child will definitely enjoy working with bright sheets of paper, and the templates for the golden sea lady will simplify his work.
DIY fish applications (2 videos)
Classic fish model
This method of assembling a figure is the simplest in its execution. It is intended for inexperienced craftsmen and teaching preschool children. For work you will need one sheet of colored paper.
Step-by-step instructions on how to make an origami fish with your own hands:
We recommend reading:
Origami envelope - the best schemes for assembling an envelope from paper without glue. Simple instructions with step-by-step guidance + 120 photos- Origami paper swan - simple instructions with step-by-step guidance. Photo, video, master class, secrets of craftswomen
- Origami butterfly: step-by-step master class with real examples in the photo. Subtleties and secrets from craftswomen + instructions and video lesson for children
- The sheet must be placed on the table along its vertical axis.
- Fold the sheet in half along the long axis and immediately unfold it.
- Consistently bend the upper corners towards the middle line.
- Next, you need to fold the side folds towards the middle.
- The bottom half of the sheet is folded up, making a square.
- The lower corners of the resulting figure are folded towards the middle of the paper blank, then they are unfolded back.
- The figure is opened, and the marked folds on the lower half of the workpiece are brought inside the figure.
- The top layer is folded in half towards the bottom half of the figure.
- The outer corners are brought to the middle.
The decoration of the fish is carried out at the request of the master: decoration with beads-eyes, painting with the color you like.
Paper Fish Craft
You can make these colorful funny fish from double-sided colored paper with your own hands, accompanying the lesson with a fascinating story about the life of fish.
Cut a wide strip from a sheet of double-sided colored paper and fold it into a neat accordion. You shouldn’t fold the accordion until the very end; leave a small piece of flat sheet, which you need to round off with scissors and cut out a mouth - this will be the head of the future fish.
Cut out a fin and tail from paper of other colors, and glue the finished parts to the fish.
On a separate piece of white paper, draw a round eye, cut it out and glue it to the fish's head.
Video master class:
gold fish
To make a more complex model, you can use golden-colored paper or a sheet with a foil back.
Step-by-step fish folding for beginners:
- A sheet of paper is folded in half twice along two axes. Unfold the workpiece, detailing the folds.
- The side folds of the sheet are folded like “doors”, bringing them to the center line.
- The top and bottom edges are also folded, aligning them with the center of the sheet.
- The last two corners are turned around.
- The lower folded corners are opened like a boat.
- Repeat the performed action on the other side of the sheet. Carefully smooth out the “boats”.
- One of the sides is brought to the center of the paper blank.
- Make one turn, folding the part, and thus form the muzzle of the fish.
- The second half of the “boats” is bent twice towards you, forming a tail and fins.
The original fish is ready. The presence of a foil layer will provide additional shine and bright colors to the model.
How to make a goldfish:: what you can make a fish out of paper:: Hand-made
Goldfish _
can be made from a wide variety of materials. The main thing is that it is shiny, with a “fluffy” tail and fins. You can “plant” it in a small aquarium or a large glass with pebbles.
The question “what happens if you drink hydrogen peroxide?” — 1 answer
Instructions
1. Make a fish
from plasticine - yellow or brown. Make an oblong shape and mark the gills with a knife. Sprinkle the mold with broken Christmas tree decorations. Make eyes, for example, from black peppercorns. The tail and fins are made of bright feathers. Cat toys on a stick are very suitable for this purpose.
2. Make a goldfish
from two sheets of thick oval paper or cardboard. Cut to create a convex shape and connect the sheets together. Place shiny golden foil on the sheets. Other colors can be added. From the same material, cut out wide simple or shaped strips and glue on the fins and tail. Draw eyes with a disc marker.
3. If you know how to sew, take a piece of shiny material and sew an oval or round bag. Fill it with foam rubber crumbs or scraps of fabric. Make button eyes. Make the tail and fins from feathers or from the same shiny material.
4. Tie a goldfish
made of thread with lurex.
Video on the topic
Helpful advice
Popular articles Valentine's card
If you want to give a gift to a child, do not use broken glass or other material that could injure the baby. A knitted or sewn toy is best.
How often, when giving gifts to the birthday person, we wish him that all his wishes come true. If, in addition to the main gift, you present a bouquet of candies in the form of a fabulous goldfish, then your wishes will definitely come true! It’s not for nothing that this character from a fairy tale known to everyone since childhood is associated with fulfilled cherished dreams. In this master class we will describe step by step how to make a goldfish out of sweets with your own hands. Such a craft will definitely be appreciated.
We will need:
- chocolates in the form of coins;
- corrugated paper;
- organza;
- Styrofoam;
- stand (you can use a tray from a flower pot);
- skewers;
- glue;
- ribbons;
- beads.
You can use more than just chocolate coins as goldfish scales. If you find round candies in a golden wrapper, they can also be used to create this craft. You just need to attach them to the base using hot glue. Other sweets that can be used to decorate the base of the craft will not be superfluous. In general, it all depends on your imagination and desire to give your loved one a sea of positive emotions.
You can also make other craft gifts from candies, for example, a shoe.
Is your child already familiar with where and how fish live? What do they eat, what types are there? Not yet?! Then it's time to introduce your baby to the amazing underwater world. And to make the acquaintance not only educational, but also fascinating and unusual, we suggest you make these bright and fun themed children’s crafts on the theme of Pisces.
Aquarium fish
This model is popular among craftsmen, as it is a figurine for creating a decorative aquarium in the house.
We recommend reading:
- Origami paper flower, made by yourself. 140 photos of original ideas + step-by-step instructions
Origami dog - step-by-step instructions for children. 123 photos of original ideas for creating a dog out of paper using the origami technique (master class + video)
- Origami owl: a review of the easiest ways to make an owl out of paper using the origami technique. 124 photos of original ideas + instructions with video tutorial
The step-by-step instructions contain a lot of steps similar to the previous method, but much attention is paid to small details: embossed fins, a curved tail and a flattened muzzle.
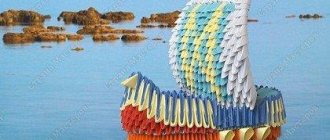
Koi model
The creation of the famous Japanese carp is also a complex model. To make a figurine, you will need some practice and advice from experienced origami masters.
To achieve the effect, use special paper with a combination of color gradients.
Instructions on how to make a decorative carp from paper:
- The bottom corner of the first layer of paper is folded up.
- The side corners are folded towards the center.
- The sheet is turned over and the side corners on the reverse side are folded to ¾ of the length.
- Press one of the lower corners with your finger and open the figure, getting a diamond.
- The outer edges are brought to the midline.
- Turn the workpiece over again. The protruding edge is divided into two parts and folded up. This is how carp fins are formed.
- Place your index finger into the resulting pocket and give the fish the desired volume.
Such a figurine does not need additional decor, as it is made of special paper.
How to make goldfish themed crafts
Before you start making crafts, you need to select equipment with your child and make a choice in favor of a specific model. In accordance with the choice, all the tools and materials necessary for the work are collected.
Required materials and tools
First you need to collect all the tools and items from which the craft will be made. Provided that a parent with a little mischief gets down to business, it is better to do it right away. Distractions from work will lead to problems with the baby’s behavior.
So, depending on the manufacturing technique, the following materials and tools will be required:
- Colored paper. You can take a standard school one or a special office one for printing. If you plan to make modular origami, it is better to take the office variety.
- Scissors - for cutting out parts or rectangles for assembling a modular option.
- PVA glue or pencil.
- Album or cardboard.
- Ruler, pencil, felt-tip pens, pens and other elements required when making crafts. You can use rhinestones, beads, stones or just plasticine to decorate the product.
Popular articles Collector heating system
Step-by-step assembly of a three-dimensional fish with a crown
A voluminous fish with a crown in this case appears to have two options. This is standard and modular origami. In the first option, you need to carry out the following assembly steps:
- Prepare a sheet of orange paper.
- Cut a large square out of it.
- Fold it in half along a diagonal line.
- Reduce the resulting triangle by folding the side parts by lowering them down.
- Raise the lower parts of the lowered triangles to the top.
- Make a double bend - first to the middle vertical line, then to the side.
- Lift up the bottom, leaving a small gap. Bend it.
- Do the same with the other side.
- Bend the resulting triangle along the middle line.
- Cut along the black lines indicated in the diagram.
- Form the tail and fins.
The crown for the goldfish can be made separately using any interesting technique. It is enough to use paper, rhinestones and other decorations. Glue the finished crown to the fish.
The second interesting way to make a fish is a modular origami goldfish. Step-by-step instructions in this case are presented as follows:
- It is necessary to cut paper to make modules.
- Start assembling a circle of modules up to the 10th row.
- On the 10th row, divide the craft into two parts using black modules. They serve as separators-indicators of two middles. They are gradually removed, making a partial connection.
- Continue making the body, reducing the number of modules from the 17th row.
- From the 21st row they begin to form a tail. This will be a flat part that gradually takes on the shape of a tail. Make it the required length.
- The result will be something like this.
- Next, proceed to the separate production of fins. Such a voluminous paper goldfish will look complete.
- Attach the finished fins to the body of the fish.
The result is a craft that is easy to make with step-by-step photos. You don't have to use scissors for cutting here, but the work is painstaking. Therefore, if a child gets down to business, adults should help him.
Origami with a simple diagram for beginners
For beginners, it is better to use a simple origami diagram.
Here you can pay attention to very simple crafts, and, as you gain experience, complicate the work. To get you started and inspired, the following products are available:
Application for children
Applications for children are also popular, since among the possible examples you can choose the most suitable option. Thus, small preschoolers are recommended to use a ready-made goldfish template for appliqué. Stencils must be printed and cut out of colored paper. Next, the blanks are glued onto a landscape sheet or cardboard. Additional decorations can be used if desired.
The application allows you to develop your child's imagination. Here you can use flat blanks or add additional volume. It all depends on the child’s capabilities. Sometimes parents make preparations for their children to use complex equipment. The following works are offered as an example.
Don't forget about additional elements. Algae, shells and stones are cut out of green paper. They are used to lay out the underwater world or simply the bottom of an aquarium.
Cutting templates
It is enough to use stencils to make blanks. There are many of them, so you should choose according to the age of the child.
It is presented in detail how to make a goldfish out of paper. There are many options, but the child’s interest should be the basis. Otherwise, the parent will be left alone with the paper.
Interesting ideas for origami crafts
Making fish figurines is the very first stage of work. They can be used to create crafts, original souvenirs or interior decorations.
Panel on the wall
The main feature is that in such a craft, the figures acquire additional volume with the help of special pins.
For variety, several bright colors are used, which allow you to make a rainbow and beautiful panel.
Using quilling technique
Any quilling patterns turn out to be very unusual and fascinating, our goldfish is no exception.
For work we will need:
- pieces of paper of various colors (for goldfish, shades of orange and yellow. For algae, shades of green are suitable);
- pebbles, rhinestones or beads to seat the eyes;
- regular toothpick;
- PVA glue and super glue;
- plastic cap.
If you plan to put the fish in the aquarium, you need:
- a small glass aquarium or round vase;
- pebbles
Additionally prepare:
- ruler with round holes;
- pins;
- stand for work.
We cut orange colored paper into equal strips and use a toothpick to roll the strips into a roller. Place the roller in the round hole of the ruler and release it so that it can unravel. The hole should be average in size among the others. We take out the roller and glue its end.
Related article: Crocheted toy with description - Rudolph the Moose
We make six of these rollers and flatten each of them in the middle.
We glue six rollers together as shown in the picture, take a piece of paper strip, wrap it around the glued rollers and glue the end of the strip in the same way.
We rotate the additional roller, glue it in the center of the workpiece and coat it and the edges of the workpiece with glue.
We twist the second exactly the same part, which will serve as the body of our fish, and glue it to the first. It should protrude slightly in the center on both sides.
We glue our part with a strip of paper.
Let's move on to the second stage. We need to make eyes and fins for the craft. To do this, we take two pieces of colored paper, one lighter, the other darker, and glue their ends.
We twist the roller from the resulting strip and lower it into the larger hole. The dark paper should be on the outside.
We flatten our rollers and bend them around the edges.
We attach the parts with glue to the body of the fish.
Place eyes on both sides with glue.
Next, we glue two bright strips and one of a paler color, and roll them into a roller, as we did before. We lower the roller into a mold measuring thirty-two mm and do this three times.
In the same way, we glue three bright and two light stripes together and, after twisting, lower them into a thirty-six mm mold.
We take a couple of pins and use them to move the center point to the side. We secure it with pins, drip a little glue and wait until it dries.
Once the glue has dried, bend the roller like this.
We make a tail from larger and smaller parts and glue it together.
We attach the third one on top.
Fourth from the bottom.
Glue the tail to the fish.
Article on the topic: Beaded brooches: Master class on weaving the “Black Swan” product from Ekaterina Deomidova
Here's how we did it.
Next, seaweed is made using the same principle.
Our fish is ready.
Dry aquarium
Bulk Koi fish or goldfish can also be used to create a dry aquarium.
The bright and original inhabitants of the glass house will fit perfectly into the overall interior, and the additional decor of the aquarium will create a real composition of the underwater world.
Origami fish are used quite often due to their unusual appearance and decoration. Photos of origami fish in various variations can help with choosing a model and working technique.
From waste material
From scrap material you can make an excellent goldfish that will decorate your home or become the central figure in any postcard or painting. Now we will tell you how to do this.
What we need to take:
- thin cardboard;
- acacia leaves or maple seeds;
- regular PVA glue;
- a can of gold paint;
- scissors;
- tape with double-sided adhesive surface;
- regular pencil;
- blister packaging for medicine;
- black button;
- hairdressing varnish;
- shiny ribbon.
The first thing we need to do is draw the outline of our fish on cardboard. The larger the seeds, the larger the fish should be. We cut off the excess cardboard so that we only have the working shape of the fish. Starting from the tail, cover the mold with glue and place leaves and seeds on top, leaving no gaps between them. These materials will act as fish scales.
Next we need to work on the head of our craft. We form the head from the same cardboard. At the point where the eye will be located, we make a hole and attach a plastic blister mold there. Don't forget to put a button in the blister - it will serve as the pupil.
The first stage is completed. Next, cover the product with gold paint and let it dry. Now let's finish working with the head of our fish. We glue the blister with a button inside with double-sided tape to the fish’s head. See how it was done in the photo. Using a regular pencil we draw on the eyelashes. You can also paint a mouth or a few scales on the fish. The final stage: to prevent the paint from getting dirty, cover the fish with hairspray. We tie a shiny ribbon to the ponytail.
Related article: Openwork braid with knitting needles: diagrams and description with photos and videos
The master class is over, our fish is ready. All that remains is to find a use for it.
Photo of origami fish
Did you like the article?
0