Newspaper hat
Now you will learn how to make a hat from a newspaper.
A newspaper hat is simple : 1. Make a vertical bend on a newspaper sheet.
2. Fold the top corners towards the fold line.
3. Fold the lapels in half.
4. Fold the bottom corners.
5. Fold both flaps up.
6. Stretch the center points of the layers. This is where you can finish the newspaper cap, or you can continue. Fold it into a square.
7. Fold the corners on both sides.
8. Stretch the center points of the layers.
9. Fold the flaps on both sides.
10. Stretch the newspaper hat by grasping the edges.
Varieties of newspaper hats
Making hats from newspaper with your own hands is a very exciting activity. There are many fashionable and practical models that can be easily built in 10 minutes. Newspaper caps can be divided into several groups depending on functionality:
- A sun protection hat is a universal and indispensable summer option. It will save you from overheating on the beach, in a summer camp, in the country, fishing and even in the city.
- Dust canopy - if the house is being renovated, then a papyrus canopy will be simply irreplaceable. It will perfectly protect your hair from whitening, dye and dust. Building such a protective cap is not difficult.
- A decorative cap or cap - such hats for fashionistas can even be painted with paints, then you will definitely be able to impress your friends.
Although, in fact, any hat made from newspaper is multifunctional. So you can apply the acquired knowledge on making newspaper hats at any time and anywhere.
For protection during repairs
To protect your head during repairs, you need to make a painter's cap from newspaper. It is perfect for both men and women. The visor turns out to be quite strong, it will definitely last for a whole working day. To make the newspaper header denser, you can use a double printing sheet.
There are many step-by-step diagrams and instructions on how to make a newspaper hat. There are also plenty of models of painting caps; you can build a protective cap to suit every taste.
The cocked hat is practically a classic of the genre; in old Soviet films, painters sport precisely such caps . The manufacturing algorithm is quite simple:
- A sheet of paper is folded in half. The bend will be the top of the painter's cap.
- A central vertical bend is outlined. Both corners of the craft are attracted to it and the place where they bend is ironed.
- Both lower rectangles, the future tricorn flaps, bend in opposite directions.
- The corners of the lapels are folded inward. And the lapels themselves are folded upward again.
- You can finish at this stage. The painting cap is already ready. And you can complicate its design a little.
- Fold the square and bend both corners in different directions.
- Stretch the two layers, folding their flaps on both sides.
- Now you need to carefully stretch the hat, holding its opposite edges.
The improved hat model is ready!
The paint cap is also a very popular model of protection against construction dust. And you can build it even on your knee in literally 3 minutes. You will need a single spread of a newspaper sheet, with which you need to perform the following manipulations:
- A sheet of newspaper is folded in half.
- The bend area is conventionally divided into three equal segments. The corners are folded inward so as not to affect the central segment.
- Fold one of the edges of the lower flight rectangle so that its free edge connects with the ends of the triangles.
- Fold the same lower rectangle a second time, now it will slightly cover the upper triangles.
- The workpiece is turned over, then you need to work from its wrong side.
- The sides are bent towards the center, the protruding edges of small triangles serve as a guide.
- Fold the bottom rectangle on the wrong side in the same way as was done on the front side of the craft.
- The inner part of the hem is fixed in the corners, as if being pushed into their pockets.
Or a cap like this so that work isn’t boring. The scheme is also very simple to implement.
Sun cap with visor
This newspaper cap with a visor is suitable for both children and adults. It not only protects the head from the scorching rays of the sun, but also the eyes and face from bright light. This model was loved by educators and pioneer leaders. To prevent a picnic or a hike from being ruined by such a trifle as a hat forgotten at home, it is enough to find a simple piece of newspaper. Making a cap is easy if you follow the step-by-step instructions.
There are quite a lot of models of caps with a visor, there is plenty to choose from. For example, such a hat with a small visor is easy and quick to make. This model can often be seen on fishermen and hunters:
- A sheet of newspaper is folded in half and placed on the table with the fold facing up.
- The two upper corners are folded towards the middle of the sheet.
- The bottom rectangle is folded upward twice.
- The large upper corner is hidden inside the folded strip of the rectangle.
- The workpiece is turned over to the other side and the protruding side corners are hidden.
- Now you need to vertically bend both side parts of the cap. The reference point is the central square.
- All that remains is to bend the lower edge of the cap at an angle and tuck its edges into the pockets of the previous bend.
- The product is neatly straightened. You can try on the cap!
Or this helmet. He will not leave any child indifferent. All you have to do is find a stick of the right size, and you can play knights. It is more convenient to wear such a paper helmet with the visor facing backwards, so it can protect your neck from the sun.
Sun hat
A special feature of this type is the wide fields. Such a hat made from newspaper can provide protection not only from the sun's rays, but also from summer rain. The Panama hat turns out to be very durable because a double sheet of newspaper is used to make it. To make a newspaper hat with your own hands, you need:
- A square is made from papyrus. It needs to be folded in half twice, focusing on the outlined lines of the center of the square.
- The origami is returned to its original position, i.e. the square is disassembled.
- The corners from the bend point are folded inward, focusing on the control points outlined at the previous folding stage.
- The folds are unfolded, secured with fingers, and the entire workpiece neatly opens.
- The edges are pulled toward themselves along the previously designated control folds.
- The sides of the panama hat are straightened and given the required volume.
Decorative and unusual newspaper decorations
Almost all paper hats are functional to one degree or another. They usually perform a protective function. A separate chapter presents purely decorative, unusual hats. They are distinguished by their original shape or unusual size. Of course, you will have to spend more time making them. But in such a hat you can safely participate even in a theatrical production.
Pirate hat
This wide-brimmed hat is perfect for theatrical productions, for example, at a summer camp. And it will also become an indispensable attribute for role-playing robber games.
Cowboy from a newspaper
This cowboy hat is truly a work of art. It looks authentic, and you won’t be embarrassed to wear it even to a party to surprise your friends with an original headdress. This hat can be decorated with a large buckle or even a paper sheriff's star. To increase strength and service life, newspaper hats can be coated with paste (a mixture of flour, water and glue). It is also recommended to paint them with paints.
The scheme for creating a cowgirl is quite complex, but there is something to work for.
Most origami patterns for making paper hats are simple and straightforward. You can make them together with your children, because the material for these crafts is always in the house!
What paper can you use to make a hat?
The paper is selected depending on the type of hat. Most often, a headdress, such as a painter's hat or a children's panama hat, is made from a magazine or newspaper. For doctor's caps, thicker paper is suitable - whatman paper in A1-A4 format, for a cap - a single-color (green or blue) sheet. It is recommended to make a pirate or cowboy hat for children's scenes from cardboard, and a cap from thick wrapping paper.
When choosing a material, keep in mind that sheets that are too soft or thin cannot be used. They will not hold their shape and will tear quickly.
Paper hat
Use, of course, plain large format paper
Therefore, depending on the type of future craft, you need to prepare a large newspaper or a piece of whatman paper, pencils, markers, paints, multi-colored paper, scissors and a glue gun.
Fold the created rectangle again. The base for the hat is done. Place the newspaper on the table so that the fold is closer to the horizontal line at the top. Bend the two side corners at the top and fold them diagonally so that they connect to each other. There should be a space of 3-4 cm at the bottom. This is a “rim” that will cover the head in a circle.
you can make other wardrobe options
How to Make a Newspaper Hat: Step-by-Step Guide
Typographic sheet is considered the most common and versatile material from which any hat can be constructed. Medium-thick, large-format newsprint folds well. If you need to make a denser product for your head, use paper folded in half.
The best things to make from newspaper are a painter's cap and a cap with a small protrusion in the form of a visor.
How to make a painter's hat from newspaper
A newspaper hat is an indispensable thing for a painter. During production, the paper is tightly rolled, so the product will last throughout the working day. Even if the paper hat gets damaged and becomes unusable, it will only take a few minutes to make a new one. All manipulations are carried out according to the scheme.
Guide on how to make a hat from a newspaper in the form of a cocked hat for repair:
- The newspaper is folded in half and placed with the fold line facing up.
- Fold one bottom strip of paper, then the second.
- Bend and join the 2 upper corners.
- Level the lapel lines with your hands.
- Fold the strip over again.
- They move to the other side.
- The edges with protruding corners are folded on both sides.
- Leveling the layers, make 3 turns at the bottom of the product.
- To maintain the shape, the edges of the workpiece are folded inward.
- Straightening out.
The hat is ready to wear. In a similar way, you can make a cap using the origami technique. To do this, in step 4, the upper edges are folded not to the connection line, but with a slight indentation.
How to make a hat with a visor from a newspaper with your own hands
Technology for making a paper cap with a visor:
- Lay out the paper on the table.
- Bend the 2 upper corners.
- Smooth out the edges.
- Fold the bottom layer of the top sheet.
- Bend overlapping again. This procedure is performed on one side of the cap only.
- Turn the figure over to the reverse side.
- The protruding corners of the rolled layer are folded inward, then moved to the edges.
- The edges of the workpiece are bent vertically on the right and left.
- The strip is wrapped at the bottom.
- Bend the bottom at an angle to the fold line, tuck it into the folds.
- Turn the workpiece over again.
- Fold the top corner horizontally.
- Tuck the top of the hat.
- Straighten the product. It has 2 corners, 1 of which needs to be folded and tucked inside the folds.
A newspaper cap with a visor protects your head from solar heat and construction debris and dust during repairs. The cap is also made from wrapping paper, then painted and appliquéd.
how to make your own clothes for home renovation
When I look at such a product of skillful hands as a hat made from a newspaper, I am immediately overwhelmed by a wave of nostalgia. My memory comes back to the times when mom and dad wore them during renovations. This was par for the course. And no one was surprised by such a headdress. Undoubtedly, it is still in demand, but it is still less common. Skills are lost. The manufacturing method has been forgotten.
Let's try to remember or learn this art. Yes, exactly art. After all, origami is the oldest type of eastern teaching for creating various objects from paper by folding it numerous times. Previously, rice paper was used for this. It is very thin and light, so it was ideal for hats.
Nowadays, using rice paper, especially in our regions, is not an affordable luxury. You can use plain paper. It will look more solid and stronger. The only problem is that for the volume of an adult’s head you will need a large sheet of A2 - A3 format. Agree, it is not always at hand.
The newspaper is in a hurry to help us. Universal material, for all occasions. Not very dense, which means it will be easier to fold. Yes, and you can read the news. In general, it turns out to be a useful thing.
What is a newspaper hat useful for?
During renovation work, everyone is faced with the constant occurrence of construction waste. Fine dust floats in the air. Plaster falls on my head. And the paint brush tries to spray you from head to toe. In this repair chaos, a cap will help protect your hair and scalp from excessive pollution.
Just imagine. You went out into nature. In the turmoil associated with getting ready, soaking kebabs, who ever thought about a Panama hat for a child. What to do? Taking off dad's T-shirt and making a turban on the child's head? No. A hat made from newspaper is a sure way to prevent your baby from getting sunstroke.
Let's look at several popular models of hats
Simple triangular hat
You need to take one spread of a regular newspaper. Fold it in half. Place it in front of you so that the fold is at the top. We bend the sides inward. You will get two triangles. The angle that was created on the first fold is the top of the future hat. At the bottom there was a thin strip of paper consisting of two sheets. We wrap them up, in different directions. We bend the resulting corners so that they do not interfere and the structure holds its shape more tightly.
Cap
Suitable for repairs and other types of work related to contamination. It looks like a military cap, so it can be used as an accessory for a children's military suit.
Let's look at the step-by-step instructions. During the process, it is necessary to additionally use a visual diagram.
Step 1. To work, we need one full spread of the newspaper. Fold it in half along the existing fold. Place it on the table in a horizontal position with the fold facing away from you.
Step 2. We bend the upper corners into the front so that we get right angles located at the same distance from the center. Use a ruler to measure out equal parts. Each angle is equal to approximately a third of the width of the fold. Now the top of the workpiece resembles a trapezoid shape.
Step 3. The bottom edge of the top layer must be folded in half outward. The edge should come right up to the bottom of the corners we turned in earlier. Fold these strips again to the same width. You will get a fold line along the lower edges of the previously folded corners. We get a shape similar to a boat.
Step 4. Turn the workpiece over to the other side. The position of the top and bottom of the future cap does not change.
Step 5. Visually draw vertical fold lines on the sides. The size of the peeking corners at the top. We bend it. Each flap will take up about a sixth of the width of the workpiece.
Step 6. Fold the remaining bottom edge of the sheet up twice. First in half. The second time again at the same width. Only, during the folding process, the first fold must be inserted into the pockets formed during the third step.
Step 7. The pilot is almost ready. All that remains is to give it volume.
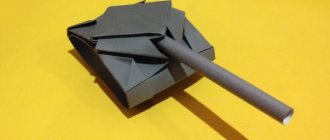
Sombrero
This is a hat that is very similar to an origami boat. Yes, and it works in the same way. Surely, many will remember the process of folding this model.
Manufacturing sequence:
Take half a sheet of newspaper. Fold it in half. We fold the upper corners inward towards the middle of the sheet. There are strips of paper left at the bottom. Fold each one in half in different directions. We turn the corners that turned out at the bottom outward. Now we bend both lower flaps up. Also in different directions. The result was a simple cap.
Next, we stretch the centers so that we get a flat square. We bend the corners that turned out at the bottom upward. We get a triangle with beveled corners at the bottom. We bend the lapels.
Now we take the products by the edges and stretch them. Our sombrero is ready.
Cap with visor
Somewhat more difficult to perform. But it looks impressive.
The following diagram also shows the procedure for making the cap. Only the method is slightly different.
The format of this article, of course, did not accommodate all the varieties of newspaper hats. But we hope you found many interesting options for yourself. The imagination of origami masters is limitless. We are waiting for new ideas and implementations.
Video selection on the topic of the article
sdelala-sama.ru
How to make a paper hat without glue: diagrams and description
In addition to the classical methods, there are more complex schemes for assembling a paper headdress with and without glue. Without an adhesive, a children's or adult skullcap, a light wide-brimmed newspaper hat, or a samurai helmet for a child can be quickly made using the origami technique.
Paper skullcap
You can create a skullcap with your own hands from hard paper or printing sheet, which is folded in 2 layers for greater density. It is made according to a pattern similar to folding a cocked hat, only in the case of a hat the outer corners are folded completely, and in a skullcap the upper corners are turned away at a short distance from the middle. The workpiece is trapezoidal in shape.
If you need a headdress made of cardboard in an oriental style, the headbands are decorated with a beautiful pattern. You can paint it yourself with artistic paints or paste it over or trim it with ribbons with colored embroidery.
When the side triangular protrusions are pulled out, the product turns into a jester's cap. If you pull out another protrusion and straighten all 3 corners, the skullcap becomes an academic cap.
Paper hat with brim
A paper hat with a brim made from a magazine or newspaper sheet is suitable for giving and relaxing. It can be made in a cowboy style. To make a hat from a newspaper, you need to follow these steps:
- A newspaper sheet is folded in half.
- The resulting rectangular figure is bent in the center and unbent. This is the middle of the hat.
- The upper corners are turned inward towards the center.
- The lower part is bent towards the turned corners.
- The product is turned and operated in a similar way.
- One more lapel is made on both sides. The workpiece looks like a rectangle at the bottom and a triangle at the top.
- The product is stretched in the center. It turns out to be a square.
- Opposite corners are wrapped diagonally.
- In the formed triangle, pull the central points and unfold the model. A new square has formed.
- The upper corners are stretched. At the final stage, the corners are not fully stretched, otherwise the hat will turn into a ship with large sides.
Paper samurai helmet
Without glue and scissors, you can make a samurai helmet from just one piece of paper for a children's party.
Instructions for assembling a paper helmet:
- Take a square sheet of paper.
- Fold it first along one diagonal, then along the second.
- Close the sharp corners in the resulting triangular figure.
- The bottom edges of the top layer are folded upward.
- Bend the resulting folds symmetrically on both sides.
- The lower part of the top strip is folded slightly below the line of the future bottom.
- The bottom layer is folded onto the bent corner.
- Turn the product over and make a fold along the bottom line.
What kind of paper hats can be made using glue?
The origami technique is used to create stronger, higher-quality hats. To do this, use means that glue paper parts together. When making such hats, it is better not to use newspaper, otherwise the product will tear during gluing. For things that hold their shape, thick colored cardboard in A4 format is suitable.
Paper cylinder
Decorated with various applications and contrasting ribbons, a headdress in the form of a paper cylinder is used as an addition to a costume for participation in a New Year's children's party, masquerades and parties.
A quick guide to making a cylindrical hat:
- A wide strip of the required height is cut out of paper.
- Roll it up into a tube shape.
- The edges are glued together with an overlap.
- From the bottom of one side of the cylinder, cuts of 2 cm are made in increments of 1-2 cm.
- 2 circles with one center of different diameters are drawn on cardboard. The inner diameter is equal to the diameter of the glued cylinder, the outer diameter is at the master's choice, since it depends on the width of the hat brim.
- The distance between the circles (the donut-shaped part) is cut out with scissors and painted.
- The cylinder is placed with the fringe down on the table.
- Apply a little glue to the cuts.
- Place the cut out part (future fields) on the pipe and press it tightly.
- Additionally, you can glue 1 more part from below, thereby hiding the gluing points.
Paper cap
A cap made from cardboard is much better than one made from newspaper. It is created on the basis of a sketch, which consists of 6-8 sections. First, they design the drawing in pencil on paper, then cut out the pattern along the marked lines, connect the parts in the center, aligning the holes made with a hole punch. The visor is glued to the main part. If the product is decorated with various decorative elements, you will get a bright and beautiful baseball cap.
Paper cowboy hat
A cowboy hat will be much stronger if it is made of dense material covered with paste or glue. To add realism and volume, the product is decorated with artistic paints. It can be worn to holidays and children's events. For a hat with a large brim, you will need pre-prepared patterns.
Ideas for hats and materials from which they can be made
Making a hat is a fun creative process. Success largely depends on the chosen style and design
It is also important to choose high-quality material so that the product turns out the same
Stylish headdress
Important! The main decoration of the hat is an additional decorative element. It could be a feather, lace ribbon, bow
Particularly creative seamstresses decorate their products with figures of birds, animals or flowers.
creative hat
It is not at all necessary to use fabric for making. After all, hats are often an element of a carnival look, in which a non-standard approach to creation is valued. Such an element of women's clothing can be:
- From paper. To make from this material you need to prepare paper of different densities, preferably large format. Most often, paper hats are not worn more than once. They are relevant during hiking, relaxing on the beach, when you need to protect your head, but there are no opportunities for sewing.
- Another suitable material for creating a hat is cardboard. It is more practical to use than paper. A frame is often created from cardboard, which is then covered with fabric, mesh or decorated with fur.
- A wide variety of hat models can be made from fabric. If a girl does not have sewing skills or time to create a pattern, then she can use knitwear. The simplest model is the beret; various types of fabrics are suitable for its manufacture.
- In the cold season, you can crochet a fashionable hat. Or sew it from fur, for example, mink.
Note! Hats can be worn not only for holidays - they can become part of your everyday look. Designers offer various design options that will add a “zest” to the image.
Paper product
Hats are:
- The Fedora hat is one of the most popular options. Features of its cut are wide fields. Felt is used to create it. Fedora goes well with coats and dresses. A girl with such a headdress looks elegant and stylish.
- Separately, it is worth highlighting the dresses for carnivals or theme parties. You can be creative when making them. Hats are decorated with various decorative elements; several materials are used at once to make the hat look original.
- Hats for special occasions. To make them, lace, beads, flowers, and satin ribbons are used. They are often complemented with a beautiful short crown. This hat looks elegant and elegant. As an example of stylish evening hats, you can look at famous women in Great Britain.
- Panama hat is relevant in the summer. It is needed more for practical purposes than for beauty. Its main purpose is to protect the head from exposure to ultraviolet rays. Most often, straw is used to make a panama hat, or it is crocheted or knitted.
- Girls and boys make hats for matinees from scrap materials.
Holiday hats
You need to choose a hat design in accordance with your image. But in order for the headdress to look beautiful, you need to choose not only high-quality materials, but also an accurate pattern.
Important! In an effort to demonstrate a creative approach to creating a hat, it is important not to overload the product. The image will not only look inharmonious, but the hat may not withstand a large number of decorative elements
The easiest option is to make a turban.
Autumn model
Therefore, before creating a headdress, you need to come up with a sketch. Then the design will look harmonious, and the hat will become the “highlight” of your image.
Newspaper cap
Comfortable DIY newspaper cap. An interesting craft - a cap made from newspaper with your own hands. Such a headdress cannot be bought in a store at any price. There is no such product because brands have not yet noticed this topic. Printed newspapers are gradually becoming a thing of the past. However, some interesting and up-to-date information can only be found in newspapers. But after reading the newspaper issue that interests her, her fate is sealed. This is usually a trash can or stove fire; it is convenient to use old newspapers as bedding for minor repairs. Of course, newspapers are used to prepare walls for wallpapering. However, before discarding, the newspaper can serve one more service. You can make a paper cap from newspaper that will protect your head, for example, from the sun. The Master will show you how to make a cap with a visor out of paper.
Newspaper hats: what are they?
The idea of creating hats from newsprint dates back to Soviet times. At that time, people tried to invent a disposable item of use from improvised means.
Newsprint has proven to be easy to fold and model . You can very quickly make a hat, cap, visor and even a cap from it.
It’s worth knowing why, in fact, such hats are needed:
- A newspaper hat can easily replace a hat on a hot sunny day: at a parade, on a hike, in a pioneer camp, in any case, in the open air. A newspaper hat will not allow direct ultraviolet rays to penetrate through it and worsen a person’s condition, as well as overheating.
- A visor or hat made from newspaper will help anyone when renovating an apartment or house. The fact is that any type of repair work: puttying, whitewashing, gluing wallpaper to walls, plastering, involves liquid building materials. Often you have to work with high surfaces and ceilings. To prevent any building material from getting on your head and damaging your hair and face, a “quick” headdress is made from newspaper. This cap will reliably protect your hair and you won’t mind throwing it away after work.
- Hats, caps or caps serve as excellent decorative decorations. Such products can be painted with artistic paints to give them an aesthetic appearance. After this, the item can be used for installations, stage performances, other creative ideas, and games.
Types of hats from the newspaper:
DIY hat made from a double sheet of newspaper
DIY visor made from newsprint
A newspaper hat is an indispensable item for children and adults
A variety of newspaper head caps for any occasion
A creative approach to creating hats from newspaper
Instructions for folding a cap from a newspaper
1. One full-size newspaper spread will be required. The work is carried out only with your own hands and no tools are required.
2. A sequential diagram of assembly steps is shown in the photo, and the dynamics of the entire process are shown in the video.
Take a newspaper sheet Bend the two top edges Iron the folded edges Bend part of the top sheet Fold the strip up again Turn the cap blank Fold the edges of the bent strip Fold the edges inward Bend the bottom edge in half Bend the bottom edges of the blank Tuck in the edges of the bends Turn the cap blank Tuck in the top edge The cap blank is almost ready We open the cap blank We bend the corner, there are two of them We tuck the corners into folds A cap made of paper How to make a cap out of paper
Cap
Making a paper hat with a visor is not as difficult as it seems, especially if you follow the instructions below.
Master Class:
- Take a standard newspaper spread and bend the closed corners inward, bringing the edges and vertices together.
- Fold the bottom side out twice.
- Bend the locking corners on the reverse side, then bend the planes on both sides towards you, setting the size of the future hat (orientation towards the center determines the universal size).
- The lower plane needs to be bent towards itself along the edges, then the duplicate corners must be bent inward from it, which will need to be wrapped inside the workpiece.
- Turn the package face down, bend a large corner to the bottom edge and tuck it over the side.
- Straighten the workpiece, side corners, tucking it over the sides. Job finished!
to contents ^
How to make a hat for repairs from newspaper?
During repairs, it is necessary to protect not only the body, but also the head. True, ready-made hats do not always give the desired result. Not everyone has old hats that they wouldn’t mind throwing away later, and thick fabric will only get in the way. For example, your head will sweat excessively. In this case, a newspaper hat can come to the rescue, which anyone can easily make.
Necessary materials
It is worth immediately paying attention to the fact that such a paper hat is a disposable item, and not a permanent assistant during professional repairs. In other words, this item belongs to amateur repair assistants. But because of the ease of preparation, such a hat will always be at hand if you have large sheets of paper, or better yet, old unnecessary newspapers.
When creating a newspaper hat with your own hands, you need to take care of one of the most important materials - paper. It is best to use A4 sheets. As already mentioned, old newspaper is an excellent option for producing disposable hats.
In order not to work with just your hands, you will need scissors in this matter, and to get straight lines, a ruler or a simple wooden strip. When all the necessary tools are prepared, you can begin to create a disposable assistant.
Samurai helmet
Origami can be folded from almost any paper. To make a Chinese samurai helmet, both a regular newspaper and an A4 sheet are suitable.
Tools and materials:
- scissors;
- paper.
Master Class:
- Using scissors, cut the paper into a perfect square.
- Fold it diagonally, then turn the resulting triangle into a square again; to do this, just bend the sharp corners to the top.
- Then bend the lower corners of the “front” side to the opposite corner.
- Bend the top peaks outward to form protruding “ears.”
- Turn the lower corner of the upper plane upward slightly, overlapping the bends of the workpiece, then turn it down to fix the shape.
- Then turn the cap over to bend the “extra” corner from the back side, up and unfold the product. Job finished!
to contents ^
Simple hat for repair
When many people broach the topic of how to make a hat out of a newspaper, they usually pay attention to the simplest option. This method can protect the head, but if necessary, it will not be able to protect the eyes from unwanted substances and light.
Steps to create a simple header:
- First you need to bend the rectangle in half, lengthwise and crosswise. This is necessary so that the lines where the paper folds occur are visible. After this, you need to unfold it and fold it in half again, matching the short sides.
- After the first stage, you need to look where the folds are and in these places bend the corners to the center.
- When you get a triangle, you need to bend the top layer underneath it, and then fold the resulting strip in half. At this stage, the newspaper hat is not yet taking any shape, so it’s worth moving on.
- This results in a third narrow strip that needs to be folded into a triangle. As a result, it turns out that the corners from this strip will stick out on the triangle; they need to be bent.
- Now you need to bend the left and right sides. They bend exactly towards the middle.
- At this stage you need to start working on the top of the header. This part bends inward. The remaining parts need to be folded in half, along the figure and up.
- The last step remains - to straighten the almost finished hat for repair.
Hat with visor
During repairs, you should also not forget about eye protection. It is in this case that you should pay attention to the question of how to make a hat with a visor from a newspaper.
- First you need to bend the upper ends. They bend towards the center.
- Then you need to work with the bottom edge. You need to bend them towards the triangles. Then up again.
- After folding the bottom strip, the corners will stick out, so they need to be folded.
- The edges of the triangle must be bent towards the center. This process is done with the lower part.
- You also need to bend the lower edges, which will then be tucked in.
- Having turned over the almost finished hat, it needs to be folded and tucked.
- This is the last stage of answering the question of how to make a hat with a visor from a newspaper. During this process, you need to hide all the corners that stick out in unnecessary places or get in the way in the folds of the newspaper cap.
Where to start making a hat?
First, you need to understand how much paper is needed to roll one hat. For example, to make one simple headdress from paper, an A1 sheet or one newspaper may be enough. Tools you may need are scissors, a ruler, or a regular strip. Then it’s all a matter of skill and skill of the person doing the cleaning. By the way, if you fold at least 2 hats with your own hands, then it will take no more than 2-3 minutes to make one headdress. If necessary, you can cover your head and protect it from the scorching sun or from harmful substances getting on your hair. Often, such hats are used by craftsmen who decorate premises or building facades. They are loved by window washers, painters, gardeners, in a word, by those who spend a lot of time working outdoors.
8 section cap
You can easily construct a hat with a visor from paper. These are just some of the models of hats that can be easily made from plain paper. To familiarize yourself with the step-by-step manufacturing instructions and understand exactly how to make a hat out of paper, it is enough to study the diagram of the operations for constructing a headdress. In order to quickly make such hats, it is recommended to practice, since without practical skills it will be difficult to make a headdress that would meet all the requirements.
Simple paper hat
Some models have almost the same manufacturing scheme.
For example, tips on how to make a doctor's hat out of paper are similar to those about making a regular cap. If you study the step-by-step instructions for making a cap, you can easily make a doctor’s hat, if necessary. The difference is that the doctor's hat needs to be given volume before use. If you want to know how to make a tanker’s hat out of paper, then it’s better to watch a detailed video with a master class. Since there are a number of features in the manufacture of this product. The master class on making a tanker's hat is much more complicated than making a cap.