- Features of knitting English elastic with knitting needles
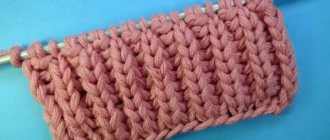
- Knitting technique and pattern of the English elastic pattern with knitting needles
- Rotary knitting of the English rib pattern 1x1 knitting pattern
- Circular knitting pattern "English rib" 1x1
- Types of English gum (step-by-step lessons for beginners):
- False English gum (fake or simplified)
- Volumetric two-color
- Double English elastic band
- Methods for decreasing, adding and closing stitches in English rib
- Products knitted with English elastic with detailed descriptions
- Cape knitted with one button
- Blue knitted vest with hood
- Knitted poncho with knitting patterns and mitts
- Hat with pompom knitted with English elastic band
- Knitted hat and scarf from Drops Design studio
Features of knitting English elastic with knitting needles
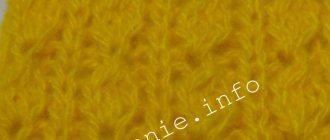
Many who have been knitting for many years have heard the concept of an English elastic band.
What is its feature and how does it differ from a simple single elastic band? A simple rib pattern, consisting of alternating purl and knit stitches, is most often used to create an elastic edge on a garment. It can be used on the neck, cuffs or bottom. This pattern does not give much volume and stretches well. But here is an English rib knitting pattern - a knitting pattern that gives volume to the loops, special elasticity to the fabric, and a beautiful texture. It is great not only for finishing edges, but can also be used independently as the main pattern of the entire product. The English rib pattern to knit pullovers, cardigans, and is good for hats, snoods and scarves.
So, let's highlight the main properties of the English rib knitting pattern made with knitting needles :
- exquisite texture, creating a beautiful canvas even in large products;
- excellent elasticity, making it well suited for decorating the edges of products;
- the looseness and splendor of the pattern, formed due to the peculiarities of knitting, allows you to create a warmer fabric.
But this pattern also has its own small drawback. For example, it is recommended that before starting a knitting pattern with English elastic , knit several rows with a simple elastic band. Otherwise, the edge of the fabric may stretch during wear.
It is also worth noting that English elastic , unlike a simple single one, requires more yarn consumption. Yes, it is not entirely economical, but how impressive it looks in products.
From the history of knitting
The craft world is full of different types of creativity. Some appeared very recently, while others are thousands of years old. Excavations of ancient settlements have proven to the world that people knew how to handle knitting needles long before the advent of our era. Thus, wall paintings depicting people wearing knitted items were discovered in ancient Greek tombs. In addition, several fragments of knitted fabrics found during excavations in Ancient Rome have survived to this day. In those days there were no patterns yet; craftsmen used only plain knitting.
This art was revived in the East, and from there, thanks to the Crusades, it came to Europe. Handicrafts immediately became popular, but were accessible only to the wealthy. This was due to the high prices of yarn, which was produced by hand processing and spinning. With the advent of special mechanisms, threads became cheaper and became available to everyone. The peasants significantly improved their financial situation by selling expensive lace. Their cost was so high that it was equal to the annual salary of an ordinary artisan.
Most of the knitting patterns and patterns of those times are still in use today. Thus, the well-known English elastic was invented by the wives of fishermen, who created a dense and voluminous fabric for clothing. It reliably protected men on the high seas.
In the modern world, the demand for knitted products is still growing. Fashion trends have made things not only comfortable, but also beautiful. Fashion designers' collections are constantly updated and replenished with new knitted items.
Related article: Origami paper heart: how to make it with diagram and video
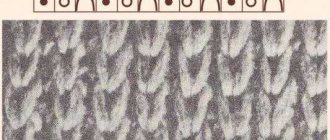
Knitting technique and pattern of the English elastic pattern with knitting needles
Rotary knitting pattern "English rib" 1x1
We said earlier that a single simple elastic band consists of alternating a purl and a knit stitch. The English elastic band also consists of purl and knit stitches, but with the addition of a yarn over and throwing over the loops without knitting. Let's look at the diagram in more detail:
Knitting pattern for English rib using knitting needles Symbols for the knitting pattern for a pattern using English rib
It is worth mentioning another important feature - the number of cast-on loops for knitting a pattern must be odd. This is done to create a neater edge of the canvas.
So, we cast on the required number of loops on the knitting needles. For example, 15 + 2 edge stitches = 17 loops.
1st row: Remove the first edge loop without knitting (How to knit an edge loop?). Next, knit alternately 1 purl and 1 knit stitch until the last stitch. Knit the outer loop.
2nd row. Remove the first loop as an edge loop. Then *1 knit stitch, yarn over, remove 1 purl loop without knitting*. Complete the row with an edge loop.
3rd row - yarn over, remove 1 loop without knitting (thread at the back of the work)*, knit the loop and yarn over of the previous row together, yarn over, remove 1 loop without knitting*.
4th row - *knit the loop and yarn over of the previous row together, yarn over, remove 1 loop*, knit the loop and yarn over of the previous row together. Next alternate rows 3 and 4.
If you are finishing the fabric with an English elastic band, then knit the 3rd row from the given description last, and then close the loops in a way convenient for you. Then your edge will be neat.
Circular knitting pattern "English rib" 1x1
At its core, circular knitting is practically no different from rotary knitting. The purl and front rows, for example in stockinette stitch or regular rib stitch, go one after another, without any changes in the technique of making the pattern.
But now you are planning to knit yourself a snood or sweater with raglan sleeves using an English elastic band. And here you may have difficulty tying yarn overs or loops together. But don’t panic, everything can be solved very simply, you just have to figure it out.
So:
- In the first row we knit: knit 1, yarn over, and remove the loop without knitting.
- In the second row: Yarn over, not knitted loop, knit a purl loop.
- Third row: knit two loops together, followed by an unknitted loop.
- Important! When knitting in the round, do not forget to mark the beginning of the row with a marker. This way you won't get confused in alternating rows!
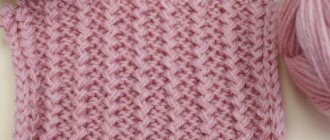
Types of English gum (step-by-step lessons for beginners):
Above we looked at a standard English rib knitting pattern. In fact, it is the only correct one. But since the pattern is quite popular, many simplified versions have appeared.
False English gum (fake or simplified)
One of the most famous imitations of the English rib knitting pattern is called false or fake. A purely visually connected canvas in this way is practically indistinguishable from the original. But working on it is many times easier.
To begin with, you should cast on loops; their number should be a multiple of 4 + 2 edge loops. The entire repeat of this pattern consists of two repeating rows:
Row 1: Edge loop, *knit 3, purl 1* - repeat until the end of the row, end the row with an edge loop.
Row 2: Edge loop, *2 knit stitches, 1 purl stitch, 1 knit stitch* - repeat until the end of the row, end the row with an edge loop.
As you can see, in this version with a false English elastic band, there are no yarn overs at all.
Volumetric two-color English rib knitting
If you love experiments and simply adore color variety in clothes, then pay attention to the opportunity to knit an English elastic pattern from two colors. The technique may seem a little complicated, but the result is worth it. You will receive a voluminous and elastic fabric, which can be used as a pattern for knitting a hat or even a pullover.
The uniqueness of the two-color pattern lies in the fact that each row is knitted twice - 1 time with a thread of one color (color A), 2 times with a thread of a different color (color B).
Important! All purl loops of this pattern must be knitted in the classic way.
The principle of knitting with two-color English elastic with knitting needles:
Cast on an odd number of stitches on the knitting needles.
1st row: knit with thread A – * knit 1, yarn over 1, remove 1 loop without knitting *, knit 1
2nd row: knit with thread B - * 1 yarn over, slip 1 loop without knitting, knit 1 loop together with the yarn over with a knit loop *, 1 yarn over, slip 1 loop without knitting
Row 3: knit with thread A – Attention! We move the knitting to the opposite end of the knitting needle * 1 loop together with the yarn over is knitted with a purl loop, 1 yarn over, 1 loop is removed without knitting *, 1 loop together with the yarn over is knitted with a purl loop
4th row: knit with thread B - * 1 yarn over, slip 1 loop without knitting, knit 1 loop together with the yarn over with a purl loop *, 1 yarn over, slip 1 loop without knitting
Row 5: knit with thread A – Attention! Move the knitting to the opposite end of the knitting needle * knit 1 loop together with the yarn over, 1 yarn over, remove 1 loop *, knit 1 loop together with the yarn over. Rows 2-5 are repeated.
Double English elastic band
It is logical that if there is a classic variation of the English elastic band 1x1, then there should be a 2x2. This method of knitting will definitely look good in pullovers, especially in oversized models. To perform it on knitting needles, you need to cast on a number of loops that is a multiple of 4 + 2 edge loops.
- The first row is knitted with a standard rib, knit 2, purl 2. There is one caveat: the last two loops must be knit stitches.
- We start the second row with a double yarn over, then slip two stitches onto the right needle without knitting, knit two. At the end of the row, yarn over and remove the last two loops unknitted.
- Third row. We knit the yarn over and loop of the previous row together, knit 1, yarn over, and leave two loops unknitted. At the end of the row we knit the penultimate loop with a knit yarn over and the last one also with a knit yarn over.
- Fourth row. We knit according to rapport: yarn over, two unknitted loops, the next loop is knitted together with the knit yarn over, then knit again. The row ends with one yarn over and two unknitted loops.
Repeat rows 3 and 4 until the fabric reaches the required size.
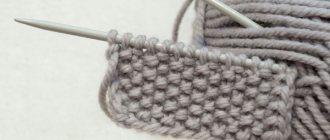
Methods for decreasing, adding and closing loops in English elastic bands
To preserve the beauty and integrity of the pattern in the canvas, the loops of the English elastic band should be decreased, added and closed in a special way. This is an important point especially when working on large items - cardigans or pullovers, where the evenness of the decreased stitches along the armhole or sleeves when knitting from top to bottom determines the beauty of the entire product.
How to decrease the loops of an English elastic band:
The decreases are made in 3 loops at a time, this allows you to maintain the sequence of the running loops of the pattern.
So, we knit an edge loop. Then the loops from the previous row (1 knit, 1 purl, 1 knit) are knitted together as follows (decrease on the right): Slip the first loop as a knit stitch, knit the next two loops together and pull the removed loop through the resulting loop. Then knit according to the pattern until there are 4 loops left on the knitting needles. Decrease on the left: Knit three stitches together. Edge loop.
How to add loops of English elastic.
To add loops in the English rib pattern, you need to first knit a sample. It is enough to knit 5-7 rows. In the next front row, in a convenient way for you, add 1 loop on each side. Then make even increments according to the pattern.
Closing the loops of the English elastic band
In order for the edge of a product knitted with English elastic to look neat, the loops should be closed correctly. To do this you should:
- Knit the product to the last row.
- Then knit a row with a simple 1x1 elastic band. This is done in order to remove the yarn over loops so that holes do not form on the edge.
- Since the density of a regular elastic band is less than that of an English rubber band, it is necessary to make the edge thicker. To do this, you can close the loops in the usual way, but with a double thread.
The video on how to decorate a raglan line with English elastic demonstrates ways to add loops in a pattern:
Colored canvas
Having mastered simple types of English knitting, you can begin to study knitting other types of fabric.
A two-color fabric can be formed by alternating yarn. If you perform a regular 1×1 rib, knitting 1 row with threads of one color, and the second row with threads of another, you can get the following result.
This type of elastic is called horizontal.
A vertical elastic band looks like this.
To get beautiful vertical stripes, use the video tutorial that will clearly show the knitting process.
Related article: How to weave an “Angel Heart” bracelet from rubber bands using forks and fingers
More skilled needlewomen can easily use circular knitting needles. Knitting an English rib with this tool will not be difficult, the main thing is to carefully follow the pattern. With their help, the product is knitted in one piece without seams, which is convenient for making hats and snoods.
Products knitted with English elastic with detailed descriptions
Cape knitted with one button
Cape with knitting needles on one button
You will need: 250 g green-blue or 200 g green-red yarn Schachenmayr Mouline Art (55% acrylic, 45% wool, 50 g/55 m); knitting needles No. 5, 6, 7, 8, 9 and 10; hook No. 6, 1 button.
Knitting density, English elastic, knitting needles No. 5: 12 sts and 28 r. = 10 x 10 cm. Knit from top to bottom.
English elastic band : odd number of sts. 1st r. (outside): chrome, 1 person. * remove 1 p. as purl. double crochet, knit 1, repeat from *, chrome. 2nd row: edge, remove 1 stitch as purl. double crochet, * knit 1 stitch with double crochet, remove 1 stitch as purl. double crochet, repeat from *, chrome. 3rd row: chrome, knit 1 p. with double crochet, * remove 1 p. as purl. double crochet, knit 1 stitch with double crochet, repeat from *, chrome. Perform 1st - 3rd rows 1 time, repeat 2nd and 3rd rows. Further
Blue knitted vest with hood
Size:
42-48
You will need:
350 g of blue yarn in 4 folds (30% mohair, 70% acrylic, 50 g / 275 m); circular knitting needles No. 5.5; large button in the color of the yarn; 2 buttons.
Weaves: Stockinette stitch, garter stitch,
English elastic band: 1st r.: chrome, * 1 knit. p., 1 p. n.*, chrome. 2nd row: chrome, *1 person. p., straight yarn over, remove 1 p. without knitting, like a purl*, chrome. 3rd row: chrome, * 2 stitches together, straight yarn over, remove 1 stitch without knitting, like purl*, chrome. Repeat row 3.
Knitting density: 10 p. x 16 p. = 10 x 10 cm. Next
Knitted poncho with knitting patterns and mitts
Poncho sizes: (38)40(42-44)
Dimensions of the finished product: width of the bottom - (117)129(142) cm, length measured from the neck - (44)48(50) cm.
You will need: Sandnes Alpaka yarn (100% alpaca, 110 m/50 g) - (250) 250 (300) g white for the poncho and 50 g for the mitts, (50) 50 (100) g each for gray and black, Sandnes Silk Mohair yarn (60% kidmohair, 15% wool, 25% silk, 280 m/50 g) - 100 g white for ponchos and 50 g for mitts, 50 g each for gray and black, circular needles No. and No. 7 ,5.
Attention! Knit with thread in two layers: Alpaka + Silk Mohair of the corresponding colors.
English gum:
1st row (front): *Knit 1. remove p. without knitting, double crochet, 1 purl. p.*, repeat *-*, at the end remove 1 persons. p. with double crochet.
2nd row: *knit a loop with a crochet, next knit. slip the loop with a double crochet*, repeat *-*, finish 1 purl. p. Repeat rows 1 - 2.
Facial surface: faces. rows - persons. loops, purl rows - purl. rows - purl. loops; when knitting in the round - only knits. loops.
Knitting density: 17 stitches. satin stitch and 11 stitches with English elastic on knitting needles No. 6 = 10 cm. Next
Hat with pompom knitted with English elastic band
Head circumference 50-53 cm.
You will need: 50 g of purple melange yarn LANG YARNS Maxi Tosca (55% natural wool, 45% acrylic, 92 m/50 g); set of double needles No. 7.
Main pattern, circle, r.: 1st r.: * K1. p., 1 p. with double crochet, remove as purl, repeat from *. 2nd row: * 1 persons. p., 1 p. with double crochet, knit together purlwise, repeat from *. Repeat 1st and 2nd rows. Knitting density, main pattern: 16 p. and 18 r. = 10 x 10 cm. Attention! The hat is knitted on the wrong side.
How to knit a hat with an English elastic band:
Doing the work: cast on 72 stitches, distribute them onto 4 needles (= 18 stitches per needle) and knit with the main pattern. 13 cm from the cast-on edge in every 2nd circle. R. At the beginning and end of each knitting needle, knit 8 x 2 stitches together. Tighten the remaining 8 stitches with a working thread and turn the hat out.
Assembly: Make a medium-sized pompom and sew it onto the top of the hat. Tip: The inlaid edge will be very beautiful if you do the “Italian set”
Knitted hat and scarf from Drops Design studio
Hat size S/M - L Head circumference ~ 54/56 - 58 cm Scarf size: 33x 180 cm Yarn: (wool; 100 g/36 m) For hat: 200-200 g For scarf: 600 g Knitting density: 6p.x8 r. (English elastic band) = 10×10 cm. 7p.x 8p. (face stitch) = 10×10 cm. For knitting you will need: circular knitting needles 15 and 10 mm Plat. knitting with straight and reverse rows: we knit all stitches. English elastic band: straight and reverse r.
Description 1st row: p. plat. knitted, * knit, yarn over, retake the trace. n. as purl. *, repeat from *-* to the last 2 sts, then sts. and p. plat. viscous. 2nd row: p. plat. knitting, * yarn over, remove p. as purl, knit stitches together. Yarn over and stitch removed in the last row *, repeat *-* until the last 2 stitches, finish: yarn over, remove stitch as purl, stitch plat. viscous. 3rd row: p. plat. knitting, * we knit the faces together. yarn over and remove the stitch in the last row, yarn over, remove the stitch as purl. *, repeat *-* until the last 3 stitches, knit knits together. Yarn over and removed p., p. plat. viscous. Repeat 2-3 times. We attach a new ball by moistening and twisting the ends.
We knit the hat in straight and reverse rows. for a circle. knitting needles Cast on 27-29 stitches on 10 mm needles. We knit a row of purl. with IS, then continue with an elastic band with LS: p. plates. viscous, elastic faces. /p. until the last 2 sts, knits, sts plats. viscous. Thus, we knit a 7 cm elastic band (we knit the last row with the IS). We switch to 15 mm knitting needles and continue knitting English. rubber band with LS. At a height of 26-28 cm we knit a row of faces. with LS, knitting 3 persons each. together along the row. We get 14-15 sts. Cut the thread, pull it through all the sts, tighten and hide the tip. We make the back seam.
We knit a scarf. We cast on 23 sts on 15 mm knitting needles and knit the boards. knitting 10 cm up straight and reverse p. In the last row with the IC, we evenly add 4 sts. We get 27 sts. We continue with the RS: 6 sts. knitted, purl, M.1 (= 6 p.), purl. M.2 (= 6 p.), purl. and 6 p. plats. viscous. We get 27 sts (we knit from RS with IS). In this way we knit up to 170 cm up (we lay the pattern completely vertically), then we knit the boards. viscous in all stitches up to 180 cm, while evenly decreasing in the 1st row. 4 sts. We get 23 sts. Close off all sts. You will find all the necessary knitting patterns here