Flowers knitted from yarn can be used to decorate almost any item. You can sew ready-made flowers onto a jumper, decorate the sides of a vest with them, or sew them onto a child’s hat or headband. In addition, crocheted flowers can also be used to decorate the interior. For example, flowers can be sewn onto knitted covers for a phone or tablet computer, sewn onto decorative potholders, or even made into beautiful curtain holders.
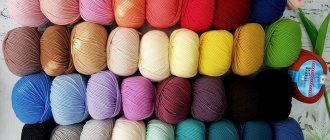
Cotton yarn is most suitable for work, but sometimes it is appropriate to use fluffy yarn, such as mohair. Also, to knit more elegant flowers, you can use yarn with lurex.
It is best to take thin knitting needles, for example No. 2. This is necessary so that the finished flower subsequently holds its shape better.
Knitting a volumetric flower with knitting needles
To work, you will need to dial the number of loops, the number of which is divisible by 6, and do not forget about the edge ones.
Row 1 - knit 3, knit 3.
2nd row - all stitches are knitted.
Row 3 - knit 3, knit, knit 4.
Next, we continue to knit like this: knit 3, nac., all other knit stitches. In this way, we continue to work until there are 14 stitches on the knitting needles, along with the edge stitches.
In the 12th row - 6 closed loops, 6 knit stitches.
This is the first petal of the future flower.
To create the second petal, repeat the above work from the 1st row on the same knitting needle. We knit in the same way until we get 5 petals.
We connect the edges of the product, stretch the working thread into the holes of the petals and tighten it. The middle of the resulting flower can be decorated with either a bead or rhinestone, your choice.
Crocheting a flower with a center
In order to knit such a flower, we cast on 65 stitches on the knitting needles. We knit the first row with all faces. Next, for 12 rows, we continue working with garter stitch. Then, on the resulting fabric, we lower every 9th loop from the knitting needle. And right there, in her place, we lift one length at a time, knitting her knits.
At the end of the work, leave a not too short “tail” of the working thread, and cut it off from the main one. Then we pass the “tail” through all the loops and pull them into a circle.
The middle can also be knitted using knitting needles using the cord technology, but it will be faster to do this using a crochet hook. The hook number should be the same as the number of knitting needles you used.
We knit a lace from the same yarn from which the flower was knitted. Next, we roll it up in the same way as a fire hose is rolled up, that is, each new circle is next to the previous one. As soon as the work is completed, we fix the middle on the flower and remove the excess threads.
The middle can also be decorated with any decor of your choice.
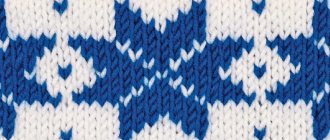
Openwork pattern Leaves with knitting needles: diagram and description
Openwork patterns with leaves have gained enormous popularity, so many options have been invented. It’s amazing how many patterns you can come up with just by alternating knits, purls, and yarn overs.
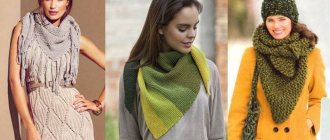
Using openwork patterns using knitting needles according to patterns and descriptions, you can knit a beautiful shawl and use wool, cotton or linen for this. Mohair yarn will make a warm and almost weightless product.
On tops, blouses and T-shirts, openwork leaf patterns can be used in different ways. Leaves can be placed partially on the canvas.
Among the openwork patterns of leaves with knitting needles, there can be both elementary variations and those that require certain knitting skills.
When you decide on the pattern of the openwork leaves, be sure to knit a sample of your yarn. You may need to change the number of knitting needles to make the pattern look more attractive. If you use thinner knitting needles, the product will be less flexible.
Please note that fabric knitted with an openwork leaf pattern may stretch after washing. Therefore, be sure to perform a WTO before calculating the number of stitches to cast on.
The easiest way to knit a flower
For beginners, the method of work described below is perfect, because there is absolutely nothing complicated in it.
We cast on the required number of loops on the knitting needles (the width of the petals depends on their number), and knit the fabric the same way as a scarf. You need to knit two such strips, one of them should be a little longer and wider, and the second shorter and narrower. We pull both strips into a circle using matching threads and sew them on top of each other. We decorate the middle of the resulting flower.
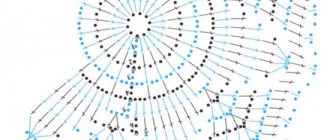
Japanese openwork patterns
- The simple “Japanese openwork” on knitting needles is one of the most beautiful and sophisticated modern patterns, known, however, in the Land of the Rising Sun since time immemorial:
It is knitted according to the pattern in which the ir is shown with hp:
The horizontal P of the ornament is 17 p, the vertical - 8 p.
- “Zigzag” is an example of a simple but incredibly beautiful openwork pattern. It is often used as a finishing border and looks absolutely flawless on a wide variety of hand-made things:
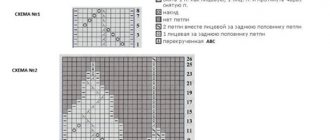
The exact diagram for LR and IR is as follows:
Horizontal R - 14 p, vertical - 10 p.
- “Lacy with braids” , in which plaits and openwork sections alternate in a checkerboard pattern. The resulting combination is considered one of the most interesting in modern knitting needlework:
A detailed diagram helps to understand the execution of LR and IR:
The horizontal R in the diagram is marked with a bracket, the vertical is 40 R.
- “Lacy braids” on knitting needles are an ideal option for making children’s clothes and light women’s pullovers:
The presented diagram shows lr, ir should be performed according to Fig, n - ip.
For the pattern you need to cast on 16 p P + 2 crp. Vertical R is 24 r.
- The “Japanese braid” with intermediate openwork sections forms the vertical structure of the knitted fabric. An excellent pattern option for children's sweaters and pullovers; they can be used to decorate the legs of women's and children's socks:
The diagram shows the product's specifications. It is used to knit lr, and ir - according to rice, n - ip.
“A braid of 6 sts with a slant to the right”: slip 3 sts onto an additional knitting needle BEHIND the work, + 3 sts, then knit the sts removed.
“A braid of 6 sts with a slant to the left”: slip 3 sts onto an additional knitting needle BEFORE work, + 3 sts, then knit sts with the removed sts.
Empty squares in the diagram are ip.
- “Lacy fabric made of leaves” is an original pattern, best suited for women’s summer jumpers:
In the diagram there is only lr, ir should be knitted according to rice, n - un:
To complete the pattern, you need to dial 16 p R + 1 ps + 2 krp. Vertical R is 12 p.
- Openwork "Vertical leaves". They can knit any item, including a bedspread or a sofa cushion cover:
In the diagram only lr are marked, ir is knitted according to rice, n - ip:
Horizontal R - 22 p, vertical - 40 r.
Knitted flower pattern
If for some reason you cannot knit a three-dimensional flower with knitting needles, or such a flower is not suitable for your product, it is quite possible to master the flower pattern. Below are two different options. In the first version of the work, you get a large voluminous flower that can be knitted on the front shelf of a children's product. The second option will show an openwork pattern that can be used to knit the entire fabric of the product.
Option one
To work, you need to dial the number of loops, the number of which is divided by 15, and do not forget about the edge ones.
1st row - all stitches are knitted inside out.
Row 2 and all even rows - all stitches are knitted according to the pattern, and the yarn overs are knitted inside out, unless otherwise indicated.
Row 3 - P5, K2, P2, K2, P5.
Row 5 - purl 4, knit 2 knits., knits., nak., purl., nak., knits., simple extended, 4 purl.
Row 7 - purl 3, knit 2. knits., knits., nak., knits., purl., knits., nak., knits., simple extended, 3 purl.
Row 9 - purl 2, knit 2. knits., knits., nak., 2 knits., purl., 2 knits., nak., knits., simple extended, 2 purl.
Row 11 - purl, 2 in. knits., knits., nak., 3 knits., purl., 3 knits., nak., knits., simple extended, purl.
13th row - 2 together. knits., knits., nak., knits., 2 combined. lits., lits., nak. (in the purl row of knitting stitches), knits., nak. (in the purl row of knitting stitches.), knitc., simple extended, knits., nac., knits., simple extended.
Row 15 - knit 3, knit 2. lits., lits., nak. (in the purl row of knitting stitches.), purl., knit.. purl., nac. (in the purl row of knitting stitches), knit stitch, simple extended stitch, 3 knit stitches.
Row 17 - knit 2, knit 2. persons., nac. (in the purl row of knitting stitches), 2 purl rows, knit stitches, purl 2 rows, nac. (in the purl row of knitting stitches), knit stitch, simple extended stitch, 2 knit stitches.
Row 19 - knit, 2 mixed. persons., nac. (in the purl row of knitting stitches), purl 3, knit stitch, purl 3, nac. (in the purl row of knitting stitches), knits, simple extended, knits.
21 row - 2 together. persons., nac. (in the purl row of knitting stitches), purl 3, bump (out of 1 - 5), purl, bump, purl 3, nac. (in the purl row of knitting stitches), simple extended.
Row 23 - P4, purl, P5, P4, P4.
25 row - 3 purl, bump, purl, 2 ins. purl, nac. (in the purl row of knitting stitches), 2 inc. purl, nac. (in the purl row of knitting stitches), purl 2, bump, purl 3.
Row 27 - purl 3, bump, 2 in. purl, nac. (in the purl row of knitting stitches), 2 inc. purl, nac. (in the purl row of knitting stitches), 2 inc. purl, nac. (in the purl row of knitting stitches), purl, bump, purl 3.
29 row - 3 purl, bump, purl, 2 ins. purl, nac. (in the purl row of knitting stitches), 2 inc. purl, nac. (in the purl row of knitting stitches), purl 2, bump, purl 3.
31 row - 4 purl, cone, 5 purl, cone, 4 purl.
Row 33: P6, purl, purl, peg, purl 6.
Row 35 - all stitches are knitted inside out.
A few secrets
If you combine the yarn over on one stitch in each front row, you will get a completely different diagonal stripe. Each element will consist of two yarn overs and two loops, which are knitted together and tilted to the right. If you want the elements to go to the left, then you need to combine the yarn overs to the left, knit two loops after the yarn over, as if it were a simple broach. You always need a diagram.
Related article: Do-it-yourself antique photo frame: master class with photos and videos
Let's go directly to the pattern itself. It will consist of 2 rows and also 9 loops.
If desired, it can be made like an openwork elastic band. If this is the main one, then you can simply run an iron over it to steam the product.
The pattern, consisting of 5 loops, is located against the background of the wrong side.
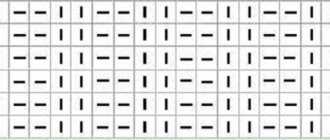
The repeat of all the tracks is 5 loops + loops for the background, but for this master class we take 3 loops between the tracks of the product. Look at the diagram, it shows the front rows. For purl stitches, you need to knit according to the placement of the loops - that is, purl only. And so you need to repeat the pattern from rows 1 to 4.
There is another pattern - double openwork. It is completely made in two alternating rows. Rapport is 10 loops. You need to knit according to the pattern, which completely shows the front and back rows.
Let's turn to the repeat of the spikelet pattern.
It consists entirely of 7 stitches, plus 3 stitches to create a symmetrical pattern. You need to knit it according to the picture below, not forgetting to repeat rows 1 to 6. Do not pay attention to the empty cells - this is for clarity.
Here are the stages of work themselves.
For the first row * we knit 3 purls, 4 knits *, and then again 3 purls. Let's move on to the second, here knitting occurs along the loops - in their direction. The third row is a little more complicated, new options are added - * 3 purl stitches, then 2 knit stitches, yarn over, knit 2 stitches again *, finish the row with 3 purl stitches. We continue to work, move on to the fourth - there will be 3 knits, *5 purls, and then 3 knits*. The fifth row is the longest - * 3 purl, and then we knit 2 knits together, make a yarn over, one knit stitch, yarn over again, do a simple broach, finish with 3 knit stitches.
Let's move on to the new “vertical ornament”.
It easily attracts attention with its interesting texture and simple knitting. Rapport consists of 9 loops and 6 rows. We knit the knit stitches according to the pattern, and then the purl stitches - we make them according to the pattern, as the loops are placed. Yarns are best done purlwise.
Article on the topic: Quilling Christmas tree: master class of postcards with diagrams and photos
These are the beautiful rows you get. Imagine what the product will be like if you knit it using one of these options.
Another option suitable for knitting sweaters, as well as for inserts on sweater sleeves.
The diagram shows all the rows - even and odd. We knit rapport somewhere from the 1st row to 6 in height. In purl we get two from the front. You need to knit like two with purl. We remove two stitches, like knit stitches, and throw them onto the right knitting needle, so that we can then throw them onto the left one. There is no need to twist, you need to knit from the wrong side, grabbing the back wall of the product.
Be sure to count the number of stitches so as not to make a mistake. If you make a mistake or get shortchanged, the craft will be uneven and ugly.