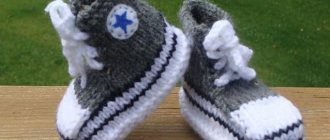
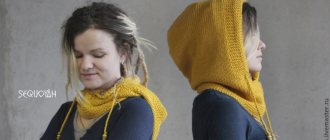
What is a snood scarf?
A snood differs from a classic scarf in that its ends are connected into a ring. This accessory is also called a pipe scarf or a collar. Previously, snoods were worn by motorcyclists and skiers.
The warm accessory warmed the athlete’s neck, and the absence of hanging ends guaranteed safety, because an ordinary scarf could come undone and get caught on some sports equipment and the person would be seriously injured.
Over time, snoods gained wide popularity among clothing designers, and the “infinity” scarf began to appear on models in glossy magazines. The tube scarf turned out to be a convenient and practical accessory.
Today there are more than 10 types of snood; it is worn as a scarf, hood or bolero.
Varieties of snood models
This accessory is worn not only for warmth in the cold season, but also as an addition to spring and summer looks. Therefore, snoods are sewn from different materials.
The most popular options:
Winter models:
- Fur.
- Velours.
- Wool.
Summer models:
- Silk.
- Chiffon.
- Knitwear.
In winter, fashionistas most often prefer knitted “infinity” scarves. Such accessories have different shapes and each of them can be worn in several ways.
Snood scarf knitted: 1 turn, snood-hood, snood-trapezoid, 2 turns
So, what are knitted snoods like:
| Form | How to wear |
| In 1 turn | Such a scarf can be knitted in a circle or made into a 60 cm long strip and sewed on the edges. It is put on over the head. The wider the scarf, the more folds it forms. |
| Snood hood | It is knitted similarly to the previous version, but the fabric should be wide, about 50 cm. The snood is put on over the head and lowered to the neck. The back part is pulled back and put on the head. |
| Trapezoid | This scarf covers the throat and upper shoulders. The volume at the top is standard, and at the bottom it is 20 cm larger. |
| In 2 turns | The knitted strip of the scarf needs to be made 2 times longer and the ends sewn together. The snood is put on the neck and wrapped around it. The accessory turns out to be voluminous and forms many folds. |
A snood with 2 turns is worn like a bolero, pulled over the shoulders, or as a hood. This model can be called universal.
How many stitches should I cast on on a snood with knitting needles?
The number of loops directly depends on the length of the scarf-collar.
As you already understood, the length of a snood can vary from 70 to 170 centimeters. In view of this, the number of loops that need to be cast on knitting needles will also be different. If you want to make a compact product, then cast on 60 -80 loops. If you plan to knit a scarf-collar in two turns, then cast on at least 120 loops.
But at the same time, you also need to consider what threads you will knit the scarf with and what knitting needles you will use for this. For example, if you knit a snood with thick yarn and large-diameter knitting needles, then to create such a product you will need to cast on approximately 100-130 loops.
Thread selection
For summer scarves, smooth, thin or medium-thick yarn is suitable. Experienced craftsmen recommend that beginners knit light snoods from 100% cotton. These accessories can be worn in the summer, layered over dresses or T-shirts. Cotton thread absorbs moisture well and allows air to pass through well, so it won’t be hot in the snood.
Types of yarn for knitting snoods: alpaca, angora, cashmere, mohair, merino
For off-season models, it is better to purchase bamboo and acrylic threads. The ideal option would be mixed yarn, for example, the famous brand ALIZE offers needlewomen skeins with thread consisting of 20% bamboo, 40% wool and 40% acrylic
The material is suitable for children's and women's snoods. The product turns out soft, with a subtle shine. No spools form on the fabric, and the thread does not delaminate.
Other mixed yarn options suitable for knitting off-season scarves:
- 45% wool, 55% acrylic.
- 60% alpaca, 40% microfiber.
- 55% cotton, 45 microfiber.
Winter snoods are knitted from wool yarn. It retains heat well, so the scarf reliably protects from frost and cold winds.
The table describes the most popular types of wool threads that are used for knitting snoods:
| Alpaca | The products tolerate washing well and are not prone to pilling. Sometimes the yarn is dyed artificially, but the natural down of the animals from which it is collected has 23 natural shades, from white to brown and black. It is not recommended to knit large patterns from alpaca; the thread looks best in garter stitch. |
| Angora | Soft rabbit fur. 100% natural material is expensive, so angora is sold mixed with sheep wool or acrylic. Scarves made from this yarn are soft and fluffy, but require more careful handling. They need to be washed and dried properly, otherwise the fluff will quickly become matted and begin to come out. |
| Cashmere | The thread is made from the underfur of a mountain goat. In its pure form, it stretches and crumbles, so cashmere is mixed with silk or sheep wool (30 - 45%). Cashmere products retain their original appearance for a long time. It is not recommended to knit very complex and voluminous patterns. |
| Mohair | A mohair snood will turn out thin, but fluffy and warm. The yarn is made from the wool of the Angora goat. The thread is suitable for garter stitch and does not hold the shape of large relief patterns. |
| Merino | A soft and elastic thread that looks good on any pattern. Merino snood is warm and durable. |
A snood scarf can be knitted with knitting needles (patterns with descriptions are located later in the article) from mixed threads.
For example, melange yarn is made from wool, acrylic and mohair fibers. Often the colors of the melange are very variegated with lurex, so it is recommended to knit the snood in garter stitch.
To knit a tube scarf for a child, you need to choose soft and hypoallergenic threads. Merino and cashmere mixed with acrylic are excellent. The yarn should not be fluffy or prickly.
Which is better: a collar made of thin yarn or thick yarn?
Snood made from thick yarn is always beautiful .
It will suit different clothes. The only peculiarity is that the threads used are very thick. Therefore, the product itself comes out thick, and, therefore, does not need complex patterns. The latter will not be able to keep their shape and the appearance will not be very good. As for fine yarn, the opposite is true. Knitting threads are very thin, so using a simple pattern will add gloom and poverty to the image. Such a scarf only needs openwork knitting in different colors. It can be used under any type of clothing: jacket, coat, shirt, and even dress. By making it wide and introducing a thread with glitter, you can use it under a good evening dress. Therefore, each thread thickness has its pros and cons.
Knitting needle selection
Properly selected tools are a guarantee of a beautiful and neat product. Threads come in different thicknesses, so the knitting needles should be 2 times thinner than the selected yarn. This will make the pattern clearer and more even. On the packaging, manufacturers indicate the length of the thread in meters. The longer it is, the thinner it is.
For smooth wool yarns, as well as bamboo and viscose, wooden knitting needles with tips are suitable. The cast-on loops will slide less along the surface of the tool.
For fluffy yarn, it is better to purchase aluminum knitting needles. They are light and fit comfortably in the hand. The smooth surface allows the thread with fluff to slide and not catch.
If you decide to knit a snood not with fabric, but in a circle, then you will need tools connected to each other with a fishing line or flexible cord. They are called circular knitting needles. The products knitted on them do not have seams. The length of the flexible cord is from 30 to 300 cm. For knitting a snood, knitting needles 120 cm long are enough.
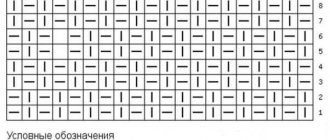
Knitting pearl pattern: snood sizes
Pearl knitting is another easy way to knit a snood with your own hands. An accessory made with this pattern looks very beautiful and stylish. The pattern is knitted by alternating knit and purl stitches. If a purl loop is knitted on the front side, then it will be knitted on the reverse side.
The diagram clearly shows how the pearl pattern is made.
Pattern diagram:
Video: Master class on knitting a snood with a pearl pattern
Decoding knitting patterns
Knitting patterns are a checkered pattern with icons inside. They are needed so that needlewomen can quickly understand how to knit a pattern. It is difficult for beginners to understand the text description, so you need to remember the schematic images. Inside the cells there are sticks at different angles, circles and other symbols.
The icons that are most often found in diagrams are:
| | | 1 knit stitch |
| – | 1 knit stitch |
| ○ | yarn over |
| + | edge loop |
| ♦ | facial crossed |
| ◊ | purl crossed |
| / | Knit 2 knitted together |
| X | remove 1 purl with double crochet |
| ● | Knit 1 loop together with yarn over |
| \|/ | In 1 loop, knit 1 knit, 1 purl and 1 more knit. |
| T | 1 loop pulled from the previous row |
There are a lot of symbols, so complex diagrams are often accompanied by a decoding of the symbols in the text.
Women's snood with English elastic knitting: diagrams and description
At its core, an English elastic band is an alternation of knit and purl stitches in a certain order. Let us consider in detail three options for knitting using this method. Beginner needlewomen can choose a more understandable and suitable knitting method for themselves:
Option 1.
The number of loops for snood is a multiple of 4. This means that the total number of loops should be divisible by four, plus 1 auxiliary loop, plus 2 edge loops.
1 r: chrome, *k2, p1, k1*, repeat from* to* until the last two stitches. Knit the penultimate stitch and finish with the edge stitch. Turn knitting.
2 r: chrome, P1, *k3, P1*, repeat from* to* until the end of the row, chrome. Turn knitting.
Next, all odd rows are knitted according to the 1st row system.
All even rows are knitted as row 2.
Option 2.
The number of loops is a multiple of 4 + 1 + 2 edge loops.
1 r: edge, *knit 2, purl 2*, repeat from* to* until the last two stitches. Knit the penultimate stitch and finish with the edge stitch. Turn knitting.
2 rows: edge, 1 purl, *1 purl, 2 knit, 1 purl* repeat from* to* until the end of the row, edge. Turn knitting.
Next, knitting continues by alternating two rows.
Option 3.
This method is called “ridges”; experienced knitters use this method mainly for knitting elastic on socks. An elastic band tied in this way holds its shape for a long time and does not stretch during intensive use.
Cast on the number of loops that are a multiple of three, plus 1, plus 2 edge stitches.
1 row: edge, *knit 2, purl 1*, repeat until the last two stitches. 1 front and edge. Turn knitting.
2 r: edge, 1 purl, *knit 1, purl 2*, repeat from* to* until the end of the row, last stitch is edge.
Knit a scarf alternating two rows.
After the product reaches the desired length, its ends must be sewn together using a needle or hook.
Snood is ready.
Schemes, English elastic:
Video: Tutorial on knitting an endless scarf with English elastic
Loop calculation
A snood scarf can be knitted with knitting needles (patterns with descriptions can be seen later in the article) in a straight line or in the round. To calculate the loops in both cases you need to knit a sample with or without a pattern, approximately 10x10 cm.
Count the number of loops per 10 cm and decide on the width of the scarf if you decide to knit with linen. Example: snood 20 cm wide. According to the sample 10 cm, 15 loops. This means: 20/10 = 2x15 = 30 loops.
For circular knitting, the calculation will be not in width, but in length. Example: Snood with 2 turns, 120 cm long. There are 20 loops per 10 cm in the sample. Calculation: 120\10 = 12x20 = 240 loops. To determine the length of the “infinity” scarf, you need to stretch your arms in different directions and measure the distance between them. The width of the snood can be from 15 to 60 cm.
We knit a snood in one turn with circular knitting needles: pattern, sizes
A simple way to knit a snood with your own hands for beginner needlewomen. The collar is knitted in the round on circular needles. In the first row, join the first and last stitch. Thus forming a ring, and then knit according to the pattern below. A detailed description is attached.
One-turn snood scheme:
Video: Tutorial on knitting a snood on circular knitting needles
Simple patterns for beginners
A snood scarf with knitting needles (patterns with descriptions will help beginners in mastering patterns) can be knitted smooth, but models with voluminous patterns look more interesting.
Before creating the first products, beginners are recommended to practice knitting ornaments and convex patterns on samples. The most popular and simple patterns for snoods are described in detail below.
Braids
The braid pattern can be simple or complex. Beginners are recommended to hone their skills from the easiest options, gradually moving on to difficult ones. The braid can also be tilted to the left or to the right.
How to knit a pattern of 2 strands tilted to the right:
- Remove the edge loop and knit 3 purls, then 2 knits. This knitting algorithm must be followed until the end of the row.
- In the next row you need to remove the edge loop and knit 2 knit stitches, and then 3 purl stitches to the end.
- Now you need to knit 3 purl loops and cross them to the right, grabbing 1 loop to transfer it to the 2nd knitting needle. There she is placed at work and 1 knit stitch is knitted. Then the front loop needs to be knitted from the front side.
To tie a braid with a left slant, you need to cross in the other direction in step 3.
Openwork
Openwork patterns are suitable for summer and off-season models. To make the pattern textured, you need to knit from cotton, bamboo or viscose threads. Fluffy and bulky yarn is not the best option. This instruction describes a pattern that is often used by beginning craftsmen.
The scarf should look like a diamond pattern with small holes at the bottom:
- The initial row consists of 8 knit stitches. At the end you need to knit 2 knit stitches together, tilting to the right, and then make 1 yarn over.
- Rows 2 and 3 begin by yarn over and knit 2 together. Then knit 5 separately, knit 2 together and then yarn over and knit 1 again.
- Now in the 5th row knit 1 knit, yarn over, 2 knit together. 3 knit stitches separately, then 2 knit stitches together, 1 yarn over and 1 knit stitch.
- Row 7 starts with 3 knit stitches, knit 2 stitches together, yarn over and knit knit stitches to the end of the row.
- After 2 rows you need to knit 2 knits, knit 2 together and yarn over. Then knit 1, yarn over, 2 stitches together and knit stitches again to the end.
- The last row of the pattern ends with knit 1, knit 2 together, yarn over. 3 knit stitches, yarn over, knit stitches to end of row.
The openwork pattern on the snood fabric seems complicated, but after knitting the pattern, the sequence of actions is easily remembered.
English gum
English rib can be knitted straight or in the round. The knitting sequence remains unchanged.
Description:
- After removing the edge loop, the entire row is knitted with knit and purl loops, alternating them 1 at a time.
- The next row starts again with an edge stitch, then knits like this: knit 1, yarn over, purl 1 onto an additional needle. The row is completed by an edge loop.
- In the 3rd row you need to make a yarn over and knit a loop from the previous row together with it.
- Knit the loops and yarn overs from the bottom row together, make 1 yarn over, and remove 1 loop.
Then the pattern is made up of repetitions of points 3 and 4.
Pearl pattern
A knitted snood with this pattern turns out textured and soft. The most popular pearl knitting option is small. If desired, you can make the pattern larger.
Knitting:
- Remove the edge loop and knit alternating the front and back loops through 1. Knit the outermost loop with a purl loop.
- Remove the edge loop again. Now you need to knit alternating stitches so that the knit stitches appear above the purl stitches in the bottom row, and vice versa above the knit stitches.
- Repeat steps 1 and 2 until the end of knitting.
It is not recommended to knit a pearl pattern using fluffy and colorful threads. Cotton, acrylic + wool, alpaca are suitable.
Braid with shadow
An interesting pattern that creates the illusion that the entire fabric consists of knitted braids.
How to knit a sample:
- Cast on 12 loops and 2 edge stitches on each side. Knit a row with knit stitches only. The next one is purl only.
- 4 loops need to be transferred to an additional knitting needle and knit 4 loops.
- The next 3 rows are knitted with knit stitches only.
- Now knit 4 stitches, then slip 4 and transfer to an additional needle. Knit the next 4 stitches, and then knit 4 stitches on an additional needle, also with knit stitches.
The voluminous pattern is obtained from soft wool threads, alpaca, merino, cashmere.
Double sided pattern
A snood scarf with knitting needles (patterns with descriptions are presented later in the article) is often knitted using a double-sided pattern. The accessory will not have a front or back side. These scarves can be worn not only around the neck, but also as a bolero or as a hood.
A simple version of a double-sided pattern:
- For the sample, cast on 25 loops. Remove the edge, knit 1 loop, yarn over, remove 1 loop without knitting.
- Next, knit 2 stitches together. Knit to the end, leaving 2 loops. Knit 1 knit, and purl the edge stitch.
- The next rows are knitted similarly to the first.
The pattern is suitable for smooth and fluffy yarns. You can knit from colorful threads: melange, assembled yarn, acrylic.
Garter stitch
The simplest pattern for knitting snoods. The product turns out smooth, since the pattern is made from only 1 type of loops - purl or knit. The advantage of garter stitch is that you can use any yarn for the project. Fluffy thick threads, as well as those mixed in color, are suitable.
Large knitting
For a voluminous and large pattern, you will need thick yarn, to which you need to select knitting needles. The fewer meters in the skein, the thicker the thread. The best option for knitting a snood is 50 m yarn per 100 g and knitting needles No. 10.
You can knit either in garter stitch or with patterns, for example, with wide braids and plaits. If a thick thread of a suitable color could not be found in the store, then you can use thinner threads, but you will have to knit in several folds. In this case, it is better to abandon three-dimensional drawings, since the product will turn out to be heavy.
Network
This pattern got its name due to the unusual combination of purl and knit stitches. The pattern resembles a wicker basket made of thin stripes. You can knit with a small braid or a large one. Experienced masters recommend that beginners first pay attention to the last option, as it is easier to master.
How to knit:
- For the sample, you need to cast on so many loops so that their number is a multiple of 8 and add 3 more.
- The first 3 loops are knitted purl, 1 knit stitch, then 3 purl stitches again. Thus, knit 1 row.
- The next row starts with purl 3, knit 5 and purl 3 again. Row 3 is the same as row 1, row 4 is the same as row 2. You need to alternate rows as long as they are needed until they become 7 in height.
- In the 8th row alternate: 4 knit, 3 purl, 4 knit
- Row 9: purl 3, knit 1, purl 3, to end.
Up to the 12th row you need to alternate rows 8 and 9, and then knit repeating the first 7 rows.
Leaves
The pattern in the form of convex leaves can be knitted in different ways. The leaves can be single or collected in a small bouquet. For snoods, the “divergent branch” pattern is relevant. The design resembles a vine with rounded leaves looking in different directions.
How to knit:
- Alternate 1 knit stitch and 13 purl stitches.
- Purl 1 stitch, knit 8. 3 loops are knitted together, then a yarn over and a knit loop are made. The last 2 steps must be repeated 2.5 times. Then again 8 knit stitches. Repeat the steps until the row is completed.
- Purl 1 stitch, then knit 6. The next 3 are knitted together with a knit stitch. 1 knit stitch and 1 yarn over need to be alternated 2.5 times. Then do a double pull and knit 6 knit stitches.
- 1 purl loop. 4 facial. The next 3 loops are knitted together, 1 knit stitch. 1 yarn over Alternate 3 times. Knit 4 again. Thus, you need to complete the series.
- The next row is knitted by analogy with point No. 3.
- 1 purl loop, 3 knit stitches together. ; knit stitches, alternating 1 yarn over and 1 knit stitch 3 times. Next, finish the row by repeating the steps from the beginning.
This pattern is clearly visible on items made of cotton, bamboo and smooth wool.
Pipe
This is one of the easiest patterns. You will need to knit vertical stripes on the stockinette stitch with purl stitches.
The width of the strip depends on the wishes of the master. In the standard, the “pipe” has a width of 2-5 cm. The main thing is to knit each row identically, without skipping stitches.
Norwegian style
Norwegian style involves a colored pattern on a product knitted with stockinette stitch.
While knitting, you need to change the thread to a different color and perform the pattern in accordance with special patterns.
What designs are typical for the Norwegian style:
- snowflakes;
- deer;
- rhombuses and triangles;
- small mark;
- stars.
The color scheme can be any. The most popular combinations of cold and monochrome shades.
The exception is the red or dark burgundy color of the product with white patterns.
Removed loops
The basis of this pattern is elastic. Thanks to the removed loops, the scarf fabric is dense and warm.
Procedure:
- To knit a sample, you need a number of loops that is a multiple of 2, excluding 2 edge loops.
- In the 1st row, remove the edge loop and knit the entire row, alternating 1 knit stitch and 1 purl stitch.
- In the 2nd row, the front one is brought behind the wall, the purl 1 is removed without being knitted, and so on until the end of the row.
Next, points 2 and 3 are repeated until the end of knitting. This pattern looks good on items made from any yarn.
Honeycomb
The pattern looks like a honeycomb, which is why it has such an unusual name. A snood knitted with this pattern will be soft and light.
How to knit:
- 1 knit stitch, then 1 yarn over. 1 loop must be removed without knitting. The procedure is repeated until the row is completed.
- The next row begins with a yarn over. The next loop is knitted, then 1 loop is removed with a double crochet.
- Knit 1, remove the yarn over, knit 2 knit stitches and remove the yarn over again. Then you need to knit 1 knit stitch.
- Slip 1 loop over, then make 1 yarn over and knit the next 2 loops together.
- 2 knit double crochets need to be re-done.
Then points 1 to 5 are repeated until the end of knitting.
Wavy pattern
An unusual pattern that will make the “infinity” scarf unique. Experienced craftsmen advise knitting such a pattern, alternating threads by color every 1-3 rows.
How to make a wave pattern:
- Rows 1 and 3 are knitted with purl stitches only.
- Row 2 should only be knitted with knit stitches.
- In the 4th row, 6 loops are knitted together (every 2 loops). 6 times you need to alternate the yarn over and 1 knitted loop to the end of the row.
If you increase the number of yarn overs and loops, the “oscillation amplitude” of the wave will change and the pattern will look different.
Rice
Another simple way to give your snood an unusual texture. Each row alternates 1 knit and purl stitch. It is important to place the loops of the new row in a checkerboard pattern in relation to the previous one.
Example: Beginning of row 1 – knit, purl, knit. Beginning of row 2 – purl, knit, purl. The result is a pattern resembling small smooth bumps. The pattern is only suitable for smooth, non-fluffy threads.
Knitted snood with braids: diagram and description
If you have a little experience with knitting needles, the following pattern will not be difficult for needlewomen. The braid pattern is great for making knitted winter items. For the scarf, it will be made in a one-sided version, which does not spoil its appearance at all.
The main pattern is knitted on the wrong side of the product.
The width of the braid depends on the number of loops chosen. The more loops you use, the larger the braid will be.
The braid, the second name for the braid, also depends on the thickness of the chosen yarn. The thicker the thread, the more voluminous the pattern will be.
Description of work:
- Cast on the knitting needles the required number of loops, so that the distance between the strands and the thickness of the braids themselves are the same.
- Knit the first row with knit stitches.
- Knit the second row taking into account the future location of the strands.
- The stitch between the strands is knitted with purl loops. The weave loops are knitted with knit stitches. The pattern is formed from the reverse side of the canvas.
- This way 10 rows are knitted.
- Make a weave on the front side of the product. Divide the marked loops for the harness in half, leave one part on the working knitting needle, and transfer the second to the auxiliary knitting needle.
- Knit in this way until the end of the row.
- Turn the knitting over and knit a row according to the pattern, not forgetting the loops on the auxiliary needle.
- Next, knit according to the pattern until the end of the product.
Scheme for the harness pattern:
Video: Knitting a snood + hat set with knitting needles in a braid pattern
Schemes describing how to knit a snood scarf with your own hands
For those who have just begun to get acquainted with knitting, experienced knitters recommend practicing knitting the lightest snood models. Their detailed description is posted below. You should start with garter stitch, gradually moving on to more complex patterns.
Snood on circular knitting needles in one turn
This model fits tightly to the neck, protecting it from the wind during the cold season. This snood is universal and suitable for men and women, the main thing is to choose the right color of the threads. The width of the finished product for adults should be at least 55 cm, and for a child from 3 to 7 years old - 45 cm.
Snood on circular knitting needles in one turn step by step
To work you will need:
- Yarn (50% acrylic, 50% wool).
- Circular knitting needles No. 9.
How to knit a pattern for adults:
- Cast on 61 stitches. All loops need to be distributed over the knitting needles so that the loops on the right end together with the working thread.
- Now 1 loop from the right knitting needle needs to be pulled through 1 loop on the left knitting needle and tighten the thread. This is necessary for seamless knitting.
- The 1st row should be knitted only with knit stitches (60 stitches), and the 2nd row should be knitted completely with purls.
Next, even rows are knitted with knit stitches, and odd rows are knitted with purl rows. The last row is closed by knitting 2 loops together.
Snood on straight needles for beginners, 2 turns
Another universal snood that can be knitted in garter stitch. This scarf will be looser and should be worn by wrapping it around your neck twice. The length of the scarf for adults is 120 cm, for children – 90 cm.
Since knitting is done on straight needles, the product will need to be carefully sewn at the end of the work. The wider the fabric, the more folds the tube scarf will form. How to calculate the number of loops can be read above, in the “calculation of loops” section.
Snood made from sectional yarn
Sectional yarns are threads that are unevenly dyed. It is not recommended to knit snoods with complex patterns from such material, since a colorful pattern is difficult to predict. If the accessory is associated with a voluminous pattern, then visually it will become heavy and less attractive.
Sectional thread is also a little coarser than regular wool, so it is not suitable for children. Their skin is much more delicate than an adult’s and a scarf made from such yarn can cause discomfort to the child.
Snood scarf knitted from sectional yarn
The best option for sectional knitting is a 2-turn scarf for adults. Width – 50 cm, length – 130 cm. The knitting pattern is simple: alternating rows, knitted only with knit and purl stitches.
Snood hood
This model is suitable for adults and children. You will need to knit a rectangle, the sides of which will correspond to the measurements taken.
| Standard canvas sizes | Width | Length |
| women | 48 cm | 61 cm |
| men | 55 cm | 68 cm |
| children from 3 to 7 years old | 35 cm | 50 cm |
After closing the knitting, you need to fold the rectangle in half. Using a needle and thread, the upper edges must be completely sewn, and the side panel must be sewn 20 cm from the bottom (for adults).
This snood is worn over the head. Stitched at the bottom 20 cm will completely cover the neck, and the seam at the top will be on the head. For children's models, you should purchase soft yarn. You can knit in garter stitch or choose a voluminous pattern from the list above.
Summer option
In summer, snoods are most often worn by women and girls. To harmoniously complement the look and feel comfortable with a scarf around your neck in warm weather, you need to choose the right yarn. Below is a model for women knitted from cotton. The openwork pattern plays an important role, because the more small holes there are, the better the air circulates, which means that it will not be hot in such a snood.
Required:
- Yarn (100% cotton).
- Knitting needles number 4.
How to knit:
- Even rows should be knitted with knit stitches, and odd rows should be knitted with purl stitches.
- To get an openwork pattern, you need to knit 1 yarn over, remove 1 loop through 3 knit stitches.
- At the beginning of the rapport, you need to remove 1 loop as a knit stitch, and then 2 as purl stitches. Afterwards you need to make 1 more yarn over.
The pattern is carried out until the end of knitting.
Warm snood
Warm and soft “endless” scarves are made from high-quality, thick thread.
Experienced craftsmen believe that for winter models it is better to purchase wool with an admixture of acrylic of no more than 50%. The men's snood model is described below.
The thread should not be bright or colorful: brown, gray or black will do.
It is also not recommended to make too voluminous patterns or designs.
Men's snood with a French elastic pattern:
- Cast on 114 stitches on circular needles. Close the knitting circle.
- Knit 1 row, alternating 2 knit stitches and 2 purl stitches.
- Start the 2nd row with 1 purl, and then alternate the loops again as in point No. 2. When the last 3 unknitted loops remain on the knitting needle, you need to knit 2 knit stitches and 1 purl stitch.
Then knit, repeating rows 1 and 2. The standard height of a men's snood is 50 cm.
Three-color model
Bright snoods can be knitted for both children and adults. The design can be very simple: colored stripes. For the female model, you need to cast on 126 loops, close the ring and knit the first 3 rows with an elastic band. Elastic pattern: alternating 3 knits, 3 purls. Every 3 rows the thread color needs to be changed.
A snood scarf is considered one of the simplest products, so learning how to knit it is not difficult. The main thing is to knit a small sample before making a new pattern, strictly following the diagrams with descriptions. This step will help you avoid mistakes and identify problem areas in your work.
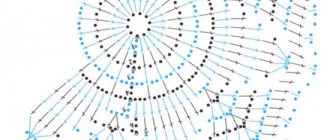
Openwork snood: diagrams, description, video
Delicate mohair snood in two turns
An original, very feminine snood model, made of airy mohair. The pattern seems complicated only when I see it, but in fact it is quite simple to knit. Like all similar patterns, the snood is knitted in the round. The volume of the openwork pattern is obtained through the use of thin yarn and thick knitting needles 4-5 mm.
To knit such a snood you will need: Schachenmayr Kid Light yarn (38% nylon, 32% acrylic, 30% mohair, 100 g/600 m) 1 skein, circular knitting needles 80-100 cm long, 4-5 mm
As a result, the product will be 110 cm in circumference and 40 cm in height. Knitting density: 18 stitches and 24 rows = 10x10 cm in stockinette stitch.
How to knit an airy snood with knitting needles in an openwork pattern, diagram and description: Openwork pattern (number of loops in multiples of 6): 1 circle: *P1, k2, p1, yarn over, remove 1 p .as persons., 1 person.p. and stretch it through the removed one, repeat from * in a circle. Round 2: *P1, k2, repeat from * around. Round 3: *P1, k2, p1, k2tog, yarn over, repeat from * around. Round 4: knit as round 2. Repeat 1-4 circles.
Cast on 216 stitches, join into a circle, place a marker for the beginning of the circle. Knit with an openwork pattern to a height of 40 cm, finish in 1 or 3 circles of the pattern. Close the loops.
You can knit a bright openwork snood complete with a fashionable hat using MK Fashionable knitting PINOCCHIO.
Openwork snood with a pattern of superimposed leaves.
If you don’t like knitting from mohair and prefer a thicker fabric, then try knitting a snood, for example, from merino wool. The canvas will be smoother and the pattern clearer. Compared to a mohair snood, a wool product knits faster and is more unpretentious to wear.
Snood is knitted with straight fabric in turning rows. Once you have knitted the length you need, the fabric closes into a ring. Knitting snood turns in rows is convenient if you are knitting a long product and plan to wear it in several turns.