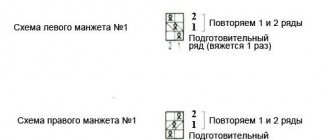
Benefits of DIY knitted booties for newborns
The knitting process has a number of positive effects on the health of the craftswoman, so knitting booties will help the needlewoman improve her well-being.
Benefits of knitting:
- A monotonous activity helps relax those whose work involves increased stress. Repeated actions with knitting needles put a person into a light trance, similar to the state before falling into sleep.
- The same type of finger movements can reduce heart rate and blood pressure and relax muscles.
- The nervous system calms down so much that even when simultaneously watching an action-packed or horror film, the craftswoman does not react to creepy scenes.
- To create a beautiful product, a creative process of selecting yarn first takes place, and then the craftsman truly enjoys the result. Thus, color therapy and the personal creation of a unique product inevitably lead to the release of the happiness hormone serotonin, as well as to an increase in a person’s self-esteem.
- To knit a complex pattern, you need to concentrate and carefully count the stitches; this activity reduces the risk of developing age-related dementia.
- Knitting develops fine motor skills , which has a positive effect on the quality of speech, memory, imagination, coordination and clarity of thoughts. Knitting is included in the complex of rehabilitation procedures after a heart attack or stroke in many modern rehabilitation centers.
Thus, by creating your own masterpieces, you can not only make a gift for your baby, but also preserve clear memory and good coordination of movements for many years.
Choosing threads for knitting baby booties
Knitted booties for newborns, the manufacturing patterns and descriptions of which are presented in the article, should be knitted from high-quality yarn.
It must have the following characteristics:
- strength, threads should not break when putting on and wearing the product;
- hygroscopicity;
- ability to retain heat;
- hypoallergenic.
For the youngest children, delicate pastel colors are usually chosen.
Yarn suitable for booties can be divided into groups based on fiber composition:
- Cotton is a natural soft fiber that does not irritate the skin and is perfect for the summer. The downside is the high percentage of shrinkage after washing, as well as low elasticity. To make a cotton product soft, it is better to choose slightly twisted threads, for example, lilac.
- Linen or bamboo are also summer options. The product, in addition to being hypoallergenic, will have an antibacterial effect.
- Wool . The best option for warm threads for booties is merino wool, but alpaca or cashmere are also suitable. They are durable, elastic and quite thin, which allows you to knit soft and warm booties. The only drawback of such threads is the formation of pills after wear and washing.
- Natural silk. Shiny and elastic threads unwind from the silkworm cocoon; they retain heat perfectly and do not roll down over time. The disadvantage of this option is the high cost of the material.
Types of threads such as mohair and long-haired angora wool are absolutely not suitable for making booties, because babies love to put new objects in their mouths and can swallow lint. Polyamide and threads with the addition of lurex can also be added to the undesirable list.
DIY booties from old jeans
To get started, you need fabric from old jeans. You can take pieces of different colors or with seams. These features will serve as beautiful decor.
Denim booties
For linings you will need knitwear. It is necessary to stock up on waffle fabric or similar to give the shoes the required degree of rigidity. You will also need loops made of leather strips through which the laces will be threaded.
To work you will need threads, needles and glue.
Booties are made as follows:
- First you need to measure your baby's legs. According to the size of the paper, you need to draw three details for each bootie. You will need a sole, toe and heel.
- The patterns are transferred from paper to denim. It is necessary to add 0.5–1 cm extra around the edges. This is necessary to create seams and to make the booties looser.
- Cotton is sewn on the inside of the denim parts. It is necessary to make a middle layer designed to increase the rigidity of the shoe.
- Two leather loops are glued to the front through which the laces will need to be threaded.
You might be interested in: Hand-made bedspreads from old jeans and other things
It is recommended to cut out the sole from thick fabric and cover it with denim. This part is glued to the shoe from the bottom. This completes the main part of making booties. All that remains is to make decorations on them (for example, in the form of appliqués).
Knitted booties
How to choose knitting needles by number?
Knitted booties for newborns, the patterns and descriptions of which are presented in this article, need to be knitted, taking into account the ratio of the thickness of the selected yarn and knitting needles. The basic rule for high-quality knitting is that the diameter of one knitting needle corresponds to the thickness of the yarn multiplied by 2.
However, in reality it is quite difficult to measure such distances. Therefore, a simple technique is popular among needlewomen to determine the required thickness of the knitting needle: the yarn is folded in half and slightly twisted. The resulting cord will have the optimal thickness for knitting needles.
If you still need to find out the exact diameter of the knitting needles, then just pierce thick paper with a knitting needle and measure the resulting hole. The number of the spokes corresponds to their diameter (3 mm = No. 3). The manufacturer most often indicates the optimal number of knitting needles for threads on the label, however, when knitting products for small children, it is best to purchase knitting needles one number thicker.
Then the product will be more loose, soft and pleasant for the baby’s delicate skin.
The strength and appearance of the product directly depends on the density of the knitting, which can be individual for each needlewoman. To make the booties beautiful, it is better to knit the control sample with the pattern that was chosen as the main one.
For knitting with soft yarn, it is very convenient to use plastic knitting needles; the thread will not slide along them much.
How to determine the size of booties?
Knitted booties for newborns, the patterns and descriptions of which will help even beginners cope with complex patterns, are best knitted based on the actual size of the child’s foot. To take a quality measurement, you need to place a clean sheet of paper on your baby’s foot and mark on it where the heel and big toe are located.
At the same time, mark the widest part of the leg on the sheet. Thus, you will get 2 measurements: the length and width of the foot. For a loose fit, you need to add 1.5 cm to the obtained dimensions.
If it is not possible to measure your baby’s leg, you can use standard sizes:
| Age of the newborn | Size |
| From 1 to 3 months. | 90 mm |
| From 4 to 6 months. | 100 mm |
| From 7 to 9 months. | 115 mm |
Which fabric to choose
Fabrics for sewing are selected in accordance with the pattern used. There are knitted booties. There are models made from one type of fabric. Shoe patterns are used that use three layers: inner, middle and outer. You can make booties with leather soles and felt tops. You can make leather booties with your own hands; patterns can be found online.
It is important for the child that the fabrics used are natural. It is necessary to exclude situations when the baby’s leg is steamed or subject to irritation. The best choice is to use cotton, linen or jersey. When creating winter boots, you will need an inner layer of fabric. The pattern of booties depends on the chosen shoe style.
You might be interested in Sewing sweaters and simple blouses with and without patterns
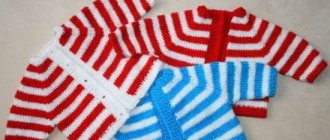
Simple knitted booties-sneakers: step-by-step master class
One of the simplest options for children's booties is a model of small shoes with cuffs, which look like children's sneakers or original UGG boots, depending on the colors of the yarn chosen. The shoes are warm, so to make them you will need thick yarn , for example, soft wool or wool blend; children's acrylic is also suitable.
Knitting needles can be used No. 2 or No. 3.
For a baby less than 3 months old. A set of 35 loops is made on the knitting needles, this number includes 2 loops for the edge (hereinafter - KP):
- The initial row consists entirely of knit stitches.
- In the second row, loops are gradually added to form the sole of the shoe: immediately after the CP, a yarn over is made (hereinafter referred to as n\d), 15 knit stitches (hereinafter referred to as RS), \\d, 3 more RS, \\d, CP. As a result, there will already be 39 loops on the knitting needle.
- Next, all odd rows are performed by LP.
- In the fourth row, yarn overs are made immediately after the first CP, then after 16 LPs, the next one after 5 LPs, the last yoke is done before the final CP. A total of 43 loops are formed.
- The sixth row is performed similarly to the fourth row, only yarn overs are made immediately after the initial CP, after 17, after 7 and again after 17 LPs.
- In the eighth row, 4 more air loops are added in the same way, and the total number of loops in the work is equal to 51.
- In the 9th row, 1 n\d is done after 25 LPs, so the rounding begins to be knitted.
- From rows 10 to 20, a shawl pattern is knitted (the work is done only with knit stitches), without any additions.
- With contrasting threads, you need to mark the division of knitting into 3 parts: on the sides there are 21 loops and in the middle 10. The 21st row begins with knitting 29 loops, then two loops are grabbed and knitted simultaneously, the knitting is turned without knitting the remainder on the second knitting needle.
- Re-slip the first loop without knitting (edge), perform 8 purl stitches, then purl two loops at the same time, and unfold the work.
- 23rd row: 8 LP and two more are knitted at the same time. The 24th row is performed by analogy with the 22nd. Until the 36th row, knitting is repeated according to the pattern of 23 and 24 rows.
- In the 37th row, after removing the edge, another 21 LPs are knitted from the last edge. There are 36 loops in total.
- The 38th row consists entirely of RS, from the 39th to the 58th a 1×1 elastic band is knitted, the stage ends with the closure of the loops.
At the end, the product is carefully sewn along the back side, and the high elastic band is tucked onto the front side. A pair for the first bootie is made in the same way.
Booties with teeth for boys
The product is especially successful if you use Krokha yarn and No. 3 knitting needles. For the sole, 39 stitches are cast on, all odd rows up to and including the 9th are performed with knit stitches (hereinafter referred to as kl). Yarn overs (hereinafter - nskr) are made crossed so that no holes are formed.
- 2nd row: 1 lp, nsk, 17 lp, nsk, 1 lp, nsk, 17 lp, nsk, 1 lp.
- 4th row: 2 lp, nsk, 17 lp, nsk, 3 lp, nsk, 17 lp, nsk, 2 lp.
- Further, in the 6th and 8th rows, 1 loop is added to the above diagram from both edges and 2 loops in the middle of the row.
- After completing work on the sole, you can tie neat cloves with a contrasting thread.
- Knit 12 rows in plain stocking stitch.
- The toe of the bootie is knitted using the heel construction technique, for which the loops must be correctly divided into 3 parts: 22 - 11 - 22.
- The toe is knitted until 14 stitches are formed on each needle, and the total number of stitches is 39 pieces.
- Two rows are performed with facial rows.
- Holes are made for the laces. To do this, two knit stitches are knitted along the edges at the same time, and then a regular uncrossed yarn over is made. The next row is performed only with facial stitches.
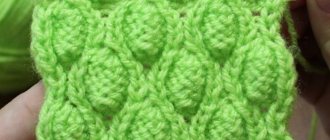
The top of the shoes can be knitted using a contrasting thread using the “corn” pattern.
Doll slippers with bows for girls
To make the product you will need about 40 g of yarn with characteristics of 100 g × 125 m and knitting needles No. 4. For decoration, you can purchase a thin satin ribbon; for white booties, a cream-colored tie is suitable.
Legend:
- “L” – front loop;
- “n*” – yarn over;
- “2vm” – knit 2 loops at once;
- “2vm (lev)” - decrease with a left tilt (slip 2 loops with the right knitting needle, then thread them with the left knitting needle in the direction from left to right, and then knit them simultaneously with the front thread).
Work begins with a set of 28 loops that need to be closed in a circle:
- 1st row: 1 L, n*, 12 L, n*, 2 L, n*, 12 L, n*, 1 L;
- Row 2 and all even numbers: knit stitches;
- 3rd row: 1 L, n*, 1 L, n*, 12 L, n*, 1 L, n*, 2 L, n*, 1 L, n*, 12 L, n*, 1 L, n* , 1 L;
- 5 row: 2 L, n*, 2 L, n*, 12 L, n*, 2 L, n*, 4 L, n*, 2 L, n*, 12 L, n*, 2 L, n* , 2 L (check number of loops after knitting a row - 48 pieces);
- 6-11 rows: L;
- 12th row: 2vm, 14 L, 4 times 2vm (lion), 4 times 2vm, 14L, 2vm (lion);
- 13th row: L;
- 14 row: 14 L, 2 times 2vm (lion), 2 L, 2 times 2vm, 14 L;
- Row 15: bind off the loops.
A ribbon is threaded through the holes on the back wall and tied into a bow.
Knitted pink beanie shoes with bows
Adorable shoes for babies from birth to two years!
We will need:
- yarn (50% cashmere, 40% merino, 10% silk, 50 grams per 56 meters) – 1-2 skeins;
- sp. No. 3 (No. 3, 25, No. 3.75);
- 2 buttons.
Size: 0-6 (6-12, 12-24) months. The size of the beanie shoe can be increased by choosing a larger needle thickness.
Description
On the sp. No. 3 (No. 3, 25, No. 3.75) dial 19 p.. 1 p.: l. P..
Next 5 rubles. garter stitch, adding 1 st on both sides in each 2 p. = 25 p.. 7 r. (LS): 14 l. n., n. p. not knitted, transfer the thread to the faces. side and return the st. to the left sp., turn.. 8 r.: l. p. to the end of the r.. 9-10 r.: l. p.. At 9 p.m. when we reach the point with the constriction, we insert the right sp. into it, put it on the left sp., wire. constriction and stitches together with the front one, and so on with all stitches with constriction. 11 r.: 18 l. n., n. n. not prov., transl. thread on faces side, return the item to the left. sp., turn. 12-14 r.: l. p.. 15 r.: 14 l. n., n. n. not prov., transfer n. on faces side, return the item to the left. sp., turn. 16 r.: l. p.. Then 5 r. plat. knitting with decreases of 1 p. on both sides = 19 p..
For the doll's left shoe
In the last R. + 5 p. at the end of the r.. Sl. r.: i. p. = 24 p.. 1 p.: + 1 p., l. p.. 2 p.: i. P..
Repeat 1-2 pp. until reaching 27 p.. 6 p.: 2 p.m. l., i. n. to the end of the river = 26 p.. 7 p.: + 1 p., l. p. = 27 p.. 8 p.: 14 l. p., i. p.. 9 p.: + 1 p., l. p., last 2 p.vm. = 27 p.. 10 p.: close 7 p., 2 l. p., transfer 3 p. to the pin, close 3 p. purl. to the end = 14 p.. 11 p.: l. p.. 12 r.: 2 l. p., i. p.. 11-12 rr. x 5. 23 r.: 14 l. p., cast on 13 p. for fastener = 27 p.. 24 p.: 13 l. p., i. p.. 25 r.: 2 p. vm. l., l. p. to the last p., before it we make a cape from the broach between the p., wire. his faces., 1 l. p. = 27 p.. 26 p.: 14 l. p., i. p.. 27 r.: 2 p. vm. l., l. p. to the last p., before it we make a cape from the broach between the p., wire. his faces., 1 l. p. = 27 p.. 28 p.: i. p.. 29 r.: 2 p. vm. l., l. p. = 26 p.. 30 r.: i. p.. Repeat 29-30 rubles, then one more time 29 rubles. = 24 p.. Closed. P..
For the doll's right shoe
We dial 5 p., l. n. to the end of the river = 24 p.. 1 p.: + 1 p., i. p.. 2 p.: l. P..
Repeat 1-2 pp. until reaching 26 p.. 5 p.: + 1 p., and. p. to last 2 p., 2 p. vm. And. = 26 p.. 6 p.: l. p.. 7 p.: + p., 11 i. p., 14 l. p. = 27 p.. 8 p.: 2 p. vm. l., l. p. = 26 p.. 9 p.: + p., 12 i. p., 13 l. p. = 27 p.. 10 p.: closed. First 7 p. knits., 2 l. p., put 3 p. on a pin, close 3 p., l. p. to the end.. 11 r.: 12 i. p., 2 l. p.. 12 r.: l. P..
Rep. 11-12 rr. x 5 times. 23 r.: 12 i. p., 2 l. p., + 13 p. for fastening = 27 p.. 24 p.: l. p.. 25 r.: 2 p. vm. i., 11 i. p., 14 l. p. = 26 p.. 26 r.: + p., l. p.. 27 r.: 2 p. vm. and.. and. p., before the last p. + p. from the stretch between p., 1 and. p. = 27 p.. 28 r.: l. p.. 29 r.: 2 p. vm. i., i. p.. 30 rub.: l. p.. 29-30 rr. x 1.29 rub. x 1 = 24 p.. Close st..
Clasp for the doll's left shoe
From the faces. side Remove 3 p. from the pin, 14 r. plat. viscous. Then: 1 l. p., n. before work, 2 p.m. l., type this item in the next line. row (button hole). Closing p.. Fastener for the doll's right shoe
From inside out sides sn. 3 p. from a pin, knit. 15 rub. garter stitch, then 1 l. p., n. before work, 2 p.m. l., type this item in the next line. R. (button hole), after - 2 p. garter stitch. Close p..
Bows (x 2)
Nab. 8 p., 19 r. garter stitch. Closing P..
Center for bows
Nab. 4 p., 11 r. pl. in.. Closed P..
Assembly
Sew the sole and heel. We sew on the buttons, connect the middle for the bow into a ring, thread the bow and sew the hat shoes onto the toe. DIY booties for newborns are ready!
Knitted pink beanie shoes
Yarn characteristics: 50 g × 56 m, knitting needles can be used with numbers 3 (for newborns 0-6 months), 3.25 (for babies from 6 months to 1 year), 3.75 (age 1 - 2 years) . The fasteners require 2 buttons.
- After casting on 19 loops, the 1st row is performed with knit stitches (hereinafter referred to as RL).
- The next 5 rows contain only LP, while even rows near the side edges are made with 1 yarn over (hereinafter referred to as n\a). As a result, there are already 25 loops in work.
- In the 7th row, after completing the knitting of 14 LPs, remove 1 loop without knitting, while the working thread is pulled in front of the product (hereinafter such loops will be called “constrictions”), the needlework is turned.
- The next 3 rows (8-10) are performed exclusively by LP, while in the 9th row the outer loop and the constriction thread should be knitted simultaneously by LP.
- The 11th row contains 18 LPs and 1 “constriction”; after their completion, the work is rotated.
- The interval 12 - 14, as well as the 16th row contain only LP.
- In the next row, after 14 LP, a constriction is done.
- To complete the element, 5 rows of exclusively LP are knitted, with 1 loop being decreased from both edges to make a total of 19 loops.
Sequence of actions for the left shoe:
- 0 rub. (aka the final row of the previous element): at the end of the row, 5 air loops are cast on the knitting needle;
- 00 r.: 24 from\p (purl);
- 1st p.: LP, at the end of 1 n-d;
- 2 p.: from\p;
- 3-4 rows: repeat rows 1 and 2;
- 5 rubles: 2 together LP (hereinafter referred to as vml), from\p;
- 6 r.: n-d, LP;
- 7 rubles: 14 LP, from\p;
- 8 r.: n-d, LP, at the end 2 vml;
- 9 r.: close 7 loops, 2 RL, 3 loops are brought out on an additional knitting needle, 3 loops are closed with purls, 14 RL;
- 10 rubles: LP;
- 11 r.: 2 LP, from\p;
- 12 rows: rows 10 and 11 are repeated 5 times;
- 23 r.: 14 LP, additionally 13 air loops (fastener);
- 24 rubles: 13 LP, from\p;
- 25 rubles: 2 knit stitches together, RS, before the last knit stitch, another additional knit stitch is knitted from the broach;
- 26 rubles: 14 LP, from\p;
- 27 r.: repeat the 25th row;
- 28 rubles: from\p;
- 29 r.: 2 together facial, LP;
- 30 rubles: from\p;
- 31 r.: repeat 29 and 30 rows, again the 29th, and then the work is closed.
Sequence of actions for the right shoe:
- 0 r-d (aka the last row of the element made at the very beginning of the work): 5 air loops are cast on immediately after the first edge loop;
- 1st row: n-d, from\n;
- 2nd district: LP;
- 3-4 rows: the same as in 1 - 2 rows;
- 5 r-d: n-d, from\p, knit the last two loops at the same time;
- 6th district: LP;
- 7 r-d: n-d, 11 from\p, 14 LP;
- 8 r-d: 2 vml, LP;
- 9 r-d: n-d, 12 from\p, 13 LP;
- 10 r-d: close 7 loops, 2 RL, 3 loops on an additional knitting needle, close 3 more loops, RL;
- 11 r-d: 12 from\p, 2 LP;
- Row 12: LP, then rows 11 and 12 are repeated 5 times;
- 23 r-d: 12 from\p, 2 LP, 13 additional loops are cast on for fastening;
- 24 district: LP;
- 25 r-d: 2 together purl (hereinafter referred to as vmiz), 11 from\p, 14 LP;
- 26 district: n-d, LP;
- 27 r-d: 2 vmiz, before the last loop, 1 from\p is knitted from the broach, 1 from\p;
- 28 district: LP;
- 29 r-d: 2 vmiz, from\p;
- 30 r-d: LP;
- 31 row: repeat 29 and 30 and again 29 rows, loops are closed
To fasten the left slipper, 14 front rows are knitted from the 3 loops that were on the pin. In the final row, you can yarn over and knit the next 2 loops at the same time to create a hole for a button.
For strength, a couple more rows are performed using the scarf technique. For the right shoe, the clasp is performed in the same way. The bows consist of two rectangles knitted with a scarf pattern, dimensions: 8 loops × 19 rows, 4 loops × 14 rows.
The finished products are assembled: first the sole and heel are sewn together, then the buttons are sewn on. A narrow strip for a bow is secured into a ring through which a wide cloth is threaded, and the resulting bow is sewn onto the bootie.
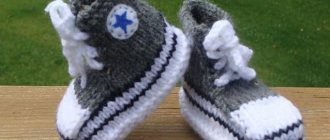
Simple knitted booties and sneakers - master class.
Stylish and unusual booties and sneakers for your baby.
In our master class we use gray, black and white colors, but they look great in combination with black, red, pink, green - to your taste. We will need:
- threads of the main color (in our case, light gray) - about 50 g;
- some white threads;
- sp. No. 4 and sp. No. 5 for the smaller size and No. 5 and No. 6 for the larger;
- two hundred sp. No. 4.
Size: 0-3 (3-6) months.
Pattern diagram:
Description
We collect 4 (5) 6 p., l. with a white thread. p.. 1 p.: 1 l. p., yarn over, 11 l. p., (yarn over, 1 l. p.) x 2, yarn over, 11 l. p., yarn over, 1 l. p.. 2, 4, 6, 8, 10 r.: l p.. 3 r.: 2 l. p., yarn over 11 l. p., yarn over, 2 l. p., yarn over, 3 l. p., yarn over, 11 l. p., n., 2 l. p.. 5 rubles: 3 l. p., n., 11 l. p., (n., 4 l. p.) x 2, n., 11 l. p., n., 3 l. p.. 7 r.: 4 l. p., n., 11 l. p., n., 5 l. p., n., 6 l. p., n., 11 l. p., n., 4 l. p.. 9 r.: 5 l. p., n., 11 l. p., (n., 7 l. p.) x 2, n., 11 l. p., n., 5 l. P..
Change the thread to n. main color, do not cut off the white one. Prov. n. above the fingers white color. (in the diagram above there are blue squares). 11 r.: 19 l. p.bas. color, 1st r. diagrams b. color.. 19 l. n. gray. We alternate these two colors. 12 p.: 19 i. p., 2 r. сх., 19 и. p.. 13 r.: 20 l. p., 3 r. сх., 20 l. p.. 14 p.: 20 i. p., 4 r. сх., 20 и. p.. 15 rub.: 20 l. p., 5 rub. сх., 20 l. p.. 16 p.: 21 i. p., 6 rub. сх., 21 l. p.. 17 r.: 21 l. p., 7 r. cx.. 21 l. p.. 18 p.: 22 i. p., 8 rub. сх., 22 и. P..
Cut off b. the thread is now only gray. 1 rub.: 29 l. p., broach, turn. 2 rubles: sn. p., 7 i. p., 2 p. vm. and., turn. 3 rubles: sn. p., 7 l. p., broach, turn. 4-13 pp.: like 2 and 3 – x 5 times. 14 rubles: as 2. 15 rubles: sn. p., 7 l. p., broach, l. p. until the end of the r.. 16 r.: 21 i. p., 2 p. vm. i., i. n. to the end of the river = 35 p..
Right side of booties for a boy or girl 1 r.: 14 l. p., the remaining points are transferred to additional. sp.. 2 r.: i. p.. 3 r.: 11 l. p., 2 p. vm. l., 2 l. p.. 4 p.: i. n.. 5 r.: l. p.. 6 p.: i. p.. 7 r.: 9 l. p., 2 p. vm. l., 2 l. p.. 8 p.: i. n.. 9 r.: l. p.. 10 rub.: i. p.. 11 r.: 7 l. p., 2 p. vm. l., 2 l. p.. 12-13 pp.: l. p.. Close all the loops.
Tongue
We place 7 central sts on the sp., 12 r. In stockinette stitch, bind off the stitches.
Left side
1 r.: l. p.. 2 p.: i. p.. 3 r.: 2 l. p., 2 p. vm. l., 11 l. p.. 4 p.: i. n.. 5 r.: l. p.. 6 p.: i. p.. 7 rubles: 2 l. p., 2 p. vm. l., 9 l. p.. 8 p.: i. n.. 9 r.: l. p.. 10 rub.: i. p.. 11 r.: 2 l. p., 2 p. vm. l., 7 l. p.. 12 r.: l. p.. 13 r.: l. p.. Close p..
Laces (x 2)
Bilateral sp. dial white n. 3 p., in a circle l. Ch. about 38 cm.
Circle
1 r.: l. p.. 2 p.: 1 l. n., pull out n. from the broach, 1 l. n., pull out n. from the broach, 1 l. p.. 3 p.: l. p.. 4 p.: 1 l. p., take out the p. from the ave., 2 l. n., take out n. from the right, 1 l. n.. 5 r.: l. p.. 6 rubles: 1 l. p., 2 p. vm. l., 2 l. p., 2 p. vm. l., 1 l. n.. 7 r.: l. p.. 8 r.: 1 l. p., 2 p. vm. l., 1 l. p., 2 p. vm. l., 1 l. n.. 9 r.: l. p.. Close p..
Assembly: sew along the bottom up to the heel, sew on a circle, sew a star on it and lace up the sneakers, sticking the laces into the holes from the broaches and 2 vm. l..
Video
Beanie boots!
Booties “Fluffy bears”
Knitted booties for newborns, the diagrams and descriptions of which are presented in the article, can be made in the form of cute teddy bears. To knit a product with a 10 cm sole, you will need two types of yarn, for example, Pekhorka “Children’s” for the sole and Alize Softy plush threads for the upper part.
You also need to prepare 2 knitting needles and a hook, which will be used to make the ears, nose and lace, and four black beads for the eyes.
For the sole, 44 loops are strung , Pekhorka yarn, and 2 rows are made with only knit stitches. In the pattern for the sole, all loops are knit (kl\p), so only their number between yarn overs is indicated (kkd).
- 3rd row: NKD, 20, NKD, 2, NKD, 20, NKD;
- 4, 6, 8, 10 rows: only kl\p;
- 5 row: 1, ncd, 20, ncd, 4, ncd, 20, ncd, 1;
- 7th row: 2, ncd, 20, ncd, 6, ncd, 20, ncd, 2;
- Row 9: 3, ncd, 20, ncd, 8, ncd, 20, ncd, 3 (in the end there should be 60 loops in the work).
Next, 6 rows are knitted with the same thread in stockinette stitch, after which a plush thread is included in the knitting, which is used to knit 8 rows using the garter technique (knit stitches in both directions).
Forming the nose:
- 25 stitches are knitted together, then 9 more, then 10 and 11 loops are knitted together purlwise.
- The work unfolds, 1 loop is removed as an edge loop, then 8 knit stitches and two loops are simultaneously knitted with the knit stitch behind the back thread.
- Knitting continues in this manner until there are 15 loops left on each side.
- When the heel is formed, the last row must be knitted to the end of the second knitting needle, and then knit another row.
Rubber:
- The thread is changed to Pekhorka and knitted 4 rows with a 2 × 2 elastic band.
- Then 4 more similar rows, only with plush thread.
- The described 8 rows are repeated.
- At the end of the stage, 2 rows are made with knit stitches using Pekhorka yarn and the work is closed.
The bootie is sewn from the wrong side along the back to the sole, made by Pekhorka.
Next, using a thread and a needle, the side is formed:
- with the needle you need to grab the thread from the loops of the 1st and then from the 6th row, which were knitted with stockinette stitch;
- after which again the thread is from the 1st row, then from the 6th and so on until the end in a circle;
- then the stitches are pulled together and a border is formed on the front side.
Next, the entire sole is stitched to the end and the product is turned inside out. Round ears are crocheted in the desired size, they can be of two colors, plush thread looks good around the edge. The nose is also knitted round, on top of the circular posts made with plush thread, a small segment of Pekhorka yarn is applied using a needle or hook.
All details are sewn onto the product. The second bootie is made in the same way.
Crochet booties: patterns for beginners
This part of the article can be called “training for dummies or how to quickly and easily crochet booties.” We chose the simplest patterns that can be implemented without any knitting skills. If you've never held a hook and thread in your hands, now is the time to start.
The simplest booties
See also...
✅ I want to make money by knitting, where to start: an honest opinion from a needlewoman
✅ How I tried to knit a string bag and why it didn’t work
✅ 6 reasons to learn to knit right now
✅ Crochet patterns and descriptions for beginners
If you learn how to knit the simplest patterns, you can get creative and turn them into funny little animals (monkeys, bunnies, lambs, bears), interesting fruits (strawberries, apples). You can also just beautifully tie the edge or decorate the socks, which will go beautifully, for example, with a headband and, voila, a chic set is ready.
Lightweight models for the summer or for home can be made with felt soles. For this model (sole size 10 cm) you need soft yarn (100% acrylic, 50 g / 200 m) in 2 colors.
We dial 12 v.p. + 3 v.p. (total 15 ch), insert the hook into the 4th loop of the chain from the hook and knit 3 rows according to this pattern.
Having knitted three rows, we move on to another color.
4th row - in each column (back) we knit a single crochet loop. The result should be 56 loops.
We knit the 5th one in the same way. The result will be two rows knitted with white thread.
Again we switch to blue. We start by knitting a “bump” (2 chain stitches, after 2 unfinished stitches, then one chain stitch).
We skip one loop and make a “bump” again.
Next - one air loop.
So knit a whole row and close. We knit the 7th in the same way as the 6th.
We close the row and break the thread. Having marked the middle, we begin to knit the toe with a white thread.
Insert the hook into the back wall of the loop and knit a white “bump” from two unfinished loops.
Next, we knit “bumps” from three unfinished loops to the middle (you should get 14 pieces). The last bump of two unfinished loops.
Turn it over and also knit “bumps”.
There should be 7 pieces, after which you need to connect them.
Next - 4 “bumps”.
Finish the row in the same way.
2 more rows and switch to blue again.
We decorate the edge by knitting three air loops for each column.
Ready!
Knitted sneakers for children
Handmade Adidas sneakers will be appreciated by true gentlemen. For this “masterpiece” you will need thin white cotton yarn (100% cotton, 50g/150m), hook number 2 and 3 hours of free time.
We start with the sole. The sole is knitted according to this pattern.
Next, without increments - 2 rows of single crochet stitches. Between the rows we embroider a strip of a contrasting shade (take blue).
The sock is knitted from the front 30 stitches. 1 row - single crochets, 2 - double crochets (3 loops and one top). There should be 10 loops left.
We connect all 10 columns, move the thread to the beginning of the row and knit 2 rows of single crochets.
7 rows - double crochets.
The tongue ends with three rows of white thread. Then you can tie the product around the perimeter.
We embroider the logo and thread the lace. Ready!
DIY summer sandals for a child
If you love children's knitted sandals for the summer, by learning how to knit soles, you can come up with a lot of ideas and create a large number of interesting models.
Next we create the upper of the shoe.
Fold the sole in half and find the middle at the toe. The middle should be 5 columns. Tie a thread with a regular knot and tie 13 air loops, then attach it to the opposite side of the spout using a half single crochet (dc). Next, knit according to pattern 2 (only what is indicated in blue and dark red). The nose should look like in Fig. 3. Do not break the thread. In the last row you attached 2 half-columns bn to the sole.
Further:
- 1st row: 3 vp, attach them to pst.b.n. to the strap (skip 3 dc). Work 34 treble stitches. n. and also attach pst. b. n. to the strap.
- 2nd row: 1 vp and the entire row of st. b.n. = 35 st.b.n.
- 3rd row: Again 3 v.p. and 34 tbsp. With. n., 4 v.p., 3 tbsp. S.N. in the middle of the strap, ch 4
- Next is a row of arches for the ribbon. 5 v.p., st.s.n. through 1 st.s.n. previous row. Senior s.n., 1 v.p., st.s. n. repeat the entire row in a circle.
- Start the next row with pst. b.n. in an arch, 4 vp, dc, 1 v. p., senior senior sciences again in the arch. And so the whole series.
Children's shoes for girls (crochet)
Christening dresses or an openwork hat will look chic when paired with crocheted shoes with beads. Make them into ballet shoes or moccasins. The most important thing is that the yarn is soft and pleasant for a child’s feet.
You can take any cotton threads you like and a hook No. 2.5. We start with the sole (look at the diagram below).
If you have a hard time navigating the diagram, I suggest you go into more detail at this stage.
We cast on 17 air loops (we start knitting from the 3rd).
1st row: 7 single crochets, 7 single crochets, 7 single crochets in the last stitch (and continue to knit on the other side of our chain), 7 single crochets, 7 single crochets, 4 single crochets in the last stitch, connecting stitch .
2nd row: 3 chain stitches, double crochet in the same base. 14 double crochets, (2 double crochets from one loop) - 5 times, 16 double crochets, 3 double crochets from one loop, 4 double crochets from one loop, 3 double crochets from one loop, connecting stitch.
3rd row: 3 chain loops, 15 double crochets, (2 double crochets from one loop, double crochet) - 2 times, (3 double crochets from one loop) - 2 times, (double crochet, 2 double crochets double crochet from one loop) - 2 times, 16 double crochets, (2 double crochets from one loop, double crochet) - 2 times, (3 double crochets from one loop) - 2 times, (double crochet, 2 double crochet from one loop) - 2 times, connecting stitch.
Row 4: chain stitch, tie the entire row with single crochets, ending with a connecting stitch.
Row 5: 3 chain stitches, knit the entire row with single crochets behind the back half-loop of our sole, ending the row with a connecting stitch.
Row 6: 3 chain stitches, knit the entire row with double crochets, ending with a connecting stitch.
Let's move on to the white thread.
7th row: 3 chain stitches, 15 double crochets, (we knit 2 double crochets together with a common top) - 10 times, finish the row with double crochets, ending with a connecting stitch.
8th row: 3 chain loops, 14 double crochets, (we knit 2 double crochets together with a common top) - 6 times, finish the row with double crochets, ending with a connecting stitch.
We make 5 connecting loops. We unfold our bootie and knit from the inside.
Row 9: 3 chain stitches, 27 double crochets.
For the strap we cast on 20 air loops. 10th row: we knit a double crochet into the fourth loop from the hook, 2 chain loops, skip 2 stitches of the previous row and knit 2 double crochets, knit 2 chain loops again - skip 2 stitches of the previous row and knit with double crochets to the end of the row.
It’s almost ready, so I suggest tying the product with single crochets.
Sew on a bow, buttons and beads.
Video tutorials: how to knit booties for newborns
Little ones simply need booties, because they warm their feet, protect them, and are also very soft and cozy. It seems that mom is hugging her favorite fingers.
This pattern knits very quickly and easily, despite the scales.
Warm boots (ugg boots). We will create high boots or boots made of wool yarn (grass can be used) for colder times. They will look very cute on a baby who is only a couple of months old.
Crochet sneakers for boys.
Openwork booties for girls.
Cozy Minions slippers for kids.
Stylish “Marshmallows”.
New Year's ideas "Santa Claus".
Share with your friends!
- 99
- 33
- 41
- 173
Shared
Subscribe to our Yandex.Zen channel or Yandex.Messenger
Bunnies booties on two knitting needles
Cute booties are knitted according to a pattern similar to the “Fluffy Bears” booties . The only difference is in the process of making the long bunny ears. 22 loops are cast on the knitting needles with white yarn, and it is advisable to leave a long end of the thread for sewing the workpiece.
The entire first row is purled, including the starting and ending edge stitches. Then the work includes yarn of the main color, for example, pink, with which 6 rows are knitted in satin stitch. When cutting the pink thread from the work, it is better to leave a long end so that you can use it to sew the ears to the slippers.
Knitting continues again with white yarn, with which 1 front row is knitted.
The second white row is purled, and then the strip is closed with a purl row. The blank for the second ear is made in the same way. The rectangle is folded in half lengthwise, right side out, and then sewn together with the white end of the thread using a needle or hook.
Video describing the process of knitting bunnies booties:
The resulting strip is folded in half again, forming an eyelet, then the edges are sewn together with the remaining white thread. Using the pink end of the thread, the ear is sewn to the bootie. As a spout for such slippers, you can use a pearl-colored bead, which is sewn onto the very edge of the booties.
Working with a pattern
The finished pattern needs to be adjusted according to the size of the baby’s legs. In this case, all dimensions must be adjusted proportionally, using one of the methods proposed here.
You might be interested in: Making a pattern and sewing gloves yourself
Suede shoes
You can use not only a ready-made diagram, but also one you made yourself. The simplest option is to create a children's pattern from three parts (sole, shin and toe) and fit it to size.
Pattern
Knitted crocodile socks
For socks, 50 g of yarn with characteristics of 112 m × 100 g and knitting needles No. 3 are enough. The number of loops for “crocodiles” should be divided by 8 with the addition of 2 edge loops; in the example, 42 loops are strung.
- 1st row: purl only (hereinafter referred to as purl);
- 2nd row: after the edge, 1 yarn over (hereinafter - NKD), 1 knit yarn over (hereinafter - KL\P), this is repeated until the end of the row;
- 3rd row: NKD, NKD from the previous row descends from the knitting needle, 1 kl\p, so until the second edge;
- 4th row: the thread is placed in front of the product, 7 air loops are strung on the left knitting needle, which are immediately knitted with 1 purl (hereinafter - from\p), 7 loops are knitted from the k\p of the previous row (1 k\p, ncd, 1 k\ n and so on until completion);
- The 5th row is knitted according to the pattern of the 1st row, the 6th row - the 2nd row, the 7th row - the 3rd row;
- Row 8: 7 loops are knitted from 1 knitting stitch (see row 4), the thread is placed in front of the product, 7 loops are strung on the left knitting needle and tied together from stitching.
You need to make 3 stripes of such “scales”, this means repeating knitting from rows 1 to 8 three times.
Finally, 8 rows are knitted only with knit stitches, and the work is completed. To continue knitting, you need to cast on 4 knitting needles from the side of the wavy row in this way: 4 loops from each “scale” and the same number of loops from the space between the “scales”. You should get 40 stitches in total, 10 on each needle.
The first row is knitted, then the sock itself is knitted:
- 11 loops are transferred onto 1 knitting needle;
- Of these, 18 rows are knitted with only knit stitches;
- the element must be completed on the front row;
- 8 loops are cast on from the side edges on both sides;
- then follows knitting in a circle for 7 rows only with knit stitches;
- 4 rows are knitted purl and 4 rows knitted;
- The sole is made in stocking stitch across.
Booties
You can use knitting needles to knit booties for newborns that look like neat bright boots; diagrams and a description of the model are given below. A set of 28 loops is made on the knitting needles with pink thread to make the sole. The gradual addition of another 20 loops is carried out according to the scheme described in the “Teddy Bears” model.
As a result, there should be 48 loops on the knitting needles.
Dark gray yarn is tied and 4 rows are knitted using the stocking technique (knit stitches in one direction and purl stitches in the other). In the 5th row, two knit stitches are knitted, then a straight yarn over is made and this is repeated until the edge stitch, the 6th row is knitted purlwise.
Next, you should perform 4 more rows of stockinette stitch. The colored strip can later be sewn using a needle to create teeth, or in the 11th knitting row, grab the stitch of the first dark gray row with the left knitting needle and knit two stitches at the same time.
The gray thread breaks, the work continues with pink yarn:
- 15 loops are knitted, then a combination of 2 purls and 2 knits is knitted 9 times, the last 15 loops are also knitted.
- In the opposite direction, 15 knit stitches are knitted again, 18 rib stitches and 15 knit stitches again.
- Data from row 2 is repeated 7 more times.
- Next, 15 knit stitches are knitted, 2 purl loops are knitted simultaneously with a purl loop, 2 knit stitches are knitted with one knit stitch, until the end of the elastic band, the row ends with 15 knit stitches.
- In the opposite direction, 15 knit stitches are performed, then 3 knit stitches are knitted 3 times at the same time, and again 15 knit stitches. This is how the toe was formed.
https://www.youtube.com/watch?v=06orQfZGkMA
For a more complete girth of the baby’s leg, a 1 × 1 elastic band of the desired height (5 – 6 cm) is then knitted. After that, 8 rows are knitted only with knit stitches (garter stitch), then several rows are knitted with any two-color pattern, after which another 4 rows are made with only knit stitches, and the work is completed.
After stitching the product, you can crochet two flowers, which are sewn onto the finished shoe.
LiveInternetLiveInternet
Knitted cap
The size of the doll's head corresponds to the average size of a newborn's head. Knitting needles 3.0. Pekhorskaya yarn “Elegant” 100% merino wool. 100 gr – 250 meters. Calculation of the head size of a newborn. The author of the work is Signora Feya.
Cast on 52 loops (tail when casting on 85 cm) with white yarn and knit 1 row with white thread using knit stitches. Then knit 2 rows in pink, knit 2 rows in white, knit 2 rows in pink, knit 2 rows in white, knit 1 row in pink. Next, knit with a “hedgehog” pattern (also called “corn”). Watch the video on how to knit this pattern: Knit 8 strips of these “hedgehogs” or “knots”. After the eighth row of hedgehogs has appeared on the front side of the cap, we knit another row on the wrong side as the loops look (knit, purl, purl) and proceed to knitting the back of the head. It can be knitted with any pattern: stockinette stitch, rice pattern (or, as it is also called “tangle”), it seemed to me that a “tangle” with alternating loops not in each row, but every other row would be most suitable. I don't know what this pattern is called. Break the thread, slip 19 loops onto the right knitting needle, attach a new thread, knit 13 loops as the loops look, and purl 14 and 15 together. Turn the knitting, knit the front knit, purl the knit, the 14th and the first unknitted knit together, turn the knitting. To avoid a square back, in the next row make yarn overs at the beginning and at the end of the row. Then knit in accordance with the chosen pattern. When about 5 loops remain on the sides, you can knit when knitting the back of the head, cut 1 loop at the beginning and at the end of one or two rows. I didn't do this when knitting the pink hat. So, the occipital part is connected. We look at the face of the work and see that on the right there is one side loop left, all the back loops are knitted, on the right the last side loop is knitted together with the back loop and the working thread “sticks out” from it. Using a free knitting needle, we lift (or cast on, I don’t know how to do it correctly) the edge loops, starting from the cast-on white row. We lift 17 loops and knit them with knit stitches. We turn the work and go back with knit stitches. We knit the remaining back and side stitches with the knit stitches. We lift 17 stitches from the edge stitches with a free knitting needle and knit them with knit stitches. Knit the next row with white thread using dice loops. At the end of the row, cast on approximately 16-17 loops using this white thread in any way. Track. row with facial loops, at the end, cast on 3 more air loops. Next We knit the first row with a knit stitch with a blue thread and the entire row with a knit stitch with a pink thread. Next make holes for the loops in the row: yarn over and two together. Then use white thread to knit two rows and bind off all the loops.
Ideas and patterns for baby booties
Many models of booties are based on the same manufacturing principle. Therefore, you can create personal variations by selecting and combining different colors of yarn, using textured “plush” threads and knitting various patterns for lapels.
Knitted booties for newborns: diagrams and descriptions will help even beginners knit a product
The resulting one-color shoes can be decorated with embroidery using woolen threads, to which beads and buttons can be added.
Knitting booties for newborns is not a difficult task. The abundance of simple patterns and their detailed descriptions allows even the most inexperienced craftswomen to create masterpieces. By adding your own imagination and replacing some of the standard patterns from the pattern with openwork, you can make summer slippers for your baby.
Author: Elena Zhukova
Article design: E. Chaikina