02/06/2019 Maria Ivanovna Handicraft Knitting is one of the most popular types of needlework, common among women of all ages. Having mastered this technique, you can please yourself and your loved ones with stylish and fashionable things. In this article we will look at the different sizes of knitting needles.
Classification
To a large extent, the type of knitting needles determines what kind of knitting will be the result and how the process of making the item will proceed. Tools can be divided into four main types:
- Straight knitting needles are best for making straight fabric. They are always sold in pairs and equipped with end stops.
- Circular jigs are used for knitting in the round or for making fabric. They are two small straight knitting needles connected to each other by a flexible cord.
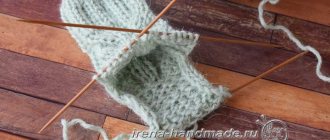
- Stocking needles are several (usually 4-5) short, straight needles of the same length and thickness. They are intended for knitting socks and stockings.
- Auxiliary knitting needles - used for knitting individual parts, for example, pockets, fingers on gloves or complex decorative patterns. They look like short, curly instruments.
How to choose?
Of course, you can try to knit everything with one pair of knitting needles. However, this will require many times more time, effort and patience and will certainly not bring pleasure. Therefore, having decided on the product you want to make, you need to choose the right size of knitting needles.
For beginner needlewomen, it is recommended to try to knit the simplest things, for example, a scarf or snood. Having mastered the needlework technique, they proceed to more complex products: a hat, socks, cardigan or sweater. This way you can work with all types of knitting needles.
If you plan to knit a scarf or snood, it is important to decide on a specific model. For a regular straight project, regular straight knitting needles will do. If you want to master the technique of circular knitting, it is better to choose the appropriate knitting needles with a fishing line length of at least 80 cm. By the way, the same devices are ideal for a hat, and the cord should be shorter - from 40-60 cm.
To knit socks, it is definitely worth purchasing stocking needles; most often you need five of them. Although such products are made in different ways.
Finally, making bulky items such as sweaters, skirts, and dresses, as well as knitting large clothing sizes, will require a whole set of knitting needles. Everything here depends on the style and complexity of the ornament. A straight skirt without pockets can be knitted with two knitting needles; to finish the sleeves and neck of the dress you will need circular tools, and to knit decorative elements you cannot do without auxiliary tools.
How to calculate loops for a hat
Hats are the most important attribute of a wardrobe in chilly autumn and cold winter. That is why a woman’s hat should not only be beautiful, but also warm. In order to knit a hat yourself you need to prepare a little. And even a beginner can handle the knitting process.
The main stages of preparation for knitting:
- Select a product model: with or without a collar.
- Choose a pattern.
- Calculate the loops.
Among these tasks, one is the most important - calculating the required number of loops for the future hat. Because if you make mistakes at this point, it may be either too small or too loose.
One of the simplest methods of calculation is to knit a sample of the future product. To do this, measure the circumference of your head (for example, 56 centimeters) and use selected knitting needles to knit a 10*10 centimeter square from selected yarn. After this, take a ruler and measure the number of loops in 10 centimeters. For example, there are 15 loops in 10 centimeters. This means that 1 cm = 1.5 loops. Then we carry out a basic calculation: 56 * 1.5 = 84 loops.
Attention! When measuring an elastic band, it is best to stretch the sample a little. Since this will help in the future to avoid miscalculations in knitting, and the finished product will still stretch a little when worn.
How many stitches does an adult need to put on a hat?
In order to knit a hat for an adult man or woman, you need to carry out a similar calculation of the number of loops. Or use the “grandmother’s method” of typing. Its essence is as follows: in order to get a product of 20 centimeters, you need to take a piece of thread larger than 3 times, that is, 20 * 3 = 60 cm. Leaving the thread for casting on 60 cm, you should cast on a sufficient number of loops right up to its very end .
This way, the number of loops will be appropriate and the product should fit. However, in order not to redo it, which can be much more annoying, it is best to use the first method with knitting a sample.
Taking measurements correctly
Any hat consists of 2 main parts: the crown (the height of the hat itself) and the bottom (the height of the beginning of the decreases). To take measurements correctly:
- Measure the distance from one ear to the other and divide it by 2.
- Determine the length between the earlobes through the crown.
- Measure the circumference of your head.
Schematic measurements are shown in the figure:
Finished product parameters:
Choosing a size
Having decided on the type of knitting needles, it is equally important to choose the correct size for the yarn used. If you don't do this, you can simply ruin the product. If the devices are too thick, the knitting pattern will be loose and almost invisible. Very thin knitting needles will result in the fabric becoming tight and tight. In both cases, the product will turn out ugly and time wasted. This can be avoided if you select a tool by number.
This parameter is determined by thickness. For example, if the size is indicated by the number “2”, then the thickness of the knitting needle is 2 mm. To choose the right attachment for a particular type of yarn, it is important to take both numbers into account. The optimal option for determining the size of knitting needles is considered to be when the tool number is one more than the corresponding yarn parameter. For example, a knitting thread has a marking of 3 mm. Therefore, the knitting needle should have a thickness of 4 mm.
There is one more important nuance. If an unusual type of yarn is used (down, with pile, sequins), then the knitting needles should be 2-3 mm larger than the thickness of the thread. This trick will allow you to get a more elegant product.
Spoke length
This parameter is also of great importance. The most popular knitting needles by length:
- straight - 25, 36 cm;
- double-edged - 18, 25 cm;
- circular with cord length 40, 60, 80, 90 cm;
- flexible - 45 cm.
- straight - 18 cm;
- double-edged - 36 cm;
- circular-29 cm.
Among the knitting needles of non-standard length are:
The length of the tool is selected depending on the product that is planned to be manufactured. The larger it is, for example, knitting is done for women of large sizes, the longer the device should be.
Choice depending on material
Looking at the wide range of knitting needles, beginners in needlework are interested in what they should be made of and whether this affects the knitting process. The answer to this question is the information that the material for making tools is selected based on the texture and composition of the yarn used:
- Metal knitting needles are best suited for knitting items made from natural wool or acrylic. They are very slippery and the porous thread moves easily without complicating the process. If you treat them with care and do not bend them, they will last for decades.
- Wooden or bamboo knitting needles are lightweight. Due to their texture, they are ideal for knitting with slippery yarns, such as viscose or silk. For beginning needlewomen, it is recommended to use them; they are held tightly in the hand and are easy to pick up stitches with.
- Plastic knitting needles are very flexible and lightweight, and do not leave marks on the product. However, they also have disadvantages. Threads slip off easily, so such devices are suitable for working with certain types of yarn. In addition, they are not used when knitting for women size 50 and above, that is, for making large items.
Knitting needles for unusual threads
Yarn is called fancy if it has:
When buying such threads, you need to study the label. As a rule, foreign manufacturers indicate the appropriate size of knitting needles and hooks for working with them. If such information is not available, the following recommendations should be followed:
- For brushed yarn (mohair, angora), knitting needles are chosen two units larger than the thickness of the thread. As a result, the product will fluff up and turn out light, airy and will not roll up when worn.
- For fancy yarn, knitting needles are selected taking into account the thickest section of the thread and one unit more. If there are few decorative details and they are woven at large intervals, you should focus on the prevailing thickness of the thread in the skein. Knitting for clothing size 48, for example, is done with a tool number 5.
- For yarn with long pile and synthetic components, the best option would be knitting needles numbered 5 and 6.
- For stretch thread, knitting needles are selected according to the standard principle. During the knitting process, maintain the correct tension of the thread; it should flow freely. The lycra in the yarn will prevent the fabric from becoming loose. If you knit too tightly, the finished product will not have a “stretch” effect.
Step-by-step instructions for knitting a warm hat
Well, it's time to knit a winter hat for women. Here will be step-by-step instructions with some explanations.
Simple mohair hat
Knitting voluminous hats with knitting needles is an excellent practice, since mohair cannot be called too pliable. You only need a number 3 knitting needle and a skein of thread.
And then knit a hat from bulky yarn using these instructions:
From angora
With ordinary knitting needles, you can really knit a hat with a beautiful crown, which will be impossible to distinguish from a store-bought one.
You only need 2 yarns of different diameters and knitting needles. By the way, Angora wool requires subsequent wet-heat treatment.
You can watch the process and patterns of knitting women's hats with angora knitting needles in the video.
Warm from the grass
To knit an acorn hat from scratch, you only need a set of size 6 knitting needles and grass yarn.
- Savoy House chandeliers, their features
Engineering geodetic surveys
Geological exploration of the site
Then follow the instructions:
- Cast on 60 stitches and go with an elastic band. This is the name for alternately changing the front and back loops.
- Using a twisted cape, add every 6 to one loop. This way the cone will gradually expand.
- Knit 6 centimeters evenly.
- Then in each L row, remove 1 loop every 5.
- Gather 10 empty loops into a double thread and knit a knitted hat with a knitted stitch.
Knitting density
Often, without sufficient experience, beginners knit fabric quite tightly. In this regard, it is better to take knitting needles that are half or one size larger than the suitable ones, that is, 1.5-2 mm thicker than the yarn. However, over time it is still better to learn to control the density of the knitting.
If the work is done too hard, then the hands are under constant tension, they quickly get tired and the craftswoman does not enjoy the needlework. As a result, this also affects the appearance of the product, it turns out rough, and the yarn does not reach its potential. Very tight knitting is not recommended, even when making items such as socks. The size of the knitting needles for knitting these wardrobe items is selected one or two sizes smaller than the yarn number, and the density of the fabric is chosen to be medium.
If you knit with a weak knitting, nothing good will come out either. After all, even by changing the size of the knitting needles, it will be impossible to obtain an acceptable result. The product will look loose and stretched, and during wear it will deform even more. With the correct tension, the loop threads are held tightly on the knitting needle, do not sag, and move freely. If the process goes easily, without unnecessary effort, and the knitting needle does not slip out, then the result will be excellent.
Patterns for hats with knitting needles: diagrams and descriptions
You can decorate knitted hats with your own hands with patterns. They have been invented a long time ago and all you have to do is use the ready-made technology. Below are the main knitting patterns used for hats.
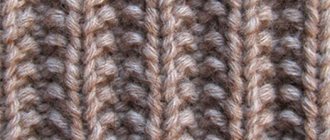
English rubber band
A common decoration for ligature is English elastic. The pattern is almost dimensionless, which is why it is easy for beginners.
A regular elastic band (alternating front and back) does not add volume to the loops and has little stretch. But the English variety is very fluffy, and also stretches well.
You can understand this using an example. Let's say there are 17 edge loops and they make 3 rows:
- The first edge must be removed without knitting. This is followed by a classic elastic band (L and I) until the last one, which is knitted by LP.
- The edge loop is removed, and then you need to follow the pattern: LP, cape, remove 1 IP, without knitting. Everything ends again at the checkpoint.
- The cape, P, can be removed without knitting; P with double crochet from the previous row is knitted together with L; yarn over; P can be removed without knitting.
Here is a hat knitting pattern to see it more clearly. You can also watch the video.
Stylish with braids
Braids are often used to knit voluminous hats so that they stay on the head better.
- Geological exploration of the site
- Search for underground communications
- Granite monuments for the grave
This is done simply:
- Cast on 95 stitches and move with a regular elastic band and so on for 6-7 centimeters. Then the braids are woven.
- 2 purl + 6 knit + 2 purl + 6 knit.
- Then knit the I-I and L-L pattern.
In the seventh row, you need to overlap near the 6th knit stitch. They are often made with toothpicks. Then you need to continue “2 purl + 2 knit + 2 purl” and make another overlap.
You need to knit a braid according to the pattern above 3 times. Then proceed in the same way, but to narrow it.
Useful tips
To be sure of the correct choice of knitting needles and threads, some experts suggest knitting a small sample before starting the main work. You need to do it yourself, since everyone’s technique is different. It is enough to knit five rows of ten loops. Then, based on this sample, the density of the fabric is analyzed and the number of loops for work is calculated.
If the product has a pattern with crossed loops and braids, you need to choose knitting needles 1.5 mm wider than the thickness of the yarn, so the knitting will be freer.
If the pattern is openwork, with numerous yarn overs, elongated or lowered loops, the knitting needles are 0.5 mm smaller.
To make elastic at the bottom of the product and cuffs, trim the neckline, etc., choose a knitting needle size that is 1 mm smaller than those used to make the product itself. Thanks to this, the edges will not stretch out.
Knitting methods
On circular knitting needles
Common knitting of hats. First, cast on the required number of loops, and then follow two plots:
- We knit a hat with knitting needles in a circle. At the ends we thread one loop into the other and that’s it.
- We make a whole fabric and then simply stitch it together. Perhaps this is the only way out for knitting large-sized hats when everything does not fit on the knitting needles. The garment will have a seam, but it will be almost invisible.
In all cases, do not forget to reduce the number of loops closer to the crown. By the way, if the narrowing is made sharp, you will get a hat with a sharp crown.
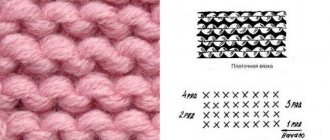
Garter stitch
If you are wondering: “how to knit a hat for everyday wear?”, then you should try garter stitch.
It is necessary to remove the first loop and then knit the LP until the very end. The fabric is then simply stitched together with a knitting needle. The most interesting thing is that such a hat will not have a noticeable seam, so it can be worn from any side, including inside out.
Stockinette stitch
If you need a hat on two knitting needles, which will have an interesting ligature, take the stockinette stitch as a basis.
With garter stitch, the only difference they have is in structure:
- The first loop is removed, and the last loop is purled.
- The row needs to be knitted “every other”: knit 1, purl 2.
You will find more information on how to knit a hat using stockinette stitch in the master class.
Determining yarn consumption
Having experience, it is not difficult to calculate how many threads you will need, for example, to knit a vest for women and the size of the knitting needles. For beginners, here are the following recommendations:
- On a piece of paper write down the number of knitting needles and the thickness of the yarn to be used.
- You need to knit a small sample. Usually this canvas measures 30 by 30 cm.
- Then count the number of rows and loops in each of them and write them down on a piece of paper.
- By multiplying both indicators, the number of loops in the entire sample is obtained. The resulting number is recorded.
- According to the size of the pattern, calculate the approximate number of loops in the entire product. The finished sample is unraveled and the length of the resulting thread is recorded.
- Now the total number of loops is divided by the number of them in the sample, the result obtained is multiplied by the length of the thread. This will be the required amount of yarn.
It is clear that these calculations are approximate and you must take this into account when purchasing material for work. It is purchased at approximately 10% above the calculated price, depending on the pattern on the product. The more magnificent it is, the larger the supply needed. The size of the knitting needles also plays a role. The thinner they are and the tighter the knitting, the more yarn you may need.
Source: fb.ru
Loop calculation
Any headdress consists of a crown and a bottom. Schematically it looks like this:
First we need to calculate the links for the elastic band. This can be done by knitting a sample of 10 x 10 cm, which will help us find out the exact number of loops, see how the pattern will lie on this yarn, and also evaluate whether we have chosen the correct thickness of the knitting needles. If the knitting is over-stretched, the finished product will quickly lose its shape and will not last long. If this is your case, choose knitting needles or a hook of a smaller diameter. Important! We measure the rubber band by slightly (!) stretching it; in all other cases, the sample must be measured in its free state - this small safety net will save you from disappointment and complete dissolution of the work.
Now we need to measure with a ruler how many loops there are in our sample per centimeter. For example, if you have 15 stitches in an area 10 cm wide, proceed as follows: 15 stitches: 10 cm = 1.5 stitches per 1 cm. Now our measurements will come in handy - depending on the circumference of the head , calculate the required number of links. For example, in our case, the volume of the head was 56 cm, respectively: 56 cm x 1.5 p (per 1 cm) = 84 p. This is exactly how many links we need in this particular case, taking into account the knitting density, the size of the knitting needles and the thickness of the yarn.
For the main pattern, loops are also counted: we knit a sample pattern and count the required number of loops by analogy with an elastic band. From the resulting number of loops of the main pattern, you will need to subtract the number of elastic loops, the resulting number of stitches. you need to evenly distribute along the length of the entire elastic band for increases in the first row, knitting from one stitch. two through an equal number of loops.
