Materials and tools
The basis of any handmade work is high-quality materials and convenient tools. For knitting you will need:
- Yarn. It is selected taking into account the season for which the boots are knitted, as well as their model and pattern. For autumn models, wool, acrylic, wool blend, cotton, and mixed threads are used. If you are knitting openwork boots for the summer, you should choose durable but lightweight options. For example, made of silk, linen or cotton.
- Hook. Choose depending on the model. Its diameter should be equal to the thickness of the thread or exceed it by one and a half times. When knitting openwork products, you should proceed from the desired lattice pattern - the larger the size of the tool, the more holes there will be on the fabric.
- Sole. The best option is a high-quality comfortable sole from existing shoes. For street models, you need a traditional base made of rubber, caoutchouc, or polyurethane. It must have high density and be wear-resistant. The base for crocheted house boots can also be crocheted, but knitted boots with felt or leather soles will be more convenient and durable.
In addition to the above, you will need twine, glue, a regular and special shoe awl. Its difference is its ability not only to pierce, but also to stitch through the material.
Rubber sole
These shoes can be worn not only at home, but also in dry weather outside.
The rubber sole from old shoes is used as a basis. It is best to use rubber because it can be easily pierced with an awl.
You can knit only with knitting needles, only with crochet, or with knitting needles and crochet together. In the latter case, the crochet not only attaches the sole to the boot, but also crochets the entire bottom of the boot. This makes it denser and holds its shape better. And on top the shin is knitted with knitting needles in any desired pattern. To get denser boots, you can knit them not in one, but in two threads.
Related article: DIY animals made from vegetables and fruits with photos
You can also not cut off the sole, but take fabric slippers with rubber soles and tie them on top. To do this, use a gypsy needle to stitch the fabric part of the slipper along the sole. You should get a line with stitches of 0.5 cm and a distance between them of 0.3 cm. Next, using a hook, knit a chain of air loops through these stitches. Having knitted a row, start knitting a sock, tying it with single crochets. The first row can have 8-12 columns.
Knit rows with additional stitches until you get 35-42 loops. Do not add any further loops. For a sock, it is enough to knit 34-42 rows. Then knit the heel and sides. To do this, start knitting single crochets on the chain stitches of the first row, grabbing 1 loop of the sock. When the sock is connected to the rest of the boot, start knitting the instep in the round. 5-7 rows, going to the shin. Knit the shin with a different pattern, crocheted or knitted.
Knitting stages depending on the model
The algorithm for making models may differ depending on the chosen master class. It is advisable to work with the insole even when using a thick sole: then attaching the boot to the base will be both easier and more reliable. After the knitted boots are ready, they need to be sewn to a solid sole using twine.
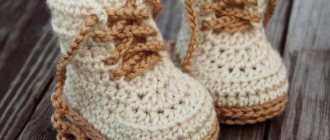
Children's
In order to make beautiful knitted boots for your baby you will need:
- 50 g soft cotton yarn in the main color.
- 30 g of yarn in a harmonizing shade.
- 4 wooden buttons.
- Hook No. 3.5.
- Scissors.
- Needle for yarn.
- Knitting markers.
Before crocheting boots for a child, you should determine the length of the insole. The size depends on the age of the baby. If he is under three months old, the base should be made 9 cm long, if from 3 to 6 - 10 cm, and if older than six months - 12 cm. The sole is knitted as follows:
- From the main color yarn you need to knit 11-14 VP. Next is 1 lifting loop, 7-10 C1H. The last loop is 6 C1H. Knit 7-10 C1H into the loop of the previous row. Place a knitting marker on the heel side. Next, stitches with 2-3 crochets are knitted only on the toe part of the boot.
- Knit a lifting loop, 5-10 C1H, 4 C2H. In the loop of the previous row - 7 C3H. After that - again 4 C2H and 5-10 C1H. At the end of the row, knit 7 C1H from the last loop.
- Lifting loop, 12 С1Н, then 17-23 С2Н, again 12 С1Н. In the last loop there are 7 double crochets. The sole is ready.
Knitting the boot top is performed according to the algorithm:
- Knit a row of 48-54 sc with the main yarn, change the color, knit the same amount. These are rows 4-5. Rows 6 and 7 need to be knitted in the same way.
- Using yarn of the main color, knit 13-16 sc, 7 times, two stitches in one, and then again 13-16 sc: in the toe part the row will narrow.
- Change color, knit 12-15 sc, then 4 times - 2 double crochets together. At the end 13-16 C1H. The 10th and 11th rows are knitted in the same way, with a change of color.
- The twelfth row needs to be knitted with the main yarn - knit a row of double crochets twice. The thirteenth one is knitted in the same way. Having finished it, you need to knit a few extra VPs for the overlap sash and unfold it.
- Use the second yarn to knit a row of sc, reaching the end of the 3rd column, replace it with air loops: a hole for buttons. Expand again. Knit the next row with the main yarn, in single crochets. These are rows 14-15. Change colors and repeat them. The latter is knitted with the second color. The work should be completed by tying the entire boot with yarn of the main color and securing the ends of the threads. You need to sew buttons onto the finished boot.
You can make stylish women's knitted boots using knitting needles using the same technology. The result will look no less elegant.
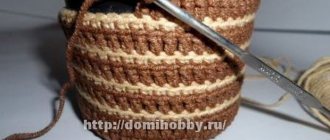
Tie the sole
Attach a thread of the main color and knit the back walls
Knit a chain in the opposite direction
Knit a “strap” with different threads
Make a buttonhole
Add decor if desired
Homemade
Knitted openwork boots for home are a comfortable, stylish alternative to socks and regular slippers. To make them you need:
- 100 g yarn;
- awl;
- two insoles;
- hooks No. 2, 3 and 3.5.
The most comfortable and practical boots are crocheted with a felt sole; it absorbs the load on the foot and reliably protects from cold and drafts. Using an awl, holes are pierced along the edge of the sole, through which the insole is tied in a circular row of single crochets using a No. 2 crochet hook. Crocheting home boots begins from the heel, along the inside. Using crochet number 3, a row of sc, included in each VP of the base, is crocheted. The second, third and fourth row are RLS, knitted using both arches in each column of the previous row. The thread is cut.
The new one needs to be tied to the middle, where the sixth sc begins. From here, knit 6 more sc. Then the slippers-boots should be turned and knitted in reverse and straight rows. When finishing the row, you need to grab the side of the boot. This is how the toe is formed. Next, 5 rows of sc are knitted around the insole, to the other edge of the toe. The extreme columns of the rows are attached to it.
The next row C1H needs to be knitted in a circle using crochet number 3.5. Then go to the “corn” pattern, knit 5 rows of 7 C2H in every fourth C1H of the previous row. The rest is air loops. New row - the same pattern, but with six C2H, alternating with 2 air loops. You need to complete the work of making crocheted slippers-boots next to the RLS.
Prepare a sole of the required size
Make holes in the sole
Tie all the holes in a circle
Next knit in circles with stitches
Make a boot toe and continue knitting
Tie the back
Go to knitting the boot
Holidays
Elegant women's boots with a knitted boot for the street must be knitted on a ready-made basis. You will need:
- shoes (the design is not important, the main thing is that they are comfortable);
- cotton-acrylic yarn;
- needle;
- transparent glue;
- starch;
- hook No. 2.5.
The procedure is as follows:
- First you need to knit the overlays, which are later sewn onto the toes of the shoes. They are knitted in rows of sc on the basis of air loops. In the first row, 2 VPs are removed, in the rest, gradually one at a time, so that the knitting narrows. They check the work by applying the pad to the shoe.
- Sew the overlays in a circle using a needle, the ends of the threads need to be hidden inside and filled with glue.
- The back part is sheathed like a toe: you need to knit strips of the required size, and in the rounded places, knit several stitches together. Sew on, tie the edges of the threads into knots, hide inside, and glue.
- Before starting the boot, several rows of sc are additionally knitted; subsequently, the socks are connected to the heels of the shoes using a chain made of VP. The result is tied with several rows of sc.
- The boot top itself is knitted in the round, in rows of any pattern. At the end of the work, 3 rows of sc are knitted.
The model goes well with light dresses in boho style. To create a casual look, jeans are suitable.
Openwork for summer
Crocheted openwork summer boots are especially popular. The following patterns look impressive and are easy to perform:
- “Side”: The first row must be knitted from RLS. Next, knit 1 sc above the stitch of the first row, divide with 1 chain stitch and the next sc into the third stitch. Repeat.
- "Star". First row: Knit 8 VP, then 11 sc in a ring. Second: above each column of the first row - 1 C1H, each alternating with 3 loops. Third: knit 3 stitches into the first arch. Next - 5 loops, 1 sc and 3 stitches twice in the next arches. Repeat again.
To make boots with a knitted top you need to prepare:
- 100 g yarn;
- hook No. 3;
- sole.
Algorithm for crocheting summer boots:
- Tie the stars, connecting them into a ring - the boot. The number of stars is selected according to the desired shoe height.
- Knit one star for the top of the cape. In the third row, 2 sc and 4 loops are knitted into the arch.
- Knit a 4 cm chain and side patterns. Add loops up to fifteen cm in width, seven in length. Last row: center – 1 loop, 2 sc. The toe and star are connected by two arches.
- The side patterns should be 6 cm. Every second row - stars in the center are connected to three arches. Knit until there are 3 loose arches left.
- The rest of the boot is knitted straight. Near the heel, 4 cm should be free; they are knitted in transverse rows so that the part can fit under the heel.
- The parts are connected using C1H or RLS.
In general, the algorithm is the same everywhere: first, the sole and lower part of the shoe are knitted, and then the boot. In order not to miss important nuances of the pattern, it is better to choose a master class in knitting boots with patterns. This will help create an identical model in the required size. It is very important to strictly adhere to the recommendations; the appearance and quality of the product depend on accuracy and accuracy.
It is a common belief that shoes can only be made with crochet, but many craftswomen show in video tutorials how easy it is to knit boots.
For babies
Very often boots are knitted for children. The sole can be left knitted or a felt base can be added to it. To do this, cut out insoles from it according to the baby’s foot, tie it with a hook with a strong thread, sew or crochet the crocheted boot to the sole. If desired, you can add a layer of padding polyester between the knitted and felt layers. This will make the sole of the boots even warmer and softer.
Related article: Crochet Mickey Mouse hat: diagram with description and video
To knit the sole, cast on 7 stitches and knit in garter stitch. In each even row, add 1 yarn over immediately after the edge stitch. After 6 rows there should be 13 stitches on the knitting needles. Single crochet 26 rows using the same stitch. Next, add 1 yarn over after the edge stitch and before the last stitch. Work 46 rows in garter stitch on the resulting 15 stitches. Then knit in decreasing order. To do this, in each odd row, after the first and before the last loop, knit 2 loops together. When 7 stitches remain on the knitting needle, close the row.
Assemble the sole from knitted and felt parts, adding synthetic padding if needed.
Cast on loops from the sole onto the knitting needles: 10, 18, 18, 14 pcs. Also knit in garter stitch.
In the 20th row in the front part, knit 2 loops together 10 times: knit the first knitting needle as usual, on the second - 15 loops as well, and starting from the 16th knit 2 loops together, knitting the loops on the 3rd knitting needle and 3 loops in this way from the fourth needle. Knit the remaining stitches of this row as usual.
Work 3 rows in garter stitch. In the 24th row: knit the first knitting needle without changes, knit 11 stitches on the second, 9 times 2 loops together, finish the row as usual.
Then you can knit with any pattern you like. The main thing is that the boots do not fall off the child’s feet, but at the same time are easy to remove. For example, any elastic band, puffs, or braids will do. Having knitted the desired height, close the loops, tying them with a bend or crochet. Finished boots can be decorated with knitted flowers, pompoms, bows.
Photo of children's boots:
Additional decor
After knitting the boots is finished, you can start decorating. Depending on the desired style, the product is decorated with beads, buboes, tassels, buttons, brooches, and rhinestones. When arranging, determining the quantity and size of the decor, it is important to take into account the width and height of the boot.
For ethnic models of knitted boots, decorative braid is often used. It can be used as embroidery or pulled in ribbon between rows. A popular decor option is knitted jewelry. They are knitted separately from the main product and then sewn on. It can be flowers, butterflies, bows, ruffles.
Without decoration, crocheted boots look no worse, so this is an optional point. If you choose a beautiful unusual pattern, additional decorations will be unnecessary. The texture itself will attract attention.
An interesting shape for the boots can be achieved by pulling the elastic into the top of the wide shaft to make the model look voluminous. The ankles seem slimmer and the silhouette is thinner. To create such a model, you can knit short boots with knitting needles.
For adults
This master class covers knitting boots from hexagons. The boots are suitable for adults. The size can be changed by increasing or decreasing the hook number.
Pattern and description of knitting motif:
Pattern and description of knitting the sole:
Assembly and diagram of the top bar:
Article on the topic: Kanzashi pansies made of satin ribbons: master class with photos and videos
This model can be of any desired height. Depending on the number of motifs, footprints or boots are obtained.
Explanation of the scheme and additional recommendations
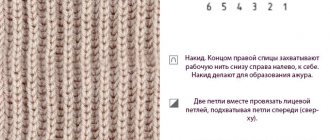
To make crocheted boot models look original and stylish, craftswomen use various knitting techniques. For ease of perception and determination of the complexity of the pattern, the algorithms are presented in the form of diagrams with special icons and abbreviations. The air loop is abbreviated as VP and is indicated by a small circle. A single crochet (SC) is indicated by a plus sign. Double crochets look like the letter T crossed diagonally down the middle. The number of diagonal sticks is the number of yarn overs. When abbreviated, they are written in numbers between the letters C and H: C1H, C2H, C3H.
The connecting post is shown in the diagrams as a small arc. If the arc is large, and there is a number under it, then it is an arch made of air loops. The number is the number of loops. A half-column looks like a vertical strip. The lifting loop is depicted almost the same as an aerial loop; it is shortened like a PP. The basis of every handicraft is a chain made of VP. It should be loose, otherwise it will be more difficult to knit further. It is customary to read the diagram from bottom to top, even rows from left to right, and odd rows from right to left. Many patterns have arrows indicating which way to knit.
The main elements in crocheting boots are air loops, single crochets or double crochets. Everything else is their derivatives. For basic models, only the simplest techniques are used, such as VP, RLS, arches. More complex ones are found when knitting intricate patterns. Before choosing a master class for crocheting boots and starting work, you need to take measurements:
- Foot length. The distance between the edge of the heel and the longest toe is measured.
- Foot width. It is necessary to measure its widest part.
- Foot circumference. It is measured in the bone area, at the same points at which the width was measured.
- Climb. The centimeter should be wrapped around the middle of the foot.
- Oblique foot circumference. It is measured in the heel area, through its most convex part in the middle of the ankle.
- Ankle circumference. You need to measure the narrowest part of your leg, just above the ankle.
- Calf circumference. Measure along its most convex part.
In order for knitted shoes to keep their shape, they must be starched. To do this, the finished product is placed in a starch solution for 10 minutes, then completely dried.
Stages of work
Before crocheting house boots, you need to prepare all the tools and materials and think through the steps of making shoes. If there is not enough experience in this type of needlework, then first of all a simple model with a simple pattern is made.
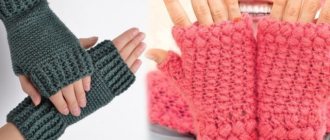
Tips for beginners
Knitted shoes require experience and skill. It is better to practice making it on small models. For example, the first model could be house boots for a child.
The size of the hook is selected depending on the size of the thread. For openwork, lace summer boots, a thin thread and a hook size 2 are suitable. For warm shoes made of thick threads, you will need a hook number 3 or larger.
There are three main elements in the knitting technique:
- air loop;
- single crochet;
- double crochet.
By alternating and combining these elements, both shoe decorations and the shoes themselves are knitted.
It is important to achieve an even row of loops when knitting - then the product will turn out neat. It is also necessary to master the technique of changing threads. You need to be able to hide the places where the threads join.
Before you start knitting a large item, you need to practice knitting a napkin, a strip with an ornament. Having chosen the decor that will be used to make shoes, you should complete it by knitting a separate element.
Tools and materials
Threads made from natural fibers are preferable for knitting. The foot in such shoes breathes and does not sweat. Shoes made from natural yarn retain heat well.
Yarn containing wool is more suitable for knitting than others, as it does not slip, so the pattern stands out clearly on the product.
What you will need for work:
- punch;
- hammer;
- awl;
- threads, yarn;
- waxed shoe thread, or twine;
- hook (the size of the hook is selected depending on the yarn);
- pin for holding loops when changing threads;
- insoles;
- sole;
- glue "Moment".
When buying yarn in a store, you need to choose threads for hand knitting and not for machine knitting. A straight, untwisted thread will ensure even rows and a clear pattern.
Basic options and work schemes
The difference in manufacturing principles lies in the use of certain materials, as well as whether the shoe will be based on an insole or sole. Knitting patterns are used depending on the tastes of the craftsman and the wishes of the future owner of the shoes. The height of the boot and the thickness of the yarn will affect the result.
To make it easier to measure the toe (forefoot), you can measure a felt slipper that fits snugly on your foot.
Main options:
- Light house boots with an openwork pattern. Flirtatious and elegant, they complement the appearance of the hostess and decorate her. The insole acts as a sole.
- Warm homemade ones, knitted from thick wool. The base is an insole made of sheepskin or wool. It is possible to use a sole. These shoes are suitable for the cold season; they look appropriate in a country house.
- Outdoor summer shoe options. Worn with dresses, shorts, breeches. Bright or plain colors will give them additional charm. Made with soles.
Options for knitting patterns are chosen independently. The combination of different techniques, patterns and patterns in one product looks elegant.