Main types of collars
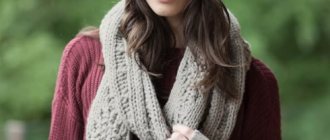
Purchasing such a collar can be an overwhelming task, especially if it needs to be adapted to your existing wardrobe. In this case, knitting a scarf-collar with your own hands will be more profitable. From such a collar you can easily create a large number of interesting wearing options. The accessory can be worn with a pullover, jacket, coat, simple dress and other things.
Do-it-yourself knitted collars may differ in models. This may include:
- circular scarf;
- knitted item;
- independent product;
- English collar in solid loose knit;
- thick fabric;
- varieties of clamps with delicate openwork as a base.
Cowl collars and scarves can be used both as a decorative element for light cotton items or silk threads, and for use in cold and even warm seasons. By throwing it over your shoulders or neck, rolling it up and giving it an unusual shape, or pinning it with a beautiful and elegant brooch, the owner will be able to change his appearance every time.
Such a spectacular item can also be used as an everyday accessory for men, as it is considered a particularly practical and attractive element. It can be worn as a scarf or hood.
In addition, a knitted collar-scarf can become not only a separate item that will decorate any look, but also part of a dress, sweater, or sweatshirt. The collar can be sewn from a ready-made fabric or created from various materials. For such a wardrobe item you can use:
- openwork;
- braids;
- arans;
- jacquard;
- garter stitch;
- facial surfaces;
- braids;
- elastic bands;
- platen patterns.
To knit a circular collar, you need to use a special tool. In this case, it is best to choose:
- fork;
- simple hook;
- flexible knitting needles;
- straight knitting needles;
- circular knitting needles;
- Tunisian hook.
In terms of their structure, the circular shapes of scarves-collars can be trapezoidal, rectangular, with a gradual expansion in length. When creating circular scarves, you can use the following techniques:
- on one circular knitting needle - most often used when worn with a dress or sweater;
- on several knitting needles - best used to create elongated circular scarves;
- on four needles with the main working needle - it is convenient to use when knitting a collar, the loops of which are cast on along the neck of an almost finished sweater.
When choosing the main tools for work, material and type of knitting, it is important to take into account the required characteristics of the finished item. It is important to remember that the thinner the yarn, the softer and more elastic the item will be. Too thick and coarse threads help to form more defined graphic shapes.
Knitted cowl collar
There are many types of neck designs for finished products. One of them is the cowl collar, which can also be knitted in several ways. Let's take a closer look at the varieties of such a collar.
A “collar” happens:
- large, which falls in soft folds;
- small, close to the neck;
- “collar” in the form of a hood.
Knitting products
To knit a collar that lags behind the neck, work must begin from the bottom edge of the collar. The shape of the knitted fabric is rectangular. To make the product soft and at the same time voluminous, it is advisable to knit it with thick knitting needles and garter stitch. In garter stitch, the errors of loose knitting are practically invisible.
For this “collar” model, not only garter stitch is used. Recently, the 2x2 elastic band has become popular; but there are 1x1 elastic and stocking stitch.
The cowl collar can come with the product or as a separate item. You can knit it both lengthwise and crosswise using two knitting needles. But if you really want to, you can use 5 knitting needles to knit it. This means that the cast-on loops are distributed onto 4 knitting needles, and the fifth knitting needle is used.
"Collar" as a separate item of clothing
It is best to start knitting such a “collar” from the bottom (wide) edge, which will cover the shoulders. To determine the number of loops, you need to knit the sample with the selected knitting. The height of the finished product can vary from 20 to 30 cm, which depends on the desired depth of the collar.
During the knitting process , decreases are made so that the upper part of the collar is one third smaller than the lower part. The number of decreases will depend on the thickness of the thread, the knitting density and the number of loops on the knitting needles.
After all the decreases have been made and the product has reached the desired height, all loops can be closed. To give the product a finished look, it can be crocheted. After this tying, the edge of the product will become smoother.
“Clamp” as a single unit with the product
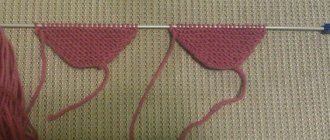
In this case, the loops for the collar are gathered along the edge of the neckline. When finished, it will have the shape of a trapezoid, only upside down. The canvas will not narrow, as in the previous case, but expand. Already in the second row you need to start adding loops. To make it even, you need to add 8-10 loops at equal intervals.
To make the addition unnoticeable, you need to do this: insert the knitting needle between the loops into the weave of the threads, throw the thread over it and pull it back in the form of a loop. In the next row you need to knit a loop like other loops.
Depending on the density of knitting and the thickness of the threads, an increase in loops occurs. It is recommended to do this in every second row 5-6 times, and then in every sixth row 5-6 times. As a result of this increase, the number of loops on the knitting needles should double. Knitting the collar continues, but without any increases, to the desired length.
Model No. 1
The shape of the collar collar is trapezoidal. This is an independent product, the lower part of which covers the shoulders (this is the bottom of the trapezoid). The collar is high, to work you need to know its length in advance. By measuring the length of the product along the shoulders and knitting a 2x2 elastic pattern, you can determine the number of loops that need to be cast on for the work. The average length is 30 cm.
During the knitting process, in order to get a trapezoid, you need to make decreases. The first time will be in the 4th row, where you need to decrease 7 loops. Several times after this, you need to make decreases in every fourth row, then in every second row.
As a result, having reached a certain height, the upper edge should be narrower than the lower one by one third. If you get this result, then the remaining stitches on the knitting needles can be closed off.
To prevent the collar from stretching for a long time, you can weave an auxiliary thread while knitting, at the beginning and at the end. This is done not at the very beginning of knitting, but in the 5th row from the beginning and in the 5th row before the end of knitting.
The resulting “collar” can be sewn to the finished product if the neck coincides with the bottom of the “collar”. To do this, you need to pin the collar to the product at four points: front, back and sides. This means: in the center of the front and in the center of the back of the product. Next, using the same pins, make uniform fastenings in other places of the neckline. Having removed all the irregularities, the collar can be sewn to the product.
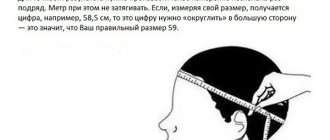
It’s not at all difficult to knit such a warm “collar” with your own hands. You just need to take the measurements correctly so as not to make a mistake and not to bandage the product. See how it's done.
Model No. 2
In this model, a set of loops is made from neck loops, in a circular manner. To prevent the collar from looking like a golf collar, it needs to be at some distance from the neck.
When casting on loops, you need to have more of them on the front half. The first 10 cm are knitted with the selected pattern, without adding stitches. Next you need to make increases only on the front part of the panel of the product. As an example: from every 5 loops, two loops are knitted.
Knitting continues until the product is a certain height. After this, all loops need to be closed.
The “collar” connected in this way has a slight sag in the front part, which looks very beautiful and impressive.
Another option for knitting a collar is in this video.
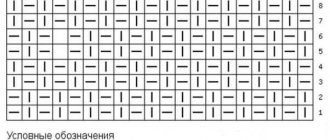
Scheme
Below are knitting patterns for a cowl collar. Depending on the chosen model, the diagrams will differ.
For the first model, the collar is knitted like a rectangle, the height of which corresponds to the height of the collar, and the width is equal to half the circumference of the neck of the finished product. For knitting, a 1x1 elastic band is used. To keep the collar free, close the loops of the last row as loosely as possible.
In the second model, the “collar” hangs beautifully, for which increases are made while knitting it. This is clearly depicted in the collar diagram. To knit the collar in this model, stocking knitting is used, the height of the finished product is 19–20 cm.
Knitting pattern
In a simple version, knitted collars with knitting patterns look like a rectangular fabric that is sewn into one piece, or decorated with a special button and zipper, or has another fastening option.
To create such a thing, you first need to cast on the knitting needles the required number of loops for the optimal width of the fabric. The fabric can reach the height of the collar if it is created of a single type, or be several times wider and larger if the scarf includes several layers.
Scheme of how to knit a collar collar with knitting needles:
- First you need to mark the wrong side of the product.
- The first row after casting on the knitting needles is knitted with purl type loops.
- Second row - knit stitches. In this case, you need to start working with the first edge loop not knitted and removed onto a working knitting needle. Afterwards, garter stitch is carried out (the loops continue to be made with knit stitches), in stockinette stitch (all even rows of knit stitch, odd rows of purl stitch). You can also use an elastic band with the following ratios (1 to 1, 2 to 2, 3 to 2). When choosing a specific pattern, it is important to remember that garter stitch is much denser than stockinette stitch. These two patterns look good when created with fluffy yarn, as well as with knotted yarn and with the addition of individual beads.
- After reaching the desired length of the product, the smaller sides of the rectangle are sewn on the reverse side.
- Next, the finished collar is crocheted and carefully steamed with an iron so that its surface becomes smoother and the material can be leveled.
All knitting features will depend on the specific pattern used. For this you can use:
- pearl pattern;
- rice;
- large rice;
- large pearl.
Description and diagrams of simple cowl collars and scarves step by step
Basic diagram of a collar collar as a separate accessory for a woman
In its simplest form, this product is a rectangular fabric, sewn into a single piece or decorated with a fastener with buttons, snaps or a zipper.
To sell the product, cast on the knitting needles loops , the number of which will allow you to obtain the specified width of the fabric. It can be equal to the height of the clamp if you plan to make it single, or be twice as wide or more if you decide to knit a double-layer clamp or wrap it several times.
Next, proceed according to the scheme:
Mark the wrong side.
The first row, after casting on the loops, knit with purl loops.
The second - with facial loops, starting with the first edge loop not knitted and removed onto a working knitting needle. Next, knit in garter stitch (all rows are knit), stockinette stitch (all even rows are knit, and odd rows are purl). You can also knit with rib (1×1, 2×2x, 3×2, etc.). When choosing a pattern, keep in mind that garter stitch is denser than stockinette stitch. Both of these patterns look good when made with fluffy yarn, as well as knotted and beaded yarns.
Having reached the required length, sew the smaller sides of the rectangle from the wrong side.
Crochet the finished scarf-collar and steam the product to even out the fabric.
As a variant of the pattern, knit the product with patterns such as:
- pearl;
- pearl large;
- rice;
- large rice.
Variant of the diagram of a trapezoidal clamp connected by an independent product with photo
The trapezoidal model looks more voluminous and looks good in the autumn-winter season. Work begins with measurements and a set of loops, the number of which will allow you to get a piece that freely covers your shoulders. You need to measure the shoulder circumference, neck circumference and width (height) of the collar. In general, the latter size is chosen in the range from twenty to thirty centimeters. Greater height will give greater volume and depth to the product.
Having cast on the loops, knit four rows with the selected pattern and begin to form a trapezoid, evenly decreasing the loops as follows:
- seven times in every fourth row in the first half of the collar (to the middle of the height);
- seven loops in every second in the second half of the clamp, until the number of remaining loops is less than the initial number by at least a third.
Having completed the fabric, close all the loops.
You can knit on two needles , on four with one working needle or on circular ones. If the work will be done on circular or several knitting needles, at the end of the first row do not turn it over and do not make a row transition.
Working on two knitting needles, think about the type and design of the fastener. It can become an interesting decorative individualizing element.
It is useful to tie the lower and upper edges of the finished product with a simple or decorative border. You can add fringe along the outer edge of such a product or decorate it with tassels, cones or pompoms.
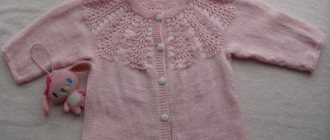
A variant of a knitted collar as a decorative element of a sweater, sweatshirt or dress
It is most convenient to knit such a product on circular knitting needles, casting stitches along the neck of a dress, blouse, sweater or sweatshirt.
In the case of the straight version, the fabric is knitted with the selected pattern without increases to the desired length, upon reaching which all loops are closed and, if desired, the resulting edge is tied.
In the case of the trapezoidal version, increases begin from the second row from the set one. To do this, 8-10 added loops are evenly distributed along the entire length of the row. Then, before the beginning of the second third of the height of the clamp, six increases are made in each even row.
In the second third, six loops are added in every fifth or sixth row so that the final number of loops becomes twice the initial number.
In the last third, knit straight without changing the number of loops .
Decorate the edge of the finished piece with regular crochet, embroidery, border, beads, tassels and other decorative elements.
Pattern of a knitted circular scarf with a spiral pattern (video)
A DIY circular scarf-collar is a practical and versatile accessory that will not only protect you from autumn winds and winter cold, but will also become a unique addition to everyday outfits and outerwear.
We suggest knitting a warm collar scarf with a spiral pattern on knitting needles. Following the description , you will complete the task in a couple of evenings.
Prepare size 8 circular needles at least 60 cm long and 200 g of thick yarn for a medium-sized scarf or 300 g for a large scarf.
To calculate the dimensions of the product using stockinette stitch, knit a square sample with a side of ten centimeters (10 loops in length, 13 rows in height).
Cast on as many stitches as necessary to obtain the desired length. The number of loops should be a multiple of six plus one loop. Without turning the work over, mark the beginning of the row with a colored thread and continue knitting in the round from the first stitch cast on.
From the first to the fifth row, knit the pattern according to the following pattern: *four knit stitches and two purl stitches*. Repeat this until the end of the row .
From the sixth to the tenth row: purl the first stitch, then knit the pattern *4+2* to the end of the row.
From the eleventh to the fifteenth row: purl the first two loops, and then knit the pattern *4+2* to the end of the row.
You may notice that the product, thanks to this knitting, begins to twist in a spiral.
Continue working until you reach the desired scarf width.
Fasten the thread.
If desired, crochet the edges or decorate them in another convenient way.
Now, even with basic knitting skills, you can create an unlimited number of different accessories.
Trapezoidal product
The trapezoidal shape of the scarf-collar is presented more voluminously and looks especially good when worn in the autumn and winter seasons. Knitted collars with knitting patterns with patterns are created as follows: to start working, you need to select such a number of loops so that the finished item freely covers the shoulders. To do this, you need to decide on the circumference of the shoulders, the circumference of the head and the width of the collar, which can be selected in the range from twenty to thirty centimeters. A large height will give a special volume and indicator of the depth of the product.
Use as a decorative element
The easiest way for a woman to make such a thing is to use circular knitting needles, determining the number of loops along the neck of a sweater, dress or blouse. The cowl collar with knitting needles and its description may vary. When creating a straight scarf, the knitting is carried out in the selected pattern without adding to the desired length, until which all existing loops are closed, and the resulting edge is tied again.
For a trapezoidal shape, the length begins to increase from the second row. The row is increased by 8-9 loops. Afterwards, up to the second third in height, add 6 loops to every fourth new row. In the second third, it is allowed to make another 5 additional loops every 5-6 rows, so that as a result the number of loops increases twice as much as the initial one. In the last third, the scarf-collar is knitted in the straight direction, the number of loops remains the same.
The edge of the finished item can be decorated with simple crochet, border, beads, embroidery, additional shaggy tassels and other beautiful details.
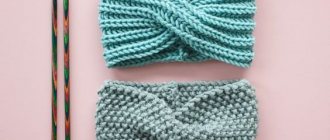
Methods of knitting products
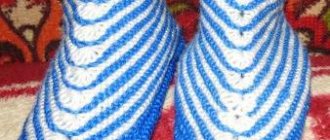
One simple option is a collar collar with a broken elastic band. To knit such a product, you will need to stock up on yarn of three colors: black (150 g), white (50 g), blue (50 g). You will need circular knitting needles with a fishing line length of at least 90 cm. A broken elastic band is knitted on an even number of loops. The first row must be knitted completely with purl stitches. The second knit and purl. The loops alternate one after another. The third one is knitted like the first one, etc. When knitting, colors should be used correctly. The process of creating a product consists of creating several sections.
Knitting the first section:
- Cast on 120 loops. Black yarn is used for the set. The first ten rows are knitted with this yarn.
- At 11, the first 60 loops are knitted with black thread. All the rest are blue yarn. In row 12 it’s the other way around. The first 60 loops should be blue, and the remaining ones should be black.
- The next 8 rows (that is, up to 20) must be knitted, focusing on the 11th and 12th rows.
- Rows 21-40 are knitted as 1-20. Next, 9 rows of the pattern are knitted exclusively with black yarn (you should focus on the pattern from the first to the tenth row).
- In 51, only 50 loops need to be knitted with black threads. The remaining ones are blue. 52 is knitted first with blue and then with black threads. Do the same with the 70 row.
- 53−60 is knitted like 51 and 52.
- 61−70 as from the first to the tenth row.
- Then the pattern (up to row 90) is repeated starting from row 51. The last ones in the first section are the closed loops.
Knitting the second section begins with raising the loops. This is done on the short front (black) side of the first section. New loops are added with blue yarn. Then new rows of the product are knitted one by one:
- 1−10 are knitted with blue thread.
- In 11, thirty loops are made of blue yarn, the rest are black. At 12 it's the other way around. This knitting technique must be followed until the 20th row.
- Rows with 21−30, 41−50, 61−70, 71−80 (black thread) are knitted like the initial 10 rows.
- 31 starts with blue (first 20 stitches), continues and ends with black. At 32, the colors are swapped and now the first 40 loops are black. In accordance with 31 and 32, the next 8 are knitted next to each other.
- In the 51st row, blue yarn first predominates (the first 10 loops), and then black yarn. In 52 the color scheme changes. The first 50 loops are black. You should focus on 51 and 52 until the 60th row.
- From the 81st to the 140th row, the process of creating a product is similar to the knitting pattern from the 11th to 70th row. The only difference is the color of the yarn. Now they use black and white threads. The last to appear are the closed loops.
The final part of knitting a collar collar with knitting needles - diagram and description consists of connecting several sides. You will need black and white threads. The front side is raised to 223 loops. Four rows are knitted in satin stitch, closed with loops. The wrong side is knitted similarly to the front side. Only white yarn.
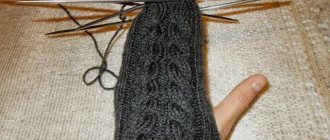
With spiral pattern
A circular scarf is a comfortable and practical addition to winter clothing. The product protects from cold winds and severe frosts. The collar collar is knitted according to the description over several evenings. To do this, you will need knitting needles with a length of No. 8 and thick yarn (at least 200 g). The number of loops is always a multiple of six. It is better to mark the beginning of the row with a thread of a different color. The knitting pattern for a scarf with a spiral pattern is as follows:
- The first 5 rows are knitted in the following sequence: 4 knit stitches and two purl stitches.
- In the sixth to tenth row, the purl loop comes out first. Next 4 knits with 2 purls.
- From 11-15 the first two loops are purl. Otherwise, you must adhere to the given format: 4 knit stitches and 2 purl stitches.
- Knitting continues until the desired width is obtained. Gradually the knitted product will begin to twist in a spiral.
- When the scarf is ready, you should fasten the thread. If possible, such a collar is tied with an edge using a hook.