A knitted hat has long become more than just a means of protection from bad weather. It has turned into a stylish accessory, which is difficult to do without during the cold season. A simple knitted hat is the most suitable option for beginners. Moreover, such hats have been at the peak of popularity for several years now and do not go out of fashion.
For beginning craftswomen, I want to offer a simple step-by-step guide that will give you the opportunity to quickly understand the intricacies of doing the work.
Detailed instructions will help you correctly determine the size of your head and the number of stitches required for knitting a hat. The described methods for calculating the height and beautiful closure of the crown are universal. They are suitable for hats with patterns of any complexity.
A simple hat with knitting needles - what needs to be done before knitting
Before you start knitting, you need to do four things - choose the yarn, knit and measure the sample, determine the size of the hat, calculate the number of loops and rows.
Yarn selection
Let's start with choosing yarn. A universal yarn for a simple knitted hat is considered to be medium-thick yarn with a length of 200 - 240 meters per 100 grams. For an adult hat you will need 150 - 200 grams of yarn, for a children's hat - 100 - 150 grams. more about how to choose the right yarn here.
The recommended knitting needle size for medium-thick yarn is No. 3.5 - No. 4.5. A label attached to a skein of yarn will help you determine more precisely the thickness of your knitting needles. It usually indicates the average knitting density and the recommended size of tools.
Knitting a pattern with knitting needles
The knitting density is determined using the control sample. Therefore, knitting a sample is a mandatory part that can be skipped only if you have previously worked with this yarn and have thoroughly studied its properties.
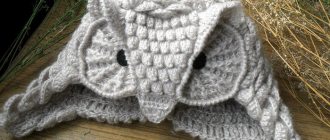
Bells pattern
The pattern in the form of “bells” is considered universal. It's easy to knit, looks chic, and is suitable for knitting not only hats, but also cardigans, sweaters, jumpers, and any children's clothing. You can knit in rotating rows and in the round.
Knitting pattern “bells” - MK:
Pattern repeat: 7 loops; 4 rows.
Knitting pattern in rotary rows:
The number of loops is a multiple of 7 + 2 for symmetry + 2 edge loops. The pattern repeat is indicated by *____*.
Preparatory row: knit 2; 5 p.
- ROW 1: *P2; 5 persons*; 2 p.
- ROW 2: (according to the picture) *K2; 5 purl*; 2 persons
- ROW 3: *P2; 1 person from the 2nd loop of the second row; 1 person; Purl 3 together; 1 person; 1 person from the adjacent, left loop of the previous row *; 2 p.
- ROW 4: *K2; 5 purl*; 2 persons
Knitting pattern in the round:
The number of loops is cast, a multiple of 7.
- ROWS 1, 2, 4: purl 2; 5 persons.
- ROW 3: purl 2; 1 person from the 2nd loop of the second row; Purl 3 together; 1 person; 1 person from the adjacent, left loop of the previous row.
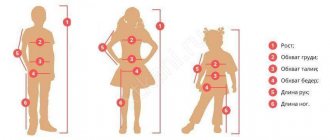
How to determine your hat size
If you are knitting for yourself, just take a hat that fits you and measure it with a centimeter tape, as shown in the picture.
For those who are going to knit hats for others, it is better to learn how to take simple measurements.
From the head circumference obtained during measurements, you need to subtract 2 - 3 cm for the tightness of the fit. This value is what you need to focus on when casting on loops.
Simple pattern of 2 loops
This pattern can be knitted in turning rows and in the round. Ideal for seamless hats, although this pattern makes beautiful sweaters, pullovers, and cardigans.
How to knit the pattern - video:
Knitting pattern in rotary rows:
Pattern repeat: 2 loops; 4 rows.
The number of loops is cast on, a multiple of 2 + 1 for symmetry + 2 edge loops.
Note! The pattern can be knitted using classic and granny stitches.
- ROW 1: knit all stitches.
- ROW 2: purl all stitches.
- ROW 3: *knit 1; 1 loop is removed - thread BEHIND the loop*. The row ends: knit 1.
- ROW 4: knit 1; *1 loop is removed - thread BEFORE the loop; 1 person*
Knitting pattern in the round:
Pattern repeat: 2 loops; 4 rows.
The number of loops is cast, a multiple of 2.
- ROW 1: knit all stitches.
- ROW 2: knit all stitches.
- ROW 3: knit 1; 1 loop is removed - thread BEHIND the loop.
- ROW 4: P1; 1 loop is removed - thread BEHIND the loop.
Calculation of loops for knitting a hat
To calculate the loops and rows, we will use a calculator for knitting hats. It was published on her website in 2000 by the famous designer and knitter Mary Young Smith.
The calculator is designed for knitting in the round; if you decide to knit on straight needles, do not forget to add one edge loop on each side.
It remains to determine the knitting density from the finished sample and find in the table the number of loops that need to be cast on for the desired hat size.
If the table does not contain the size or knitting density you need, then you can take the average value between the nearest cells, but it is better to perform simple calculations.
You can determine the number of loops by multiplying the hat size by the knitting density and dividing the resulting result by 10.
For example, for a hat measuring 43 cm with a knitting density of 17 p./10 cm, you need to dial
73 p = 43 cm * 11 p / 10 cm
Hats are usually started with an elastic band, so the number of stitches cast on should be a multiple of the elastic repeat. If necessary, the number of loops is adjusted downward. Since the elastic is subject to stretching, it is better to use knitting needles that are half the number smaller than for the main part of the hat.
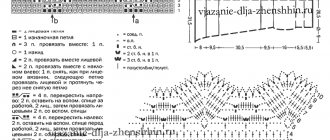
Dense, warm pattern
A beautiful and simple pattern that can be used in knitting a hat, sweater, cardigan, jumper and various children's products. The pattern forms a dense and warm fabric and has a front and back side.
How to knit the pattern - MK:
The sample was knitted on 2.5 mm knitting needles and 50 g yarn. - 120 meters.
Pattern repeat: 6 loops; 4 rows.
Knitting pattern in rotary rows:
The number of loops is cast in multiples of 6 + 1 for symmetry + 2 edge loops.
1st prep row: *P3; 1 person; 2 p.;* 1 p. 2nd prep row (how the stitches look): *K3; 1 purl; 2 persons;* 1 persons.
- ROW 1 (as the stitches look): *P3; 1 person; 2 p.;* 1 p.
- ROW 2 (as the stitches look): *K3; 1 purl; 2 persons;* 1 persons.
- ROW 3: *P1; the loop is pulled from the front braids from the 4th row; 2 purl; 1 person; 2 purl; the loop is pulled out from the front braids from the 4th row;* P1.
- ROW 4: *knit 1; 2 together front (behind the front walls); 1 person; 1 purl; 1 person; K2 together behind the back walls (turn over the 2nd stitch on the left);* K1.
Knitting pattern in the round:
The number of loops is cast in multiples of 6.
1st and 2nd preparatory rows: *P3; 1 person; 2 purl*
- 1st and 2nd rows: purl 3; 1 person; 2 p.
- ROW 3: P1; the loop is pulled from the front braids from the 4th row; 2 purl; 1 person; 2 purl; The loop is pulled out from the front braids from the 4th row.
- ROW 4: *P1; Purl 2 together; 1 purl; 1 person; 1 purl; Purl 2 together.
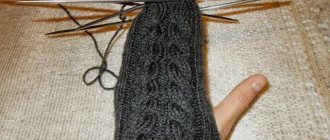
Knitting a hat with circular knitting needles
Knitting in the round makes the work much easier, since all rows are knitted on the right side. In patterns, the number of purl loops is reduced, and in stocking stitch they are completely absent.
Circular knitting can be done on double-sided knitting needles or on knitting needles with fishing line.
Double needles are sold in sets of 5 pieces. The loops on them are cast on in the usual way and distributed in equal parts onto 4 needles. Then the loops are closed in a circle, the fifth free knitting needle is considered working.
Short circular knitting needles 8–9 cm long, connected with a 40 cm long fishing line, are considered an ideal option for hats. You can also use standard knitting needles 11 - 12 cm long. But you need to take into account that they are not suitable for too small sizes and for covering the top of the head.
To ensure that a step does not form at the very beginning of knitting and the beginning of the hat looks neat, there should be 1 more loops than required for knitting. We close the work in a circle. We carefully check that the canvas does not twist. We knit the first and last of the cast-on loops together. Mark the beginning of the row with a marker.
You need to cast on the hat the number of loops that we determined from the knitting density table. To prevent the edge from curling, knitting begins with an elastic band.
Unusual knitted hats
Patent rubber band
We cast on the loops and distribute them equally among 4 knitting needles. Next we use a classic 1 by 1 elastic band so that the edges do not stretch. In this case, we knit the rib using the back thread (crossed).
After 8 of these next to each other, we begin to knit with a patent elastic band with the following features:
- ip double crochet;
- we remove the lp with a double crochet, and we knit the sp (which were removed in the previous row) with a double crochet like purl4
- We remove the sp with a double crochet, and we knit the l with a double crochet like knit stitches.
So we knit 20 cm, then we begin to narrow it: we remove the stitch, we knit the next one like a stitch, threading the previous one into it.
We knit the entire row in this way - there will be half as many loops. Next is the entire series of LPs, and repeat cyclically. When there are few loops, tighten them with thread and hide the end with the IP.
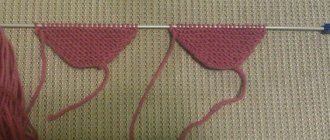
How to beautifully close the crown of a simple hat with knitting needles
After the main part of the hat is knitted, they begin to launch it. To beautifully close the crown of the hat with knitting needles, you need to distribute the number of loops into wedges of equal size.
Mary Young Smith's calculator will allow you to close the crown of your cap without calculations. The number of wedges and rows depends on the thickness of the thread and the knitting density. Thin large caps can have up to 12 wedges; they start from the first row of the table.
For volumetric headings, the rows located at the top of the table are omitted. Decrease of loops begins with the row number, with the indicated knitting density.
Reducing stitches on a hat
A simple hat with knitting needles is usually closed with wedges of equal size. By decreasing one loop in each cap wedge, we get a beautiful crown in the form of a spiral. The thinner the yarn, the more twisted the crown becomes. Using a little trick, the spiral can be twisted both to the left and to the right.
- If you close the loops by knitting two stitches together, knitting them to the right, the parts of the cap will have a right slant. With this method of closing, decreases are made at the end of each wedge. The working needle is inserted from left to right into 2 loops at the same time. Then the loops are knitted together behind the front walls.
- In order for parts of the crown to look to the left, it is recommended to make decreases on the first loops of the wedge, closing them with an inclination to the left. Most handicraft publications recommend closing the loops with a pigtail. First, you need to remove one unknitted loop onto a working knitting needle, then knit the next loop and throw it over the removed loop.
I prefer the method of knitting two loops together, tilting to the left and turning the loops. The loops on which the decreases will be made are removed one at a time from the front wall, not knitted onto a working needle. When removed, each hinge rotates 180 degrees. The inverted stitches are returned to the left needle. After which a working needle is inserted into them from right to left, and the loops are knitted together with a knit stitch.
Simple knitted stockinette hat
Now we know that a simple hat is knitted quite simply. Let's try to put our knowledge into practice and knit two hats with the tops of their heads having different slopes.
Crown tilted to the right
Hat size: for head circumference – 35, 45, 55 cm.
Materials:
- Yarn Katia “Merino Aran” - 52% superwash merino wool, 42% acrylic (155 m - 100 g) - 1 skein. Color 88 lilac.
- Circular knitting needles (line 40 cm) – 4 mm, 4.5 mm.
- Stocking needles for closing the crown - 4.5 mm.
Knitting density: 16 loops = 10 cm, 20 rows = 10 cm.
Scheme:
- Elastic band 1*1 – alternate 1 knit stitch, 1 purl loop.
- Knit stitch – all rows of knit stitches.
- Decreasing loops with a tilt to the right - a working needle is inserted from left to right into 2 loops at the same time, after which 1 knit stitch is knitted from two loops.
Completing of the work:
Cast on 57, 73, 89 stitches on circular needles No. 4. Connect the cast-on stitches into a circle. To prevent a step from forming at the junction, you need to knit the first and last loops together with a knit stitch. 56, 72, 88 loops remain in work.
Knit with an elastic band 1*1 - 2 cm - 4 rows.
Switch to knitting needles No. 4.5 and knit in stockinette stitch 12 cm - 24 rows, 14 cm - 28 rows, 17 cm - 34 rows.
Next, to form the crown, you need to decrease the loops with a tilt to the right:
When knitting on circular knitting needles becomes inconvenient, you need to switch to stocking needles.
Row 1 – 6 knit stitches, 2 knit stitches along with a tilt to the right. Repeat - 7, 9, 11 times.
2 and knit all even rows with knit stitches without decreases.
Row 3 – 5 knit stitches, 2 knit stitches along with a tilt to the right. Repeat - 7, 9, 11 times.
Row 5 – 4 knit stitches, 2 knit stitches along with a tilt to the right. Repeat - 7, 9, 11 times.
Row 7 – 3 knit stitches, 2 knit stitches along with a tilt to the right. 7, 9, 11 times.
Row 9 – 2 knit stitches, 2 knit stitches along with a tilt to the right. 7, 9, 11 times.
Row 11 – 1 knit stitch, 2 knit stitches along with a tilt to the right. 7, 9, 11 times.
Row 13 – 2 knit stitches along with a tilt to the right. 7, 9, 11 times.
Row 14 – 2 knit stitches along with a tilt to the right. 7, 9, 11 times.
Row 15 – tighten the remaining stitches using a tapestry needle.
Remove the ends of the threads and carry out a wet-heat treatment.
Top of the head tilted to the left
Hat size: for head circumference – 40, 50, 55 cm.
Materials:
- Yarn Katia “Merino Aran” - 52% superwash merino wool, 42% acrylic (155 m - 100 g) - 1 skein. Color 68 light grey.
- Circular knitting needles (line 40 cm) – 4.5 mm.
- Stocking needles for closing the crown - 4.5 mm.
Knitting density: 16 loops = 10 cm, 20 rows = 10 cm.
Scheme:
- Knit stitch – all rows of knit stitches.
- Decreasing stitches with a slant to the left - the first loop is removed without being knitted onto a working needle. The second loop is knitted and then pulled through 1 loop.
Knitting methods
On circular knitting needles
We cast on the required number of loops. Then there are two ways:
- We connect the product in a circle. We swap the two outer loops, threading one into the other. Next we go with the desired pattern.
- We knit the entire product with canvas and sew it together at the end. This path is relevant if the fabric is really large and does not fit on ordinary knitting needles.
In both cases, do not forget that you need to gradually decrease the loops closer to the top. Usually this is clearly stated in the diagrams.
Joining the initial row on circular knitting needles. Video tutorial:
Garter stitch
We cast on and start knitting in rows: slip off the first stitch and then knit all the way to the last one (it’s purl). Closer to the top, we remove the loops and finally sew the product together using a knitting needle.
In a circle it will be more practical - no need to sew + the hat will have no unnecessary irregularities.
Garter stitch in the round with knitting needles. Video for beginners:
Stockinette stitch
The only difference from the previous point is the structure.
We always remove the first one, always remove the last one. We knit the rows alternately: one - the whole rib, the second - sp.
As a result, you will get two sides - the wrong side and the front side, on which the given pattern is located.
How to knit smooth stockinette stitch - video tutorial:
Hat with 5 spokes
The knitting principle is similar to circular knitting needles. Divide the cast-on loops evenly into 4 parts and distribute them over the knitting needles. It turns out to be a square along which we continuously go upward with the fifth knitting needle in the desired knitting pattern.