From centuries to modern times
Fashionistas owe the appearance of clothes so beloved by modern women as a long cardigan to the high-born Englishman, the seventh Earl of Cardigan, James Thomas Brandell, who was very fond of knitting. While on one of his military campaigns and freezing from low temperatures, the count knitted himself a long jacket, which was later named in his honor. The thing turned out to be so warm and comfortable that, being modernized over time, it came into the 21st century.
Modern cardigans come in a variety of materials, but a product is still considered classic only when it is knitted. There are different types of these products: they are created with and without pockets, with hoods and fasteners, simply universal capes with sleeves for any occasion.
Among modern lovers of knitted products, items created using the following techniques are especially popular:
- "Asian spikelet" or "Chinchilla";
- "Lalo."
The above knitting techniques include knitting braids, for which there are many master classes on the Internet. Having mastered a simple pattern, you can use it to create various beautiful and warm things. For example, using this technology you can knit:
- sweatshirts;
- cardigans;
- hats;
- scarves;
- snoods.
The thicker the yarn is used, the more voluminous the product is. The knitting pattern for the “Asian Spikelet” or “Chinchilla” pattern is quite simple and even a beginner can handle it if he follows all the instructions from experts.
Knitting technique
On Osinka (a popular online community) the topic of making this fashionable wardrobe item is now widely discussed. The Chinchilla cardigan is made with an “Asian spikelet” pattern. The design of this pattern is different in that it is knitted lengthwise. Finished products made using this technique are voluminous, which means more yarn is needed for knitting.
Read this: Knitting a shirt-scarf with a description: we knit a beautiful product in a short time
To make a Chinchilla cardigan you will need:
- thick yarn 1.5-2 kg;
- knitting needles No. 5.5;
- knitting needles No. 6 (circular).
Let's take a closer look at the master class on how to make this spectacular product. The finished Chinchilla cardigan looks just like the fur coat from the animal of the same name.
Draw a pattern for the future cardigan.
A detailed scheme for performing the work is presented in the following description:
- Knitting starts from the top. When choosing a color transition (gradient), knit a spikelet with threads of the top color.
- We've reached the end. Now knit 4 rows in stockinette stitch. Then the work is carried out along the front side from bottom to top.
- The finished half of the product looks like this.
- They continue to work further.
- Due to the fact that the weight of the finished product is 700 grams, the spikelets elongate significantly. Additionally, it is worth tightening them with thread.
- The last stage of work is making the sleeves. They are knitted according to calculations.
- Now you can assemble the finished product.
The assembly diagram is very simple. To do this, carefully sew the shoulder seams and the middle of the collar. The collar itself is sewn to the back.
In order for the finished parts of the cardigan to take the ideally correct shape, the so-called blocking of the product should be performed. To do this you need:
- soak the knitted parts in water of a suitable temperature. Add a small amount of conditioner to the water.
- squeeze lightly and lay out on a flat horizontal surface, securing the edges with pins. It is very important to ensure that the braids on the pattern do not stretch.
- Allow the product to dry naturally in a well-ventilated area.
When the blocking process is performed correctly, all strands of yarn straighten out and the product takes on a beautiful shape.
The video provides another detailed description of how to knit a Chinchilla cardigan:
Read this: Relief patterns with knitting needles to realize all the fantasies of craftswomen
Asian braid pattern
The description of the creation of the “Asian braid” is as follows. To do this, the needlewoman needs, in addition to patience, to stock up on:
- knitting needles;
- threads;
- scissors.
To begin with, the required even number of loops is cast, for example, 6. Next, 6 classic facial loops are knitted, after which the knitting is unrolled and the 6 pieces already knitted from the face are knitted on the other side with purl loops.
After which the knitting is unrolled again, and until the 11th row, only the working strip is knitted in the already familiar way. In the 11th row, along with the 6 loops that are in knitting, three more are knitted from the edge, where the cast-on loops are not yet touched by the pattern. Having turned the product to the second side, in the 12th row only those 6 loops that are already knitted are knitted using the purl technique, and the 3 that were knitted in the 11th row are not yet used. From rows 13 to 22 inclusive, only 6 loops are used in knitting, as at the beginning of work.
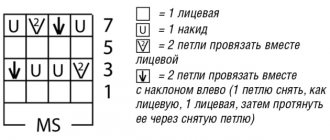
Making the “grains” of the first row of the “Asian spikelet”
1st row of “grain” (front): remove the edge and knit 5 knit stitches, turn the work to the wrong side.
2nd row of “grain” (purl): remove the edge and knit 5 purl loops, turn the work to the front side.
Knit 4 more knit rows and 4 purl rows, for a total of 8 rows (Figure 3).
Figure 3
11th row of “grain” (front): remove the edge, then knit 5 knit stitches and three more new loops from the left knitting needle, also knit with knit stitches (Figure 4). Turn the work to the wrong side.
Figure 4
12th row of “grain” (purl): remove the edge, knit 5 purl loops, do not knit the remaining three loops on the knitting needle (Figure 5).
Figure 5
Turn the work to the right side and knit another 8 rows of 6 stitches in stockinette stitch (Figure 6).
Figure 6
The 11th and 12th rows of the first “grain” are the 1st and 2nd rows of the second “grain”. All “grains” of the first row of the “spikelet” are performed in the same way, except for the outermost “grain” in the row (Figure 7).
Figure 7
The 11th row of the outermost “grain” is its last row; it is knitted like the previous front rows of “grain”. Turning the work to the wrong side of the fabric, you need to knit four rows of stockinette stitch from all the loops on the left knitting needle (Figure 8). That is, the 12th and 14th rows should be knitted with purl loops, the 13th and 15th with knit stitches, and the first edge loops should be removed. In the “Asian Spikelet” pattern, the 14th and 15th rows are equal to zero rows, i.e. these rows are the basis of the second row of “grains” of the “spikelet”.
Figure 8
The second row of “grains” of the “Asian Spikelet” is knitted similarly to the first row with the difference that you need to start knitting from the wrong side of the fabric, due to this the slope of the second row of “grains” will change, as a result of which both rows of “grains” will be positioned mirror symmetrically with respect to four rows of stockinette stitch located between them.
Fashionable cardigan Chinchilla
Having dealt with the voluminous pattern itself, you can proceed to the knitting pattern for the “Chinchilla” cardigan, which got its name because of the individual braid stripes, like on a product made from the skin of a real animal. The thing promises to be warm and for this the needlewoman will need:
- 1.5−2 kg of yarn;
- knitting needles
Craftswomen recommend using the following knitting threads for this outerwear pattern:
- "Alpaca";
- "Angoru Ram";
- "Lanagold 800";
- "Slonimskaya".
When choosing the length of the product, it is necessary to take into account that it stretches under its own weight. The recommended length of the item should not exceed 80 cm. Craftsmen note that a cardigan looks especially impressive using the “Gradient” technique or a smooth color transition. To create a similar effect, it is best to stock up on threads of individual colors in different skeins, and those who do not want to bother with transitions can purchase multi-colored yarn in one skein.
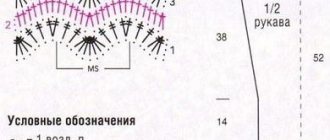
It is recommended to start creating warm outerwear by thinking through and sketching its diagram. For example, for girls who wear jackets and raincoats in sizes 42–44, the “Chinchilla” cardigan will consist of 9 spikelet stripes. For convenience and ease of understanding, experts recommend numbering each part of the diagram.
The figure clearly shows that No. 1 and 9 are responsible for the collar, and No. 2 and 8 are the shelves. Also in the diagram, numbers 3 and 7 indicate the armhole, and the remaining numbers 4, 5, 6 correspond to the back.
Direct knitting of the product can be carried out either in parts or as a whole fabric. In the first case, after finishing the weaving, the resulting braid elements are sewn together, resulting in a fairly large number of seams. And with the all-woven technology, the entire cardigan comes out “from under the same knitting needles,” and the number of joints is reduced to a minimum. Those who have already tried creating a cardigan with their own hands still recommend knitting the product in separate strips.
How to knit a stylish Chinchilla cardigan with knitting needles in a step-by-step tutorial
This cardigan also has a second no less interesting name - Lalo. Now it won’t be too difficult to find a knitting pattern and choose the model you like. Those who have the opportunity and access to Internet sources can use them to search for such a cardigan, and those who have not yet mastered this skill can purchase any knitting magazine and find something suitable from the proposed list. In this case, of course, there will be very large restrictions. Similar patterns are knitted both with knitting needles and with crochet.
Recently, it has become very popular to knit a Chinchilla cardigan with an Asian spikelet. A model using this pattern looks incredibly stylish and chic. The Asian spikelet pattern should be knitted lengthwise. This is its unsurpassed difference from others. As a result, such products are unusually voluminous. Naturally, this also requires greater consumption of yarn used. To knit such a cardigan, you need to know a certain order and be able to choose the right yarn.
We will need the following materials to knit this product:
- Yarn – 1.5-2 kg;
- Knitting needles No. 5.5 and No. 6 (circular if possible).
Now we will conduct a master class on making a Chinchilla cardigan. Everyone chooses the number of spikelets individually. Moreover, it will depend on the thickness of the yarn and what size you want to get the desired product. Therefore, before starting knitting, it is necessary to make a calculation.
- For small sizes: 6 loops per 12 rows;
- For medium sizes: 8 stitches per 14 rows;
- For large sizes: 8 stitches for 16 rows.
Let's look at the description of knitting this cardigan. It is best to start knitting a Chinchilla cardigan with a set of loops the length of the product. You need to take into account that the number of loops must be a multiple of 6. We also include edge loops in the count.
Scheme:
- You need to knit 6 knit stitches in the first row and leave the rest. In the next row, knit 6 purl stitches. According to this pattern we knit 10 rows.
- In the next row, 3 more should be added to the 6 loops and knitted in the same way, while the 12th row should consist of 6 loops;
- Then we continue to knit another 10 rows according to the same example;
- We knit in stockinette stitch and add 3 stitches every 10 rows;
- Next we knit 2 rows in stockinette stitch on all stitches;
- After this, we turn the product inside out and repeat everything, starting from the first row.
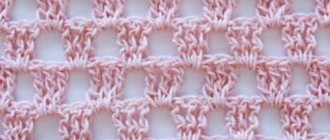
The so-called Asian spikelet consists of 2 parts: one looks up and the other looks down. Between them, 4 rows are knitted in stockinette stitch. Let's see what it looks like in the photo:
The next step will be our collar, which can be knitted separately, and then folded in half and sewn. It will consist of 27-28 spikelets (112-122 p.), front and back for 24-25 spikelets (100-104 p.), armhole: 17-18 spikelets (72-76). The outer and inner dimensions of the sleeve are 20 and 14 spikelets, respectively (84, 60). The total amount of Asian spikelets is exactly 9. They can be knitted in parts or as a whole cloth at once, and then sewn. Now let's move on to the description of knitting sleeves. We tie the armhole with b/n posts using a hook. For the sleeves you will need 2 spikelets. You need to start with 14 grains, and then it will be 20 at the top of the sleeve, finish again with 14 grains. Tie the sleeve with non-woven columns. Sew on the sleeves.
In order to get a beautiful gradient in our cardigan, you need to cast on half of the loops with a thread of one shade, and the second half with a different thread. If you take threads of the same color with a different shade, in this case, you can knit half of the spikelets in one color, and the other half in another.
The Chinchilla cardigan is knitted using this pattern on aspen and turns out unique and incomparable. The main thing to remember is that in order to look impeccable, you don’t have to go to a store or an expensive boutique. You can make a cardigan at home yourself. This will require a little diligence, patience and desire!