- 112985
- 13-10-2020
- Author: Mysekret Team
- 1
Braids are always a great idea for any knitted item: they are universal, because they are suitable for children, women and men; There are a huge number of their varieties - there is always plenty to choose from; braids and plaits look wonderful on most models of knitted items, be it hats, sweaters, scarves, cardigans, snoods, mittens, sweaters, dresses, booties, vests, pants and much more.
Using diagrams with descriptions of knitted braids, you can almost always knit not just another thing, but a unique, one-of-a-kind designer product that will delight not only the craftswoman, but everyone around.
From the very beginning
Creating braids with knitting needles is a fairly simple task. It just requires perseverance and patience. However, before you start knitting, you will need to learn the types of stitches to create the pattern. Then you will need to stock up on additional knitting needles and pins. Additional tools include:
- Special knitting needle. It should be slightly curved in the center. With this knitting needle you can easily knit not only a bias pattern, but also a cable pattern.
- The auxiliary tool should always be smaller than the main one. This is done to ensure that the drawing has a neat appearance.
- If you do not have a special tool, you can use a crochet pin.
And now some tips for beginners:
- In order to make the braid width you need, you need to select threads that are suitable specifically for the selected pattern size. For example, if the pattern is wide, then fluffy and thick threads are needed. And if you want to make a thinner pattern, then you will need cotton threads.
- You need to know that with this pattern, the item you are knitting will narrow. Therefore, this factor must be taken into account when purchasing threads and counting stitches.
- The pattern always has only 2 directions. And an auxiliary knitting needle is used to correct this pattern. If the braid is located behind, then you should give it the direction to the right, if in front, then to the left.
A beautiful and simple braid is the first exam for beginners
For craftswomen who are just beginning to learn the basics of knitting, they need to start with simple patterns. This includes a simple braid. In order to make it, take eight loops. You can change their quantity at your discretion. The main thing is that no hole is formed during the crossing.
To create a pattern, you need to take fourteen loops, give eight to the “braid”, four will serve to highlight it, and 2 are edge loops.
The first column is made from an edge column, two internal ones, eight external ones, two internal ones and ends again with an edge column.
From the second to the fourth column the same pattern is knitted as in the first row.
The fifth stitch begins with an edge stitch, purl two stitches, and four stitches are removed using an auxiliary tool or a knitting pin. They are held in the hands, then four loops are tied, and the loops from the auxiliary needle are transferred to the left needle. Thus, it turned out to be a cross to the left. If you want to make crosses to the right, then you will need to transfer them to the auxiliary tool and leave them behind the canvas. The column ends in the same way as the first ones - 2 purl. and 1 edge.
And the sixth and twelfth columns are created in the direction where the knitting is facing. Then you need to cross again.
If a beginner has completed this task, then the first exam has been passed.
Knitting harnesses
The rope pattern is the simplest and most original for decorating jackets, sweaters and other warm knitted items. It consists of an interlacing of loops.
For beginners, you need to start with the simplest patterns in the form of a rope. For example, raised vertical stripes. They are very easy to create, since only 2 loops are intertwined, and a beautiful pattern appears on the wrong side of the fabric. This pattern will look especially impressive if made from thick thread.
In order to try to make a pattern in the form of a rope, you need to cast on thirty-four loops. And add 2 from the edge so that the pattern is symmetrical. Then, do the following:
- The first column consists of two outer ones, four inner ones and ends again with two outer ones.
- The second one must be made from two purl stitches, crossing the 2 adjacent ones with a tilt to the right. Make a second one and hold it before the first. Then you need to knit the first one with an external knitting stitch.
- Then 2 more cross, but with a tilt to the left. A second stitch is knitted and held behind the first, then the first stitch is knitted with an outer stitch. And the second column ends with two inverses.
- The third column should repeat from the very beginning of the list.
Such patterns are made easily and quickly even by beginners. And the burden of executing this pattern lies in counting and tracking the sequence of loops for beginners if they take complex patterns.
Having dealt with the simple “braid” and “braid” patterns, let’s move on to drawing a braid of 12 loops.
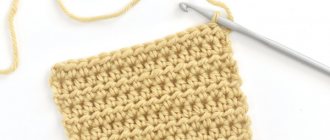
Crochet cords
When knitting blouses, you can use not only knitting needles, but also a crochet hook. The product knitted with this tool is indistinguishable from knitting. Crochet
- Classic braid;
- Harness with openwork fragments
- braid created by "shells".
All methods have their differences, but their use leads to a rather characteristic pattern. Each one is complicated in its own way. That is, the knitter must determine whether the instructions are suitable for her capabilities before starting to learn how to crochet ropes.
The easiest way to crochet ropes
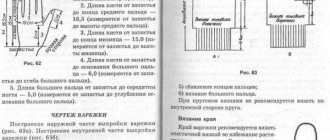
The first point is not new; it has successfully proven itself a long time ago. To knit such plaits, a pattern is not necessary. Only one picture can be provided here to illustrate the 3 steps presented:
- production of fabric having transverse holes
- interweaving of strands;
- finished braid.
The pattern is quite simple to make. It is necessary to make calculations of the main section in width, the number of sc for all sections. The knitting example will help you achieve the correct sizes.
Then the number of loops is cast on so that the entire part is formed, which follows, represented by the section of the fabric before the braid, the length of the strand, and the fragment after the braid.
Next, several rows of sc are knitted. (four or six, depending on the thickness of the yarn.
How to form a strand, braid a strand
To obtain a slot of the required size, you should, at the beginning of the row, make the number of columns that make up the section of the fabric up to the strand. Next, cast on as many air loops as required to form one strand, skip the same number of sc from the previous row, and carry out work with the section of fabric coming after the braid (knit sc). The next row should be different by knitting one sc. This will create the required slot, but the number of sc will remain the same.
The needlewoman carries out these actions until the planned part is completed. The pattern can be obtained by using a large hook (No. 6), with which the craftswoman grabs one strand, dragging it under the other. Then everything is repeated again.
Using this technique, you can make clothes, pillows, various covers, etc. Bundles with beads tied into them will look more impressive.
Use of “shell” plaits in knitting
It is distinguished by a more complex execution than the previous one, because the knitter must have the skills to perform not only ch and sc, but also double crochets and half-dcs. But this technique has the advantage of easier calculation of loops.
To form a rope using a hook, you should make a set of such a number of loops that is the width of the parts, not including gaps and allowances.
When knitting, use sc in the first row. From the second the pattern itself is knitted:
- Knit the section up to the braid;
- Knit 12-16 stitches, taking into account the thickness of the yarn;
- A loop is formed, then the canvas should be turned. A turn is necessary to complete the shell, to continue knitting the section after the element itself.
- The pattern is knitted using sc, plc, 10-15 dc (the number depends on the type of thread), plc, dc, sc.
- The dc is completed until the end of the row. Next, knitting continues by repeating these steps.
The finished fabric is completed by intertwining all the shells to create a finished pattern.
The patterns are convenient and there is no risk of slipping a loop or skipping a weave as with knitting. But there is a need to watch the placement of the shells in their places, otherwise the pattern may not work out.
So, knitting strands is not difficult, and the patterns themselves look quite beautiful on various products.
Braid pattern of 9 loops
When knitting the first column, only the outer loop is used.
When creating the second and next even rows, the rows are performed using internal loops.
The third stitch is knitted by placing three loops on the auxiliary needle, three more loops are knitted with the outside ones, then three more, taken from the auxiliary needle, are knitted with the help of the outside ones.
The fifth column is knitted outside.
The seventh is the same as the third.
The ninth is corresponding to the first.
Braided braids with shadow
We dial at least 8 points.
- 1 rub. (LS): cr. p., *l. p.*, cr. P.
- 2 r. (IS): cr. p., *i. p.*, cr. P.
- 3 rubles: cr. p., *l. p.*, cr. P.
- 4 rubles: cr. p., *i. p.*, cr. P.
- 5 rubles: cr. n., *sn. 4 p. for additional sp. back knitting, 4 l. p. from left sp, 4 l. p. with additional sp.*, from 8 to *, cr. P.
- 6 rubles: cr. p., *i. p.*, cr. P.
- 7 rubles: cr. p., *l. p.*, cr. P.
- 8 rubles: cr. p., *i. p.*, cr. P.
- 9 rubles: cr. p., *l. p.*, cr. P.
- 10 rubles: cr. p., *i. p.*, cr. P.
- 11 r.: cr. p., 4 l. n., *sn. 4 p. for additional sp. over knitting, 4 l. p. from left sp., 4 l. p. with additional sp.*, from * to *, 4 l. p., cr. P.
- 12 rubles: cr. p., *i. p.*, cr. P.
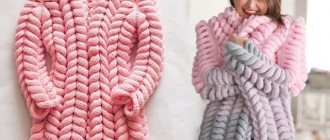
How to tie a wide and voluminous braid
The wide and voluminous braid has a relief pattern. It is usually dominated by external loops.
The first and third, seventh and ninth columns are knitted using two purl stitches and nine outer stitches. The end of the column is complemented by two underwear for symmetry.
In odd-numbered columns, the outer ones are knitted first, then under the faces. knits are made, and purls are made under the underwear. And the braids intertwine in the fifth row. This is done like this: 2 internal ones are performed, then three remain on the additional knitting needle. The tool remains under the canvas. The next three loops are knitted externally, and the remaining ones under the fabric are knitted purlwise. The last three loops are made external. the column usually ends with a purl.
The eleventh row consists of two internal loops, three external ones, then three loops are thrown onto an additional knitting needle. Next, three purl stitches are knitted. And those on the additional side are external. We conclude the row with two outer ones.
There is only one piece of advice for beginners: the main thing is not to get confused in the sequence of what is being done.
Braided pattern 2 x 2
- x 2/2 ← – dn. 2 p. for additional sp. before elm., 2 l. p. with left sp., 2 l. p. with additional;
- x 2/2 → – n. 2 p. for additional sp. per elm, 2 l. p. with left sp., 2 l. p. with additional;
The number of points must be a multiple of 8.
Basic series (IS): i. P.
- 1 rub. (RS): x 2/2 ← to the end of the row.
- 2 rubles: i. P.
- 3 rubles: 2 l. p., x 2/2 → – repeat until the last 2 p., 2 l. P.
- 4 rubles: i. P.
How to tie a false braid
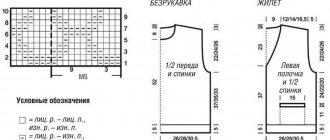
Knitting pattern:
- horizontal lines indicate internal loops; they are collected in any quantity;
- empty cells are outer loops;
- circles are yarn overs;
- two lines at an angle mean: 2 loops are inclined to the left.
Yarn overs are made with the front side facing away from you, and from the wrong side towards you.
Now let's try to tie a double braid. All these points will come in handy when you move on to knitting sweaters and other things.
Knit and garter stitch weaving
Scheme of a dense braided pattern with knitting needles
The number of loops must be a multiple of 8 + 3.
- 1 rub. (IS): 3 i. n., *1 l. p., 3 i. p.*, from * to *.
- 2 r. (LS): 3 l. n., *5 i. p., 3 l. p.*, from * to *.
- 3 p.: 3 i. n., *1 l. p., 3 i. p.*, from * to *.
- 4 rubles: 3 l. n., *5 i. p., 3 l. p.*, from * to *.
- 5 rubles: 3 i. n., *1 l. p., 3 i. p.*, from * to *.
- 6 rubles: 3 l. n., *5 i. p., 3 l. p.*, from * to *.
- 7 rubles: 3 i. n., *1 l. p., 3 i. p.*, from * to *.
- 8 p.: 4 i. p., *3 l. p., 5 i. p.*, from * to * to the last 7 p., 3 l. p., 4 i. P.
- 9 rubles: 3 i. n., *1 l. p., 3 i. p.*, from * to *.
- 10 rubles: 4 i. p., *3 l. p., 5 i. p.*, from * to * to the extreme 7 p., 3 l. p., 4 i. P.
- 11 p.: 3 i. n., *1 l. p., 3 i. p.*, from * to *.
- 12 rubles: 4 i. p., *3 l. p., 5 i. p.*, from * to * to the extreme 7 p., 3 l. p., 4 i. P.
How to knit a double braid
Here the loops should be divided by twelve. The first pair of rows is made to form the initial pattern, then all the weaves are knitted.
- The first and fifth stitches are made according to the pattern: three outer, three inner, the remaining three loops are knitted purl.
- The second column is knitted: under knit stitches - knit stitches, under purl stitches - purl stitches. All even rows are knitted this way.
- The structure of the third column is as follows: three purl, three knit, on an auxiliary needle - three loops are removed, the next ones are knitted purl. Removed - face to face. And the row ends with three purl loops.
- The seventh column is knitted with a slant to the right. Three are internal, three are used as an auxiliary tool, three are external, the removed ones are knitted with internal ones. Then again three are external and end with internal ones.
- The ninth row and subsequent ones are knitted according to the pattern from the first row.
Now let's look at the best simple and beautiful braid patterns.
Five of the most beautiful patterns on clothes that can be knitted
Let's look at a few knitting patterns.
Miniature braids
So, the first of the most beautiful is the design of miniature braids.
Advice: to tie it, be patient. Do not use yarn that is too thick, otherwise the design will be unattractive.
The diagram is given below, where the horizontal lines are the outer loops, the vertical lines are the inner ones.
It must be borne in mind that the initial set has ten loops and 2 edge loops, and is sixteen columns high.
Chain of braids
Horizontal lines – inner loop.
Vertical – external external.
Birdie with the number 3 on top - three loops with a yarn over. The third loop is thrown over the first and second. The first is knitted on the outside, yarn over again and the second is knitted on the outside.
Each row will be equal to five loops plus 2 additional ones and, in order not to lose symmetry, 2 edge loops.
The diagram shows the front side. The reverse side can be seen in the picture.
Braids with ornaments
Scheme:
The figure below explains the meaning of the figures in the diagram
There should be twenty-three loops and twenty-seven columns. The reverse cells are made according to the drawing. And according to the scheme, only the outer column is made. Green cells in the diagram mean that there are no loops there.
Such a beautiful composition will look chic on your cardigan.
Curly braid
This type is knitted with simple crosses of four stitches.
The horizontal line means the inner loop.
Vertical - external.
In this pattern, the horizontal column consists of fourteen loops, then there are 2 loops and 2 along the edges. Knit vertically from the first column to the eighteenth, then you need to knit repeating from the third row.
The diagram shows only the outer columns. The purl side is knitted according to the pattern.
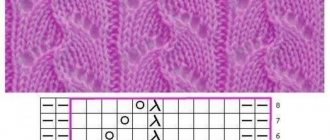
Openwork pattern
One of the most beautiful patterns for women's blouses. The diagram shows only the front stitches, and the inner stitches are knitted according to the pattern.
Horizontal repeat consists of sixteen loops, three loops and 2 edge loops. Vertical repeat consists of twenty-six rows.
Textured braid with constrictions
Rapport consists of 6 + 3 points of symmetry + 2 cr. P.
- 1 rub. (LS): cr. n., *1 i. p., 1 l. p., 1 i. p.*, from * to *, cr. P.
- 2 r. (IS): cr. n., *1 l. p., 1 i. p., 1 l. p.*, from * to *, cr. P.
- 3 rubles: cr. p., *thread over work, n. 3 p. on the right sp., 1 i. p., 1 l. p., 1 i. p.*, from * to *, thread over elm., sn. 3 p. on the right sp., cr. P.
- 4 rubles: cr. p., *thread over work, n. 3 p. on the right sp., 1 l. p., 1 i. p., 1 l. p.*, from * to *, thread after sample, sn. 3 p. on the right sp., cr. P.
- 5 rubles: cr. n., *1 i. p., 1 l. p., 1 i. p.*, from * to *, cr. P.
- 6 rubles: cr. n., *1 l. p., 1 i. p., 1 l. p.*, from * to *, cr. P.
- 7 rubles: cr. n., *1 i. p., 1 l. p., 1 i. p., thread over work., sn. 3 sts on right sp.*, from * to *, 1 i. p., 1 l. p., 1 i. p.. cr. P.
- 8 rubles: cr. n., *1 l. p., 1 i. p., 1 l. n.*, under work., sn. 3 p. on right sp.*, from * to *, 1 l. p., 1 i. p., 1 l. p., cr. P.
Knitting a royal braid
This pattern can be used to create things such as hats, men's sweaters, cardigans.
In order to knit this pattern, you need a number of braid loops equal to thirty. Then the following is done:
- In the first row, all the loops are external.
- In the second column, purl stitches are knitted inside. And from this row this is done for all rows.
- The third stitch is knitted in this way: five loops are removed and put on an auxiliary knitting needle, and the tool remains in front of the fabric. The next five are knitted, and then removed with knits. Then, ten knit stitches are knitted again and five stitches are removed. And the previously described action is repeated again.
- The fifth and seventh are knitted externally.
- The ninth is knitted with five knit stitches and five are removed and left behind the fabric. Then five are knitted and the removed ones are knitted.
- The eleventh column is knitted.
- From the thirteenth row everything is repeated.
Advice: be patient. It’s only at first that knitting seems like backbreaking work. Once you get used to it, it will work out quickly.
Women's cat hat
Scheme:
The designations are given in the figure below:
For this header we need:
- yarn from alpaca, acrylic for 200-220 meters;
- knitting needles number 3.5 - 4.5.
This will be a chic hat for both a girl and a child.
Ninety stitches are cast on and joined into a circle. Work one outer stitch, two purl stitches, three knit stitches, and end with two purl stitches and two knit stitches. About ten rows are knitted in this way. From the third row, knitting begins according to the pattern. Since the pattern shows only half of the knitting, it needs to be repeated twice in width. The diagram shows knitting knit stitches.
After the circuit is completed, all loops are closed. From the wrong side, along the decrease line, the side arches for the cat's ears are sewn.
The hat is ready.
Round
But what if you want to knit a seamless product? For example, a hat without a seam. This is also possible. When knitting a braid in the round, be sure to mark the beginning of the row with a marker so as not to go astray from the pattern. The number of loops must be a multiple of 4. 1p.: *2p. transfer to additional sp. before work, k2, then we knit loops with an additional sp. persons.p. behind the front walls*; 2p.: knits.p.; 3p.: *K2, 2p. transfer to additional sp. at work, k2, then we knit loops with an additional sp. knits.p.* 4p.: knits.p.
You can watch the video on the Miraletto channel:
Wide braid 3 x 3
So we come to a wider braid. There will be nothing new in knitting: you need to cross the stitches in the same way. Only this time in 3. Large braid can also be knitted 4 x 4, 5 x 5, 6 x 6, etc. The principle in these patterns is the same. If you carefully read the diagram with the description and mastered the previous two knittings, you will be able to knit the pattern with any number of loops in the overlap.
Description of the 3 x 3 pattern: Cast on the number of loops that are a multiple of 6 + 2 edge stitches. 1st row (wrong side): purl; 2p.: facial; 3p.: purl; 4p.: 3knit., *3p. remove to additional sp. at work, knit 3, then knit 3 sts with an additional sp. faces.p.* - to the end of the river; 3 persons; 5 and 7 rows: purl; 6 rubles: knits.p.; 8p.: *3p. remove to additional sp. before work, knit 3, then knit 3 stitches with additional sp. faces.p.*. The pattern is repeated from the 1st to the 8th row.
You can watch a detailed master class here:
Women's cardigan
We will need:
- silk yarn 400 grams;
- mohair yarn 160 grams;
- circular knitting needles No. 3,5, 4;
- hook number 3.
Beautiful cardigan for women knitted with a braid pattern
The elastic for the sleeves is knitted in this way: two knit stitches and two purl stitches are knitted alternately.
- The key pattern is also performed alternately - with one outer and one inner loop. The pattern should shift by a stitch every other row.
- The “Mesh” pattern is knitted alternately. The outer line is made up of knit and purl stitches, one at a time. And the inner line is only purl.
- The outer and inner fabric is knitted from knit stitches in the outer rows and purl stitches in the inner rows. And vice versa - in the outer rows there are purl loops, in the inner rows there are front loops.
- The braids should cross to the right on one shelf and to the left on the other.
- Everything is done with one piece. Then the model is stretched and the upper part of the sleeve is knitted.