Set of loops by interlacing threads (Italian method).
This set of stitches, in which the edge, while remaining elastic, looks impeccable, is ideal for knitting panels and cuffs with 1×1, 2×2 rib and patent patterns.
Make the first loop in the usual way and place the threads on the index and thumb as in the simple cast-on method (short end of the thread on the thumb, thread from the ball on the index finger) (Fig. 1).
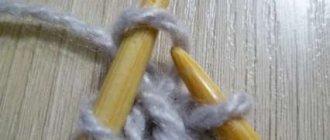
Place the knitting needle with the point away from you under the thread coming from the thumb, and grab the thread on the index finger coming from the ball. After performing the technique, a facial loop was formed (Fig. 2).
Place the needle with the point towards you under the thread on your index finger coming from the ball. Grab the thread located on the thumb (Fig. 3), pull it out from under the thread on the index finger.
After performing the technique, a purl loop was formed (Fig. 4).
Repeating the above steps, cast on the required number of loops (Fig. 5).
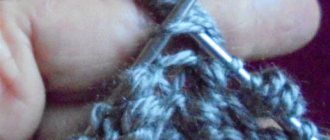
After casting on, the edge can be decorated in the “Italian” way, to do this, knit 4 rows with double knitting, i.e. knit the front loop (Fig. 6), and remove the purl loop, the thread in front of the loop (Fig. 7).
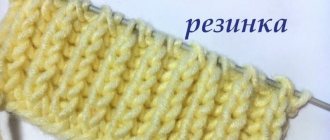
After knitting 4 rows with double knitting, continue knitting 1x1 rib, i.e. *Knit 1, Purl 1* (Fig. 8)
In order to switch to making a 2×2 elastic band (Fig. 9), you must remember: firstly, the number of loops when casting on must be a multiple of 4 plus 2 edge stitches; secondly, next to the edge loops there will be only one knit or purl stitch. Since the cast-on is carried out according to the principle “one loop in front of the thread, the other behind the thread”, then the first ones are knitted with knit stitches, and the second ones with purl stitches, it is impossible to cast on two loops more than one or the other. Therefore, it is necessary to cast on the same amount for a symmetrical arrangement of the pattern and knit one knit or purl next to the edge, otherwise one edge will have two knit stitches, the other two purl.
When switching from double knitting to 2×2 elastic, some loops should be swapped. For example, after edging, knit a knit stitch, then a purl stitch, remove the next knit stitch before work, knit a purl stitch according to the pattern (Fig. 10), then remove the knit stitch, then knit a knit stitch according to the fabric pattern, purl according to the pattern and again remove the knit stitch before work, etc. .
By casting loops by interlacing threads, you can make a 1×1 (Fig. 11) or 2×2 (Fig. 12) rib at once, without knitting 4 rows of double knitting. When doing a 2×2 rib, you should rearrange the stitches.
Why are air loops needed in knitting?
The main area of use of air loops is to expand the product by simultaneously increasing the number of P along the edge or inside the fabric. You can increase the P number using several techniques. One of them involves a gradual increase in the number of P, which is achieved by gradually knitting two or more P from one P, as well as using yarn overs. This increase is done inside the row (P), that is, after the edge P. The second technique, which we will discuss in this article, involves a sharp increase in the number of P both inside and outside the canvas. The technique for forming the described loops outside the fabric will look like this. The canvas does not increase in an arc shape, but at a right angle:
Now we will give examples of those cases in which these loops will be required.
- They become necessary when you need to knit a full kimono sleeve. For such a sleeve, P is added directly from the armhole itself.
- The second example is making a hat with ears with knitting needles, when handicraft begins with knitting an ear. Having knitted one of them to the end, these buttonholes are collected along the edges to form the main part of the cap.
- The next use is the formation of holes and holes in a knitted product if the holes are located horizontally. These are fasteners for blouses and coats, and holes for fingers in mittens. Such horizontal holes will also be required when you need to form welt pockets. The first operation of this technique is to bind off the required number of loops in one row. After this, we collect air loops in the next row. By obtaining P, we will fill their missing number.
Read
Ideas for knitting simple toys
In some cases, such links are used to set the first row. The only drawback of this method is a slight displacement of the P. In addition, the edge of the canvas is not as dense as with conventional formation, and stretches quite a lot. Next in the master class we will look at the step-by-step technology for setting the described loops.
Cast on with crossed stitches using double thread (or cast on with thickened edge):
Form a starting loop, then place a double thread (the length of the thread is equal to twice the length of the cast-on edge) around the thumb of your left hand and hold it together with the starting loop. A single thread runs from the ball around the index finger to the needle. Then cast on the loops, bringing the knitting needle under the thread in the direction of the arrow, each time throwing the thread off the thumb and laying it alternately from the outside and then from the inside of the thumb. In Fig. Several stitches of the initial row cast on using this method are shown.
A set of cable cast on loops or a crossed set of loops.
This method of casting on stitches is used for tight edges and also when adding stitches within the work.
1. Make a loop (the so-called “blind knot”), put it on the left knitting needle.
2. (First stitch only) Insert the right needle into the stitch as if knitting and wrap the yarn around the tip of the right knitting needle.
3. Pull out the loop.
4. Place this stitch on the left needle.
5. To perform the next loops, insert the knitting needle between the last stitch completed and the previous one, but not into the loop.
6. Pick up the thread with a knitting needle and pull out a loop, place it on the knitting needle.
Repeat steps 5 and 6 until the required number of stitches is cast on. As you can see, all the loops form small bridges along the bottom edge, lying in the same direction.
If you need to knit in the round, it is preferable to do the first row with flat knitting and then knit in the round. This way, not only will it make it easier to close around the edges without crisscrossing, but it will also ensure a neat edge.
Bulgarian beginning - cast-on edge with knitting needles
For the Bulgarian beginning of a set of loops, you can use one knitting needle, in this case the edge will be tighter. When using two knitting needles, the edge becomes more elastic and loose. The thread that passes through the thumb and “looks” at us can be doubled. In this case, the edge becomes more voluminous and rounded.
Bulgarian beginning with knitting needles – video:
White yarn: knitting needles 5.5 mm; yarn 50 g. 80 meters. Gray yarn: knitting needles 5.5 mm; yarn 50 g. 80 meters.
A set of loops with an alternating “pigtail” (alternate cable cast on)
With this method, the set of loops will be carried out, alternating the front and back loops. An alternating braid is used if you start knitting with a 1/1 rib.
Steps 1 - 4 are performed as for a regular cast-on.
5. Now, insert the needle behind the last loop (that is, between the last loop and the previous one), inserting the needle from back to front, as when knitting a purl loop.
6. Pick up the yarn, pull up a loop and place it on the needle - You have just completed a purl stitch.
7. When we need to perform a knit stitch - insert the knitting needle from front to back between the last loop and the previous one, pick up the thread, pull out the loop and place it on the knitting needle - the next knit stitch is made (as with a regular set of loops with a pigtail).
Repeat steps 5-7 until the required number of stitches is cast on.
As you can see, along the inlaid edge the bridges alternate with depressions.
The method can be varied by tying a knit stitch into a blind knot, then alternating a set of purl and knit stitches; or, knitting a purl loop in a blind knot, alternate a set of knit and purl loops.
To make the cast-on edge neater at the end of the cast-on row, you need to move the working thread along the trail. way: if the last stitch cast on was a knit stitch, then slip the last stitch as a purl on the right needle, move the thread forward between the needles, return the last loop to the left needle and pull the working thread tighter; if the last stitch cast on was a purl, then remove the last stitch as a purl from the left knitting needle to the right knitting needle, move the thread behind the work between the knitting needles, return the last one to the left knitting needle and pull the working thread tighter.
If you need to continue with a 2/2 rib, then in the first row you need to periodically swap the knit and purl stitches to maintain the 2/2 rib pattern. This must be done carefully so as not to miss the loop.
Video
Experienced craftswomen know that the appearance of the product depends on how the loops of the first row are cast on. A test knitting pattern will help you calculate the correct number of loops to be cast on, with the help of which you can easily determine how many loops in a given pattern are needed in one centimeter. The existence of several typing methods provides an excellent chance to choose the right option that is suitable only for such a product.
How to cast on loops on knitting needles to create a beautiful elastic band that will not stretch and retain its original shape - learn from the video. This method will definitely come in handy if you decide to knit a snood scarf, gloves, mittens, or socks. The difference in starting work for these products will not be in the method of casting, but in what knitting needles were used and how. For a scarf, circular ones with fishing line are suitable, and mittens and socks are knitted using four and five additional ones. You can learn more from video tutorials on how to knit a scarf-collar with knitting needles.
- Symptoms of kidney failure in humans
- Lymph nodes in the neck hurt - the cause of inflammation. Treatment for pain in the lymph nodes in the neck
- Grooves on the tongue
Circular knitting needles and specific work on them will help you knit sweaters with a neck, including a cowl collar and a cape. Using two knitting needles at the same time when working with loops makes the edge thicker and more embossed. There are types of casting that add variety to the pattern, starting with the first row of knitting. Some products are knitted in parts and then crocheted into a single whole. This applies to ponchos in which the seam is in the middle of the product, blankets, sweaters with raglan sleeves, and some models of hats.
“Pigtail”, “tangle”, “harness”, “herringbone” patterns will turn out more elegant if the set of loops is made with a tightened edge. Several educational videos brought to your attention will once again help you understand how to correctly cast on stitches for different types of knitting, which will be useful if you want to knit socks, warm footwear, a sweater with a front placket or a scarf. Mastery will come with experience; all needlewomen were once beginners. Your desire to knit on your own will definitely be rewarded with the resulting beautiful thing.
Three ways to cast on stitches on two knitting needles at once
A set of loops on two knitting needles - 3 ways. KNITTING FOR BEGINNERS
On 4 and 5 knitting needles for knitting socks or gloves
Set of loops for toe knitting needles
For a snood scarf
We knit Snood, a circular scarf. Snood with English elastic band. Knitting needles LIC, circular scarf.
How to calculate the number of loops when knitting a sweater
How to CALCULATE THE NUMBER OF LOOPES when knitting with needles #15
Set of loops along the side edge of the fabric:
1st method.
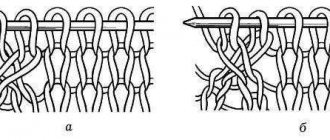
The loops are knitted from under the two threads of the edge loops: enter with a knitting needle under two threads of the braid (Fig. 1), pull out the loop, then enter the gap with the knitting needle where one braid hooks onto the second (Fig. 2), pull out the loop, enter again with the knitting needle under two strands of braids, pull out a loop, etc. (Fig.3)
2nd method.
The loops are knitted from under one thread of the edge loops: enter with a knitting needle under one distant thread of the pigtail (Fig. 4), pull out the loop, then enter with the knitting needle into the gap between the distant threads, where one pigtail hooks onto the second (Fig. 5), pull out the loop, enter the knitting needle again under one distant thread of the braid, pull out the loop, etc. (Fig. 6).
3rd method.
The loops are knitted from the loops of the row closest to the edges (Fig. 7, Fig. 8).
Invisible or provisional cast on.
Make a loop and place it on the right needle. Keep the auxiliary thread near the loop and around the left thumb; hold the working thread over the index finger of your left hand. *Pass the knitting needle under the auxiliary thread, over the working thread, grab the working thread and make a loop (Fig. 1).
Then pass the knitting needle in front over both threads and, grabbing the working thread, make the second loop (Fig. 2).
Repeat from *.
This method is used when in the future it is planned to continue working in the opposite direction from the set row. In this case, the auxiliary thread is carefully removed and the loops are strung on a knitting needle.