“Raglan”: general meaning of the term and essence
When studying thematic materials, you can see that the name raglan is used both to designate the sleeve and the entire product. If you knit on top, then everything really turns out whole. When knitting to the bottom, you cannot do without stitching between the parts.
The shoulder parts of the shelves and backs are drawn simultaneously with the sleeves. This name owes its appearance to the famous baron from Britain, who demanded a certain size for his clothes. Next there will be a master class on how to make a raglan line.
Positive and negative aspects of the method
Here are the main advantages characteristic of raglan knitting:
- Everything is knitted in one piece, the need for stitching almost completely disappears.
- Simultaneously perform decreasing and adding for all loops. The possibility of errors and omissions is reduced to a minimum.
- Each new product does not require the preparation of separate patterns. Just one option is enough; armholes in all products are made in the same way.
- It is impossible to spoil the finished parts, so fitting can be done without any problems at any time.
- There are no loose ends after work. Thanks to this, the assembly of the product is simplified.
- Size adjustment. The product can be easily shortened, even if it has stretched somewhat during the previous wash. They also increase the length of things that have become short over time. But these rules apply to raglans that are knitted from above.
- There are no seams completely. For the manufacture of children's things, such properties are especially important. The raglan line at the top remains the easiest solution for everyone.
This method of creating clothes is not without its downsides:
- If a person is of miniature size, the line style does not suit him.
- The work can seem endless due to the large number of loops in the process.
- While the work is going on, the thing is kept suspended.
As you can see, there are many more advantages compared to the disadvantages. Therefore, this method of knitting is becoming more and more popular among craftswomen. As are the specific lines of raglan knitting on top.
How to knit a women's dress with raglan knitting needles?
A raglan dress is the same blouse, but longer. To perform raglan on top, you need to start from the neckline. Very often it is knitted simply without changing the loops.
Next, the redistribution of loops begins and the most interesting moment begins - this is the raglan itself. You need to knit enough to get the desired width along the front and sleeves.
Additionally, after finishing the raglan, a set of loops occurs so as not to get an unpleasant hole in the armpit.
Then the division of labor, and the sleeves are separate from the shelves. In fact, it is easier to knit with this technique than with separate pieces. Since the assembly stage may be completely absent .
Next is a wonderful model that will clearly demonstrate how you can do an easy job and at the same time elegant.
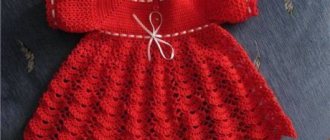
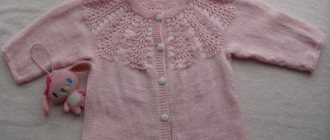
Elegant red knitted dress with braids
This model is created thanks to the raglan top. Braids are simply perfect for this model. It is thanks to such an interesting motif in the center of the front shelf that the master does not have to make a single reduction to obtain a fitted model.
For work use:
- red yarn (wine color is possible);
- knitting needles for red yarn.
Measurements
Measure the length of the back of the model. Then the width of the back, the length for the 3/4 sleeves, the length of the hem from the waist line. And the most important thing is to measure the neck circumference correctly.
For this model, you can simply measure your head circumference and use that measurement.
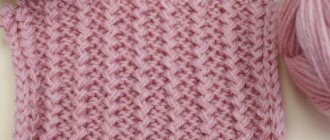
Sample
Knit a sample for such a model, but, what is most interesting, use a non-knit stitch for it, which takes up more space on the entire fabric. Measure the knitting density for the resulting sample, and calculate how many loops are required for the initial set of loops around the neck circumference.
Facial surface
Neck elastic
The neck elastic is made from a 2*2 elastic pattern. Knit only 10 rows of such elastic, and without changing the number of loops, immediately redistribute the loops for the sleeves and fronts. Knit with appropriate additions.
Raglan
To create a soft transition and get a beautiful raglan, make it in place of the continuation of the strip of facial loops of the elastic band. To do this, add not 1 loop, but 2 on each side of such a strip.
Along the front shelf, immediately distribute a beautiful pattern with braids and a fancy weave in the form of a honeycomb. Knit the raglan itself to the desired length.
Honeycomb pattern
Shelves
Without changing the patterns and number of loops, combine only two shelves into a circle, and continue knitting in circular rows. Leave the sleeves aside for now. For a smooth transition, you can cast on a few loops for the inside of the sleeve. Knit to the waistline and change the braids to a simple stockinette stitch.
Hem
For the hem, only the front stitch takes part in the work . Knit to the required length and carefully calculate, since the elastic should still fit at the bottom. For elastic, use a length of at least 10 cm to get such a wide and even strip. It is very important that the number of loops does not change. The slight narrowing at the bottom is only due to the transition from the stockinette stitch, which always spreads well to the 1*1 elastic band.
Sleeves
For the sleeves, also use stockinette stitch and at the end make an elastic band 10 cm wide as for the hem. For the sleeves, use 1*1 elastic with knitting needles . It is better to close the loops using a special elastic method of closing loops.
Important! To make the sleeves neat, you should add additional loops from the inside, but you should not make them very wide.
So the chic dress is ready. It does not require assembly or other seams.
How to choose materials with tools?
You can't do without circular knitting needles. The thickness is greater for the main fabric, less in the case of elastic. The line should be of such length that it can accommodate everything.
The first step involves selecting images to apply to the products. Determining the number of loops for the main fabrics becomes easier if you have developed a small sample in advance.
Additional tools include:
- Markers indicating the beginning of the circle along with raglan lines.
- Several student elastic bands and other tips for knitting needles.
- Notebook.
- Centimeter rulers.
The main thing is to be patient. Especially when the work is being done for the first time. Only in this case a beautiful raglan line is obtained.
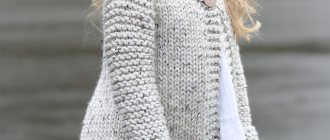
Women's sweater with raglan sleeves for knitting
A popular model of a women's sweater with smooth raglan lines.
Emphasis on the sleeves due to openwork ornaments. The model for women uses a voluminous openwork motif . It follows from the yoke itself to the cuff. This visually lengthens the arms, and the same motif is used along the side seam line.
The yoke is highlighted with a hollow elastic band , which emphasizes how smoothly a round collar can be made by knitting raglan on top.
Materials and tools
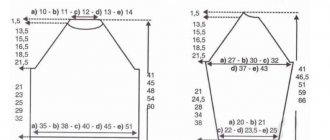
Everything is indicated for women sizes 48-50.
Materials:
- knitting needles No. 2 (for making elastic) and No. 3 (for creating the main fabric);
- Alize yarn (49% wool, 51% acrylic) No. 193 (required for approximately size 50, 290 g).
What are the rules for knitting raglans?
Both sleeves are knitted separately using this method until they reach the armholes of the back and front. The connection together is performed only after completion of the previous stages of work. The ideal option is to lay out the entire structure on a completely flat surface. Next, starting from the first row, they are assembled onto knitting needles in a circular row.
Note!
Knitted raglan - step-by-step instructions, patterns, recommendations. Photo review of the best works and new products from craftswomen
Knitting a shawl - step-by-step instructions for making a shawl with your own hands. Tips for beginners on knitting + photo reviews
Amigurumi ring ⭕: features of the amigurumi technique. Step-by-step DIY master class with simple knitting patterns + 180 photos
The pattern does not change when it comes to the first row. Another thing is when at least minimal fastening is planned. In this case, you will need both the front and back sides of some parts. Markers and pins mark the locations of the joints. This is necessary so that later you do not forget about the Raglan line itself.
The shoulder will be smooth for now if you start with decreases. The action must be performed at the end of each of the parts. These are usually the front loops, not the last ones. The reduction can be performed not only on one loop, but also on several at once.
The result is the part at the top in the form of a single canvas, devoid of seams. It is carried out according to a single pattern, without any errors. There are four lines of raglan where you need to create decreases. A finishing strip separates the elements from each other to make the appearance more attractive, so that a beautiful line appears.
8 decreases are required in each row. You need to look at what thickness the products and threads need. Elements go in each row, or across a row. It is important to immediately calculate the number of loops, then the scheme will be as simple as possible. A pre-linked sample will help with this.
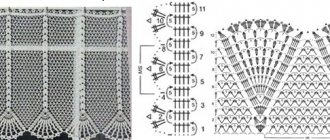
Pigtail pattern in raglan
This master class shows how to increase stitches on the left and right, and knit a pattern in the middle of the increases. In our case, this is a strand of 4 knit stitches + 1 purl stitch on each side.
Knitting pattern in rotary rows and on circular knitting needles:
Raglan line repeat with pattern: 10 loops; 4 rows.
1st row preparatory (purl): purl 2; 1 person; 4 purl; 1 person; 2 p. For knitting on circular knitting needles: knit 2; 1 purl; 4 persons; 1 purl; 2 persons
- 1 ROW of rapport: knit 1; a loop is added from the broach and knitted with the front one crossed over the back wall; 1 person; 1 purl; 4 persons; 1 purl; 1 person; a loop is added from the broach and knitted with the front one crossed over the front wall; 1 person
- ROWS 2 and 4: purl 2; 1 person; 4 purl; 1 person; 2 p. For knitting on circular knitting needles: knit 2; 1 purl; 4 persons; 1 purl; 2 persons
- ROW 3: knit 1; a loop is added from the broach and knitted with the front one crossed over the back wall; 1 person; 1 purl; 4 crossed loops (2 loops are removed on an additional needle and left BEFORE work, k2; k2 from an additional needle); 1 purl; 1 person; a loop is added from the broach and knitted with the front one crossed over the front wall; 1 person
What are raglan lines?
Reducing stitches before and after the dividing strip is the simplest option for raglan lines in practice. Then, when selling the product, there are no obstacles to a harmonious design and adherence to all lines.
Note!
- Knitted braids: simple patterns and the best master class for creating patterns with knitting needles. How to knit braids with your own hands + photo reviews
- Knitting booties for newborns: detailed patterns for knitting booties for beginners + 150 photo reviews of the best products
- Mittens - TOP 100 photos of the best creation ideas. Description of the technique + instructions for knitting mitts with your own hands for beginners
But there are shapes that are of greater interest when knitting from below, from above. The following options are always in demand:
- Tourniquet.
- Protection,
- Christmas tree.
- Corner.
Any of these types of patterns can be displayed on the front side of the product. Then the finished version looks more unusual and beautiful. But you still can’t do it without some skills and perseverance.
It is worth considering each instruction separately to understand. And to understand how a beautiful raglan line appears with knitting needles.
Tips for designing tucks
Stitches are picked up on knitting needles in odd numbers to develop a test pattern. The preparatory row is always purl. Next knit using the following pattern:
- Edge loop, followed by 3 knit stitches, 3 together with a knit stitch with a right slant. Next come the knit stitches, with 7 loops left non-knit with the edge stitch. Together with the knit stitch, 3 stitches are made with a left slant, then three more knit stitches, then an edge stitch.
- Facial.
- Purl.
- A row of purls.
- Repeat the first row.
When knitting large items, this method becomes especially relevant. Such raglan lines are distinguished by their simplicity and the absence of additional skill requirements.
Raglan line from the front loop
In this case, the raglan line with knitting needles has a large knit stitch on top. It looks simple, but certainly stylish.
Knitting pattern in rotating rows and in the round:
Rapport: 1 loop; 2 rows.
- 1 ROW: three are knitted from one loop: 1) From the bottom loop, which is located under the central one, the right wall is picked up and thrown over the left knitting needle, then knitted with the front one crossed over the back wall. 2) The top knit stitch is knitted. 3) The left wall of the bottom loop (3rd from the top) is picked up, thrown over the left knitting needle and knitted with a crossed loop behind the front wall.
- ROW 2: for turning rows, purl all stitches. For circular knitting, all stitches are knit.
How are flagella formed?
After the required sample, the work is performed in the following sequence:
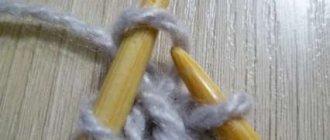
The first loop is made as an edge loop in any case. The next stitch is a purl, and the next 4 are swapped with each other. The loops are removed on the right needle, without knitting. In the first 2 loops, the left knitting needle is inserted behind the work. Counting goes from the right side to the left. The right knitting needle is removed from 4 sts. Before work, they immediately begin to insert it into 3 and 4 sts.
All previous loops are returned to the left knitting needle. Next come three facial ones.
The next three loops go together; when forming them, use the following method. Each loop is transferred to the knitting needle on the right in such a way as if the front version is knitted, the knitting needle is inserted into the loops from left to right.
There is a return to the right knitting needle of all parts, knitting behind the walls behind. The remaining part is knitted; only the last of the 8 stitches are not knitted until the end of the row. The first 2 of 8 are removed on the knitting needle on the right. The same is done for the next 4, the first two of those indicated before work are removed onto the same knitting needle on the left side.
4 loops are released from the knitting needle on the right, but then it is again wound into 3 and 4, which remained unknitted. The left knitting needle should accommodate the two mentioned earlier and those for which processing has already been carried out. Finally, take 1 purl stitch and 1 edge stitch.
Knit based on the pattern. All knit stitches go. Repeat the second row.
Repeat the first row. The line length table also helps to complete projects of any complexity.
Raglan on top with knitting needles - theory and practice
To calculate a raglan top with knitting a sprout, you need to know the size of the head circumference, the knitting density, the number of loops in the raglan line and the height of the sprout. The master classes describe in detail and show how to calculate the raglan top using knitting needles with a sprout. It starts with the theory of calculations, then the practical part of the work.
Calculation of raglan on top using knitting needles with a sprout - THEORY:
Progress:
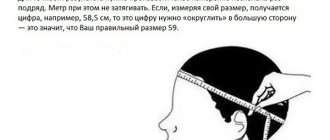
1. Determine the head circumference, for example, 55 cm.
2. Determine the density of your knitting. Knit a sample and from it calculate how many loops and rows are in 1 cm in width and height. For example, 1 cm = 1.9 loops (width); 1 cm = 2.7 rows (in height).
3. Select a raglan line pattern and determine the number of its loops. Then multiply this quantity by 4, since there will be four lines in the product. For example, 2 loops * 4 = 8 loops.
4. Determine the height of the sprout. Basic sprout dimensions:
- Children from 0 to 3 years – up to 1.5 cm;
- Children from 3 to 12 years – up to 3 cm;
- Adult size up to 50 – up to 5 cm;
- Adults from 52 and above - up to 7 cm.
When these four indicators are known, the number of loops of the product itself is determined. To do this, the number that indicates the head circumference is multiplied by the number of loops in 1 cm. 55 cm * 1.9 loops = 104.5 loops - the number is rounded, for example, to 104 loops.
From the total number of loops of the product itself, the number of loops of raglan lines is subtracted: 104 – 8 = 96 loops.
The resulting number is divided into 8 parts: 96: 8 = 12 loops. One part (12 loops) is distributed on the sleeves, three parts (12 * 3 = 36 loops) on the back and front (1 part sleeve + 3 parts back + 1 part sleeve + 3 parts front).
Conventionally, with a sprout of 3 cm, you need to knit an additional 8 rows (3 cm * 2.7 rows (knitting density in height) = 8.1 rows). Since in every second row 2 loops will be added from the raglan line and the knitting point will begin from the back raglan line of the left shoulder, then 8 rows: 2 = 4. 4 loops are subtracted from the number of back loops, and they are added to the front (see . rice.).
The sleeve line is divided into 4 parts. These are the points from which the turn will be made, since the sprout is knitted in short rows. When distributing these points, the rule is followed: a larger number of loops are left closer to the rear raglan lines, a smaller number of loops are distributed closer to the front raglan lines (see figure).
If the sprout goes to the front line, then the “turning” points are lined up in the following order: the number of loops is left towards the front line of the raglan; towards the central part of the front the number of loops is distributed more.
After knitting the sprout in short rows, the knitting is closed and knitted in the round.
It is worth noting that sometimes, for a more correct planting, the height of the sprout can be calculated from your individual dimensions. For this calculation, the neck circumference is measured. Received size: 6 + 1 cm.
Knitting raglan on top with knitting needles - PRACTICE:
Progress:
After calculating the raglan, knit 1 row with purl or knit stitches, then the 2nd row with knit stitches. The locations of the raglan lines are indicated by markers, and “turning points” are determined on the sleeve lines.
Knitting a sprout in short rows:
- 1st ROW (front): starts from the raglan line of the back of the left sleeve (the raglan line pattern is knitted with the addition of loops) + back + 2nd raglan line (the raglan line pattern is knitted with the addition of loops) + the 1st part of the right sleeve loops is knitted to the first turning point. The knitting turns over.
- ROW 2 (purl): a “double” loop is made, which is transferred to the right knitting needle without being knitted + part of the loops is knitted to the back raglan line of the right sleeve + the raglan line itself (without adding loops) + back loops are knitted + the back raglan line of the left sleeve (without adding loops) + knit the 1st part of the left sleeve loops to the first turning point. The knitting turns over.
- ROW 3 (front): a “double” loop is formed + knitted to the back left raglan line + the raglan line itself is knitted, where loops are added + back loops are knitted + the back raglan line of the right sleeve (loops are added) + loops are knitted to the second turning point, where The “double” loop is knitted with the front one behind the front walls (knitting needle from left to right). The knitting turns over.
- 4 ROW: (purl): a “double” loop is made, which is transferred to the right knitting needle + part of the loops is knitted to the back raglan line of the right sleeve + the raglan line itself (without adding loops) + back loops are knitted + the back raglan line of the left sleeve (without adding loops) + loops are knitted to the second turning point, where the “double” loop is knitted with a crossed purl stitch (the knitting needle is wound from the back from left to right). The knitting turns over.
- The next rows are knitted similarly to the 3rd and 4th rows, taking into account the knitting of the next turning points and the unfolding of the knitting in these places.
How is the length of the raglan line calculated? In this case, it is better to try on the product during the knitting process. The generally accepted calculation of the length of the raglan line is calculated as follows. Half bust: 3 + 5 cm.
Tips for counting correctly
Samples of 20 by 20 cm are considered standard. This is necessary to correctly determine the amount of materials that will be needed for further work. For every 10 cm of the pattern, the number of loops and rows is simultaneously counted.
Getting an accurate result involves multiplying numbers with each other. The correct distribution of loops to the knitting needle is important. You just need to take into account that there are not only the main components, but also wool raglan. Then knitting a raglan line gives results for many years.
Purl stitch line
The line turns out interesting and expressive. Between the “braids” there is one purl loop, which is practically invisible.
Knitting pattern in the round and in rotating rows:
Line repeat: 3 loops; 2 rows.
1 preparatory row (purl): for turning rows: purl 1; 1 person; 1 purl. For circular knitting: knit 1; 1 purl; 1 person
- 1 ROW of rapport: two are knitted from one loop: knit 1; 1 person from the loop of the bottom row of the previous knitted loop; 1 purl; two are knitted from one loop; 1 person from the loop of the bottom row of the next person. loops; 1 person
- ROW 2: for turning rows: purl 1; 1 person; 1 purl. For circular knitting: knit 1; 1 purl; 1 person
What else should you consider when working independently?
In the case of seamless knitted items, a pattern ceases to be a mandatory requirement. The main thing is to pay attention to accurate calculations and correct measurements. The products are knitted from top to bottom; this method has advantages for both beginners and experienced knitters. It becomes easier for them to determine the dimensions of the raglan line from the very beginning.
The raglan line is included in many products, but it is not always possible to quickly and easily master this element right away. The main thing is attention and perseverance, as in other types of work.
It is important to avoid miscalculation; even the slightest mistakes can lead to negative consequences. You must be prepared for the fact that at first it is difficult to calculate everything in advance. Therefore, it is possible to make changes during work.
There is a high probability that the first few products will have to be completely unraveled, and then put back on again. This is a normal process of learning and mastering any skill.