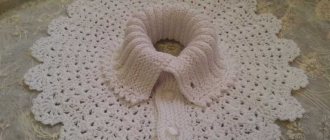
Knitted by hand, Haruni's shawl will become a unique and versatile accessory or a great gift, and will take a special place in every woman's wardrobe. Simple patterns form an elegant openwork, emphasizing the natural femininity and lightness of the image.
The list of necessary skills to create this shawl is minimal: the ability to knit and patience when studying patterns. The work will take no more than 3 free evenings, and the finished product will be a reason to be proud.
The Haruni shawl with knitting needles, the pattern and description of which was created by Emily Ross, is a harmony of an easy knitting process and an incredibly beautiful result. The combination of these qualities makes the shawl the most popular among beginning craftsmen.
The original description and knitting pattern for the product appeared in December 2009. To date, there have already been 9 versions of the Haruni shawl in its classic form, many of which have been officially translated into 6 different languages. The Russian-language version exists thanks to the initiative of the masters and the free access of the author's MK.
The unusual name of the product is taken from the fictional language of Tolkien's works and means “grandmother”. The Haruni shawl has an interesting shape: it is crescent-shaped on the inner edge (which gives an ideal fit on the shoulders) and conventionally triangular on the outside, which adherents of the classics like so much.
Materials and tools
In the original description, the author uses 1 skein of Jill Draper Makes Stuff, Ecopus 457m/100g (100% merino) and 3.5 mm circular knitting needles with a line length of 60 cm.
When choosing alternative options, it is important to pay special attention to the composition of the yarn. Natural yarn with minimal or no synthetic additives is suitable for the shawl. Yarn with a large yardage will relieve the craftsman of the need to connect the ends of the skeins and thread the ends of the threads. The seasonality of the finished product plays an important role: linen and cotton are excellent options for cool summers, and for a warm shawl it is better to take wool or mohair.
Examples of the most popular yarns:
- Kauni;
- Dundaga;
- Haapsalu;
- Siulas;
- kid mohair on silk;
- bobbin yarn in several folds of thread.
Knitting needles are selected based on the thickness of the yarn and comfortable knitting density: usually 3.5 mm, less often 3 mm. You will also need stitch markers to clearly highlight the central part of the shawl, waste thread and a crochet hook for casting on and casting on stitches.
Knitted Haruni shawl. Scheme and description step by step
The original Haruni shawl is knitted from the middle of the edge tape down to the border. The width of the shawl's spread is achieved through regular and even increases on both sides of the central loop. Increases along the edges of the front rows give the finished product a crescent shape. An interesting feature of the pattern is the ability to independently adjust the size of the future shawl, while maintaining both the openwork pattern and its rhythm.
Knitting principle, diagram with description
According to the latest edition of the description, the diagram is divided into 3 parts: the beginning, the main part and the border. The pattern and sequence of work have not been changed, but working with this option is much more convenient than with previous versions. For comparison and selection, two schemes are presented: the most common, color-coded, consisting of 2 parts (3rd edition) and the new one, divided into 3 blocks (9th edition).
Scheme A (3rd edition)
Scheme B (3rd edition)
Scheme A
There are 7 loops not marked in the diagram: 3 edge loops at the beginning of each row, 1 central loop, 3 edge loops at the end of each row. After the 9th row, all subsequent rows should begin with loops before rapport. Then a complete repeat of the pattern is knitted one after another in the required number of times. Next, you should knit the loops marked in the diagram after the red frame. This is the right half of the shawl knitted.
Be sure to knit the central loop that is not marked in the pattern. For convenience, it can be separated from the rest of the loops with markers.
Knit the left half of the rows mirror the right. In other words, after the central loop, the diagram is read from left to right.
Scheme B
The pattern is read similarly to pattern A and knitted once.
Diagram C (right side)
The arrows in the diagram mark the borders of the pattern repeat and the central loop.
The edge loops are marked, and from the 2nd row they are partially included in the main pattern.
Diagram C (left side)
For convenience, the table shows the symbols used in the diagrams.
| face loop; |
| no loop (indicated for easier perception of the circuit as a whole); |
| yarn over; |
| 2 loops knitted together like a knit stitch (tilted to the left); |
| 2 loops knitted together like a knit stitch (tilted to the right); |
| 3 loops knitted together like a knit stitch; |
| 1st loop of the row (the edge loop, which is loose, is removed unknitted); |
| The red frame highlights the complete repeat of the pattern. |
Set of loops
Loops for the shawl are cast on using the open method:
- It is necessary to crochet a chain of 4 air loops from a waste thread. Pull the thread out of the last (4th) loop and tighten moderately.
- Insert the hook into the outer loop of the chain, pick up the working thread of the yarn (from which the shawl will be knitted) and pull it back together with the working thread, leaving the length of the free end of the yarn at least 10 cm.
- Insert the hook into the next chain stitch, pick up the working thread and bring it back. There are 2 loops of working yarn on the hook.
- Raise the last loop in the same way.
- Then transfer all 3 loops from the hook to the working needle.
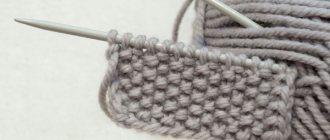
- Knit 6 rows with knit stitches. In this case, remove the first loop of each row without knitting, and the last loop in each row is knitted like a knit stitch and very loosely.
- Having knitted the 6th row, you should, without unrolling the work, crochet 3 loops from the edge loops along the vertical side of the knitting.
- Then carefully remove the waste thread, and transfer the remaining open loops to the left needle and knit like knit stitches.
As a result, there are 9 loops on the knitting needle: 3 edge stitches, 3 stitches of the main pattern, 3 edge stitches. Turn the work and knit as follows: slip 1 stitch freely, knit 2 stitches, purl 3 stitches, knit 3 stitches. The first and last 3 loops form the edge band of the future shawl, which will be formed between them. They are not involved in the patterns and are knitted with facial loops in all rows.
Body of the shawl, working with the pattern
The body of the shawl consists of 2 symmetrical parts, separated by a central loop. A pair of repeating leaf elements is knitted from yarn overs on both sides of this loop. The Haruni shawl with knitting needles, the diagram and description in this case will increase accordingly, can be adjusted in height and width by the number of pairs of leaves knitted along the center line. Thanks to the checkerboard arrangement of the elements among themselves, the rhythm of the pattern will not be disturbed, no matter how many additions are made.
Departing from the original description, it is important to take into account two rules: increases (new leaf elements) must be made symmetrically on both sides of the central loop; the total number of loops on the knitting needles should remain a multiple of 40+9.
Legend:
| 3KR | Edge tape loops. At the beginning of each row: remove 1 stitch freely; 2 p. persons. At the end of each row: k3. |
| L1 | Face loop. The number indicates the number of knit stitches in a row. |
| N | Yarn over |
| 2HDL | 2 stitches together, knit stitches slanted to the right |
| LVL 2 | 2 loops together, knitted to the left |
| 3LV | Knit 3 stitches together |
| ()×2 | Number of repeats of the loop section indicated in brackets |
Scheme A
The description begins with the edge loops and ends with them.
The number of loops on the working needle after each row is indicated in brackets:
- 1st row : 3KR, (N, L1)×3, N, 3KR. (13 loops)
- Row 2 (and all even ones): 3KR, purl to last 3 stitches, 3KR.
- 3rd row : 3KR, (H, L1)×7, N, L3. (21 loops)
- 5th row : 3KR, N, 2LVP, (L1, N)×2, K1, 2LVL, N, L1, N, 2LVP, (L1, N)×2, K1, 2LVL, N, 3KR. (25 loops)
- 7th row : 3KR, N, 2LVP, L2, N, L1, N, L2, 2LVL, N, L1, N, 2LVP, L2, N, K1, N, L2, 2LVL, N, 3KR. (29 loops)
- From rows 9 to 16, a complete repeat of the pattern is formed, which is described in Fr.
- 9 row : 3KR, *N, L1, N, 2LVL, K5, 2LVP*, (N, L1)×2, *N, L1, N, 2LVL, K5, 2LVL*, N, L1, N, 3KR. (33 loops)
- 11 row : 3KR, N, R1, *(N, R1)×2, 2LVL, K3 2LVP, R1* (N, R1)×4, *(N, R1)×2, 2LVL, K3, 2LVL, R1, * (N, L1)×2, N, 3KR. (41 loops)
- 13th row : 3KR, N, 2LVP, R1,*N, R1, N, L2, 2LVL, R1, 2LVP, R2*, (N, R1)×2, 2LVL, N, R1, N, 2LVP, R1, * N, L1, N, L2, 2LVL, L1, 2LVL, L2*, (N, L1)×2, 2LVL, N, 3KR. (45 loops)
- 15 row : 3KR, N, 2LVP, K2, *N, K1, N, K3, 3LV, K3*, N, K1, N, K2, 2LVL, N, K1, N, 2LVP, K2, *N, K1, N, L3, 3LVL, L3*, N, L1, N, L2, 2LVL, N, 3CR. (49 loops)
Next, you need to knit rows 9-16 10 more times. There are 249 stitches on the needles.
How to make the edge of a product, working on the border
When starting to knit a border, you should take into account that it will require the same amount of yarn as has already been used on the body of the shawl.
Scheme B
Creation next.
Peculiarities:
- 1st row : 3KR, *N, R1, N, 2LVL, R2, N, 2LVL, N, R2, 3LV, R2, N, 2LVL, N, L2, 2LVL*×6, (H, R1)×2, * N, L1, N, 2LVL, L2, N, 2LVL, N, L2, 3LV, L2, N, 2LVL, N, L2, 2LVL*×6, N, L1, N, 3KR. (253 loops)
- 2nd row and all even ones: 3KR, purl loops to the last 3 loops, 3KR.
- 3rd row : 3KR, *(N, R1)×3, N, 2LVL, R2, N, 2LVL, N, R1, 3LVL, R1, N, 2LVL, N, K2, 2LVL*×6, (H, R1) ×4, *(H, L1)×3, N, 2LVL, L2, N, 2LVL, N, L1, 3LV, L1, N, 2LVL, N, L2, 2LVP*×6, (H, L1)×3 , N, 3KR. (285 loops)
- 5th row : 3KR, *(N, L1)×7, N, 2LVL, R2, N, 2LVL, N, 3LVL, N, 2LVL, N, L2, 2LVL*×6, (H, R1)×8, * (N, L1)×7, N, 2LVL, L2, N, 2LVL, N, 3LV, N, 2LVL, N, L2, 2LVL*6, (H, L1)×7, N, 3KR. (373 loops)
- Row 7 : 3KR, *N, 2LVP, (R1, N)×2, K1, 2LVL, N, K1, N, 2LVP, (R1, N)×2, K1, 2LVL, N, 2LVL, K2, N, 2LVL, L1, 2LVL, N, L2, 2LVP* ×6, (N, 2LVL, (L1, N)×2, L1, 2LVL, N, L1)×2, *N, 2LVL, (L1, N)× 2, L1, 2LVL, N, L1, N, 2LVP, (L1, N)×2, L1, 2LVL, N, 2LVL, L2, N, 2LVL, L1, 2LVP, N, L2, 2LVL*×6, N , 2LVP, (L1, N)×2, L1, 2LVL, N, L1, N, 2LVP, (L1, N)×2, L1, 2LVL, N, 3KR. (405 loops)
- 9 row : 3KR, *N, 2LVL, K2, N, K1, N, K2, 2LVL, N, K1, N, 2LVL, K2, N, K1, N, K2, 2LVL, N, 2LVL, K2, N, 3LW, N, L2, 2LVP*×6, (N, 2LVP, L2, N, L1, N, L2, 2LVL, N, L1)×2, *N, 2LVP, L2, N, L1, N, L2, 2LVL, N, L1, N, 2LVL, L2, N, L1, N, L2, 2LVL, N, 2LVL, L2, N, 3LVL, N, L2, 2LVL*×6, N, 2LVL, L2, N, L1 , N, L2, 2LVL, N, L1, N, 2LVL, L2, N, L1, N, L2, 2LVL, N, 3KR. (437 loops)
- 11 row : 3KR, *N, 2LVP, K3, N, K1, N, K3, 2LVL, N, K1, N, 2LVL, K3, N, K1, N, K3, 2LVL, N, 2LVL, K5, 2LVL* ×6, (N, 2LVP, L3, N, L1, N, L3, 2LVL, N, L1)×2, *N, 2LVP, L3, N, L1, N, L3, 2LVL, N, L1, N, 2LVP, L3, N, L1, N, L3, 2LVL, N, 2LVL, L5, 2LVP*×6, N, 2LVP, L3, N, L1, N, L3, 2LVL, N, L1, N, 2DVP, L3 , N, L1, N, L3, 2LVL, N, 3KR. (469 loops)
- 13 row : 3KR, *N, 2LVP, K4, N, K1, N, L4, 2LVL, N, K1, N, 2LVL, K4, N, K1, N, K4, 2LVL, N, 2LVL, K3, 2LVL* ×6, (N, 2LVP, L4, N, L1, N, L4, 2LVL, N, L1)×2, *N, 2LVP, L4, N, L1, N, L4, 2LVL, N, L1, N, 2LVP, L4, N L1, N, L4, 2LVL, N, 2LVL, L3, 2LVP*×6, N, 2LVP, L4, N, L1, N, L4, 2LVL, N, L1, N, 2DVP, L4, N, L1, N, L4, 2LVL, N, 3KR. (501loop)
- 15 row : 3KR, *N, 2LVP, K5, N, K1, N, L5, 2LVL, N, K1, N, 2LVL, K5, N, K1, N, K5, 2LVL, N, 2LVL, K1, 2LVL* ×6, (N, 2LVP, L5, N, L1, N, L5, 2LVL, N, L1)×2, *N, 2LVP, L5, N, L1, N, L5, 2LVL, N, L1, N, 2LVP, L5, N, L1, N, L5, 2LVL, N, 2LVL, L1, 2LVP*×6, N, 2LVP, L5, N, L1, N, K5, 2LVL, N, L1, N, 2DVP, L5 , N, L1, N, L5, 2LVL, N, 3KR. (533 loops)
Scheme C
Creation next.
Peculiarities:
- 1st row : 3KR, N, *3LV, L11, 2LVL, N, 3, N, 2LVL, R11, (3LV, N)×2*×6, 3LVL, (R11, 2LVL, N, K3, N, 2LVL) ×3, L11, 3LV, *(H, 3LV)×2, L11, 2LVL, N, L3, N, 2LVL, L11, 3LV*×6, N, 3CR. (483 loops)
- Row 2 (and all even ones): 3KR, purl to last 3 stitches, 3KR.
- 3rd row : 2KR, 2LVL, N, *2LVL, K9, (2LVL, N)×2, K1, (N, 2LVL)×2, K9, 2LVL, N, 3LVL, N*×6, (2LVL, K9, (2LVL, N)×2, L1, N, 2LVL, N)×3, 2LVL, L9, 2LVL, *N, 3LVL, N, 2LVL, L9, (2LVL, N)×2, L1, (H, 2LVL )×2, L9, 2DVP*×6, N, 2DVP, 2CR. (457 loops)
- 5 row : 2KR, 2LVL, N, *2LVL, K7, (2LVL, N)×2, K3, (H, 2LVL)×2, K7, 2LVL, N, 3LVL, N*×6, (2LVL, K7, (2LVL, N)×2, L3, N, 2LVL, N)×3, 2LVL, L7, 2LVL, *N, 3LVL, N, 2LVL, L7, (2LVL, N)×2, L3, (H, 2LVL )×2, L7, 2DVP*×6, N, 2DVP, 2CR. (431 loops)
- 7 row : 2KR, 2LVL, N, *2LVL, K5, (2LVL, N)×3, K1, (H, 2LVL)×3, K5, 2LVL, N, 3LVL, N*×6, (2LVL, K5, (2LVL, N)×3, L1, (H, 2LVL)×2, N)×3, 2LVL, L5, 2LVL, *H, 3LVL, N, 2LVL, L5 (2LVL, N)×3, L1, ( N, 2LVL)×2, N, 2LVL, L5, 2LVL*×6, N, 2LVL, L2. (405 loops)
- 9 row : 2KR, 2LVL, N, *2LVL, K3, (2LVL, N)×3, K3, (N, 2LVL)×3, K3, 2LVL, N, 3LVL, N*×6, (2LVL, K3, (2LVL, N)×3, L3, (H, 2LVL)×2, N)×3, 2LVL, L3, 2LVL, *H, 3LVL, N, 2LVL, L3, (2LVL, N)×3, L3, (N, 2LVL)×3, L3, 2LVL*×6, N, 2LVL, L2. (379 sts)
- 11th row : 2KR, 2LVL, N, *2LVL, K1, (2LVL, N)×4, K1, (N, 2LVL)×4, K1, 2LVL, N, 3LVL, N*×6, (2LVL, K1, (2LVL, N)×4, L1, (H, 2LVL)×3, N)×3, 2LVL, L1, 2LVL, *H, 3LVL, N, 2LVL, L1, (2LVL, N)×4, L1, x 3, 2 HDL*×6, N, 2 HDL, 2 KR. (353 loops)
Closing the loops
It is not very convenient to close the Haruni shawl with knitting needles (a diagram and description of closing the loops is given below) due to the large number of airy arches framing the border. The hook will speed up the work and allow you to better control the process. Closing the loops too tightly can pull the edges together, which will negatively affect the appearance of the finished product.
The loops on the front side of the shawl are closed. Knit the first 4 stitches together like a knit stitch. *Then you need to knit a chain of 8 chain stitches. On the left knitting needle, crochet 3 loops together, like a knit stitch, and pull it through the loop already on the hook from the chain chain.* Next, you need to repeat the alternation until the last 4 loops.
During this process, be careful to ensure that the 3 stitches knitted together complete each border sheet.
Knit the last 4 stitches together like a knit stitch. Fasten the thread and cut it. Using a knitting needle, hide the ends of the yarn.
Knitting from Kauni
Kauni ("beautiful" in Estonian) is the name of a Danish company that purchases yarn from Baltic factories, in particular from the Estonian Aade Lõng factory. The yarn is washed and packaged into standard skeins and skeins, and then sold all over the world.
Kauni yarn is famous for its rare color combination and exceptional quality. The yarn is distinguished by a color palette: natural shades, monocolor and section-dyed with long, delightful and soft color transitions. In addition to high quality, Kauni yarn is distinguished by its environmental friendliness and the absence of synthetic fibers.
Incredibly beautiful shawls are knitted from Kauni yarn. Even if they are light, airy and openwork, they still turn out very warm.
To create such a shawl fabric, one hundred grams of Kauni yarn 8/1 or 8/2 was needed, it was knitted with number four ring needles. The finished size of the canvas is 120x90 cm.
When knitting, the skein threads must first be washed, then dried and rewound into balls so that they do not get tangled.
More photos with models of Haruni from Kauni:
So, materials and tools that will be needed:
- four hundred and forty meters of thread;
- ring knitting needles 3.5 or 4 mm thick (for thick knitting needles you need more thread);
- pin or special marker;
- hook corresponding to the knitting needles.
The density of the lace pattern in this case is twenty-one loops wide and eighteen rows high, after blocking it is a square of ten by ten centimeters.
Finished size of the knitted fabric: height - 0.58 m, width - 1.14 m. You can easily achieve the desired size by repeating the “fern” pattern.
Article on the topic: Master class on St. Petersburg bead chain: necklace patterns
Knitting pattern
For convenience, we recommend printing out the diagrams so that they are always at hand.
Work process
Let's start knitting Haruni, set “Ribbon”:
At the end of the set, we knit with a ribbon according to pattern A.
Please note that the pattern only contains half of the shawl. It is also missing seven loops: the first 3, the last 3 edge loops and the middle loop. Slip first stitch, k2. (total 3 edges), then work according to the pattern from right to left, one person. (middle) loop, again knit according to the pattern from right to left, finishing with 3 knit stitches (edge stitches). Even rows are knitted according to the following principle: slip the first stitch, knit 2, purl to the last 3 stitches, knit 3.
Follow pattern A until twelve “branches” appear on both sides of the middle loop (or repeat 4 more times from rows 17 to 32, rapport is accented in yellow in the pattern). “Twig” is a knit stitch with yarn overs on both sides of it. If you need to increase/decrease the size of the canvas, you need to complete diagram A with an even number of “branches” in both halves. Note on the distribution of the amount of yarn: about half of the threads will be used to complete pattern B.
Scheme B. In the first 15 rows of the scheme there is an active addition of loops, and in the 2nd half of the scheme the number of loops in the row decreases. Here, as in diagram A, only half of the shawl is shown, although it includes edge loops. The initial 15 rows of the pattern are devoted to knitting a pair of leaves; the loops between the pairs are decreased. Two leaves (yellow accent in the diagram) begin and complete the halves of the shawl. The entire row of pattern B is knitted like this: from right to left according to the pattern, repeating it all (except for the edge stitches), finish with the last repeat of the first half, the last yellow loop. Then the middle loop (not on the diagram). Same for the second half, starting and ending with the yellow segment. And three edge ones at the end.
Related article: DIY summer hats for girls with photos and videos
Knitting leaves by decreasing - rows from 17 to 27, adding loops only between the leaves (pink color). After four leaves (two pairs) appear in the center of the fabric, increases should be knitted between all the leaves (highlighted in pink). From the 17th row (pink segment), the middle loop goes into the middle section. The edges are knitted like this: yarn over, knit 2 together, knit 2 (instead of knit 3). There are also special loops in the 17th row; be sure to pay attention to them.
Decoration of the edge of the canvas:
Methods for closing loops
Close the loops after completing the last row (wrong side of the shawl). This can be done in two ways: the first is with a crochet hook, the second is with a cord. The latter requires more yarn to complete. If a thin thread was used in the work, the second option is advisable; if you decide to finish it first, do it in two threads.
Regardless of which method you choose, it is important to remember that the loops must be closed very loosely.
Performing the first method: crochet knit 4, chain 6 together. loops in the chain, knit together the next 3 loops of the left knitting needle. Bind off one stitch by slipping the first stitch (on the hook) over the stitch you just knitted. Again 6 air. loops in a chain, knit 3 together, close with one loop. Continue further, and the three front ones together should coincide with the pattern and form the top of the leaf.
Before closing the loops in the second way, it is necessary to complete the vertices of the leaves. To do this, knit another row according to the pattern. Now the method itself: knit 2 loops together, knit 2 more together, then return both resulting loops to the left knitting needle and knit them again, return them to the left knitting needle again and knit again, and so on eight times. The result will be a narrow cord. Slip these stitches onto the right knitting needle, knit three stitches together, bind off one loop, throw the middle one over the knitted one, dropping it from the knitting needle. On the left needle, slip two stitches again, knit two. In this way, process the edge of the product completely. The front three together should coincide with the top of the leaf. Tighten the thread, cut it, leaving a small piece. Then hide it by weaving it into the drawing.
Related article: DIY salt dough crafts for children with photos and videos
Another option is the Haruni model with a double border. Knitting patterns:
L in a yellow cage - front loop.
Washing and wet-heat treatment of the shawl:
Moisten the shawl with water, stretch it as much as possible, giving it the shape of a triangle or sickle, secure with pins, and dry.
Stretching the finished product
Stretching or blocking is necessary for the shawl to open and unfold in size.
The tension smoothes the fabric and fixes it in this form until the next wash:
- First of all, the finished shawl must be washed carefully with a special product for delicate materials.
- Rinse and gently squeeze out excess water without twisting.
- Lay out the shawl on a flat surface into which you can stick safety pins. Give it a crescent shape.
- Secure the shawl with pins, straightening and stretching it well. At the same time, it is important to monitor the symmetry and correct direction of the patterns on the product. Particular attention should be paid to the border and the numerous arches with which it ends.
- If necessary, during the stretching process, you can adjust the position of the previously fixed needles. A well-blocked shawl should be left to dry completely.
Features of knitting a shawl with a double border
The Haruni knitted shawl, the pattern and description of which can be quite easily modified, can be knitted with a double border. This is a deviation from the canons of the original model, thanks to which it is possible to increase the size of the product.
Knitting the Haruni shawl according to pattern A and B occurs without changes. Scheme C will require correction, where, according to the pattern, the leaves of the first border will gradually be completed and, at the same time, space for the second border will be formed.
In this case, the edge tape remains the same width (3 loops) until the shawl is knitted. Additional pattern C1 shows the right half of the rows up to the center loop. The left side is knitted in a mirror image. The step-by-step description explains in detail the key points of knitting a double border.
Scheme C1
Table:
| Row number | Beginning of row/end of row | Rapport | Central motive |
| 1 row | 3KR, N, L1, N, 2LVL, L11, 2LVL, N, L3, N, 2LVL, L11, 3LVL; | *N, 3LVL, N, 3LVL, L11, 2LVL, N, L3, N, 2LVL, L11, 2LVL* | N, L1, CPU |
| 3rd row | 3KR, N, L1, N, 2LVL, N, 2LVL, L9, (2LVL, N)×2, L1, (N, 2LVL)×2, L9, 2LVL; | *N, 3LVL, N, 2LVL, L9, (2LVL, N)×2, L1, (N, 2LVL)×2, N, 2LVL, L9, 2LVL* | N, 2LVP, N, CP |
| 5 row | 3KR, N, 2LVL, N, L1, N, 2LVL, N, 2LVL, L7, 2LVL, N, 2LVL, N, L3, N, 2LVL, N, 2LVL, L7, 2LVL; | *N, 3LVL, N, 2LVL, L7, 2LVL, N, 2LVL, N, L3, N, 2LVL, N, 2LVL, L7, 2LVL* | N, 2LVP, N, L1, CP |
| 7 row | 3KR, N, 2LVL, N, L1, (N, 2LVL)×3, L5, (2LVL, N)×3, L1, (H, 2LVL)×3, L5, 2LVL; | *N, 3LVL, N, 2LVL, L5, (2LVL, N)×3, L1, (N, 2LVL)×3, L5, 2LVL* | N, 2LVP, N, 2LVP, N, CP |
| 9 row | 3KR, N, 2LVL, N, L3, (N, 2LVL)×3, L3, (2LVL, N)×3, L3, (H, 2LVL)×3, L3, 2LVL; | *H, 3LVL, N, 2LVL, L3, (2LVL, N)×3, L3, (H, 2LVL)×3, L3, 2LVL* | N, 2LVP, N, 2LVP, N, L1, CP |
| 11 row | 3KR, (H, 2LVL)×2, N, L1, (H, 2LVL)×4, L1, (2LVL, N)×4, L1, (H, 2LVL)×4, L1, 2LVL; | *N, 3LVL, N, 2LVL, L1, 2LVL, (N, 2LVL)×3, N, L1, (N, 2LVL)×4, L1, 2LVL* | (N, 2LVP)×3, N, CPU |
| 13 row | 3KR, (N, 2LVL)×2, N, 3LVL, (N, 2LVL)×3, N, 3LVL, N, (2LVL, N)×3, 3LVL, (N, 2LVL)×3, N, 3LVL; | *N, 3LV, N, 3LV, (N, 2LV)×3, N, 3LV, N, (2LVL, N)×3, 3LV* | (N, 2LVP)×3, N, L1, N, CP |
| 2nd border begins | |||
| 15 row | 3KR, (N, 2LVL)×2, N, 33LVL, N, (2LVL, N)×2, 2LVL, L1 (2LVL, N)×3, (N, L1)×3, N, (2LVL)×3 , L1; | *N, 3LV, N L1, (2LVL, N)×3, (N, L1)×3, (N, 2LVL)×3, L1* | (2LVP, N)×3, (L1, N)×3, CPU |
| 17 row | 3KR, (N, 2LVL)×2, (N, L1)×3, N, (2LVL, N)×2, 3LV, N (2LVL, N)×2, (L1, N)×7, (2LVL, N)×2, 2LVL; | *N, L3, N (2LVL, N)×2, (L1, N)×7, (2LVL, N)×2, 3LV* | (N,2LVP)×2, (N, L1)×7, N, CPU |
| Row 19 | 3KR, (H, 2LVP)×3, (L1, N)×2, L1, (2LVL, N)×2, 2LVL, L1 (2LVP, N)×2, 2LVP, (L1, N)×2, L1 , 2LVL, N, L1, N, 2LVL, (L1, N)×2, L1, (2LVL, N)×2, 2LVL, L1; | *N, 3LVL, N (2LVL, N)×2, 2LVL, (L1, N)×2, L1, 2LVL, N, L1, N, 2LVL, (L1, N)×2, L1, (2LVL, N )×2, 2LVL, L1* | (N, 2LVP)×2, (L1, N)×2, L1, 2LVL, N, L1, N, 2LVP, (L1, N)×2, L1, 2LVL, N, CP |
| 21 row | 3KR, (H, 2LVP)×3, L1, (L1, N)×2, L2, (2LVL, N)×2, 3LW, N 2LVP, N , 2LVP, L1, (L1, N)×2, L2 , 2LVL, N, L1, N, 2LVL, L1, (L1, N)×2, L2, (2LVL, N)×2, 2LVL; | *N, 3LW, N (2LVP, N)×2, 2LVP, L1, (L1, H)×2, L2, 2LVL, N, L1, N, 2LVP, L1, (L1, H)×2, L2, (2LVL, N)×2* | 3LV, (N, 2LVP)×2, L1, (L1, N)×2, L2, 2LVL, N, L1, N, 2LVP, L1, (L1, N)×2, L2, 2LVL, N, CP |
| 23 row | 3KR, (H, 2LVP)×3, L2, (L1, N)×2, L3, 2LVL, N, 2LVL, L1 2LVP, N, 2LVP, L2, (L1, N)×2, L3, 2LVL, N , 2LVL, L1; | *N, 3LVL, N L1, 2LVL, N, 2LVL, L2, (L1, N)×2, L3, 2LVL, N, L1, N, 2LVL, L2, (L1, N)×2, L3, 2LVL, N, 2LVL, N, 2LVL, L1* | 2LVP, N, 2LVP, L2, (L1, N)×2, L3, 2LVL, N, L1, N, 2LVP, L2, (L1, N)×2, L3, 2LVL, N, CN |
| 25 row | 3KR, (H, 2LVP)×3, L4, N, L1, N, L4, 2LVL, N, ZLV N, 2LVP, L4, N, L1, N, L4, 2LVL, N, L1, N, 2LVP, L4 , N, L1, N, L4, 2LVL, N, 2LVL | *N, 3LV, N 2LVP, N, 2LVL, L4, N, L1, N, L4, 2LVL, N, L1, N, 2LVL, L4, N, L1, N, L4, 2LVL, N, 3LV | N, 2LVP, L4, N, L1, N, L4, 2LVL, N, L1, N, 2LVP, L4, N, L1, N, L4, 2LVL, N, CP |
| 27 row | 3KR, (H, 2LVP)×3, L5, N, L1, N, L5, 2LVL, N, L1, N, 2LVP, L5, N, L1, N, L5, 2LVL, N, L1, N, 2LVP, L5, N, L1, N, L5, 2LVL, | *N, 2LVL, L1, 2LVL, N 2LVL, L5, N, L1, N, L5, 2LVL, N, L1, N, 2LVL, L5, N, L1, N, L5, 2LVL* | N, L1, N 2LVP, L5, N, L1, N, L5, 2LVL, N, L1, N, 2LVP, L5, N, L1, N, L5, 2LVL, N, CP |
Haruni shawl knitted, the final result of the product.
After the 28th row, pattern C of the classic version of the Haruni shawl is duplicated, with adjustments for the beginning and end of each row, where only one sheet from a pair is knitted. The sequence of closing the loops and blocking the finished product is similar to those described above for a shawl with a regular border.
Step-by-step master class on knitting a Haruni shawl
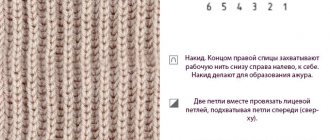
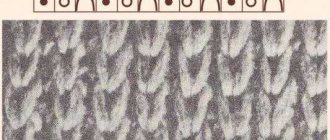
The entire fabric of the shawl is made with a “fern” pattern. The border of the product is knitted with knitting needles in a pattern of leaves, and at the end the knitting is closed with a hook. Prepare the following materials for work:
- mohair and wool yarn;
- knitting needles in the round, numbers 3.5 and 4;
- markers;
- hook.
The master class and its description begins with making a chain using air loops. After this, pick up three stitches with your knitting needles and knit five rows of scarves. knitting with facial links only.
Take one stitch from the side edge and three from the main set. Remove the chain and you should have seven loops. Mark the central one with a marker. Now begin to form the body of the canvas itself, which should be formed in a circle around the central link. The scheme will be as follows:
- 1 rub. - three persons. p., yarn over, central loop, yarn over again and knit three. P.;
- 2 r. - three knits, the same number of purls and again 3 knits. P.
It is necessary to remember that before and after the middle stitch, a yarn over is performed. After the initial three and up to the last three. Thanks to these sketches, you will get a beautiful openwork in the form of a triangle. A strip of 3 stitches contributes to the formation of the upper elegant and durable edge of the Haruni shawl. A video lesson from a famous knitter will show you a professional master class on knitting the described shawl.
Read
Simple knitting patterns for children's slippers
The diagram shown in the master class shows only one side of Haruni's shawl. On both sides of the canvas a beautiful openwork of leaves will be made with knitting needles. The description of the right side of the knit will mirror the left.
The photo shows areas marked in a different color - this is a rapport that can be repeated as much as you want. Also shown are the loops that participate in the formation of the upper strap of Haruni's shawl.
It is very convenient to knit this fabric on circular knitting needles. By stretching it, you can clearly see the wonderful openwork of leaves with veins and cuttings. To make the shawl airy and light, you need to knit nine leaves on each half of the product. But in order for the product to be uniform, it is better to make at least ten cuttings on both sides.
Now let's move on to working on the border. The description will take place exclusively according to the scheme. On it you can see the outer buttonholes, which will be knitted a little differently than the previous ones. The repeat of the first stripe is made in the form of a rectangle, which must be repeated to the central link. And yellow rapport is knitted before and then after the central link.
From the seventeenth row, proceed to the final stage of knitting the border. The extreme links should be connected differently. Rapport is repeated to the center. loop, which is located in the blue figure of the diagram. The last sector is shown in pink and also contains the center. link highlighted in black.
After twenty-eight rows, carefully close the buttonholes. And before that, complete the final knitting of the Haruni shawl:
- 2 persons knit and transfer to another knitting needle. Repeat these steps eight times until a long beautiful chain is formed;
- the upper part of the leaf of three stitches is knitted together with 1 persons. p., and then connects it with a broach to a nearby p. on the opposite instrument.
The knitting pattern with description is finished, just like this master class. Before trying on, you need to wash the Haruni shawl in relatively warm water, adding a little shampoo to it. Dry the product on a flat surface. Now go to the video watching how to knit such a shawl for beginners.
Read
Types and purposes of knitting needles
Important nuances in knitting a shawl
For a better understanding of the process and to eliminate possible errors when knitting the Haruni shawl, it is recommended to simultaneously use patterns and stitch descriptions. In cases where it is not possible to control the first loop of a row, it can be knitted in each row, like a knit stitch.
Stitch markers will delimit complete pattern repeats, highlight the central loop, save time when counting stitches and help avoid undetected mistakes. If possible, it is better to choose a contrasting yarn color for the knitting needles. This will reduce eye strain and make the knitted pattern easier to perceive.
Description of the shawl
A shawl is a very beautiful and cozy cape that can be successfully combined with any other clothing, and this is its very significant advantage. Made with a large knit and thrown over a blouse, it can serve as a substitute for a sweater, and wrapped around the neck in winter, it imitates a warm scarf. The shawl can decorate on its own or be part of some set of clothes; it is unusual, warm and beautiful.
Haruni is a triangular design that is made with a round bottom corner and a pattern resembling the underside of leaves with a pronounced border. When knitting a Haruni shawl, patterns and descriptions must be followed step by step and exactly with the instructions. If the master suddenly loses count of the loops and rows, the pattern will become incomprehensible and ugly.
As a rule, craftswomen who have knitting experience dare to knit such a thing. It is very important to understand how exactly the widest part of the shawl is knitted, in which it is necessary to create a mirror effect so that both halves of the cape look the same.
Yarn selection
Since the Haruni shawl is very light and is used for decoration, the threads must be chosen accordingly.
Thin threads are suitable and will make the item airy and weightless. If you choose a thicker yarn, you will get a fairly warm cape, with which you can keep warm in cold weather. The crocheted Harouni shawl is usually made from soft mohair. This material is unique as it is suitable for knitting almost any item. Other capes are also knitted from mohair, such as the Miralda, Percy, Kiri and others shawls.
Very beautiful things are made from section-dyed yarn. This type of thread allows you to simply enjoy what you love, creating certain patterns, and not think about how to connect the ends of the threads of the required colors. Recently, Kauni yarn has gained great popularity. It is fantastically thin, and a skein that weighs 100 g contains about 800 m of thread.