Preparation for the process
Despite the painstaking nature of such work, you can knit a hat-sock with knitting needles quite quickly. Since dark, calm tones are often chosen for a winter wardrobe, it is recommended to choose bright threads for knitting a hat to create contrast. And also for work you will need the following devices:
- Circular knitting needles No. 4.
- Centimeter tape for taking head measurements.
- Woolen threads in a volume of 200 g (color individual).
All this can be purchased at a specialized store. You should not skimp on knitting needles and threads, since the success of the entire process depends on them.
Color matters
Choosing the optimal shade is a very important and responsible moment. We will now, of course, talk about the trends of the coming year, but before that we should give a few recommendations that will help you ease the pain of choosing the right tone.
- The first thing you need to pay attention to is your own color type and individual appearance features. That is, light, cold colors are more suitable for blondes, and bright, rich palettes are more suitable for brunettes and dark-skinned women.
White for blonde
- The second important point is women's wardrobe. Before you go to the store and buy yarn, open your closet and look through the clothes. Thus, you will determine for yourself what tone of thread will suit the maximum number of outfits.
Only after you have made a complete analysis, based on the tips described above, should you compare your choice with fashion trends. This year, designers do not set strict restrictions and prohibitions. As last season, beige, pink, pastel, and gray shades remain at their peak. At the same time, black and white remain beyond competition and fashionable whims. Bright and original personalities can afford to knit an accessory with an acidic palette, as well as in the usual green, red and orange design.
What to wear with such beauty? A handmade product can be skillfully combined with things of various stylistic trends. They look especially harmonious in tandem with casual clothing. These are all kinds of leather jackets and aviators, jeans (skinny, boyfriend, banana, etc.), loose-fitting T-shirts with animal prints and prints, sweatshirts, sweatshirts, knitted dresses, shirt-cut outfits and much more. To continue the look, add flat boots, UGG boots, cowboy boots and felt boots.
Large knitting
As you can see, the options can be very different. Therefore, if you have learned the skill of knitting a sock-shaped hat, we recommend that you make several options at once. Of course, this will help greatly diversify your wardrobe and make it more vibrant and original.
Similar materials
How to knit a chic headband? — Ideas for inspiration
January 10, 2018
Stylish ombre coloring (50 photos) - Best options 2018
April 14, 2017
Stylish hair bronding (50 photos) - Options and nuances of coloring
May 15, 2017
Fashionable hats fall winter 2017-2018 (50 photos) - Original styles
January 8, 2018
How to get rid of depression on your own? — Recommendations from psychologists
July 24, 2017
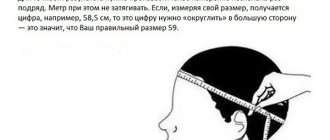
Taking measurements
This is a very important stage of work, since it determines whether the hat will fit in size and how comfortable it will be for the person to wear it. It is necessary to take head circumference measurements. To do this, a measuring tape must be drawn around the head along the temporal region, starting from the forehead to the back of the head. On average, this circumference in adults is 56 cm. Based on this parameter, we can consider an example of knitting a beanie hat on circular knitting needles.
Youth model
If you have already passed this fabulous age, such a hat will be an excellent gift for your daughter or even granddaughter. Yes, you can wear it yourself if you are going to the gym or go to the grocery store.
It is necessary to ensure that the product does not have seams or defects. Therefore, we take circular knitting needles in a needlework basket, which are connected to each other with fishing line or a thin tube. You can also use stocking tools (5 pieces included in the set). Buy yarn of the desired color at the store. Don't forget that the model's shade should highlight the beauty of your eyes and hair, and not overshadow it. We make ten rows of 20 loops. This is a sample. Take your first fitting. To ensure that the hat fits tightly to the head and does not create discomfort, 100-120 loops are optimal.
Now let's move on to creating a masterpiece. Distribute all knots onto four knitting needles. The first two to three centimeters will serve as an elastic band, so they must be knitted according to the following ratio: knit 2, purl two. Options for one loop are allowed. Once you have reached the desired length, start decreasing. To avoid seeing sudden changes, make cuts progressively, that is, knit two loops together on each knitting needle. When there are only 12 pieces left on the knitting needles, pull a strong thread through the remaining weaves and tighten it. Hide the knot inside. You can make a shaggy ball to make the product look original and interesting. You can make your own pompom or tassel, but if you can't, stick with an interesting pin or a fun brooch.
Attention! Before using the hat, wash or wet it and then stretch it out slightly. This will help give it the desired shape.
And one more thing: when you finish knitting the elastic, start making original weaves or combinations of knots. You can use balls of different colors.
Knitting hats for adults
To begin with, it should be said that the knitting process requires perseverance and calm. If a person is irritated or too tired, it is better not to get down to business, postponing it for another day.
It is necessary to determine the knitting density of the accessory. To do this, you need to cast on 22 stitches using stockinette stitch. So, you need to knit a length of 10 cm. In the knitted fragment, you need to count the number of loops and rows to establish the repeat of the knot.
Then you need to moisten this fragment with a spray bottle and iron it with an iron. You should not be too zealous; with the help of an iron you just need to remove the creases so as not to get confused in your own calculations in the future.
So, for a head circumference of 56 cm, there should be 30 rows around the perimeter. And the density of 1 cm of the product will be equal to 3 rows and 2 loops.
Working with a hook
To make this knitted hat we will need: yarn of two colors (choose shades to suit your taste), a hook and a tape measure.
Using a centimeter, take measurements of the head for which the future hat is intended, and we can get to work. For this headdress you need to start by knitting an elastic band. To do this, cast on 12 air loops (the width of your elastic band), then make a lifting loop and knit a row of single crochets. Knit another stitch for lifting and one row of single crochets (a prerequisite is knitting at the back of the loop). With the help of such rows our elastic band is made. Knit until you reach the required head circumference, the main thing is that the number of ribs is a multiple of 12.
Now connect the end to the beginning. Make one loop for lifting, insert the hook into the very first loop, first on one side, then on the other, and knit a blind loop. Using such blind loops, make a seam (connecting two to two, three to three, etc.). Insert one instep loop into the elastic already folded in half and knit a single crochet. Now carefully place the product edge up and knit 2 single crochets in the outer loop. Make 10 single crochets like this. It's time to add the second color and start working on the base. Here you can show your full potential. You can knit all rows using single crochets or double crochets. The main thing is that the thread is always behind the loop.
Related article: Crochet baby pillows. Scheme
So, after you have joined the new yarn, make a lifting stitch and knit a row of stitches that you like. To keep your hat even, get into the habit of counting the number of stitches after each row. Their number should be exactly divisible by 12. After you smoothly “approach” the crown, you need to make decreases. We divide our number of loops by 12 and get exactly 10. This means that exactly every nine loops, it is necessary to cut one column. Do this in this way until you have 3 loops left. Knit them into one and start making (without breaking the thread) a small lace. Roll it into a ring, secure the yarn and cut it. Carefully sew a beautiful button onto the base of the cap, which will look harmonious with the overall design of the finished headdress. Our lesson is over!
Baby hat
A beanie hat for a boy is knitted very simply. Since children often have an allergic reaction to natural wool, for knitting a product it is better to choose acrylic yarn in a volume of 100 grams, as well as knitting needles No. 3.5. The work is performed according to the following algorithm:
- For 4 knitting needles you need to cast on 100 stitches. Closing them in a circle, you need to continue knitting with an elastic band. For a beanie hat with knitting needles, the rib knitting pattern is very simple - the first row consists of 2 knit stitches, and then 2 purl stitches. So it is necessary to continue in order of priority.
- When 7 cm is ready, you can start knitting in satin stitch. At 24 cm you can start decreasing 15 stitches in every 3rd row.
- Finish the knitting with a knot. If desired, you can decorate the product with a pompom.
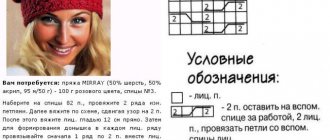
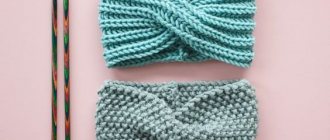
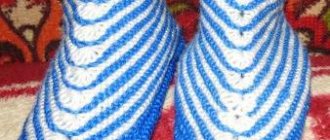
Stylish stocking hat
Sizes: S; M; L.
Cap circumference: 48; 50; 53cm.
Actual head circumference: 50; 55.5; 58cm.
We have to:
- h/w yarn (50g per 166m) – 100g;
- circular sp. on a fishing line 40cm long No3 and No4;
- set of socks No4;
- markers (M).
Patterns:
- persons stitch: all stitches in all rows - knit.;
- composite elastic - see diagram.
Density: elastic with knitting needles No. 4 26p. equal to 10cm; on an elastic band with knitting needles No. 3 32p. equal to 10cm.
Description of knitting
Using knitting needles No. 3, cast on 152; 160; 168p. We switch to knitting in the round, placing M at the beginning of the row. We perform composite elastic with 1p. 24 rub. – see diagram.
Let's go to sp. No4 and the pattern of faces. Ch. Having knitted 20-25cm (you can determine it yourself by trying it on), we begin to decrease. Set M with an interval of 19; 20; 21p. We perform decreases on both sides from M: before it 2p. in 1l. broach, after it 2p. in 1l. In total we decrease 2 stitches x 8 times = 16 stitches in the row.
Repeat decreases every other row 7 times. 40 left; 48; 56p. Then we decrease twice in each row. We have 8; 16; 24p. For solution S: break the thread, tighten the remaining stitches, bring the tail inside the hat and fix it. For size M: knit 1 row: all loops are 2p. in 1l. Then we proceed as described for solution S. For solution L: we knit 1 row: all loops are 3p. in 1l. Then we proceed as described for solution S.
Accessory decor
If desired, the hat can be decorated with various details. For example, you can combine thread colors during knitting. After completing the main work, you can embroider any design on the hat using beads, beads, rhinestones or sequins .
You can purchase accessories for hats in specialized stores. These can be leather patches, plastic, wooden or metal emblems. For women and children, the simplest and most universal decoration for a headdress will be a brooch in the form of an animal or flower figurine.
Before knitting a product, it is necessary to take into account the tendency of some threads to shrink (this especially applies to natural wool). In order for the accessory to last longer, it is necessary to properly care for it, if possible, using hand washing.
Different models to keep your closets from becoming empty: descriptions and diagrams
Helmet
This helmet hat is suitable for girls from 0 to 6 years old. The diagram shows in detail how the product should look and how the work should be structured. The size of the hat-helmet for girls shown is approximate. It depends on the individual characteristics of the child. Here you can use 100% wool and circular knitting needles No. 2.5, No. 3 and No. 3.5, hook and thread.
Master class on video:
Kapor
The bonnet is perfect for a child under six years old. You can use any yarn of different colors and composition. Necessary:
- knitting needles No. 3 and 4, as well as circular;
- hook;
- decorative buttons.
Photo description of how to knit a bonnet for a girl:
Cap
A bonnet hat is a great option for a girl from 0 to 3 months. Any colors can be used; it is better to use 100% acrylic yarn. You will need a hook with which you will need to knit additional ears and fur for the lion cub, and circular knitting needles.
Another master class:
Cap
A children's cap can be used for any age of girl, as can the composition and color of the threads. You can take any model as a basis and extend the knitting to a certain length (make a tail). Finish using the usual method and decorate with a pompom. The result should be a fancy cap like a gnome's.
Video:
Cat
Cat hat for children under 3 years old. The color scheme is presented as an example (it is possible to use any color scheme).
Description in the picture:
Beanie
An easy option for today's youth. Circular knitting needles, thread of any composition and color. It is possible to decorate the product with rhinestones, beads, buttons or stripes.
Little dragon
Model for 4 year old girls. You will need: circular knitting needles, yarn of any composition and color, hook. You can use a simple pattern without an elastic band as a basis. After completing the procedure, the edges need to be decorated with ties (you can refer to the photo). At the top of the product, you need to knit elements using a hook (like a dragon on the back) and fasten them tightly (preferably in a different color).
Hood
This children's hooded hat is perfect for girls aged 10 to 16 years. She is very original and fashionable. Knitting needles are suitable No. 4 (2 or 4), any yarn of any color. The detailed diagram shows exactly how to knit the rows and make the pattern.
Double cap
Double hat for autumn and spring for girls 4-5 years old. You will need raspberry and blue yarn containing wool, a hook and circular knitting needles. It is recommended to decorate the finished double hat with knitted ties and a flower of the same color. This way the model will look very impressive and stylish.
Photo with knitting model:
Openwork
This lacy hat is suitable for any age. It is better to use a thread that is light and has a high acrylic content. You can use absolutely any color (one is better). The diagram shows exactly how to design the pattern. The top is knitted using the usual method, decreasing the stitches. The last row needs to be finished and tied.
Two-color
A two-color knitted hat is perfect for little girls under three years old. The thread should be 100% acrylic, circular knitting needles and a hook. Knitting is done without elastic. The ends are decorated with knitted cords 5-6 centimeters long.
With pom-poms
This hat with pom-poms can be knitted using absolutely any technique and in a variety of colors. An additional element will be 1 or 2 pompoms. Sometimes the product is decorated with 5 to 10 pompoms at once.
Shown here is a simple pattern that helps make knitting especially fun. You can sew any number of pom-poms onto the model. Needed: 100% wool thread, knitting needles (circular) and hook. Pompoms can be made using a special device or independently. Suitable for all ages.
With braids
Hat with braids for girls 10-18 years old. Any colors will do, 100% acrylic thread, double-sided knitting needles No. 4.5 and circular knitting needles No. 4.5 and No. 5.5. The finished product stretches beautifully and can be further decorated at your discretion.
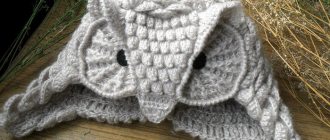
With ears
This knitted hat with ears can be worn by girls of any age. When using warm or light yarn, it can be winter or demi-season. It is best to use needles No. 5. The whole process consists of several stages:
- It is recommended to cast on loops for the ears (3 pieces) and knit according to the 1 to 1 principle with an ordinary elastic band, adding 1 loop to each row (8).
- For the back of the head you will need 15 loops, for the main area 25 (depending on the size).
- Knit both parts with an elastic band, and then knit with the ears and form a circle.
- Knit together, gradually decreasing stitches by 1 (first in every 4 rows, then every row, then 3 and 4 stitches together).
- Separately tie the strings and sew them to the hat.
- At the very end of the work, you need to make 3 pom-poms and attach them to the top of the cap and strings.
It will be possible to add various patterns to the image (for experienced craftswomen). It is also possible not to attach additional ties and pompoms to the earflap hat, leaving only the ears for beauty.