- 22319
- 19-10-2020
- Author: Mysekret Team
- 0
Today, thanks to the Internet, everyone can learn to knit for free. To do this, you need to arm yourself with patience, since you will not immediately get a perfectly beautiful product. But we will start with the simplest things, which will help you master more complex and original models in the future.
The most important advice for beginners: do not be afraid to experiment, as needlework is creativity.
Rubber
The elastic pattern is one of the simplest. This knitting has increased elasticity, which is why it got its name. The relief pattern resembles an accordion.
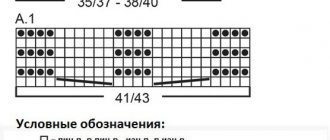
The elastic band is knitted according to the pattern:
- Some of the loops are knitted purl, some knitted. The number of loops in the parts should be the same. The parts alternate with each other.
- On the reverse row, the loops are also knitted in a mirror manner, purl and knit.
A variant of the elastic band pattern is a voluminous English elastic band. It is knitted according to the pattern: 1 knit stitch, 1 purl loop, then the rapport is repeated. The reverse row is knitted in a mirror image.
Knitting lessons for beginners: video
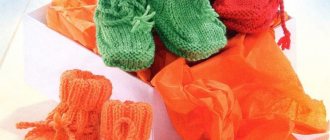
Knitting socks on 5 knitting needles is a difficult task, but can be done if you follow the presented pattern. It is recommended to choose multiple colors to make the product colorful.
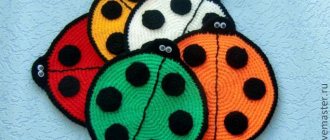
Patchwork socks are another project that is recommended to be started after knitting plain socks and a few scarves.
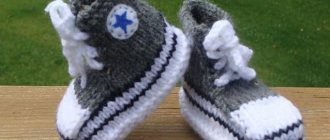
Slippers - little footprints - are a stylish gift that can be knitted with knitting needles already in lesson 2-3, after the loops have been sharpened and basic knitting patterns have been sorted out.
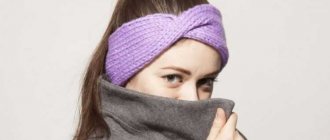
You don't need any special skills to tie a beret. All you have to do is choose a model and start implementing it.
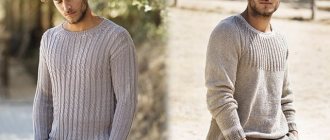
A blouse for a baby requires painstaking work, so it’s worth taking on such work after at least a month of actively learning to knit.
Simple knitted vests are very popular this year. If you can make one yourself, don’t put it off for too long. Treat yourself and your baby in style.
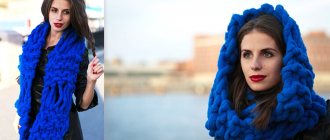
A down stole can be knitted using a standard pattern, which is suitable for a blanket, scarf, or scarf.
A rug with elongated loops is a product that is absolutely easy to learn to knit. And such a rug looks no worse than a store-bought one.
Share with your friends!
- 3
- 8
- 11
Shared
Subscribe to our Yandex.Zen channel or Yandex.Messenger
Simple things to knit
The best way to start any knitting project is with a creative idea and planning the pattern of the item. The simplest things to knit:
- Scarf
- A cap
- Beret
- Mittens
- Vest
The simplest thing to knit is a scarf. It has the simplest knitting pattern in the form of a long flap. Knitting such a pattern does not require special skills: just cast on the loops on the knitting needles and knit the fabric of the required length.
The hat is also knitted using the same geometric pattern. First, knit a long and wide rectangle, and then sew it into a hat.
Mittens are knitted using a more complex pattern, since at the end of the product it will be necessary to close the loops gradually. Also in the mittens, the thumb is knitted separately in a circle.
A simple vest for a child is created using the same principle: two rectangles are knitted, which are then sewn together.
Closing the loops
Another important part in learning to knit is closing a row. Watch the thread tension when closing the row, it should be the same so as not to deform the fabric. The method of closing a row depends on the type of knitting pattern.
The process of closing a row in the classical way is shown in the diagram.
You will learn how to close loops in different ways by studying video tutorials.
Simple and universal patterns
The easiest way to knit is to create a stockinette stitch. All knitting goes from left to right.
It is knitted according to the scheme:
- The first row is knitted with knit stitches. The right needle picks up a stitch from the front and pulls the yarn through it to form the next stitch.
- Then the product is turned over. Knitting also goes from left to right, but from the other side. In this case, the purl loops are knitted. To do this, the loop on the left knitting needle is pryed from the reverse side and the thread is also pulled through it.
- The rest of the fabric is knitted alternating these two rows. At the same time, a beautiful herringbone pattern is obtained on the front side.
By alternating purl and knit stitches you can create a wide variety of patterns. Such patterns will look embossed and cozy on any product. Therefore, having mastered only two types of loops, you can quickly understand how to knit simply and beautifully. This means you can create interesting patterns yourself.
Types of loops
If you decide to learn how to knit, then first of all you need to master the technique of casting on loops. There are at least four options for a set of loops. Let's look at each of them.
- Classic way. The most common type of loop set. Presented schematically.
The technique of casting on loops in the classical way is presented in the video tutorial.
- Continental method of casting on using one needle.
- English way. Presented in the diagram.
- Slipknot.
Examples of setting loops in different ways are presented in the video. Choose a method convenient for you.
The basis of knitting is knit and purl stitches. Wide horizons will open up for you to create a variety of complex patterns with simple loops if you master the technique of knitting them.
By knitting all rows with knit stitches, you get a garter stitch.
If you knit one row with knit stitches and the other with purl stitches, you get stockinette stitch.
Knit stitches can also be knitted in a variety of ways. The most common is classic. The knitting pattern for knit stitches is shown in pictures below. The main rule: the first loop (edge) is never knitted, it is always removed.
We learn to knit purl loops based on the diagram.
Before you start knitting yourself, you should study a video master class that teaches how to knit knit and purl stitches in the classical way.
Simple Crochet
Those who are afraid of not being able to handle knitting needles at first can try their hand at simple crochet. This will also require yarn and a hook. In this case, it is better to choose a long tool, this will make it more convenient to hold it in your hands.
Before knitting, it is also better to create a control sample, from which you can calculate the knitting density and the number of loops.
You can crochet the same things as knitting: a scarf, a hat or a vest. In this case, it is more convenient to crochet in the round.
The principle of crocheting is even simpler than creating a fabric with knitting needles. To do this you need:
- Create a simple loop and knit another one into it and tighten. Next, lower the hook into the loop and knit the next one from it. This creates a braid - the basis of any crochet.
- After this, the second and subsequent rows are knitted. In this case, the thread is not threaded into the previous loop, but along the chain in the opposite direction.
- Next, the product is turned over again and knitted in the opposite direction.
- You can not turn the product over, but loop the chain. Then it is knitted in the round. This makes it so convenient to knit a hat or vest.
In this way, a dense knitting is created that resembles cells. Crochet is denser and less elastic than knitting.
These simple techniques will allow you to master both knitting techniques and create simple things yourself.
Tools and materials
The main tools for knitting are knitting needles. They vary in composition; they can be aluminum, steel, wood, plastic, bone, etc. Each has its own advantages and disadvantages.
If you need thin knitting needles, give preference to steel ones - they are more durable, and if you need thick knitting needles for needlework, choose wooden, bone, or plastic ones. Aluminum knitting needles are best used for knitting dark items, as they tend to leave marks and get dirty.
The knitting needles have their own sizes, which are expressed in numbers. The number is expressed in millimeters and indicates the diameter of the spoke.
Rule for selecting knitting needles: the thinner the knitting needles, the tighter the knitting.
There are three main types of knitting needles:
- ordinary (limited by a tip at one end, Fig. 1a);
- hosiery (represent a set of 5 knitting needles, each of which does not have a limiter, suitable for circular knitting, for example, socks, mittens, gloves, Fig. 1b);
- circular (they are two knitting needles connected by an elastic cord, suitable for circular knitting of large pieces, raglan Fig. 1c).
For needlework you will need each of them.
We suggest you study a video review of existing types of knitting needles.
Yarn is the main material for needlewomen. The choice of yarn determines how the future product will look. There are many varieties of yarn: natural, synthetic, semi-synthetic. Let us demonstrate the main ones:
- Wool;
- Merino wool;
- Cashmere;
- Mohair;
- Angora;
- Alpaca;
- Silk;
- Cotton;
- Linen;
- Bamboo;
- Acrylic;
- Microfiber;
- Nylon;
- Blended fibers;
- Chenille;
- Pile yarn;
- Bulky yarn;
- Ribbon;
- Boucle yarn;
- Rubber thread.
Related article: How to make a ship out of paper with your own hands
Lesson No. 5. Purl loop
The next stage in mastering knitting techniques is purl stitches with knitting needles. They can be knitted in two ways - behind the front and back wall. The more common type is considered classic. To do this, the working thread is thrown over the fabric, the front part of the loop is grabbed with a knitting needle, through which the thread is pulled, which forms a new purl loop.
How to knit facial loops
After you have mastered the process of casting on loops, you should learn how to quickly learn how to knit the front side (stitch stitch). This is one of the main knitting methods used in most products. If the set of loops was made with two knitting needles, you should carefully remove one, take the empty knitting needle with your right hand, and the one with the loops with your left hand.
Also, grab the thread coming from the glomerulus with your left hand, throwing it over your index finger. Pass the empty knitting needle through the outer loop and simply move it to the right (now the main loop from which the thread comes is in the hand on the right).
Hold the thread back, bring the right needle from the inside into the next left loop, pull it towards the thread, grab the thread and pull it through the loop. The new loop will remain on the right needle, and the old one will be dropped down to the first row.
Knit the entire row in this way. The last loop is always knitted purl in all products - this is the rule.