- 14539
- 13-10-2020
- Author: Mysekret Team
- 0
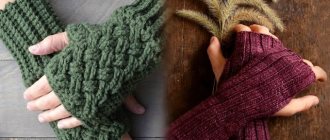
Crocheted mitts are a beautiful accessory that can be both warm and perform decorative functions, especially when it comes to airy openwork fingerless gloves. Creating them using a crochet hook is quite simple, especially if you choose simple patterns with descriptions for beginners, like those presented below.
These fingerless mittens can be given to girls, boys, women and men - there are a huge variety of styles and models of mittens, and many of them have their own individual charm, which is transmitted to those who wear them. This is why many beginners want to learn how to knit mitts with their own hands, because this way you can please not only yourself with an interesting job, but also those around you with a beautiful and comfortable thing.
Another interesting fact is that mitts are crocheted for all occasions - from everyday casual style to wedding style. There are many options for various schemes. Let’s take a closer look at those that even beginning needlewomen can knit.
A few words about buying a hook
Most beginners are sure: to knit this or that product, you just need to choose the appropriate model, purchase a tool, yarn and proceed to execution. However, professionals never tire of talking about how important it is to find a good hook. After all, it is he who largely ensures the quality of work. The best tool is considered to be one made of metal. However, when purchasing, it is important to check it for defects. For example, chips, roughness, “burrs” and other things. If the hook is smooth and comfortable to hold in your hand, then you can buy it.
How not to get confused when choosing yarn?
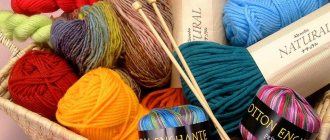
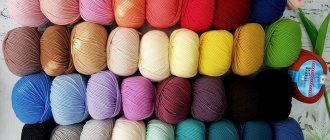
It is also important to choose a good yarn for crocheting mitts. Professional craftsmen advise beginners to pay attention to those made from natural materials. It will not inject itself and will not cause allergies. There can be no recommendations regarding color. In this case, you can rely on your taste. However, for patterned items, it is better to consider a single-color thread rather than a variegated or multi-colored one. In addition, for beginner knitters, it is wiser to work on mitts knitted with regular stitches for the first time. But make them using original yarn. For example, one that itself folds into a certain pattern. As a last resort, you can make the “clothes” for the pens striped. This will also give the product originality. The main thing is to combine colors harmoniously. In this case, you should take into account the season when wearing mittens. For autumn, you can choose yarn from the red-red-yellow color scheme. For winter - white-blue-violet.
How to measure your palm correctly?
Professional craftsmen do not advise beginners to take up knitting gloves. Because this product requires some experience to complete. But the solution to crochet mitts for beginners will be the best. This accessory is simplified due to the fact that it does not require tying the fingers. Also, experienced knitters are convinced that it is best to implement the idea using a crochet hook. And all because work on four knitting needles for the first time may turn out to be of poor quality. The loops will be too elongated, which will make the product holey and sloppy. When crocheting, the master needs to control only one loop and this greatly facilitates the process. However, if a beginner fails to correctly take measurements from his hand, creativity will turn into real chaos, which will not allow him to create beautiful crocheted mittens.
We suggest that beginning craftsmen study the points of necessary measurements:
- A - wrist circumference.
- B - the distance from the base of the thumb to the fold of the little finger.
- B is the distance from the wrist to the base of the thumb.
- G - palm circumference (through the bones).
- D - the circumference of the palm including the thumb.
In addition, if you want to knit long mitts, you need to measure the circumference of your hand in the place where the upper edge will be located. And also determine the distance from it to the wrist.
Video for beginner needlewomen
It is difficult for beginners in any business to navigate work recommendations the first time, since they cannot know some details due to inexperience. This also applies to crocheting. In this case, practical video lessons with master classes for beginners help you work faster and better.
Video “how to crochet beautiful mittens”:
Share with your friends!
- 13
- 5
- 4
- 22
Shared
Subscribe to our Yandex.Zen channel or Yandex.Messenger
How to calculate the number of loops and rows?
When telling beginners how to crochet mitts, one cannot fail to mention the technology of converting centimeters into loops and rows. After all, it will help you calculate the size of the future product in advance. And then just knit according to your own pattern, without checking the centimeter. It's very easy to do this:
- You need to take the prepared yarn and hook.
- Knit a chain of 20 loops.
- And knit 20 rows with the selected pattern.
- Measure the length and height of the resulting fragment.
- Divide the number twenty by the first value, and then by the second.
- If necessary, round the new parameters to whole numbers.
Using simple mathematical calculations, you can find out the number of loops and rows in one centimeter. Thanks to these values, it is easy to determine the size of future mitts. We simply multiply the loops by all horizontal measurements, and the rows by vertical ones. After this, we begin to study the technology of how to crochet mitts for beginners - step by step.
Crocheted mitts 15 models with descriptions
View > Home / Knitting patterns, Gloves, mittens, Miscellaneous, Collections
01 March 2021 Category: Knitting patterns, Gloves, mittens, Miscellaneous, Collections
your feedback
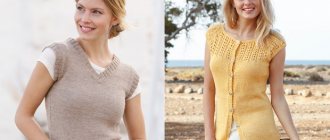
Recently, knitted mittens have come into fashion. This trend is quite understandable; they are convenient to use a cell phone, drive a car, and most importantly, they are also beautiful. Is it possible to crochet mittens? Of course, I will answer you and I have specially selected the best models with descriptions to help you. I myself know how difficult it can be to find something worthy on the global Internet.
Crocheted mittens turn out to be quite delicate, and if you also use interesting yarn, for example, with sequins or lurex, then your mittens will become an even brighter accessory. It’s better if you start knitting a set at once: a hat, snood and mitnecks.
To make mitts, you don’t need much experience; even a novice craftswoman can do it. Well, girls, let's start choosing the most beautiful and beloved couple and start creating!
A set with a jacket and a hat, complemented by wonderful openwork mittens, stunning lingonberry color
Description of the entire set HERE
Very beautiful cape and mitts
Bright set for spring
DESCRIPTION
Hat, scarf and mitts. In such a set, you will not go unnoticed.
DESCRIPTION
The mitts are knitted from merino wool, but you can make them from any yarn of your choice.
STEP-BY-STEP DESCRIPTION
High mitts/sleeves and a stunning top from Phildar
KIT DESCRIPTION
Openwork mitts
Cap, saffron and mitts
KIT DESCRIPTION
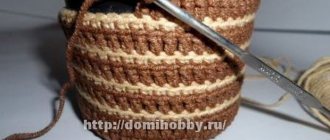
Striped mitts
These mitts are knitted from the bottom up, that is, from the fingers to the hand. You can change the number of rows, thereby adjusting the length of the mitts.
The mitts are knitted quite tightly.
Start knitting each row with a new color thread.
Knitting description:
Cast on 30 chain stitches.
When knitting the 1st row, make stitches behind the “tubercles” on the wrong side of the chain. This will give the edge of the product a finished and neat look.
Row 1: Starting from the third loop from the hook, we knit half double crochets into each loop. Using a half single crochet, connect the last and first stitch. This way you will close the knitting.
Rows 2-5: Double crochet in each stitch.
Now we begin to form the hole for the thumb.
Right mitt:
Row 6: cast on 3 chain stitches, then work a single crochet into the next stitch. After this, we cast on 9 air loops, retreat 3 loops and knit double crochets to the end of the row, completing the row with a connecting loop - closing the circle.
Left mitt:
Row 6: 3 chain stitches, then double crochet a row until 3 stitches remain. We cast on 9 VP, retreat 3 loops and finish the row.
Rows 7-9: 3 chain stitches for lifting, dc in each loop of the row, finishing as usual with a connecting stitch.
Rows 10-12 are almost no different from 7 and 9. However, we need to reduce the row by 2 loops. That is, in the 10th row we will decrease by two loops in the row. In the 12th row, add 2 dc. You can skip this step and knit 10-12 rows just DC.
Try on the mitts periodically and adjust the knitting if necessary.
Rows 13-19: 3 chain stitches for lifting, dc to end of row, connecting stitch.
Row 20: 2 chain stitches for lifting, half double crochets in each loop.
The mitts are ready!
Next are very beautiful mitts, but without a description, I found patterns for the border, maybe you will find something better yourself
Schemes for the border
Video tutorials on crocheting mitts m
The article was prepared for the website Kryuchkom.ru; when copying, a link to the article is required!
We also recommend:
- Calculation of the amount of yarn - table for calculations
- Knitting trends 2021: patterns, materials and new things
Like? Press!
Tags: Mitts, Accessories
Set of loops
It is most convenient to perform mitts starting from the wrist. However, depending on the level of the upper edge of the product, the number of loops varies. If the cuff is small - about 5-10 cm, we knit a chain equal to the circumference of the wrist. A longer accessory requires more loops. Therefore, we measure the circumference of the arm in the place where the upper edge of the cuff is expected to be located. After this, multiply the parameter by the number of loops in one centimeter. As a result, we will find out how many loops are needed to cast on. However, it is important to note that before starting to crochet mitts, beginners should compare the calculated number of loops with what the report of the selected pattern provides. The product under study is knitted in the round. Therefore, the drawing must be complete, which means that each report must be complete.
Patterned gloves
If you have just recently learned to knit and want to crochet mittens, this master class will help you with this. This pattern is knitted in the round:
- First they make an air loop. Cast on a chain of 30 chain stitches and connect its end and beginning.
- Knit 5 rows in a circle with regular single crochets.
- Start knitting the pattern. You can use yarn of a different shade for this. A simple and beautiful pattern is obtained from double crochets. First, make 3 air loops for the height of the row. Skip two stitches, and knit 4 double crochets into the next one. The entire row is performed in the same way.
- Start the next row - skip two loops of the previous one, then knit 4 double crochets in one loop. The result is triangles, each of which “grows” from the middle of the same triangle of the previous row. In the same way, finish the row and knit 4 more rows.
- After the sixth row, the fingers begin. Try on the glove.
- To make a hole for the thumb, make two connecting loops and end the row. Next, turn the work around to knit in the other direction. Make another row like this.
- We usually knit the next row in the round. You can continue with regular columns. The edge can be tied with a “crawfish step”.
- Having finished the main part, knit the finger. To do this, the hole is tied with single crochet stitches to the required length of the finger.
The finished product can be decorated with applique, beads, and embroidery.
How to calculate the cuff length?
Traditionally, the upper part of the accessory under study is decorated with a different pattern than the one that covers the palm. Mitts knitted with knitting needles are decorated with an elastic band, thanks to which the product (even a long one) will not fall off. In our case, this part can be connected with ordinary posts. However, there is a risk that the mitts will not look very nice. After all, they are designed to fit the entire hand. Therefore, when crocheting warm long mitts, beginners need to calculate the number of loops that need to be reduced as they progress, in order to ultimately get as many as necessary to encircle the wrist. For this:
- We subtract from the number of loops cast on at the beginning of knitting as much as should remain in the end.
- Thus, we find the difference and find out the number of extra loops. Which should be reduced.
- We denote this value as parameter L.
- We measure the distance from the intended edge of the product to the wrist.
- Multiply by the length of the number of rows in one centimeter.
- We denote this value as parameter P.
- Divide L by R.
- And we determine exactly how the loops should be distributed in order to reduce them evenly.
Mittens or gloves
In autumn and spring bad weather, and even in cold weather, a person tries to warm his hands. In winter, mittens and sometimes gloves are ideal for this purpose. But in the fall, it is gloves that become indispensable. However, knitted mittens - a kind of fingerless gloves - can also warm your hands.
Without a doubt, this is a fashion accessory that can be worn at any time of the year, as they are not only knitted, but also made of lace. Initially, they were designed to protect hands from the cold when it was necessary to maintain finger mobility for small movements. However, now they are used not only as decoration, but also in sports. In addition, mitts come in a wide variety:
covering the palm to the base of the fingers and covering the thumb;- with separate fingers up to the height of the first phalanx;
- mittens with lapels;
- long to the elbow or with a small cuff covering the wrist.
On the Internet you can find a wide variety of master classes on making crocheted mittens. Gloves for beginners can be a labor-intensive task, mainly due to the difficulty in tying off the fingers.
The first part of the mitts is the cuffs
When all the necessary calculations have been made, you can proceed to the next stage of the description for beginners. Crochet mitts start with a set of loops. Let us remind you that there should be enough of them so that the chain covers the hand in the place where the upper edge of the accessory being studied will be located. After this, we close the chain into a ring. And we knit a “pipe”, moving in a circle. If the cuff is long, you need to gradually decrease the loops. Don't forget about this while working. Having knitted the cuff of the required length and reached the wrist, in the next row we add loops so that in the end we get as many as required to circumference the palm. Calculating the required value is very simple: multiply the number of loops in one centimeter by parameter D.
Having carried out the necessary manipulations, we can say with confidence that the first part of the description has not only been mastered, but also completed.
The simplest pattern “Columns”
We will need:
- yarn;
- hook No. 2.
We start knitting by setting up an air chain. So let's get started.
Determine the length of the chain yourself, the length of your elastic depends on it, for standard ones you will need 20-25 air loops, but if you want to make elongated mitts, you can cast on more.
Having collected 25 air loops, we make one more for lifting. We knit a row with single crochets, clinging only to the back wall of the loop. Having reached the end of the row, we make a lifting loop, turn the knitting over and knit the second row. The number of rows will depend on the width of your hand.
When you knit it to the desired size, we connect its two sides with connecting posts.
It should look like in the photo:
Now let's start knitting the palms. You don’t have to break the thread so that there are no extra unnecessary knots, but continue further.
We knit in a circle with single crochets.
We periodically try on our future mitt and, if necessary, make an increase.
When we reach the thumb, we need to make several air loops, forming a place for our finger; calculate the number of loops according to your size.
And we continue knitting until the end. The length of the mitts is calculated so that your nails are on the outside, therefore, you need to knit up to the nail on the little finger. We secure our last row with a connecting loop and break the thread.
Related article: Fun crocheted potholders that don't require patterns, with description
Now let's start knitting the thumb. To do this, you need to make a starting loop and connect it to the nearest knitting stitch. We continue to knit according to the previous pattern, in a circle, with single crochets.
It should look like in the photo:
In principle, our mitt is ready, all that remains is to knit the second handle in the same way. You can embellish it a little by tying an openwork flower to it.
The second part of the mitts - from the wrist to the thumb
Professional knitters note that the further steps are so simple that even beginners who are just learning the basics of knitting can do it. We have read many instructions and master classes, thanks to which we are convinced that this statement is quite true.
But we still prepared the most detailed and understandable description for beginners:
- We crochet the mitts, also moving in a circle.
- We have already selected the number of loops to go around the thumb, so we will not knit the part called the wedge.
- Our next step is indeed very simple. Having added loops on the wrist, we move on to making the main pattern.
- We determine the required length of the part as follows: multiply the number of rows in one centimeter and parameters B.
- We knit as many rows as required.
And the required part of the product was completed quite successfully. Let's move on to the next step!
Openwork product
Another option for beautiful openwork mittens. At first glance, the pattern may seem complicated, but it is not. It is enough to have minimal knowledge in the field of crochet, and a detailed diagram with a description will simplify the task.
We will need:
- yarn of two colors;
- satin ribbon of two colors;
- hook;
- beads;
- needle.
We start by knitting an elastic band. To do this, in our case with black yarn, we cast on air loops, the number of loops depends on the girth of your hand.
And we knit the required number of rows with regular single crochets.
In order to start knitting the main pattern, it is necessary that the number of loops be a multiple of three.
We attach yarn of a different color, in our case it is peach, and begin knitting according to the pattern.
Please note that in the pattern 5 double crochets are knitted; in our case, we need to knit only 4, but the essence of knitting is the same.
We collect 3 air loops. We make three more double crochets in the same place. Thus, you should end up with a kind of fan.
Next, skipping 2 loops of the bottom row, we knit 4 double crochets into the third row.
Thus, we knit to the end of the row.
To make the transition to the next row, you need to knit a connecting loop into the middle of the fan, we knit a new fan.
Our next row goes further and we knit it through the middle of the lower fan.
Related article: How to properly sew knitwear on a sewing machine
We knit the required number of rows up to the thumb. Now we need to arrange a place for it. To do this, we knit another row according to the pattern, and instead of the last fan we knit a stitch with three crochets.
We knit the next row as shown in the photo.
And continue knitting to the desired length.
You can knit your thumb with regular single crochets, or you can leave the mitt without a thumb, like ours.
Decorate with ribbons and beads.
As you can see, there is nothing complicated, and every craftswoman, even the most beginner, can repeat it. This option is very suitable for a girl.
The third part of the mitts - from the thumb to the little finger
You don't have to add anything at this stage. We'll just separate the thumb loops. To do this, you need to multiply the number of loops in one centimeter by the parameter G. This way we will find out how many loops should remain for further work. After this, we separate the excess ones, fold the product and fasten it over the thumb. This is the thumb bridge. It separates the loops we need from the ones we don't need. Next, you need to calculate the number of rows that should be knitted from the base of the thumb to the fold of the little finger. To do this, multiply the number of rows in one centimeter by parameter B. We tie the part for the palm, observing the pattern. Then we knit a “pipe” without decreasing or adding stitches throughout the calculated rows. If desired, tie the thumb.
Here is the main part of the instructions on how to crochet mitts for beginners (step by step), completed. Now you can come up with an original product and boldly bring it to life!
Crochet mitts
You can knit mitts not only with knitting needles, but also with crochet. Many people have a question: how to crochet mitt gloves? To do this you need:
- Yarn
- A hook that matches the thickness of the threads.
When making half gloves using a hook, you should perform the following steps:
- Calculate the arm circumference and length of the product
- We cast on a row of thirty chain stitches. The set should not be done tightly
- We crochet rows of single crochets of the required height
- After knitting the required number of rows, you need to fold the product in half and sew. We sew using a chain stitch, not forgetting to leave a wedge for the finger
- We move on to knitting the finger and fasten it at the end.