Selection of yarn and knitting needles
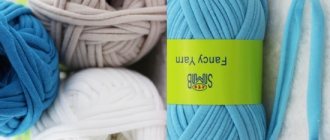
First, the color, materials and size of the tools are determined, focusing on a number of factors:
- seasonality;
- floor;
- age;
- fashion;
- individual preferences;
- compound.
Important! There are yarns that can stretch after washing if you wash and dry the knitted product incorrectly.
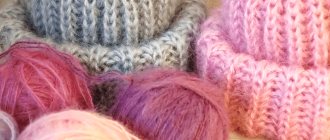
For work, use thick and medium threads and needles of appropriate thickness. The thicker the thread, the larger the needle size required. You can work from natural or synthetic materials:
- mohair;
- wool;
- alpacas;
- Angoras;
- acrylic;
- mixed
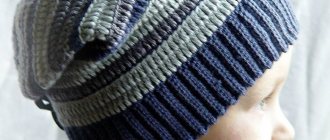
Advice! The trendy voluminous style is made with large thread numbers. Then the hat knitted with an elastic band will be looser. If you need a headdress that fits tightly on your head, then take a ball wound from two or three skeins.
On thick knitting needles the knitwear comes out looser, and on thin and medium knitting needles it comes out denser. This must be taken into account during work. A women's hat, knitted with large needles from thin wool, will not keep you warm in the winter; it is better to wear it in the off-season as a bright and effective addition to your image.
For winter, a tight knit is chosen, thanks to which the hat will fit well on the ears and back of the head with an elastic band, keeping it warm. It is important to take this into account when making models for children.
Put it on and fall in love - a hat with a large pattern
For the cold winter - no laces or intricate designs! Rough patterns dominate modern fashion, and they are used not only for sweaters, but also for hats. Therefore, many knitters (especially beginners) are interested in how to knit a large knitted hat with knitting needles. Here is a simple model that will make you look stylish and keep you warm in the winter cold.
Necessary materials:
- thick wool blend yarn 200 g 120 m - from 150 to 200 g;
- circular knitting needles on 40 cm fishing line No. 10;
- double-edged knitting needles 10 mm.
Step-by-step description of the process:
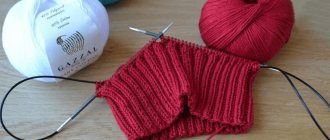
- Start working on circular needles by casting on 42 stitches.
- Knit the first row after the cast-on stitch.
- Switch to a spiral pattern. There will be seven rapports in one row.
- For a spiral hat using coarse knitting needles, use the pattern: row one - purl, k4, purl. Second - purl 2, knit 4. Third - knit, purl 2, knit 3. Fourth - k2, p2, k2. Fifth - k3, p2, knit. Sixth - k4, p2.
- In the seventh, start duplicating the pattern from the first row.
- When you have knitted 20 cm of the ornament, start making the descent. To do this, we recommend switching to straight knitting needles.
- “Transplant” the loops onto four knitting needles (on two - 11 and on two more - 12 stitches on each).
- In the front row, knit two loops in pairs.
- When you knit three rows, there will be 21 stitches left in the work.
- Perform another decrease by knitting purl stitches at the same time.
- There will be 14 stitches left.
- Cut the thread, pass it through the loops, tuck it inside the product, tighten and secure.
- Make a large pompom and sew it to the top of the product.
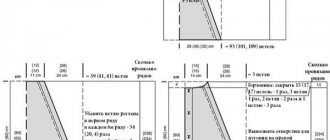
Performing calculations
In order for a women's, men's or children's hat with a turn-up to be worn comfortably, you will need to calculate its width. This will help you avoid typing mistakes. The craftswoman’s action plan is as follows:
Note!
How to crochet a mouse and a rat: video master class on crocheting the 2020 symbol
How to knit a warm hat with ears for a newborn boy and girl - video tutorials with patterns, instructions for beginners
How to crochet a beautiful scarf: video master class on creating unusual, beautiful, simple scarves for boys, girls, men and women
- measure the circumference of your head using a tailor's meter;
- knit a small sample;
- count the number of loops in one centimeter;
- multiply centimeters by pieces and add a couple of centimeters to the result.
English knitting is loose and voluminous, a wide cut is chosen for it, and when stretched it looks ugly. In this case, you cannot use threads that are too thin; only thick yarn makes a beautiful garment.
Mohair lapel hat for women with description
Women's knitted hat with a lapel is crocheted from thick bouclé yarn with mohair. Knitting patterns for the model are presented below.
Description of knitting a hat
Designed for head size 56. The model with a lapel is quite warm and can be worn in winter.
For crochet hats
you will need: 100 g of ASTRAKAN yarn, hook number 5. This stylish model is good because it gives an extraordinary feeling of comfort.
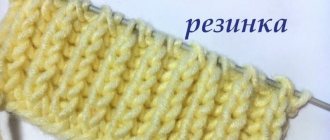
Pattern selection
First, the type of equipment is determined. It is preferable to choose alternating external and internal loops in different sequences. Despite the simplicity of the action, it gives room for imagination: you can create a panel with different structures and densities, changing the ratio of the face and the back. It is easier to do 1 x 1 single crochet. Then the knitwear turns out less loose.
You can work with a 3 x 3 or 2 x 2 elastic band, and perform the middle with the classic step of alternating face and back. Then the lower part will look more prominent. This is usually done for tight styles.
English technology creates a double-sided canvas. It is based on the following algorithm:
- knitted front;
- yarn over
- an unknitted buttonhole that is removable.
Note!
How to crochet a winter hat: 95 photos of new models of warm, fashionable, original knitted hats with a lapel and a beautiful pattern
- How to knit a beanie hat correctly with knitting needles: video master classes, patterns, knitting patterns for fashionable models
Light and beautiful crochet shawl: photos of chic openwork scarves with simple patterns
Helpful information! The English pattern is used for double-sided products, so it will be used for folding. Then this element will look double. Using this technique, you should not make an accessory without a lapel, as it will not hold well.
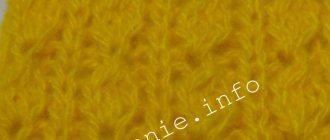
A false or patent analogue is performed without a crochet like this:
- outside alternates 1 knit, 1 purl;
- inside they work according to the pattern, and the front stitch is knitted from the bottom row, the working loop is removed.
The patent pattern produces a less voluminous texture. But one and a half times more material is taken for it.
For reference! To avoid stretching the bottom, the edge is knitted 1 x 1. Then the bottom zone will not stretch out in width during wear.
Bush hat.
The red cap with a lapel was brought into fashion by Jacques Cousteau, a traveler, writer, director, inventor, explorer of the world's oceans, who lived a bright, interesting life and made many geographical discoveries.
I propose to knit a red hat with a lapel in a circle, starting from the top of the head. What's good about this method? Firstly, you can knit a hat lengthwise until the skein runs out. There will be no leftover yarn. Secondly, a beautiful top is knitted right away. If something goes wrong, you will have to dissolve quite a bit. Thirdly, the size of the hat is determined as you knit. You can try it on either by your head or by the hat you’re wearing. And yet, closed loops look much more beautiful than cast-on ones. I really like this way of knitting.
We will need:
Red yarn “ARLEKINO” 100 g = 320 m 100 g, sock knitting needles No. 4.5 and circular knitting needles No. 5.
We will knit in 2 threads.
You can take other yarn and other knitting needles and knit in one thread.
Description.
We start on toe knitting needles. We cast on 8 loops +1 to close into a circle. We distribute the loops on 4 knitting needles, 2 loops on each knitting needle.
We knit the front and back loops on the right wall, yarn overs on the left. We make the yarn over ourselves.
1 row. *Knit 1, yarn over* repeat until the end of the row.
2nd row. 16 facial.
3rd row. *Knit 1, yarn over, knit 2, yarn over, knit 1* on each needle.
4 row. *Knit 1, purl crossed, knit 2, purl crossed, knit 1*.
5 row. *Knit 1, yarn over, purl 1, knit 2, purl 1, yarn over, knit 1*.
6th row. *1 knit, 2 purl, 2 knit, 2 purl, 1 knit*.
7th row. *Knit 1, yarn over, purl 2, knit 2, purl 2, yarn over, knit 1.
8 row. *1 knit, 1 knit crossed over the left wall (at first you can turn the yarn over the other side, it will turn out more beautiful), 2 purl, 2 knit, 2 purl, 1 knit crossed (we knit over the left wall, no need to turn over), 1 knit*.
Got the point? On each knitting needle in odd rows we knit 1 knit, yarn over, then follow the pattern (2 knit stitches, 2 purl loops should alternate), before the last loop, yarn over, and the last knit stitch. In even rows we knit according to the pattern: over the front loops - knit stitches, over the purl loops - purl stitches. We will knit yarn overs either purl crossed or knitted crossed. An elastic band should be formed between the outer knit stitches on each knitting needle *knit 2, purl 2*, oriented from the middle of the pattern.
We continue knitting like this until there are 24 loops on each knitting needle (the number of loops on each knitting needle should be divided by 8).
We switch to circular knitting needles with a short fishing line and knit an elastic band *2 knits, 2 purls* to the desired length or until the yarn runs out. Close the loops.
You can wear a hat with 2 lapels.
Other hats can be viewed here:
Winter hat knitted with elastic band.
Knitted hat. Description and diagrams.
Hat with pompom. Several variants.
Knitted hats. Detailed description and diagrams.
How to knit a hat with knitting needles. For beginners.
Knitted pumpkin hat. Description, video MK.
How to knit a hat. Schemes, description.
How to knit a men's hat with knitting needles. Five options.
Hat with arans and scarf with knitting needles. Description, knitting pattern.
Knitted hat with a flower crown with knitting patterns, MK video.
Knitted TakOri hat. Description, diagram, video.
Knitted hat and scarf for a boy. Detailed description.
Knitted men's hat. Various options.
Knitted beanie hat. Twenty options.
Knitted hat of happiness with detailed description, photo.
Beginning of work
140 stitches are cast on from the average thickness of the threads. It is important to take into account at the initial stage that when using large needles, the set turns out to be wide, therefore, when using large knitting, it is selected individually, using preliminary calculations on a small sample.
First, 1 x 1 is knitted to create a rigid edge. Then comes the alternation of the main pattern.
This type of hat can be knitted in one day, as it is done the same way until the knitting at the top is completed.
Its diagram and description are accessible even for beginners. The pattern consists of three zones:
- bend;
- center;
- tops.
The length depends on the chosen design. Taking into account that the bending element should take approximately 4-7 cm, the classic version, which fits the crown, should have a height of 21 cm.
Many people are interested in how to knit a fashionable beanie. Using these instructions, it’s easy to make this trendy accessory hanging from the back with your own hands. For this you will need to add another 4-5 cm to the classic size, and then finish according to the instructions. For “Pumpkin”, the necessary centimeters are created at the stage of completing the knitting.
How to knit a hat with a lapel master class
Knitting a hat with a braid lapel
To make this simple and fashionable hat we will need: Drozs Nepal threads with the addition of Alpaca - you will need 2 skeins of 50 g/75 m. Circular knitting needles No. 4.5 and 5, as well as markers and a tape measure
Density - 10x10 cm = 17p./22p.
Description of a hat with a knitted lapel
On circular knitting needles you need to cast on 80 sts with 4.5 cm knitting needles. And start knitting an elastic band according to diagram 1. In diagram 1 there is a 2x2 elastic band. And in the image 1x1
Knit an elastic band for 24-25 rows. Then continue knitting with needles No. 5. After this, start adding 16 stitches from the 3rd row (from the 5th loop). See Diagram 1.
Hat with a lapel scheme
Now we have only 96 loops on our knitting needles. We need to continue row 4 according to pattern 1. The repeat consists of 24 loops. it is highlighted in diagram 1.
From 5 to 30 rows, look at pattern 1. From 31 rows, go to pattern 2 and knit from 1 to 25 rows
Hat with a lapel braid pattern, diagram
So, from the 10th row I recommend switching to knitting needles No. 4.5. Connect the remaining loops after decreasing with a needle to the main thread, tighten and hide the ends.
Winter beanie hat with lapel and pompom
The hat is knitted with garter stitch, cords and double rib using stocking needles, so it comes out without seams. A master class on making a pompom is presented below. As an option, you can buy a fur pompom, then the hat will look more original.
Sizes: One size
Materials: Yarn Patons Classic Wool Worsted (100% wool, 100 g/192 m) 2 skeins, circular and hosiery knitting needles 4.5 mm
Knitting density: 20 p. and 26 p. = 10x10 cm in stockinette stitch (RS)
How to decrease and end
To make the back of the head smooth, you need to pick up the loops using a launch. The reduction is done after the structure has the required length. It is done by knitting double loops 4-3 cm to the end. In total, it takes approximately 7 lines on each side to complete.
To do this, in the first purl track, one loop is reduced, which is knitted together with the adjacent one. As a result, 105 p. will remain.The second and all even numbers are performed according to the pattern. In the third, a decrease is made until the number of loops is reduced to 70.
In the fifth, a double loop is knitted everywhere. After this there will be 35 points left.
In the seventh, two are knitted. After this, 17 stitches remain, through which the thread torn from the ball is pulled and tightened with a knot.
For reference! The bottom should be sewn along the length of the lapel from the outside so that the seam is on the inside when it rises to the main fabric.
Having mastered a simple pattern, you can start drawing with braids and combining them. It's easier to learn basic skills with the classic style. After this, it is easier to master the technique of making diagonal lapels and other options for fashionable knitted hats. There are a large number of varieties of combinations based on different methods of knitting threads, which allows you to create different designs of hats.
Advice! When everything is ready, the new product can be washed in warm water and dried on a towel without stretching. Then it will look more even and uniform, the wool will settle a little and will not stretch out when worn.
Knitted hat with a lapel: photos of finished beautiful works
Please repost
1+