Calculation of yarn by knitting needle number and thread thickness
To determine the amount of yarn per product, an approximate sample is knitted using the materials and tools that will be used to create the entire model.
Its approximate size with rapport should be 20-30 loops for 10-12 rows. The resulting sample is measured with a ruler or measuring tape and the number of loops in its 1 square is determined. cm. The width of the example will correspond to the number of loops in 1 cm of any of its rows. By measuring the length of the vertical edge of the probe, determine the number of rows in 1 cm.
Next, the number of rows or loops is divided by the length of the side of the example in cm. Then the sample is unraveled and the length of the thread is measured. The resulting number is divided by the number of square meters. see example. The result will be the exact length of the thread for the execution of 1 sq. see products. After this, the area of the entire thing is calculated and multiplied by the result obtained in the previous action.
The sample is ironed through the fabric immediately before all measurements. If the pattern is loose or lacy, do not iron the example. The sampler, tied with an elastic band, will have to be stretched a little.
Yarn calculations can also be made by decoding information from the tags on the threads. One number always acts as the thickness, and the other – as the number of threads in the skein. The correct length of yarn is found by dividing the 1st number by the 2nd.
Long pullover with a very deep V neckline
Dimensions: 36-40 (42-44, 46-48).
You will need:
- 300 (350, 350) grams of green and 50 grams of white yarn, consisting of 42% wool, 28% alpaca wool, 30% polyacrylic; thread length 150 meters in 50 grams;
- straight knitting needles No. 5;
- circular needles No. 5.
Elastic band : knit alternately 2 knit stitches, 2 purl loops.
Color sequence : * 5 rows/rounds of green, 5 rows/rounds of white, from * repeat.
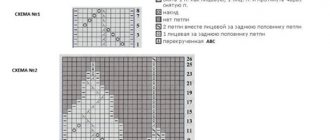
Braid pattern : knit according to the pattern. Distribute the loops as described in the instructions. Repeat in height from the 1st to the 12th row.
Decorative decreases : from the right edge of the front row - edge row, knit 1, knit 2 stitches together with a slant to the left (= slip 1 loop, as in knitting, knit the next loop, then pull the removed loop through the knitted one). Purl row: knit 2 stitches together, purl crossed, 1 purl, edge stitch. From the left edge of the front row - knit 2 stitches together, knit 1, edge stitch. Purl row – edge, purl 1, purl 2 stitches together.
Knitting density : 22 loops per 24 rows corresponds to 10 by 10 cm, knitted with a “braid” pattern, using knitting needles No. 5.
Description of knitting
Back Using green thread, cast on 128 (136, 144) loops and for the bottom bar knit 15 cm = 35 rows with an elastic band, performing stripes in the indicated sequence, starting from the purl row and wide from the edge, 2 purl, 2 knit and finish symmetrically. In the last row, increase, evenly distributing, 1 (2, 3) loops = 129 (138, 147) loops.
Next, knit with green thread in a pattern of “braids” and distribute the loops as follows: edge, 8 loops from arrow a to the left double arrow, repeat repeat 13 (14, 15) times = 9 loops, 2 loops from the left double arrow to arrow b , edge
After 53 (55, 57) cm = 128 (132, 136) rows from the bottom bar, bind off the middle 47 (46, 47) loops for the neck and finish the left side first. To round the neckline, close from the inner edge in each 2nd row 2 times with 3 loops, 3 times with 2 loops and 3 times with 1 loop. At the same time, close from the outer edge for the shoulder bevel after 57 (59, 61) cm = 138 (142, 146) rows from the bottom bar 1 time 6 (7, 7) loops, then in each 2nd row another 4 times 5 ( 6, 7) loops. Finish the other side symmetrically.
Front part Knit like the back, but for a V-neck, close the middle loop (divide the work in the middle - close the middle loop) after 12 (14, 16) cm = 28 (34, 38) rows from the bottom bar and finish the left side first for 64 (69, 73) loops. For a bevel, decoratively decrease from the inner edge in every 3rd row 32 times, then in every 2nd row 6 times 1 loop = 26 (31, 35) loops. At the same time, make a shoulder bevel from the outer edge, as on the back. Finish the other side symmetrically.
Assembly Sew shoulder seams. Using green thread on circular knitting needles, cast on loops starting from the middle of the back neckline: 40 loops along the back neckline from the mid-back line to the shoulder, 100 loops along the left bevel of the V-neck, 100 loops along the right bevel of the V-neck and 40 loops along the neckline back from shoulder to mid-back line = 280 loops.
Attach markers to the 1st and last loops on the neckline bevels (for 100 loops) and to the 1st and last loops of the back neckline (for 80 loops), as a result, 2 loops are marked with markers on the sharp angled tip of the neckline and 2 loops each on the shoulder line . Knit strips with an elastic band in the indicated sequence, and distribute the loops so that 2 adjacent loops with a marker are knit.
To give the binding a shape, knit on the front pointed tip 7 times in every 2nd round row and then 11 times in every round row, knit the 1st stitch with a marker with the previous stitch together and knit the 2nd stitch with a marker with the next stitch together. tilt to the left. At the same time, on both sides of the shoulders, knit 8 times in each 3rd circular row, the 1st loop with a marker with the previous loop together with the front one and the 2nd loop with the marker with the next loop together with the front one with a slant to the left = 212 loops.
After 10.5 cm = 25 circular rows of elastic, bind off all the loops according to the pattern. Sew the side seams, leaving the top 27 cm on each side open for the armholes.
Patterns for women's vests
Before knitting a women's vest, familiarize yourself with the diagrams of its patterns. Their descriptions are always easy and intuitive.
Classic (shawl)
The pattern for this pattern is as follows:
- for the front surface: in faces. rows - persons. loops, purl rows - purl loops;
- for purl stitch: in knit stitch. rows - purl. loops; inside out rows - persons. loops;
Garter stitch
- elastic band: alternating alternating knit and purl stitches;
- knitting density: 14 loops and 16 rows equal to size 10 by 10 cm.
Braids
Braids are usually combined with the main pattern and garter stitch.
It should look something like this:
- Garter stitch: In knit and purl rows, all stitches are knitted.
- Knit stitch: knit stitches. rows and purl stitches in purl. rows.
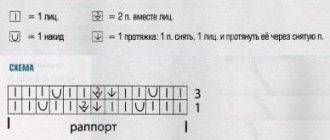
- Basic pattern: from the 1st to the 5th row knit in stockinette stitch; 6th row - facial loops; Rows 7 and 8 – stockinette stitch. Then the pattern is repeated.
- Braids: 12 loops + 6 additional in the 1st row. Perform according to the scheme from the 1st to the 10th row. Repeat from 3rd to 10th.
- Knitting density. Basic pattern on knitting needles No. 5: 16 stitches and 22 rows equal 10x10 cm; braids: 18 loops are identical to 8 cm.
A women's vest, knitted with knitting needles, has many options that any craftswoman can make. In the fall, such a wardrobe item will provide additional warmth, and in the spring it will help you quickly switch to lighter clothes.
Shells
Graphic instructions and its description:
The loops must be multiples of 8+5+2 edge loops. Repeat from 1st to 12th row. Density: 25 loops and 28 rows equal 10x10 cm.
Long women's vest with hood
A very practical clothing option for the off-season. An elongated vest with a hood is ideal to wear on autumn days with changeable weather. With such a sleeveless vest, you are always protected from sudden cold snaps. It can be knitted from mohair or wool with the addition of synthetics.
A special feature of this simple model is the use of large knitting. The fishbone pattern may seem difficult for beginning knitters. In fact, once you figure it out, you will understand that knitting this pattern with your own hands is not difficult.
Sizes: 38/40.
For this model we need:
- yarn containing 50% wool, 50% acrylic (100g per 240m) – 1100g;
- knitting needles No. 6.
Patterns:
- persons smooth surface: in faces. rows - knit stitches, purl stitches. rows - purl;
- fishbone pattern: 1 r.: 1 kr., right sp. insert into two loops, pull out k1, remove the 1st of the knitted stitches, leaving the 2nd on the left knitting needle. Through the remaining st and the next one we again thread the right sp., pull out 1 l., remove the first of the knitted sts, leaving the second loop on the left knitting needle. We continue like this until the end of the row; 2p.: according to the principle of the first row, only with purl loops. For beginner knitters - see video
We knit a long women's vest with a hood - detailed description
Front sleeveless vest with hood
We cast on with knitting needles 61 sts. and perform 40cm of coarse fishbone knitting. Next row on the outside under the closed armhole. in even p. 3p., 2p., 1p. At a height of 55cm internally. edge for rolling out closed in even p. 4p., 3p., 2p., and 3 times 1p. 65cm closed all loops.
Knit the second part of the front in a mirror manner.
Back of sleeveless vest with hood
We cast on with knitting needles 111 sts. and perform 40cm of coarse fishbone knitting. Next row on the sides under the armhole closed. in even p. 3p., 2p., 1p. 65cm closed all loops.
Hood
We cast on with knitting needles 99 sts. and perform 28cm of large fishbone knitting. Closed p. For the strap along the front edge of the hood, we lift the loops evenly with our hands and knit 5p. persons satin stitch Then - 1 rub. purl stitches (this will be the fold line). We knit 5 rubles again. persons satin stitch Closed loops. We fold the strip outward along the fold line and hem it. We make the same strips along the edges of the armholes, the front edges of the shelves and the bottom of the model with a hood.
Step-by-step instructions for beginners on knitting a women's vest
A women's vest, knitted with knitting needles, refreshes the look. Sleeveless vests help out in cool and windy weather. Various models can be combined with other things, and also decorated, for example, with fur or lace.
Knitting pattern
For a pattern with taking measurements, measure:
- back width;
- model length (DI);
- neck circumference (OS);
- chest girth (OG).
Draw a rectangle on paper with a height equal to DI and a length equal to OG. A vertical line is drawn in the center of the figure. To calculate the depth of the armhole, subtract the width of the back from the half-circumference of the chest, and divide the resulting total by 2. The height of the armhole is calculated using the formula: OG/6+5. The resulting measurements are transferred to the drawing, connecting the armhole cutouts with rounded lines.
Next, line up the neck, dividing the OR by 3. In the middle of the rectangle, measure half of the result obtained on both sides of the vertical. The neckline is raised 2 cm and connected to the shoulder, and its neckline to the top of the rectangle using a rounded line. When performing all the above manipulations, a pattern for the back of the vest is obtained.
The patterns for the front shelves are made similarly to the shape of the back, but without drawing the neckline, since it is calculated for these parts using a different formula: ОШ/6+2. The resulting number of cm is laid down from the level of the neckline and roundly connected to the center of the pattern.
Knitting back
Creating a women's vest with knitting needles begins with knitting the back.
Step by step:
- From the cast-on loops, knit a pattern with an elastic band (2 knits, 2 purls) 4 cm.
- Further work is done using stockinette stitch or the required pattern according to the pattern.
- Having reached the level of the armholes, they begin to perform them, cutting the loops on both sides in every 2nd row. The remaining length is knitted straight.
Right shelf
Description of work on the right shelf of the vest:
- The loops cast on the knitting needles are knitted with an elastic band of 1/1 5 cm.
- Up to a height of 30.5 cm, follow the pattern according to the following pattern: knit stitch – 15 stitches, rapport – 25 stitches, 17 knit stitches.
- Having reached the given height, close 6 stitches for the armhole on the left, then 8 times, 1 stitch in every 2nd row. and 1 time 1 p. in every 4th r. Further work continues on the drawing, as before.
- Having reached a height of 53 cm from the bottom, 8 stitches are closed for the shoulder in every 2nd r. 3 times.
Left shelf
The left front is knitted in a mirror image to the right.
The diagram is above.
Assembly
All finished parts of the vest are placed right sides together and begin to connect the side and shoulder seams of the product using a hook or a needle and thread. This work is done only from the wrong side, and not from the front.
Neck strap
Having assembled the vest, the neck and armhole are crocheted or knitted.
Beginners can do this using the 1/1 elastic pattern:
- From the top of the neck, from the row located immediately below the edge, loops are pulled along the entire part.
- From these loops and threads from a skein, a 2-3 cm elastic band is knitted. Then the loops are closed and the thread is hidden on the wrong side.
- The armholes are knitted in the same way as the neckline.
Assembling a vest, how to sew vest fronts?
Before you begin assembling the product, you need to steam all the parts through gauze, carefully, without pulling them out. Then, one by one, attach each shelf to the back with the right sides, aligning the armholes, shoulders, and side seams. Assembly seams are made only on the wrong side of the product. There are two ways to connect the parts together: 1. Using a hook. To do this, we make a loop on the thread, insert a hook into it, and then in small steps we knit the edge loops of the parts together. 2. Using thread and needle. We move along the fabric and sew the edges of the product, inserting the needle perpendicular to it.
How to tie and attach a hood
The protective and decorative element of a women's vest, the hood, is knitted as follows.
Step by step:
- First, determine the number of loops required to complete the part. This is done by counting the loops from the neck of the front shelves and back.
- Then the loops are put on the knitting needles, not forgetting about the additional ones for the strap, and a rectangle with the required pattern is knitted.
- To measure the length of a rectangle, calculate the distance from the cervical vertebrae at shoulder level to the top of the head. Another 5 cm is added to the result.
- Having knitted to a certain length, the loops are closed and the edges are sewn.
- The finished hood is sewn or knitted to the vest.
Vest with braids and V-neck
Size: 38.
Materials:
- 400 g of blue yarn (50% wool, 50% acrylic, 280 m / 100 g),
- knitting needles No. 4.
Rib 2 by 2 : in the front rows, knit 2 knits alternately. p, 2 p. p., in purl rows, knit according to the pattern.
Pearl pattern : knit according to pattern 1. The diagram shows only the front rows, knit the purl rows according to the pattern. Repeat in height from the 1st to the 4th row.
“Braid” : knit according to pattern 2. The diagram shows only the front rows, knit the purl rows according to the pattern. Repeat in height from the 1st to the 6th row.
“Oblique diagonals” : knit according to pattern 3. The diagram shows only the front rows, knit the purl rows according to the pattern. Repeat in height from the 1st to the 8th row.
“Rhombus” : knit according to pattern 4. The diagram shows only the front rows, knit the purl rows according to the pattern. Repeat in height from the 1st to the 24th row.
Description of knitting
Back : Cast on 76 loops on the knitting needles and knit with an elastic band 2 by 2. At a height of 6 cm from the cast-on edge, along the width of the fabric, evenly add 18 sts. Then distribute the loops as follows: 1 edge. p., pearl pattern - 12 p. according to pattern 1, "braid" - 6 p. according to pattern 2, "oblique diagonals" - 13 p. according to pattern 3, "braids" - 6 p. according to pattern 2, "rhombus" - 16 p. according to pattern 4, "braid" - 6 p. according to pattern 2, "oblique diagonals" - 13 p., "braid" - 6 p. according to pattern 2, pearl pattern - 12 p. according to pattern 1, 1 chrome n. Knit straight. At a height of 40 cm from the cast-on edge, for armholes, on both sides of the part, close 1 time 6 stitches and in each 2nd row close 2 times 3 stitches. At a height of 63 cm from the cast-on edge, for the neckline, close the middle 22 loops and knit both sides separately. For rounding, from the side of the neckline, in every 2nd row, bind off 1 time 2 sts, 1 time 1 st. At a height of 66 cm from the cast-on edge, bind off all loops.
Before : Cast on the loops and knit as a back. At a height of 40 cm from the typesetting edge, divide the canvas into parts. Perform armholes as on the back. For the bevel, from the side of the cutout, in every 2nd row, cast off the 1st stitch 14 times. At a height of 66 cm from the cast-on edge, bind off all loops.
Assembly : Sew shoulder and side seams. At the edges of the armholes, cast on loops on the needles and knit with an elastic band 2 by 2. At a height of 4 cm from the cast-on edge, bind off all loops. Along the edge of the neckline, cast on the loops on the knitting needles and knit with an elastic band 2 by 2. To form a V-shaped neckline at the beginning of the row after the edge. knit 2 stitches together with a slant to the left, at the end of the row before the edge. knit 2 sts together with a knit stitch slanting to the right. Sew the seam of the neckline.
Knitting a vest with an openwork pattern step by step
Women's vest, knitted, universal. This comfortable item looks great with any trousers and skirts.
To knit an openwork vest up to size 42, take:
- 0.5 kg of olive-colored cotton yarn;
- circular knitting needles No. 5;
- standard size 5 knitting needles.
Knitting patterns:
- Purl stitch (knit stitches in purl rows and purl stitches in knit rows).
- Knit stitch (knit stitches in knit rows and purl stitches in purl rows).
- In an elastic band, the loops should be multiples of 4 + 2 edge loops.
- Front rows: edge, *front, 2 purls, front*. Repeat from * edge.
- Purl rows are knitted according to the pattern.
- Openwork motifs: loops must be a multiple of 26 + 2 edge loops. Knitting is done according to a pattern where only the front rows are visible. On the wrong side, all yarn overs and loops are made purl. Between the edges repeat the rapport from the 1st to the 40th rows.
- Gauge: 14.5 stitches and 24.5 rows equal 10x10 cm.
Women's knitted vest - openwork model
Back design:
- 82 loops cast on knitting needles are knitted with a 10 cm ribbed pattern. In the last row, decrease 2 loops.
- Next, openwork motifs are knitted.
- After 144 rows (59 cm) from the elastic for the shoulder bevels, 7 loops are closed on both sides and in each 2nd row there are 4 × 6 loops.
- On the 146th row, the middle 8 loops for the neckline are closed from the elastic. The resulting 2 parts are finished separately.
- On the inside, in every 2nd row, close 1x3 and 1x2 loops to obtain a rounding.
- The work is completed after 152 rows from the elastic band.
A women's vest, knitted with knitting needles, is a thing that young and mature women love.
The former prefer simple and creative models, while the latter prefer voluminous products with openwork patterns. Easy to wear sleeveless vests are suitable for casual and business looks.
Performing the left shelf:
- 42 loops are cast on the knitting needles and an elastic band is made to a height of 10 cm. In the last purl row, 3 loops are decreased.
- Up to a length of 43.5 cm, an openwork pattern is knitted: 1 edge, loops before repeat, 1 repeat, loops after it, 1 edge.
- After 106 rows from the elastic for a beveled neckline, cast off 1 loop on the left and in every 6th row 7 × 1 loops.
- On the right, a shoulder bevel is made similar to the one that was on the first part of the jacket.
- The work is completed at the height of the back.
Women's knitted vest - openwork model
The right front is knitted symmetrically to the left. The finished parts of the openwork vest are sewn together, assembling them into a single model. The edges and neck of the product are tied with the front and back stitch, forming a neat strip.
How to knit a vest in a classic style
A product made using this method looks very noble and stylish!
Sizes Average adult S (M, L, 1XL, 2XL, 3XL, 4XL).
Finished Measurements Chest/Bust: (buttoned): 91.5 (101.5; 111.5; 122; 132; 142; 152.5) cm
What you will need:
- Coriander Tivoli yarn (Cascade Yarns® Tivoli) 60% Wool / 40% Silk – 6 skeins (7, 8, 9, 10, 11, 12) 100 grams each;
- knitting needles size 9 and 10.5;
- circular knitting needles size 9 (91.5 cm);
- holder for delayed loops;
- stitch marker;
- large buttons - 4 pieces;
- needles for yarn.
Density: 14 stitches x 20 rows - 10 cm of weaving with large knitting needles. From the 20th stitch using the stitch holder, these figures are 10.8 cm (with large needles).
Important! Be sure to check these numbers with your yarn to ensure they match the stated weight. If you knit fewer stitches and rows to get the desired length, use smaller knitting needles. If you need to make more stitches to obtain the required values, use larger knitting needles.
Legend:
- person.pet. – facial loops;
- p.p. – purl loops;
- Art. – stitches;
- Personal side - front side;
- External side - wrong side.
Weaving instructions
Knit stitch Row 1 (Knit side): knit stitches along the entire length. Row 2: purl stitches along the entire length. Alternate rows 1 and 2.
Elastic band On the front side, knit 1, purl 1. along the row. From External side knit stitches on purl. stitches and purl stitches on knit.pet.
Pattern See the pattern below.
Product Length Refer to the figure below for the required measurements for the back and front sides.
Step 1. Back To knit a vest correctly, first decide on the size. The total number is indicated for the smallest size, subsequent numbers are in ascending order - S (M, L, 1X, 2X, 3X, 4X). With smaller needles, cast on 75 (81, 89, 97, 103, 110, 116) sts. Start by making an elastic knit 1 stitch, purl 1 stitch. Weave until you have a length of approximately 3 cm. Finish after the purl row.
Pattern setup Next row: (Knit side) Change the needles to larger ones. Work in stockinette stitch for the first 6 (8, 12, 15, 18, 21, 24) stitches. Mark it with a marker. Next, form the pattern over the next 20 stitches. Mark with a marker. Stockinette stitch on next 23 (25, 25, 27, 27, 28, 28) stitches. Mark with a marker. Pattern on the trail. 20 stitches, mark with a marker. Stockinette stitch until end of row. Continue with these instructions until you have a length of about 40cm from the start. Finish after the row with purl stitches.
Create an armhole Cast off 2 (3, 4, 6, 6, 6, 6) stitches. at the beginning of the next 2 lines. At the beginning of the next 2 lines, close 2 (2, 3, 3, 3, 4, 4) stitches again. Then reduce by 1 tbsp. on each side in each line 1 (2, 3, 4, 4, 5, 6) times, then in every second line 3 (3, 3, 3, 4, 4, 4) times. You should have 59 (61, 63, 65, 69, 72, 76) stitches left. Continue working until you get a product length of approximately 60 (61; 62.3; 62.3; 63.5; 63.5; 66) cm from the beginning. Finish after the purl row.
Make the neckline Work along the first 19 (19, 19, 20, 22, 23, 25) stitches. Join the second skein of yarn and bind off in the middle with 21 (23, 25, 25, 25, 26, 26) stitches. Continue working along the end of the row. Decrease by 1 stitch from each edge of the neckline 1 time. You should have 18 (18, 18, 19, 21, 22, 24) sts left. at both sides. Continue braiding until you reach a length of approximately 61 (62.2; 63.5; 63.5; 65; 65; 66) cm from the beginning. Finish after the purl row.
Decorate the shoulders. Cast off 6 (6, 6, 6, 7, 7, stitches at the beginning of the next 4 lines. Then bind off (6, 6, 7, 7, 8, stitches at the beginning of the next 2 lines.
Step 2: Knit Left Side With smaller needles, cast on 34 (38, 42, 46, 49, 52, 55) sts. Start by making an elastic band (k1, p1). Weave until you have a length of approximately 3 cm. Finish with a purl row.
Pattern setup: Next row: (Knit side) change the needles to larger ones. For row 1, knit the first 6 (8, 12, 15, 18, 21, 24) sts. Mark with a marker. Pattern on next 20 stitches and mark with marker. Weave the remaining stitches in stockinette stitch. Continue with this pattern until you have a length of 39.5 cm. Finish next to the purl stitches.
Create an armhole Cast off 2 (3, 4, 6, 6, 6, 6) stitches. along the edge of the armhole once, cast off another 2 (2, 3, 3, 3, 4, 4) sts. along the edge of the armhole 1 time. Then reduce by 1 tbsp. along the edge of the armhole in each row 1 (2, 3, 4, 4, 5, 6) times, then in every second row 3 (3, 3, 3, 4, 4, 4) times. You will have 26 (28, 29, 30, 32, 33, 35) stitches left. Continue until you have a length of approximately 43 (44.5; 43; 43; 44.5; 42; 42) cm. End next to the purl stitches.
Decorate the neck Make a reduction by 1 tbsp. along the edge of the neck in every second row 0 (3, 2, 2, 2, 0, 0) times, in every 4th row 7 (7, 9, 9, 9, 11, 11) times, and then in every 6 -th row 1 (0, 0, 0, 0, 0, 0) times. You will be left with 18 (18, 18, 19, 21, 22, 24) stitches on each side. Continue until you have a length of approximately 61 (62.3; 63.5; 63.5; 65; 65; 66) cm. Finish with a row of purl stitches.
Make the shoulders Cast off 6 (6, 6, 6, 7, 7, stitches along the edge of the shoulder 2 times, then knit the 1st row again. Cover the threads.
Step 3: Front Right Side Do the same as for the left side. Just do all the stitches in a mirror image.
Trim Join the shoulder seams.
Connections With circular knitting needles and with Face-to-face. Pick up and work 63 (65, 67, 67, 69, 71, 73) sts. on the left Face side. to the beginning of the neck, 37 tbsp. on the left Face side. neck, 32 tbsp. on the back of the neck. Next 37 Art. on the right Face side. neck, and 63 (65, 67, 67, 69, 71, 73) st. on the right Face side. Total 232 (236, 240, 240, 244, 248, 252) art. Next, knit an elastic band (1 knit stitch, 1 purl stitch) until the length is 2 cm.
Buttons Mark with a marker on the left side. 4 button points. Place the first one at a distance of 2 cm from the bottom edge, the last one – 2 cm from the beginning of the neck formation. Define the rest evenly between them. Next row: Make buttonholes opposite the mark by casting off 3 sts. Next row: add 3 loops in place of the closed stitches of the previous row. Continue knitting with an elastic band until the length is 4 cm from the very beginning. Close the threads.
Group of loops along the armhole With circular knitting needles and with Face side. Pick up and work 76 (80, 84, 84, 88, 92, 96) sts. along the armhole. Make an elastic band, knit 1, purl 1. until the length is 2.5 cm. Bind off the loops. Sew the side seams, including the armhole. Sew on the buttons. A charming DIY knitted product is ready!
Long vest
When knitting elongated vests, take into account the following:
- pockets should be decorative;
- braid patterns require more yarn and time;
- simple models look more interesting than complex ones;
- The thicker the knitting needles and yarn, the less thread and time it takes to create products.
Women's knitted vest - long model
For a long and practical vest you will need:
- collar zipper;
- knitting needles No. 4 and No. 5;
- wool yarn.
The vest is knitted using stockinette stitch and 2/2 elastic:
- Performing the back. On needles No. 4, knit 12.5 cm with an elastic band of 2/2 out of 88 loops. Then they are evenly reduced to 80. Having reached a length of 30 cm, holes are made for the belt: from one ball, 21 knit and 3 purl loops are knitted, from the 2nd - 3 purl and 26 knit, from the 3rd - 3 purl, 21 knit. After 5 cm of such knitting, the loops are brought together again.
Women's knitted vest - elongated model
Having reached the length of 45 cm from the elastic, close 1x8 loops on both sides for the armholes and decrease one loop 4 times in each 2nd row. When the armholes reach a length of 25 cm, in every 2nd row for the shoulder bevels, close 3 times with 3 loops. The loops remaining after this are closed.
- The front front is knitted like the back, right up to the armholes. For them, at a length of 45 cm from the elastic band, close 8 loops on both sides and decrease one loop in each second row 4 times. At the same time, for fastening, the product at the top is divided in half and each part is knitted separately.
Women's knitted vest - elongated model.
The outer 2 loops from the neckline are knitted with a garter pattern, and the rest - with stockinette stitch. When the armholes reach a length of 19 cm, to cut out the neckline, put 9 loops on the inside and decrease 1 loop 7 times in each row and 1 loop 3 times in each 2nd row. The shoulder bevels are performed in the same way as on the previous part.
- The vest is assembled by connecting its finished components with side and shoulder seams.
Women's knitted vest - extended model
- The neckline is processed as follows: along the neckline, pick up 9 stitches on needles No. 4, 19 stitches from the front, 36 stitches from the back along the neckline, 19 stitches along the front and again 9 stitches set aside. The result should be 92 loops. They are used to knit a collar with a 2/2 ribbed pattern. Having reached a height of 10 cm, switch to needles No. 5 and knit another 13 cm. Then close the loops.
- Next, the armholes are processed and a zipper is sewn in.
- Knit a belt and insert it into the slots of the vest. Description of the creation of the element: cast on 16 loops on knitting needles No. 4 and knit with a 1/1 elastic band to a length of 146 cm.
Women's knitted vest - elongated model.
Knitted sleeveless vests successfully replace sweaters or are part of classic suits. They can be made by knitting or sewing. For beginning needlewomen, entire master classes are offered on how to independently create original vests. Women who are more experienced in this matter use more complex schemes.
How to knit a sleeveless vest with knitting needles?
There are many patterns available for both beginners in this business and experienced craftswomen. Creating a sleeveless vest with your own hands is not a troublesome or expensive task, but it is worth considering some nuances before starting work.
Taking measurements
To ensure that the product is the right size, it is better to make a pattern. The pattern drawing is carried out by taking the following measurements (depending on the model and pattern, some measurements may not be taken into account):
- length;
- armhole depth;
- chest girth;
- waist circumference;
- hip girth.
Thanks to the abundance of patterns, sometimes you can even do without patterns.
Pattern selection
Beginners should choose simple patterns to gain experience and enjoy the work. You can choose a sleeveless vest pattern in a simple knit without a pattern and take only three measurements:
- width. This is the half-circumference of the widest point.
- length.
- armhole depth.
With such minimum requirements for work, beginners in knitting will want to continue moving in this direction.
Tools and material
For knitting a sleeveless vest, one pattern is not enough. You need to choose the right yarn and knitting needles:
- For children's or light models, cotton or acrylic yarn is suitable, and for warmer products you should choose wool.
- You can select the knitting needles after choosing the yarn. The label should contain information about the appropriate tool sizes.
With the right approach, knitting a sleeveless vest according to the pattern will not be difficult for beginners. And experienced craftswomen have long been using the many patterns available on the Internet. There is also an abundance of options for children's vest models in the public domain, which will allow you to create something for your child with your own hands from natural and safe materials.
Voluminous vest
For a voluminous vest size 44 take:
- knitting needles No. 5.5;
- knitting needles No. 4.5;
- 600 g green wool yarn.
Patterns for application:
- elastic band 2/2;
- facial surface;
- purl stitch;
- sand: an odd number of loops are knitted according to pattern No. 1, repeating the 1st and 2nd rows; density: 15 loops and 20 rows are equal to 10 × 10 cm;
- braid: 24 loops are knitted according to pattern No. 2. Perform 1 time from the 1st to the 12th row, then repeat from the 3rd to the 12th rows; density: 24 loops and 4 purls equal to 10 cm.
Back detail:
- From 68 stitches, use knitting needles number 4.5 to make 18 rows with a 2 by 2 rib pattern, evenly adding 9 stitches in the final rows.
- Switching to number 5.5, knit with a sand pattern.
- After 116 r. from the bottom for shoulder bevels from 2 ends are closed at each. 2nd row 4 p., and then 4x5 p.
- With the third decrease for the neckline, the central 25 loops are closed and the 2 resulting parts are completed separately.
- In the next 2nd row, for rounding, close 2 stitches on the inside.
Women's knitted vest - voluminous model
Front design:
- From 68 stitches on number 4.5 knit 18 r. elastic pattern 2 by 2. At the same time, 20 stitches are added evenly at the end of the rows.
- Next, with number 5.5, knit: knit stitch, 30 stitches in sand stitch, 2 stitches in purl stitch, 24 stitches in braid stitch, 2 stitches in purl stitch, 30 stitches in sand pattern. After 114 r. from the bottom to cut out the neckline, close 28 stitches in the center and the resulting components are completed separately.
- The inner side is closed to obtain roundness in each. 2 r. first 3 p., then 2, and then 1 p.
- Shoulder bevels are made on both sides, as on the back.
Making trims for armholes and collars:
- Using knitting needles number 4.5 for the armholes, knit 8 rows. rib pattern 2 by 2 from 98 stitches. and put it off.
- For the collar, 50 rows are performed with an elastic band 2 by 2 of 110 stitches and set aside. To do this, use knitting needles number 5.5.
Women's knitted vest - voluminous model
For assembly:
- Connect the back and front along the sides and shoulders.
- A collar is sewn to the neckline, and armhole strips are sewn to the shoulders.
- The last 13 cm of the collar seam, called Loop to Loop, is performed on the front side of the product.
- The armhole strips are attached to the sleeves, 30 cm away from the shoulders.
Always fashionable and relevant, vests have long and firmly taken their rightful place in the hearts and wardrobes of fashionistas. Knitted sleeveless vests are easy to create different looks. Models made with knitting needles and simple patterns are suitable for women of any size.
Author: tanyda
Gray sleeveless vest with a deep V-neck for obese women
Sizes : 42/44 (46/48) 50/52 Russian sizes: 48/50 (52/54) 56/58
You will need:
- 350 (400) 450 g of gray yarn (80% cotton, 10% silk, 10% polyamide; 80 m/50 g);
- knitting needles No. 6.5.
Knitting technique
Front stitch : front rows - front loops, purl rows - purl loops.
Purl stitch : front rows - purl loops, purl rows - front loops.
Elastic band : alternately 1 stitch of front stitch, 1 stitch of purl stitch.
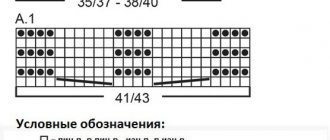
“Braids” 1 and 2 (for 6 stitches) : knit according to patterns 1 and 2. Knit 1 time in width on the given loops. Repeat in height from rows 1 to 12. The diagrams show only the front rows; in the purl rows, knit the loops according to the pattern.
“Braid” 3 (for 10 sts) : knit according to pattern 3. Knit 1 time in width on the given loops. In height, perform 1 time from the 1st to the 12th rows. The diagram shows only front rows; in purl rows, knit loops according to the pattern.
Decorative reductions:
- from the right edge - knit 4, then knit the 5th and 6th stitches together, tilting to the left (= slip 1 stitch, purl the next loop, then pull the removed loop through the knitted one);
- from the left edge - purl the last 6th and 5th stitches of the row together.
Knitting density , purl stitch: 14 p. and 21.5 r. = 10 x 10 cm.
DESCRIPTION OF WORK
Back : cast on 86 (92) 98 stitches and knit, distributing the patterns as follows: edge, 4 stitches in stockinette stitch, 19 (22) 25 stitches in purl stitch, 6 stitches in braid 1, 8 stitches in purl stitch , 4 stitches in stockinette stitch, 2 stitches in purl stitch, 4 stitches in stockinette stitch, 8 stitches in purl stitch, 6 stitches in braids 2, 19 (22) 25 stitches in purl stitch, 4 stitches in stockinette stitch, chrome . After 3 (5) 7 cm from the cast-on row, reduce with decorative decreases on both sides for fitting 1 time, 1 p., then in every 8th r. 4 more times, 1 p. = 76 (82) 88 p. After 22 (24) 26 cm from the cast-on row, in the same rhythm and in the same places, add 1 p., knitting them from the broaches. crossed. After that, every 12th r. add 2 more times by 1 p. = 82 (88) 94 p. After 45 (48) 51 cm from the cast-on row, decrease with decorative decreases on both sides for the armholes 1 time by 2 p., then in every 2nd r. 1 time for 2 p., 3 times for 1 p. and in every 4th p. 3 more times, 1 p. In this case, before, respectively. Afterwards, decrease from the edge only in 2 stitches. loops = 62 (68) 74 p. After 20 (22) 24 cm from the beginning of the armholes, close the middle 38 (40) 42 p. for the neck and finish both sides separately. In the next 2nd r. close from the inner edge to round the neck 1 time 3 sts. Close the remaining 9 (11) 13 sts of the shoulder in one row. Finish the second side symmetrically.
Before : start as the back, and also make decreases for the fit and armholes. At a height of 33 (36) 39 cm from the cast-on row, knit on the middle 10 stitches “braid” 3, while from the 1st to the 12th row. perform only 1 time. Then, to form the bevels of the V-shaped neckline, divide the loops in the middle and finish both sides separately (purl loops = edge). For bevel, reduce with decorative decreases 7 times in every 2nd r. and 9 times every 4th r. 1 p each. In this case, before, respectively. after, decrease knit for 2 stitches. satin stitch Start decreases for the armhole at the same height as on the back. After 20 (22) 24 cm from the beginning of the armhole, close 9 (11) 13 stitches of the shoulder from the outer edge and on the remaining 6 stitches from the inner edge, knit another 16 (16.5) 17 cm for the binding with an elastic band. Then close the loops. Finish the second side symmetrically.
Assembly : sew shoulder seams and side seams. Connect the ends of the binding using a loop-to-loop stitch. Sew the trim into the back neckline.
Video master class
The video shows a step-by-step and detailed master class.
Part 1 Gray women's sleeveless vest (vest) knitted (yarn, pattern, back)
Part 2 Formation of a solid knitted armhole in detail
Part 3 All-knit V-neck neckline
Part 4 Processing, fitting