Needlework
05/02/2018 Anastasia Prozheva
Nothing lifts your spirits like juicy oranges. Do you want to place a whole tree on your window? Then you should learn how to make an orange tree from beads; the weaving pattern and master class on assembling the composition will help you create a real masterpiece.
The Birth of Beading
“Busra” is the word used to call beads in ancient times. Translated from Arabic, this word means “fake pearls.” Indeed, the first glass beads looked like pearls. Their creators were the ancient Egyptians, who invented glass. It was cloudy, and the beads were large, heterogeneous and opaque. The ancestor was strikingly different from modern beads. We are used to seeing smooth and bright beads on the shelves of craft stores. The Egyptians strung beads on threads and embroidered clothes. A little later, they came up with the mesh nisannie, which gave impetus to beading. This method made it possible to make crafts and decorations that were found in tombs during excavations. After all, glass is not afraid of the passage of time; its dense structure does not allow the material to decompose.
Later, the secret of producing colored glass was discovered in Europe. It was so closely guarded that Venetian factories were built on separate islands. You could pay with your life for stealing a trade secret. But any secret is revealed over time, so production appeared in Germany, and then in the Czech Republic. Bohemia came up with a special method of melting glass, which made it as transparent as possible. Incredibly bright and durable colors appeared. Czech beads are highly valued; with their help, craftswomen create incredible crafts that are not afraid of either time or unfavorable environments.
Material and tools
It is very easy for novice craftswomen to get confused in the wide range of beads. When choosing it, rely on the following tips:
- To make a beautiful product, do not skimp on the material; give preference to high-quality beads made in the Czech Republic or Japan.
- High-quality material has bright colors and a smooth surface. The inlets are uniform throughout.
- To test the quality of the beads, you need to soak them overnight in a concentrated mixture of laundry detergent and bleach. If the colors do not fade, then the quality is at its best.
- The numbers indicated on the packages are the bead number; the larger it is, the smaller the size of the material.
- The work will require special threads, fishing line, wire and needles. They are purchased according to the size of the beads.
Related article: Elegant things using the Hawaiian quilt technique with your own hands
Weaving technique
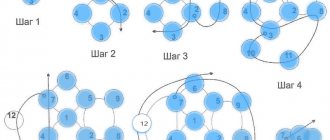
To create an orange tree with your own hands, the loop weaving technique is most often used. It is performed according to the following scheme:
As you can imagine, a small number of beads are placed on a wire and then it is twisted to form a loop. A series of beads are again strung onto the free ends of the wire and twisted into a loop. So, weaving continues until a branch of the required length is obtained.
The crown of an orange tree can be formed in another way. Using French (arc) weaving, you can get very beautiful and realistic leaves. It is performed as follows.
A row of beads is put on the wire, one side is fixed by twisting. This is followed by a larger number of beads, which, when twisted over the first row of wire, form an arc. Depending on the number of arcs, the leaf may turn out to be narrow and long or wide, but more squat.
We weave an orange tree according to MK photo
To make this option, the French weaving technique is used. Leaves are woven on several pieces of wire, which are then combined with each other into branches with orange beaded orange fruits. To make the crown lush and beautiful, you need to create as many branches as possible.
Choose any of the proposed options for yourself, and let your craft turn out to be the best and most similar to the original.
Beaded tree
The beading technique is again at the peak of popularity; most of all, needlewomen like to create jewelry and beaded trees. Once you try to create one composition, you will want to create the next one. The beauty of such a tree is that it will never fade and will delight you with its bright colors every day.
This master class is dedicated to creating an orange tree using the loop weaving technique.
To complete the composition you will need:
- Green beads;
- Large orange beads;
- Beaded wire;
- Glue;
- Construction gypsum;
- Masking tape;
- Decorative elements;
- Acrylic paints;
- Acrylic lacquer.
Cut 80 cm of bead wire, string 3 green beads and an orange bead onto it. The beads will serve as a fixative for the orange. Bypassing the beads, insert both ends of the wire into the hole of the bead. Form three leaves around the fruit using a loop technique. Each loop should consist of 7 beads.
Form the branches with a loop weave, following the steps in the photo.
The tree may turn out different. Regulate their splendor and the number of fruits on the branch yourself.
When all the branches are ready, you need to form a trunk from them. Use thicker wire for the base. Gather branches in random order to form a crown. Wrap the barrel with masking tape.
Related article: DIY paper bell: selection of templates with video
Take a shallow container and cover its surface with cling film. Spread the plaster and “plant” the tree. The plaster sets quickly, so hold the trunk with your hands to prevent it from leaning.
While the base is drying, dilute the plaster with a mixture of PVA glue and water and apply the solution to the trunk and thick branches. Give the bark structure using a wooden stick. After drying, remove the tree from the container, paint the trunk and island with acrylic paints, add decor and varnish the craft.
The orange tree is ready!
Master class “Orange Tree” made from beads
This orange tree tutorial comes with detailed step-by-step instructions so you can easily create this amazing arrangement. The orange tree will look very original and bright. So, let's begin!
To make an unusual and beautiful tree from beads we will need the following materials:
1. For leaves - green beads 100 g. 25-30 pieces of large orange beads - they will be our oranges.
2. Wire 0.3 mm, wire 1 mm (for the barrel).
3. Acrylic paints (watercolors are also suitable), alabaster, PVA glue and acrylic or regular universal varnish.
Orange branches for a beautiful beaded tree.
1. Prepare a thin wire 0.3 mm 80 cm long. String a large bead and 3 green beads into the middle. We pass the end of the wire through a large bead.
2. We put 7 green beads on the long end of the wire and twist them into a loop. We string 7 beads again and also twist them into a loop. We should have three loops around the orange bead.
3. Take the long end of the wire and twist the wire 1 cm, create 2 more such loops. We twist it again by 1 cm. We bend the wire by 3 cm and repeat the same operation - weaving oranges and leaves.
4. Again bend 3 cm in the other direction, but for variety we will make it without the orange bead. So, first we weave one leaf from 7 green beads, then two more and two more. A twig with five leaves should come out.
5. Bend 1 cm on each side and weave a leaf on each side. One orange branch is already ready. This was the first step to creating a beautiful beaded tree.
6. Create two more branches with only leaves with 9 loops. And we screw them with the main orange branch, we get a triple branch. We create two more such branches.
We form a bouquet for a beautiful tree from beads
The orange branches are ready, now you need to combine them into a beautiful beaded tree.
1. Take a thin wire 1 mm and 20 cm long. We collect the branches in the shape of a pyramid. The first at the top, the second a little lower, the third even lower. And we tie them with thread. We make 4 more such branches. There should be five branches in total.
2. We screw all the others to the main branch. Bend the branches in different directions, use your imagination. To thicken the trunk, it is better to use masking tape.
Creating a base for an orange tree from beads
We continue making wood from beads. The bouquet is assembled, now we need to prepare the shape for our tree.
1. As a form, you can use a regular jar of any cream, a cupcake mold, or a disposable plastic container. Cover the prepared form with cling film.
2. We dilute the alabaster with water (one to one) and pour it into the mold where we placed the tree in advance. Let the mold dry, holding the wood for 8-10 minutes.
3. When the alabaster has hardened, carefully remove the wood, pulling it out by the film.
4. Prepare the mixture for the trunk. We will again need alabaster, water and PVA glue (1x1x1). Using a brush, cover the tree trunk with this mixture. Try to do everything carefully, without covering the branches. If you are not sure, it is better to first cover the branches with film or foil.
5. Cover the barrel with brown paint and then varnish. You can paint the base under the tree to your taste, for example, in different shades of green.
The master class was created on November 2, 2010 by Elena Martynova specifically for the Masters Fair. True, now it is all over the Internet, and almost everyone is trying to assign their authorship to it. Now it has been slightly redesigned and more materials have been added to it.