If you want to add exclusive pieces to your jewelry collection, we suggest starting small and gradually creating your own bracelet. To do this, you will need beads, beads, leather scraps, fishing line, memory wire, floss, accessories and other available materials that any woman usually has.
This article contains original master classes and video tutorials: they tell you how to weave bracelets with your own hands and in different ways to make unique jewelry to suit any look. Let's get started!
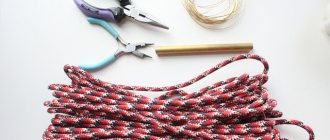
Bracelet made of cord and beads
For work, you can choose beads of any shade: in this example it is contrasting, but the idea with a discreet finish looks no less beautiful.
You will need:
- lace braid made of genuine leather or suede;
- small beads or large beads;
- strong thread to match the lace;
- a thin needle - ideally a special one for leather, but a regular one will do;
- fastener - you can take an unusual button or a beautiful pendant;
- scissors.
Weaving a bracelet from beads will be like this:
- Having folded the lace in half, step back a little from the fold, leaving some free space - this will be a loop for the fastener. Having threaded the needle, start sewing both sections of the lace: after passing the needle through one section, thread the bead, and sew the second. This way the cord will be on both sides of the bead.
- Repeat the first step, going through one side of the lace, the bead and the other side. Do not forget to alternate the pattern if several shades are selected: in our example, the repeat consists of 10 blue and one gold beads.
- Continue sewing until the desired bracelet length is formed. Now cut off one of the free ends of the cord, and tie a bead or put on a pendant on the second. Sew the end so that the clasp does not get lost.
The decoration is ready! Wrap it around your wrist and thread the button or charm through the loop at the other end of the bracelet. You can show off and use it as a basis for a technology lesson at school!
Schemes for weaving bracelets from laces: we analyze male and female options
Woven products, not only bracelets, but also belts for clothes, collars and cuffs, necklaces and headbands, scarves and stoles, bags and clutches, covers for phones and chair seats and much more, consist of knots, the tying technique of which can be easily found in such needlework as macrame. Macrame has its roots in Ancient Egypt, Greece, Iran, Peru and China. People of those times tied stone axes with similar knots and knitted mats. To this day, macrame is popular among both the female and male half of humanity. You will find patterns for weaving bracelets from laces below in the material.
Men, of course, do not wear jewelry, but they can wear a minimalist stylish bracelet made of knitted or leather cords. Women's jewelry is more varied and a woman has to have a large number of them in her wardrobe, matching them with each of her outfits, but in order not to spend your entire budget on beautiful things, you can weave an original bracelet yourself. For a woven bracelet, various materials are used: threads of different composition, incl. and floss, beads, satin and leather ribbons, fabric, knitted and leather laces, and to make the bracelet more attractive, it is recommended to add beads of different sizes and colors.
Selection of schemes
Below is a selection of patterns for weaving bracelets from laces.
1) The most common knot in woven bracelets is the double flat knot.
2) The next weaving option is “Tatting” knots with “picot” air loops along the weaving. Tatting knots are also called left and right loop knots.
Here the tatting knots are woven not on one knotted cord, but on two.
3) The Josephine knot (another name for the bow knot) is another way to weave a lovely bracelet.
4) The Turkish knot or also called the “Turkish head” knot is very popular among lovers of bracelets with interesting patterns.
5) Weaving a variety of braids from 3, 4, 5 and 6 laces does not cause difficulties for beginning craftswomen.
6) A Celtic knot (“Heart” knot) can be woven for the entire bracelet and simply tied at the ends of the laces.
Bracelet made of laces and beads
In the following example, you can consider step-by-step weaving of a bracelet from laces and beads.
You must first measure the size of your wrist with a centimeter and buy a cord 4 times longer than your wrist size, because... you need a reserve for knots, you will also need 9 large beads of different colors and 2 smaller beads for ties.
The color of the cord does not have to be black, the choice depends on desire.
The knot used to weave this bracelet is called a double flat knot.
First of all, you need to cut the cord into three cords of different lengths: one will be short, equal to the length of the wrist, an increase for the fit and size of the beads and bracelet ties; the other two are long, which will be used to weave knots and braid beads. Next, the cords are secured to the tablet or pillow with a pin, retreating a few (7-8) centimeters to the tie, and weaving begins. The laces should be arranged like this: two long ones along the edges of the short one.
1) The knots come first, you need to make 1 or 2 of them, double flat. You need to tie a knot like this: first the left single flat knot is woven, then the right single flat knot is woven underneath it, so you get a double flat knot, so that the knots look even and neat, you need to regularly tighten the short cord that goes inside the knot, so to speak, the base. The photo shows the sequence of weaving the knot:
2) Next, you need to put one large bead on the central lace, and the two outermost long laces wrap around the bead on the sides and again weave 1.5 double flat knots, one full double flat knot and one left or right single flat knot, depending on where was the beginning of the double knot. And again the bead is put on the central cord, and also tied.
3) Work continues in this way until all the beads are woven or until the desired length of the bracelet (wrist size) is reached.
Read this: How to make a hamster from rubber bands: DIY cute rodent
4) At the ends of the bracelet ties, one small bead is placed on any cord on each side.
In order not to have to worry about tying a bracelet every time, you can weave a braid for ties with the same double flat knots. When putting on the bracelet, the ties move apart inside this braid and then tighten again to the size of the hand.
Leather bracelets
Bracelets can be woven from thin or wide leather laces (strips); depending on their color, they can be divided into men's and women's. For example, men prefer leather laces in black, brown, gray, blue colors, but if you add more feminine openwork elements to the weave, then women can also wear such a bracelet.
You can see a men's bracelet made of leather cords below:
But by adding any elements or colors, you can get women's bracelets:
Women's bracelets made of leather laces can be plain, colorful, or with a combination of different materials, incl. beads and metal chains. In most cases, men's bracelets are made only from leather laces.
Video on the topic of the article
The video collection is collected on the described topic; it will help you find a suitable bracelet for weaving and teach you how to create your own bracelet style based on knot weaving patterns.
knittochka.ru
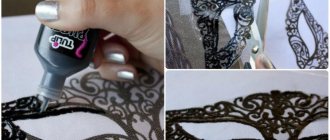
Leather bracelet
To make this popular, stylish bracelet at home, you don't need any special sewing or leather working skills. Decorating here is also not difficult, so even a child or a beginner can master making a leather bracelet!
Prepare a piece of leather measuring 25x5cm. The length may be different: measure your wrist and add another 2-3 cm for the rivet. Round off the cut at the edges, giving the desired shape with scissors, as in our template.
The main highlight of this decoration is the bow. This is what we need to form now. Carefully fold the piece of leather so that neat folds form in the center.
Now you need to secure the folds: to do this, wrap the middle with strong threads in several turns (it is better to use a polyester spool).
Cut a piece of leather measuring 4x1 cm.
Wrap it around the center, masking the thread ring, and sew it on the back side into a ring.
The final touch is to attach a snap to both edges of the bow to turn it into a full leather bracelet.
Thanks to the variety of shades of the material, such a decoration will be appropriate both in a classic toilet and in a trendy look for a friend.
Leather cord bracelet
Regular laces may not seem stylish or “grown-up” enough. In this case, leather that always looks presentable is suitable. Both natural and artificial materials are used.
The classic option is jewelry made from leather in neutral shades - black, brown, gray or white. But if you want a bright accessory, you can use any colors.
Made from denim
We are almost sure that you will find a piece of denim, or at least an old pair of jeans, in your craft supplies. We'll need them to create a boho bracelet - and this is just one of many ways to use textured fabric!
What will be needed in the process:
- jeans, or a scrap of denim;
- strong thread and needle;
- large beads for decoration;
- scissors.
Detailed MK:
Step 1: Measure your wrist circumference and multiply it by two. Add another 3-4 cm of margin: this will be the length of the denim strip that needs to be cut. Width - 3-4 cm.
Now, using a needle, you need to make a fringe along the long sides of the piece, leaving 2-2.5 cm on the fabric.
Trying to maintain the same length of stitches, we sew the fabric in the center, forming several folds.
We string the bead and make the same number of stitches as at the beginning.
Repeat the previous step until we get the desired length of the bracelet.
If you don’t have a fabric strip of the required length, or it runs out at the most inopportune moment, then make another strip of the same dimensions and fray the edges. Carefully sew to the previous one, hiding the seam in the folds, and continue to increase the length to the desired size.
You can finish it in two ways: if your wrist circumference allows, then simply sew the ends together on the front and back sides, or sew a button to the folds.
Using this technique, you can create original jewelry in an almost endless number of designs. Arm yourself with fabric, decorative materials and use your own imagination to help!
Product options and step-by-step knitting process
In stores you can find a variety of carpets for the home. They are made of different materials and have a variety of designs and patterns. There are knitted, cotton, woolen, multi-layer and other rugs on sale that can fit perfectly into any interior style. But handmade products have always been and will be valuable decorative elements that have a unique look.
You can make your own polyester or cotton mat in different shapes. To make it you need to use a hook, knitting needles or other special elements. But in this matter you cannot do without diagrams, templates, photos and knowledge of the basic rules.
Round or oval carpet
To make a round rug, it is recommended to select patterns and patterns for knitting. The process itself looks like this:
- Knitting a braided rug must include stitches.
- To knit the second row, you need to make two stitches from each loop.
- In the third, you need to add columns; they are increased through one loop.
- Next, add 2 loops and knit every two columns.
- In subsequent rows, the number of skipped loops increases.
For beginners, it is best to focus on the diagram. It is simple and understandable.
Making an oval rug is also not difficult. But in the end you can get a neat product with bright and beautiful patterns. The entire knitting process can be divided into several stages:
- to create a column of the required height using a hook or knitting needles, a series of air loops is cast on;
- then columns are knitted along the length of the chain of air loops;
- Posts are made at the ends, which will eventually be connected in one loop.
Round or oval rugs will fit perfectly into the living room or bedroom. They can be placed near the sofa, bed or armchairs. The soft surface and unusual pattern will bring warmth and comfort to the room.
Rectangular rug
Polyester, polyester, or cotton thread can be used as yarn for a rectangular rug. Laces should be used in different colors; it is better to combine them: purple with white, blue with pink, yellow with green.
The product is knitted step by step:
- A row of double crochets is knitted. After this, the work is turned over.
- Then a row of single crochets is made, the hook is placed under the front side of the loop. Everything is turning upside down.
- The third one is knitted in the same way as the second one. But the hook must be placed under both sides of the loop.
- The fourth is done in the same way as the second.
- The last row is made from double crochets under the far wall of the loop.
A rectangular rug is considered a universal product that can complement any room. You can create rugs of different sizes, which are laid out in the hallway, on the balcony, in the kitchen, in the hall.
Large rug: Tunisian knitting
The knitting of a Tunisian rug is simple, so you can easily reproduce it yourself. It is recommended to use thick woolen rope for the product; it will make the lace rug voluminous, soft and cozy. The carpet is created from individual fragments, which can be made from yarn of different colors. Then the flaps are stitched together. Step-by-step instruction:
- For knitting, it is recommended to use a long hook; use it to create a chain.
- Long loops are knitted from the air loops of the first row.
- All even-numbered rows must be fastened with the hook hooked to the working thread, which is passed through all the loops of the row.
A large Tunisian carpet looks rich and luxurious. Many people will not believe that you made this product yourself if there are patterns and designs of different colors on its surface. The main thing is to understand the knitting method and choose suitable patterns.
Multi-layer mat
To create multi-layer carpets, any type of cord is suitable - cotton, polyester, polypropylene. The products are knitted from several layers, for which yarn of different colors can be used.
Various patterns are made on the surface of the carpet - round, triangular, square, diamond-shaped, pentagonal and others. If you combine them, you will get a beautiful and unusual rug for the hallway or bedroom.
Different techniques can be used to knit a multi-layer rug. The main thing is to find the necessary diagrams and templates. A suitable method would be Spanish knitting. It will help you get a voluminous and beautiful product. But it is still quite difficult and requires experience.
Openwork rug
If desired, you can use a hook to make an openwork carpet from polyester cord with beautiful patterns and frills. Diagrams and templates with a detailed description of the process will help in this matter. Knitting is similar to the oval rug technology, but there are still some distinctive features.
There are many master classes on the Internet with videos and pictures that will help you create openwork carpets of different sizes. It is advisable to use multi-colored yarn: this will give the knitted product brightness and richness.
Knitting cord floor rugs is a fun and exciting process that allows you to relax and take a break from everyday activities and problems. If you have long had an interesting idea and want to make your own knitted rug for a cat, flower stand or bedroom, living room, hallway, then be sure to consider the options and technologies for making products from cord.
Paper beads
This idea of making beads can be called universal, because on its basis elements of any color and size are obtained, from which jewelry is made to suit any style and image. Any paper is used: colored, cardboard, glossy magazine sheets and even postcards.
First, the sheet needs to be cut into strips 22 cm long and approximately 1.2 cm wide. Please note: on one side the width of the strip will be 1.2 cm, but it needs to be narrowed along the entire length towards the center to form an elongated triangle, as in the diagram .
Take a toothpick and roll a strip of paper around it, starting from the wide edge. To keep the paper bead in shape, secure the last couple of centimeters of the strip with glue.
We also advise you to lubricate the entire surface of the finished bead with glue: PVA will increase its strength. While the glue layer dries, the paper beads can be decorated with sparkles.
That's all, actually. All that remains is to let the beads dry and collect them on a thread or elastic band.
This craft is well complemented by metal and plastic pendants and large beads: experiment, and the result will pleasantly surprise you!
Knot diagram for a men's paracord bracelet
The “Cross” pattern looks very cool in laconic men’s jewelry, and it’s quite quick and very easy to make. Prepare two colors of paracord and a clasp, and below we will tell you how to weave a bracelet from laces for men.
Weaving process:
- fold the dark cord in half, thread a loop through the clasp ring and pull the free ends of the cord through it, fixing it on a metal base; do the same with the second dark cord;
- Place turquoise paracord as shown in the photo;
- tie a simple knot with the outer dark sections, thereby securing the contrasting lace;
- twist the turquoise paracord and lower its ends down and tie another knot with a dark cord;
- bring up the light sections;
- tie a simple knot with dark paracord, check whether the light cord is evenly tensioned - you need to adjust the tension immediately.
Then the steps are repeated.
In the photo you can see how a cool hiking bracelet made of rope will look from the front side, and below from the back side.
You need to knit until the desired length is reached. You can make a paracord decoration as a gift for a loved one or a boy you know - we’re sure every guy will like it!
A slip knot would be a great finish. Here you can watch a video with instructions on how to properly make an original paracord bracelet WITHOUT a fastener, with self-tightening ends - to fasten it, just adjust the free end of the cord. Even loops!
Instructions
We tie a knot in the thread and secure it to the needle cushion with a pin.
We will weave the bauble in the direction to the right, tie two threads into a knot, and leave the outer one. We tighten the resulting knot and move it to the base of our work. In the same way we connect two more threads.
Next, we knit the corners from the remaining threads, moving to the right. The outermost thread is tied in two knots with the rest. Having knitted the first row, we continue to weave the bracelet to the desired length. After finishing weaving, tie all the threads into a knot and trim off the excess with scissors.
Read here: Knitting a shawl: knitting patterns for beginners and descriptions of the most popular patterns (95 photos and videos)
This was the simplest thread weaving technique; once you master it, you can learn how to do straight weaving and even weave bracelets with ornaments and designs.
Currently, anti-evil eye and good luck bracelets made from red thread have become very popular. How to weave a red bracelet? Easily! Use threads of the same, corresponding color, and choose the type of weaving to your taste.
A symbolic decorative element in the form of a castle, star, horseshoe, etc. can be woven into such a bauble.
Wooden bracelet made from ice cream sticks
It is not necessary to use ice cream sticks: wooden medical spatulas will work well for the same purpose.
Below we will tell you how to make a bracelet from such an unusual material:
Step 1. First of all, you need to give the sticks the desired shape: to do this, soak them for half an hour in boiling water. After this time, try to bend our base: if it is flexible enough, then good, but if not, pour boiling water over it again.
Step 2. Carefully remove the sticks and, without waiting for them to cool, place them in a bent state in any cylindrical container, the diameter of which is slightly smaller than your wrist.
Step 3. Your foundations will need about a day to cool and dry completely; if possible, place them in fresh air to speed up the process. When the pieces of wood are completely dry, you can start decorating.
As decorative elements, we use whatever we feel like: we paint, draw hearts, paste them with patterned fabric, wrap them with bright threads, satin ribbon, twine, jute, and whatever is at hand.
The result is very beautiful Indian-style jewelry that is easy to take off and put on thanks to the absence of clasps.
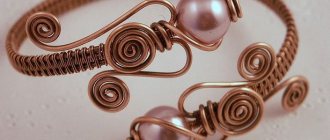
Chang Lu talisman that brings good luck
A mandatory attribute of Chan Lu bracelets is leather cords and natural stones (agate, turquoise, cat's eye, tiger's eye, malachite and others), but no one is stopping you from trying to do the same with artificial beads. A fashionable bracelet is a chain in which two cords are connected by a central strip of stones. Traditionally, good luck charms are made with 2-3 or more girths.
*photo by Elena Goloshtenko
This master class uses tiger eye. The thick bracelet is universal and looks great on both men and women. You can give it as a gift to a teenage girl for her birthday. The main advantage of this decoration is that, if you have the necessary materials, you can easily learn how to assemble it yourself, without a machine or any other devices. Let's get started!
The double bracelet in this example is made in four turns, its length is approximately 80 cm. To make the same, you will need:
- round cord - preferably leather, a little more than 2 m long;
- agate beads with a diameter of 8 mm - 36 pcs;
- tiger eye with a diameter of 8 mm - 36 pcs;
- wooden button with a diameter of 1.5-2 mm - 1 piece;
- three yellow metal pendants and rings for them;
- durable nylon thread matching the cord;
- needle, pliers, scissors.
When choosing a needle, consider the size of the holes in the beads.
Advice: the cord should be smooth, with a round cross-section. Suede is not suitable - it deforms too easily.
Step-by-step process for making a bracelet:
- Fold the cord in half and thread each tail through the button holes on the front side. Pull the button all the way through and tie a knot, fixing the fastener element in one place. Do not tighten the knot too much, it is not adjustable!
- We cut off 5-6 meters of nylon thread. It is better to calculate the length with a margin - it is not very convenient to work with, but it will be enough for the entire length of the bracelet. Fold the thread in half, tie a knot and place it in the one that was used to secure the button.
Now you can tighten it more tightly, and for reliability, drop a little glue-moment - this way it will definitely not come undone.
- We trace the top leather cord with a needle, string a tiger eye bead and trace the bottom one. We return to the original position through the same bead.
In this way we increase the length of the bracelet: 18 beads are enough for one circumference around the wrist.
Then you need to change them: take agate instead of the tiger’s eye, and sew on 18 beads again. And we repeat again: 18 tiger eye beads, and 18 agate beads.
- When all the beads are sewn, you need to tie the same knot as at the very beginning, and also hide the nylon thread inside it. We cut off the remaining thread at the knot itself, and glue the ends if necessary. Since we already have part of the fastener in the form of a button, all that remains is to make a fastening for it by tying a couple of knots from the remnants of the cord.
Cut off the ends of the cord.
If desired, you can attach various pendants: to do this, open the connecting ring on the pendant, hook it to the cord in the right place and close it using pliers.
That's all, you can wear the amulet! He gives to everyone “according to their needs,” depending on what the owner needs. Whether it's love, friendship, or good luck in business - homemade Chan Lu will be your assistant in any endeavor!
In our previous article we wrote how to make a shamballa bracelet>> Go and watch the free master class. There are some very interesting ideas there.