Home » Trees » Beaded wisteria: master class and patterns for beginners
Trees
Irina Vyshivaikina 06/21/2019
1
When you look at this incredibly beautiful tree, it’s impossible to even imagine that skilled needlewomen can replicate it using beads. Photos of beaded wisteria fascinate and inspire many. But to create such a masterpiece, you don’t have to study for many years; it’s enough to know the basics and have a lot of patience.
In this article we will show a master class on weaving wisteria from beads. Detailed step-by-step instructions will help you make this miracle tree from beads even for those who have only recently become acquainted with this amazing material. Be inspired by the products of experienced craftswomen and quickly grab all the necessary tools - soon your home will be decorated with this magical tree.
Description of the plant
The name itself speaks of a very proud tree; even those who do not know what it looks like immediately imagine a slender and graceful plant.
Wisteria is also called Chinese wisteria and is a very beautiful climbing plant. It is not entirely suitable for maintaining a house, but experienced gardeners, with proper care, can decorate an apartment with it. The leaves are light green in color and have an oblong shape, pointed at the end. The flowers are collected in racemose inflorescences - this gives a large volume to the tree and it looks lush and neat.
Has delicate colors:
- blue;
- lilac;
- white;
- pink.
This plant is conventionally divided into several types:
- Chinese wisteria is one of the most spectacular vines, reaching its peak of beauty during flowering. The look is complemented by variegated foliage, which turns golden orange in the fall;
- wisteria profusely flowering - similar to the previous species, differences in the size of flowers and leaves. The inflorescences reach 50 cm, and the leaves are larger than those of the Chinese one. But despite all this, the overall size of the tree is smaller;
- beautiful wisteria - white flowers, pubescent shoots. There are subspecies with double flowers;
- bush wisteria - reaches a height of about 12 meters, the branches are pubescent, the flowers are violet-blue.
Knowing all this information, you can choose the tree that best suits your interior. Blue beaded wisteria will look very impressive on the windowsill.
Wisteria brushes
You need to form delicate tassels from beads according to the following instructions:
- Take a wire whose width is 0.3 mm. The cut should be 1 m long. String 6 lilac beads on it so that they are in the center. Twist the wire to form an oval of beads.
- Continue working on one side of the cut. First, make 2 loops of lilac beads, 7 each. for each oval.
- Next you need to make 2 loops, following the color sequence in them (3 beads of each color): hot pink, lilac, hot pink.
- Then collect loops containing 10 bright pink beads. Make 2 of these petals.
- Create 2 loops of 12 beads in different shades of pink. Alternate colors 4 pcs.
- The next 2 petals should contain only 12 beads of a soft pink shade.
- Complete the composition with a pair of white loops. To make each you need 13 beads.
- Fill the other end of the wire with a similar sequence of loops.
- Twist both parts of the brush together. Arrange the petals so that they are facing towards the top. Bend their ends slightly to the sides.
- To get wisteria, you need 32 pieces of such blanks.
Leaves
The foliage of the wisteria tree must be woven using green beads, according to the instructions:
- Use 0.4 mm wire. String 10 beads onto it, forming leaves from this amount using twisting, similar to the elements of a brush.
- The leaf is formed from one loop at the top and five on each side. There will be 11 ovals in total.
- Connect the sides of the wire to each other. You will need 32 blanks.
Assembly of branches
This process is not difficult, take a wire 1 mm thick, a thread for winding and get to work:
- Twist the bunch and the wisteria leaf together. Do this with all the preparations.
- Then, connect the 2 branches with wire. To hide unsightly metal, wrap them with thread.
- From this pair, make an indent of 1 cm and secure 1 more workpiece. Only 6 branches should have a common trunk. Do the same with the remaining parts. Attach 2 more small pieces to the fifth one.
Forming a trunk
The trunk of a beaded wisteria tree is formed by twisting the previously obtained branches; they need to be collected in this order:
- The top is 2 branches connected with 3 mm wire. Wrap them with thicker thread.
- Attach another branch below. Rewind that too.
- Attach a branch of 8 blanks, having previously made a winding.
- The last part needs to be wrapped with a thick thread and attached with wire just below the previous one.
As the wisteria blanks are connected, a trunk is formed, which must be hidden under the winding, forming a single structure by twisting. Direct the branches in different directions to make the beaded tree look beautiful.
- Uterine fibroids - what kind of tumor it is: symptoms and treatment
- Carrot salad for the winter: recipes
- Salad with beans and croutons: recipes
Assembly and installation of wood
Start installing the resulting decorative wisteria from beads by forming a stand. To do this, cut the bottom of the plastic bottle so that the resulting saucer is not too deep. Carry out the assembly process based on the following steps:
- Pour a mixture of glue and alabaster, taken in equal proportions, into a plastic saucer.
- To ensure that the beaded tree holds well, form small support roots directed in different directions.
- Insert the craft into the base. Wait for the mixture of glue and alabaster to dry completely.
- Start painting. First, carefully apply the paint to the branches. When the parts are dry, wrap them in foil so as not to get dirty when working with the barrel.
- Paint the base of the tree using several layers of watercolor or gouache mixed with PVA so that the color does not turn out transparent. After the dye has dried, the wisteria tree will be ready.
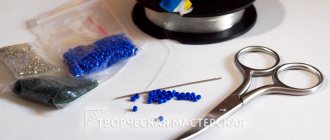
Required tools and materials
All materials can be easily found in stores; you don’t have to look for the right tools for a long time. This is precisely why beadwork attracts many creative people - accessibility and simplicity.
To start making beaded wisteria, you will need the following materials:
- beads;
- wire or thread;
- floral tape;
- PVA glue;
- dye;
- decorative varnish;
- gypsum;
- pot or flowerpot.
Video with a master class on weaving wisteria from beads
- The author of the video gives a detailed lesson with a master class on creating wisteria from beads. The weaving technique, the arrangement of branches and the design of the trunk and stand are painted in such detail that even for beginners the work will not be difficult.
- White wisteria looks sophisticated, but it is easy to weave if you watch all the steps with an explanation in the video. You can weave snowflakes from white beads for a festive mood.
- The original composition, the center of which is two-color wisteria, will decorate any interior. Try other beading patterns, such as creating your own beaded dog.
Share your opinion on how beautiful the wisteria tree looks in the interior. Do you like the idea of beading?
How to do it right?
Brushes
Making wisteria from beads with your own hands is not at all difficult, the main thing is to follow a proven algorithm:
- take a meter of wire;
- insert 6 beads of the desired color and make a loop;
- on one side also make 2 loops of 7 beads of the same color;
- the next loops are the same, but similar in color to make the beaded wisteria tree as similar as possible to the real one;
- in total you need 12-13 stitches close in tone;
- twist the second side of the wire in the same way and create identical loops opposite each other;
- To completely weave wisteria from beads, you will need 32 of these tassels.
Photo source: https://melodiabisera.ru/wa-data/public/blog/img/melodiabisera-9.jpg
This is the longest stage, but the wisteria beading is soothing and peaceful. Many people make jewelry making not only their hobby, but also their income.
Leaves
Let's start creating green leaves that will complement the image and give naturalness to our tree.
For foliage, also use several shades of green and follow the pattern:
- take a 25 cm wire;
- string one light-colored bead;
- with the second tip of the wire, pass through the bead in the opposite direction - parallel weaving technique;
- increase the number of beads in each row;
- Having reached the middle, do the opposite - reduce the beads in each row;
- You should get a diamond of different shades of green.
Branches
To form beaded wisteria branches, follow the diagram:
- connect flowers with thread;
- make an indent of 1 cm;
- add leaves and also attach them with thread;
- form branches from all the prepared flowers and leaves.
Photo source: https://static.biserok.org/wp-content/uploads/2010/07/bonsaj-iz-bisera-.jpg
Shaping the trunk
You are already approaching the final stages, you can look at a photo of a beaded wisteria tree to see how it should look in the end.
All that remains is to collect all the parts and form the trunk with your own hands for the wisteria tree from beads:
- connect all the branches together with thick wire;
- form the branches, balancing them on each side so that the beaded wisteria does not fall to one side;
- to create veins and an interesting shape, form a trunk from gypsum on top of the wire;
- according to our master class with step-by-step photos, the beaded wisteria trunk needs to be painted with brown acrylic paint;
- it will not only be aesthetically pleasing, but also durable.
Stand
Be sure to fix the trunk at the base; for this you need to make a stand. A tree made from beads is not at all light; the gypsum trunk adds weight. Therefore, a stand is simply necessary for stability. In the future, it can be hidden in a pot or decorated.
Materials required for weaving
- Beads. To make wisteria, it is best to use small beads; the plant will look more elegant. You need several colors, green for the leaves, several shades of blue and white for making flowers. Flowers can be made from any shades, it all depends on the desire of the artist.
It is best to use Japanese or Czech-made beads in your work. Manufacturers from these countries make the highest quality beads, which are practically free of defects.
Types of beads:
- Ordinary. Standard round or rectangular size beads.
- Chopping. Small short tubes, up to 5 millimeters long.
- Bugles. Long tubes that can reach up to 3 centimeters in length.
- Wire of several sizes. The smallest wire 0.3 mm is suitable for making flowers; larger wire is useful for connecting parts. And sizes of 1 and 3 millimeters are necessary for braiding the trunk and connecting all the compositions.
- Alabaster for the base of the flower.
- Glue.
- Beading thread.
- Jewelry can be beads of various sizes and small stones.
- Pot.
Assembly and installation
After you have collected all the parts, you need to install the tree in a pot or flowerpot:
- make a stand from plaster or cardboard;
- fix at the bottom of the pot;
- fill the pot with solution, cover it with glass pebbles or coffee beans;
- decorate the finished product.
To fill a pot with solution, you need:
- dilute plaster with water;
- follow the instructions on the packaging;
- the solution should resemble the consistency of sour cream;
- add glue to the mixture;
- pour the mixture into the pot;
- place wisteria inside;
- use a brush to fix the trunk;
- If desired, leave room for a pond.
Let's weave together
The weaving pattern of wisteria is not complicated, but it requires attention and perseverance. Let's start with wisteria sprigs.
Step 1
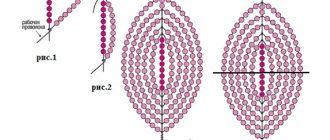
Take the thinnest wire you need - 0.3 mm, about a meter. Place 6 beads on it, slide them into the middle of the wire and twist an oval loop.
Step 2
To the left of this loop you need to make 12 more of the same loops.
You need to pay very close attention to the color scheme. Every 2 loops the number of beads will increase, pay attention to this.
The first two loops of 7 beads are the same color as the central loop (lilac); the second two loops of 9 beads - three each, first pink, then three lilac, then pink again; the third two loops are 10 pink and 4 light pink; the fourth two loops are 4 pink, 4 light pink, then again 4 pink and 4 light pink; and finally two loops of 12 pcs. light pink and 13 white beads. If you do everything exactly as described, you will get a smooth change in color in the inflorescence.
Related article: Men's knitted sweater with patterns and descriptions for beginners with video
Step 3
We weave the right side in the same way. Next, we connect the loops of the left and right sides together by twisting.
Step 4
The loops must be turned upward towards the central loop. As a result, we get this branch:
You need to make 32 similar branches. Now let's move on to the wisteria leaves.
Step 5
For leaves, use a slightly thicker wire - 0.4 mm.
In this case, you can immediately put a lot of beads on the wire and start twisting the loops in the same way as you did for the twigs.
The loops consist of 10 beads and there should be 11 of them. Twist it to make a branch.
There should also be 32 branches with leaves. You can knit the leaves differently (by parallel weaving) and they will look different:
And it is woven like this: take 1 bead, thread the ends of the wire into it from different sides towards each other, then string 2 beads, then three, etc. up to 6-8 in a row, after which you reduce the number of beads one by one. If the leaves are two-colored, then weave light beads one at a time from the edges, and a dark leaf in the middle. And remember, such leaves in wisteria must necessarily look up, and the inflorescences themselves must look down. Let's start assembling the tree.
Step 6
For assembly you will need 1 mm wire. You combine a pair with it: a twig and a leaf, which then needs to be wrapped with a thick thread. After a cm, add 1 more branch, in this way fasten 4 branches.
Step 7
It is necessary to screw two additional branches to the fifth one.
Step 8
Connect all the branches with 3 mm wire. Start at the top - connect two large branches and wrap them with thread. Wrap another branch a little lower and process it again with thread. Wrap the remaining branches (6 and 8 branches) with thread, and attach to the tree first a large branch, then a smaller one. It is advisable to twist the barrel a little.
Related article: Lining fabric: mesh, silk, viscose, etc.
Step 9
It's time to prepare the stand. Cut the bottom off a plastic bottle. Pour the mixture into it: alabaster and PVA glue (1:1). Place your tree in the stand. Wrap foil or place plastic bags around tree branches to prevent staining. Coat the trunk with the solution that was poured into the stand, and make a small depression for the future pond near the tree. Before you leave the tree to dry, you need to decorate the place near the pond, or lay out beads or shells, plant some flower nearby so that it matches the color of your wisteria. You just need to do it in advance, until the alabaster dries.
Then, when the alabaster dries, paint the tree trunk with paint: acrylic, watercolor or gouache. Next, to make the pond itself, you need to take a gel candle, heat it in a water bath and immediately pour it into the recess that you made in advance under the tree. Well, here she is. Take a closer look at how it sparkles in the sun. Isn't this a miracle?
If the leaves are made in parallel weaving, then the tree should look something like this:
French technology
The easiest way to make a flower from beads for beginners is to weave it using the French technique. Later I will tell you how you can weave certain flowers, but now I will give a description of the technique itself so that you understand its essence.
The French technique is bead weaving with arcs, when each element is woven in the form of a kind of boat (from the center to the edges), resulting in a pleasant pattern and the desired volume. If you see a bouquet woven from beads that looks almost lifelike, then most likely it is French beadwork.
French weaving is practically not performed on fishing line - in order for a leaf or flower petal to hold its shape and look elastic and fresh, wire is needed. So, how to weave simple beaded flowers for beginners?