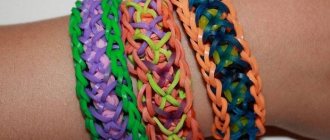
One of the new trends in needlework is weaving from rubber bands on a machine. Admirers are mainly children and teenagers, but adults do not neglect the new technology. With its help, you can weave inexpensive, but bright and stylish accessories - for example, bracelets, keychains, beads and various cartoon characters. Rainbow Loom sets, which include sets of silicone rubber bands and a weaving machine, also played a significant role in such popularity.
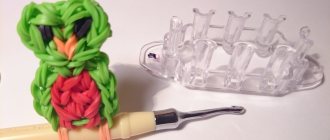
Weaving machine
Machines for weaving with rubber bands are made of coated plastic . Their structure consists of round hollow columns, on one side of which there are holes for crocheting. When choosing a tool, you need to check that it is free from defects and nicks. These shortcomings will significantly reduce the quality of the process.
The machine significantly increases the speed of product production. Often used to make Lum Bands bracelets. Simple patterns can be made with other available tools. But only a machine can handle complex and intricate options.
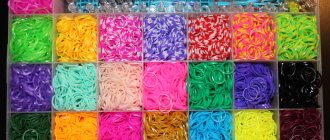
The material for weaving products is silicone rubber bands Loom Bands. They are wildly popular among children and adults.
LiveInternetLiveInternet
Weaving from rubber bands is a new type of handicraft. It appeared quite recently, however, it quickly gained popularity among children and adults.
From small multi-colored rubber bands, which can be easily purchased at a stationery store or where they sell hairpins, you can easily and quickly make beautiful and bright decorations:
- bracelets;
- pendants;
- necklace;
- belts;
- rings, etc.
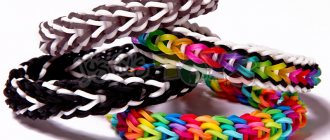
Thanks to a wide range of shades, accessories made from rubber bands are unique, and every needlewoman will be able to find a color scheme to suit her taste.
There are various techniques for weaving rubber bands:
- Weaving on fingers.
- Weaving on a loom or small loom.
- Weaving on a fork.
These techniques involve weaving both simple patterns that even a child can handle, as well as more labor-intensive ones. What is needed for weaving with rubber bands? For weaving, in addition to the elastic bands themselves, you will need the following tools:
- •hook (take a simple crochet hook No. 3-4, it differs from the special one in the size of the head and rounding);
- •weaving machine – can be of various modifications with 2 or more rods for fixing elastic bands;
- •regular table fork;
- • rubber bands, they come in bags and come with a plastic hook, sometimes with a slingshot - this is a small machine, as in the photo below.
The set of tools may vary depending on the chosen technique. On the Internet, it is now easy to find a huge number of master classes on weaving from rubber bands. Many of these lessons are provided with detailed descriptions and video instructions in Russian. Basic weaving pattern
In order to learn how to weave from elastic bands, it is best to start with the simplest basic pattern that does not require special equipment. One such pattern is the chain pattern.
The chain weaving process consists of the following steps:
- We put an elastic band twisted in the shape of a figure eight on the index and middle fingers;
- We do not twist the next elastic band, but simply pull it next to the first one;
- We remove the first elastic band from the fingers, threading it onto the last one;
- We continue in this way until we obtain the product of the required length;
- At the end of the weaving we attach an S-shaped fastener.
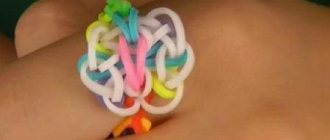
Bracelet made of rubber bands “flower”
This bracelet model is also woven without using a machine. To work you will need:
- pencils – 3 pcs.;
- hook;
- clasp;
- colored elastic bands of green-36, orange-12, pink-24, purple-12 and red-7.
Weaving a bracelet with a flower takes place in two stages:
- Making a flower. We weave 6 petals from orange, pink and purple elastic bands. The weaving of flower petals is based on the “chain” pattern discussed above. We connect the flower petals by stringing them on a red elastic band and securing them with a green one.
- Making the bracelet base. We braid the plait in a fishtail pattern, starting with the first green elastic band of the flower. For this weaving, we put an elastic band twisted in a figure eight on two pencils, and on top we string two more untwisted ones. We remove the first elastic band and stretch it through the last two. We weave in this way until the desired length is reached. We connect the ends of the bracelet and secure them with a clasp.
For more details on the process of making a bracelet with a flower, watch the following video tutorial in Russian.
Bracelet made of rubber bands on the machine
This original decoration is not at all difficult to make. We will need:
- weaving machine;
- hook;
- rubber bands of two or three colors (imagine a bracelet, in what order you want to see it, arrange the rubber bands);
- clasp.
The first step is to decide on the sequence of colors in the drawing. For a sample, arrange the rubber bands in the desired order and refer to it as you work.
- To start weaving, stretch three elastic bands onto adjacent posts of the machine: twist the first elastic band in a figure eight.
- We will put on the next two as is.
- Next, grab the bottom elastic band with your hook and thread it through the other two.
- Then we’ll put on one new rubber band and remove the bottom one in the same way. We will continue this way until the end of the work, and then we will connect the ends of the resulting bracelet using a clasp.
Bracelet made of rubber bands on a fork
The “iris” bracelet is a classic version of weaving on a fork. To work you will need:
- fork;
- elastic bands of all colors of the rainbow;
- thin hook.
- At the beginning of weaving, fold the first elastic band in half and, twisting it in a figure eight, put it on the two central teeth of the fork.
- We pull the next two elastic bands in pairs onto the left and right teeth in the same way.
- Now we remove the initial elastic band, stretching it from above the central loops. To prevent the elastic bands from slipping, we move the entire canvas down along the fork.
- Then we place the elastic band folded in half, but not twisted, on the middle pair of teeth, and remove the previous row on top of it.
Thus, we alternate: elastic band in the center; elastic bands on the sides. For each color we repeat two or more rows.
To complete the weaving of the product, we throw the loops from the outer tines of the fork through the central ones, and then the lower ones through the upper ones. On the remaining 2 loops in the center we put on the last ring folded in half and pull the loops through it. All that remains is to throw one loop over the other and secure the weave with a clasp. The bracelet is ready!
Decoration made from rubber bands "panda"
In addition to bracelets, other accessories are also woven from elastic bands. The following video tutorial explains in detail how to weave a keychain in the shape of a funny toy. Weaving a “panda” keychain requires initial training, so you should take it on after training on simple jewelry.
!!
panda
This article examined a variety of patterns and techniques for weaving products from rubber bands. However, this is only a small part of the whole variety of options. By using different colors and being creative, you can easily master or come up with more complex patterns on your own.
Continuation - What can be made from rubber bands? a lot of videos =>
Those who want to master the technique of weaving three-dimensional objects, we recommend starting with weaving eggs from rubber bands. The article describes and shows different weaving options, both without a machine (on forks) and with it. If you're ready to get started right now, you can find video master classes here.
Don’t know what you can weave with rubber bands? This article with photos and videos will illustrate in detail the different products and options for their creation.
Insects and animals, birds and rings, necklaces and amphibians. How to weave such things and on what: a loom, fingers, without a loom can be easily repeated in the video.
Weaving from rubber bands will be interesting for both teenagers and adult craft lovers. In addition, this hobby is exciting and useful for children, promoting the development of fine motor skills and perseverance.
Happy crafting!!
https://kayu.ru/rukodelie-podelki/pletenie-iz-rezinochek/190-kak-splesti-iz-rezinok-krasivye-braslety-video-foto.html
Terms of use
Weaving on a machine is quite simple. For this process you will need a machine and a crochet hook. The tool selects the number of columns on which to work.
After a certain pattern has been chosen, according to it, elastic bands are placed on the columns, and then removed using a hook and thrown over in a certain order. The actions are simple, the main thing is attention and perseverance.
Photos of crafts made from rubber bands
Read here - Crafts from plastic disks - how to make bright and beautiful decorations for the holidays with your own hands (85 photos)
Did you like the article?
0
From the very beginning
Weaving from rubber bands on a machine for beginners involves using simple patterns. They also determine which machine to use for beginners. Several simple, but at the same time original and stylish options are presented in master classes for beginners.
Simple "Sidewalk" scheme
It is recommended to start weaving from elastic bands on a small machine with the simplest patterns. Only two rows of the machine are taken, and only two columns are used in the weaving process. Determined by the color of the material. For this product you will need elastic bands in two shades: metallic gray and yellow. Then follow the following instructions:
- They work with pairs of rubber bands. The first gray pair is twisted in a figure eight and thrown over two columns.
- The next pair is pulled on top, but yellow. There is no need to twist this and subsequent pairs with a figure eight. Use a hook on the left column to hook a gray double loop, remove it from the column and place it in the middle of the product.
- Throw on the next pair in gray. Use a hook to hook and remove two pairs of lower loops.
- In the future, the process is continued, alternating pairs of rings of corresponding shades to the required length of the bauble.
- The weaving of the product must be completed in the following way. The last pair should be gray. On the side on which two loops have formed on the post, pry up the bottom one and remove it. Then the loops are transferred from the left pin to the right double loop. A clip fastener is attached to the resulting quadruple loop and the first loop at the other end of the product. Weaving the bracelet using the “sidewalk” technology is completed.
Small tool
This type of bracelet can also be woven on a small machine. To do this you need to use only two columns.
We pull the first twisted elastic band onto the pegs. We put the next flat Rainbow Loom on the same posts.
To work, remove from one column of the bottom row to the center of the work. We put on an elastic band of a different color for easier work. The weave stands on the post where three rows appeared: remove the bottom two and transfer the center. We braid the bracelet to the desired length. To finish the product from the post, where there are 2 loops left, we transfer the bottom one to the center, and connect the remaining two with a clasp, after which we connect it to the beginning of the product.
Related article: DIY macrame flower pots: how to knit, master class with photos
Bauble “Mermaid Braid”
This product can be woven on just two columns of the machine. Despite the easy process, the end result is a pretty impressive bracelet. The material is used in two colors. In this case, you will need 60 yellow and 60 black rings.
- The first black elastic band is placed over the columns, twisted in a figure eight. I put the yellow ring on the right side, twisting it in half. Another black element is put on top without twisting.
- On the right column, pull the double yellow loop with a hook, grab the bottom black one and remove it.
- A similar procedure is performed on the left column, only the double bottom loop is removed.
- The steps are repeated until the product of the required length is obtained.
- Finally, throw one black elastic band over two columns and remove all the loops from the right and left columns. Next, from the left pin the black loop is transferred to the right one.
- A clip is put on the double elastic band and connected to the opposite end of the bracelet.
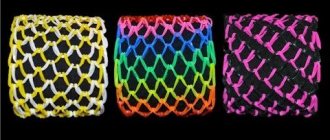
Rainbow "Dragon Scale"
Making this bracelet made from large rubber bands does not require any special tools: a couple of forks, a piece of tape and standard plastic clips will suffice. You will also need different colored rubber bands: 13 purple, 16 blue, 12 light blue, 16 green, 12 yellow, 16 orange, 12 pink and 16 red - a complete rainbow.
Before starting work, secure the forks with tape in two places, as shown in our example. This design will replace a huge machine for us.
The scheme will be like this:
1. We start weaving with red ones. The first row consists of four elastic bands placed in a figure eight over the 1-2, 3-4, 5-6 and 7-8 tines of the forks.
2. In the second row, we put pink elastic bands on 2-3, 4-5 and 6-7 teeth, without twisting .
3. We hook the red elastic bands of the first row on all the prongs, except for the side ones (there is simply nothing to fix on them), and transfer them to the back side of the forks. You should get it like in the photo.
4. Without twisting, we put four orange elastic bands on 1-2, 3-4, 5-6 and 7-8 cloves. Now you will need a toothpick or a hook, but with proper skill you can continue with your hands.
5. We hook the elastic bands from each tooth and put them on the reverse side as shown in the photo.
6. Introduce a new color - yellow. In this row there will be three elastic bands on 2-3, 4-5 and 6-7 teeth.
7. Repeat step No. 3, throwing all the loops, except the side ones, over the tines of the forks.
The principle of operation is maintained throughout the entire weaving. The bottom line is that you need to repeat steps No. 4-5-6-7, alternating the selected colors : when you throw on 4 elastic bands, then throw the loops from all the teeth back, and when you throw on 3, then from the 2nd to the 7th clove, i.e. except for the extreme ones.
In this way we weave to the desired length, not forgetting to check the size: for the pattern to look good, the rainbow dragon scales should be slightly stretched.
When the weaving is finished, it’s time to fasten. To connect both parts of the bracelet you will need four S-shaped clips. Slide all the loops on the forks to the very bottom.
There are two loops for each clip: alternately fix the loops with 1-2, 3-4, 5-6 and 7-8 teeth on the fasteners, and carefully pull them off the forks. Don't worry: the weave will not unravel, as the clips hold it securely.
On the back of the bracelet you need to find the red elastic bands that we used to weave the first row. In the same way, we attach two loops to the second edge of the clip.
Dragon scales are ready! If the description did not seem detailed enough to you, we recommend watching the video from the author:
Weaving patterns on the machine
On the Internet there are quite a lot of options for weaving bracelets from rubber bands using simple patterns. Since using the machine you can easily create extraordinary masterpieces, we will consider several such models and step-by-step instructions for their manufacture.
"Star" for experienced
Before weaving rubber band bracelets using the “Star” technology on a machine, you need to decide on the design. The colors of the rubber bands are selected for both the stars and the rim. The main rule: the colors of the figures must be correctly combined so that the product does not look tasteless.
We prepare the machine, which is assembled from three rows of 13 columns. The middle row is shifted by one pin relative to the outer rows:
- 26 yellow rings are prepared, which will act as the rim of the product. Throw the elements onto the columns, starting from the middle row. They continue to put them on around the perimeter of the front one, without using the last column. The last ring is put on the penultimate row of the front row and the penultimate middle row. As a result, a total of 13 rubber bands were worn.
- Return to the first column and add 13 more rubber bands in a symmetrical order. In this case, the outermost row of the machine is used.
- Move on to weaving stars. For one such element you will need 6 rings. The center of the star is determined by the second column of the middle row. The pins that surround it form a hexagon. Alternately place elastic bands on the central column and one of the hexagons.
- Rubber bands of a different color will form the next star, the center of which will be the fourth pin of the middle row. The rings should be tightened in the same way as described in the previous paragraph. Then they continue to form the remaining four stars, the center of which will be the sixth, eighth, tenth and twelfth column.
- At the next stage, take yellow elastic bands, twist them in half and put them on the leftmost column of the middle row, and then on all the centers of the stars.
- Then the machine is turned over so that there are two free end posts in front.
- Begin to remove the rings in the following way. From the first pin, using a hook that is inserted inside, a ring is pulled out, forming a star, and put on its center. Then the elastic bands are removed from the center and put on the elements that make up the hexagon. The procedure is repeated with other stars. All actions are performed counterclockwise.
- They return to the yellow elastic bands that were worn at the very beginning. Using a hook, pull out the ring and put it on the adjacent column. In this way, all elements pass one by one along the perimeter of the machine.
- At the final stage, take a yellow elastic band, grab it with a hook and thread it through all the loops of the first column, fold it in half and put a clip on it. After this, carefully remove the product from the machine.
Original decoration
The most convenient of all the machines is the Monster Tail. Thanks to this type, it is possible to weave not only various complex patterns of wide bracelets from rubber bands, but also weaving toys. Making decorations on this type is very simple. What can you weave? Anything, for example, a “Dragon Scale” bracelet, but some craftswomen even managed to weave a dress. This type of bracelet stands out for its originality and uniqueness, and since it requires materials of different colors, it can fit perfectly into any style. This article shows the step-by-step weaving process with photos.
Related article: Learning to crochet from scratch using patterns with videos and photos
We prepare tools and materials: select elastic bands of suitable colors, install attachments on the left side. We twist the first elastic band in the shape of a figure eight and fasten the third and fourth columns. Next, we gradually tighten the elastic bands, turning over and covering the pegs in a given chronology - the fifth and sixth, the seventh and eighth, then the next pair. If there is an intention to make the decoration wider, the number of irises should be taken more.
We fasten the columns that take part in the weaving: we tighten the elastic bands, turning them over in this chronology - from 4 to 5, from 6 to 7 and so on until 11.
To make it easier, it is advisable to use a hook or fingers. Let's move on to weaving: there will be two layers on the nozzles, you need to work with the lower ones, throwing them to the center. We recreate this sequence until the end of the row; at the end there should be 1 loop left on each column. We put on the 3rd row, just like the first, but there is one difference - these and further elastic bands should not be turned over. We do the work, and there should be one iris left. We weave an accessory of the required length.
To prevent the bracelet from unraveling, you need to finish it correctly: remove the bottom elastic bands, leaving one iris elastic band on the posts. Then we pull the elastic band from the outer column to the previous one and repeat this with all the elastic bands. We attach fasteners to each resulting loop. From the other end of the product, take two loops along the edges and attach them to the side hooks. We also fasten the middle elastic bands with fasteners. In this way we will make a wide decoration.
Fishtail bracelet pattern on fingers
- Place a figure eight rubber band on your fingers.
- Add 2 more elastic bands, you should have 3 figure eights on your fingers.
- Swap the middle and bottom elastic bands without removing them.
- Throw it into the center.
- Put on the next elastic without twisting it.
- Throw the bottom elastic band into the middle.
- Repeat these steps until you reach your desired bracelet size.
I recommend watching the video: how to weave a fishtail rubber band bracelet on your fingers!