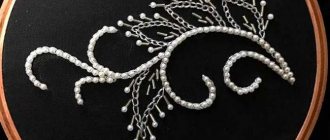
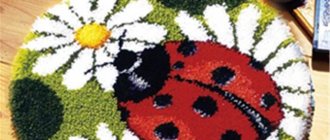
Round frame
Just like the methods of cutting gemstones, the shape of cabochons is also varied. In order to braid a round stone with beads, you will need the following materials and tools:
- round cabochon, diameter 20 mm;
- Czech beads No. 10 in two colors, corresponding to the cabochon, one of which must be transparent;
- Chinese beads No. 7;
- felt of the same color as the cabochon;
- skin fragment;
- scissors;
- needle and thread;
- glue "Moment";
- cardboard
The first step of the master class will be gluing the cabochon onto the front part of the felt.
The second stage is the beginning of braiding the stone. For the first row, Czech opaque beads are used. The needle is passed from the back of the felt to the front side, near the edge of the cabochon, while 2 beads are strung.
The needle is inserted into the face of the felt at a distance to accommodate the two strung beads, thereby firmly attaching them to the felt and the edge of the cabochon. The needle is brought back between two sewn beads, threaded through one of them - counterclockwise, after which two beads are again strung on the needle and the actions are repeated around the entire circle of the stone.
To be used in a mosaic pattern, the number of beads in the first row of the braid must be an even number. You need to compact the row of beads by passing the needle and thread through them again.
The third stage is the second row of braiding. This row is made with the same beads. Having threaded the needle through the first bead of the first row, you need to string 1 bead, pull the needle through the bead from the already connected first row, and then tighten the thread. All beads of the second row will be attached through one bead of the first row throughout the work of the third stage.
Related article: How to weave bead bracelets for beginners: easy tutorials with photos and videos
The fourth step is braiding the third row of transparent Czech beads. This series is performed similarly to the actions in the third stage.
The third row is also compacted by repeatedly threading the thread through it.
The fifth stage of work will be adding two more rows external to the cabochon: the first one is made of Chinese beads, the second one is made of Czech opaque beads. They are embroidered using the method from the first step.
For the sixth step, you need to cut out a cabochon braided with beads on felt, make a piece similar to the decoration out of cardboard, shortening the edge of the cardboard by 5 mm, and glue it to the wrong side of the main part.
After this, the cardboard is smeared with glue and a piece of leather is glued to it on the wrong side, the excess of which is removed after the glue dries.
The seventh step is to seal the edge where the felt and leather are glued together. The needle is inserted between the felt and the leather and brought out between the beads of the last row on the decoration.
You need to string transparent Czech beads, one bead at a time. The thread needs to be passed around the edge of the decoration from its front part to the leather front part, after which the needle is threaded through the previous bead already sewn. These actions are carried out until the end of the circle.
The finished product looks like this:
What materials are needed
To cover stone according to all the rules, in order to end up with a beautiful product, you will need to purchase a number of tools and materials. All of them must be of good quality and match each other.
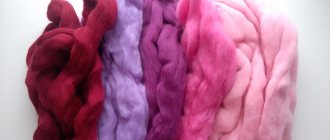
- Felt . Used as a base on which the stone is glued. Beading also begins from here. You need to choose a dense material that will have a neutral color or match the color of the product. If you use material of the wrong color, it will spoil the appearance of the finished craft, since it will be slightly visible . It is best to choose felt that is sold in sheets rather than in sets. This will allow you to feel the material and personally evaluate its density before purchasing. The heavier the cabochon that is braided is, the denser the base for it should be.
- Cabochon . A wide range of stones is presented in handicraft stores and those selling products for designer jewelry. It is better for a beginning needlewoman to choose a stone of the correct shape in order to master all the cladding techniques without difficulty. The complex shape of the cabochon requires certain skills in working with beads, the ability to independently edit and adjust the weaving pattern.
- Needle . Only bead needles are used that are suitable in size to the number of beads selected for sewing. They will also easily pass through the base, which will avoid unnecessary damage to it, which reduces the strength of the finished product.
- A thread . Beads require a thin and strong thread. The best option would be nylon . There are also special threads for beading on sale. You should not choose a fishing line for this purpose, as it is too slippery and the structure may not be durable.
- Beads of two sizes 11 and 15 when braided using the “snake” technique . Japanese is considered the best. It is expensive, but the price is fully justified by the quality. Czech products take second place. When braiding, it is important that all the beads are the same size, so you should buy only calibrated material. Braiding is done only with round beads. Chopping and glass beads are not suitable for this type of work. You can read everything about beads and manufacturers here.
- Scissors . Required for cutting threads and for cutting sheathed stone from the base. The tool must be very sharp along the entire length of the blades. It is most convenient to use small scissors with slightly curved blades, like manicure scissors. They will allow you to easily trim the felt so that there are no areas left that are not sewn up with beads.
- Glue . Required to connect the cabochon to the base. You should choose “Moment”, “Crystal” or any other transparent superglue. It should be moderately thick in order to minimize the risk of uncontrolled spreading when used, which can lead to damage to the stone, as well as to impregnation of the base with glue in places where it is not required.
Editorial Voice
Matryona
Fan of embroidery and sewing
Ask a Question
For convenience when working, you need to have an organizer for beads. It is best to use special jars with screw-on lids. When the work is finished, the remaining material will be securely stored in them and will not crumble accidentally.
Working on a two-sided version
If the first case is quite popular for novice masters of this type of work, then the second case is suitable for more experienced lovers of homemade accessories.
For double-sided beading, you will need the following tools and materials:
- Czech beads No. 11;
- Czech beads No. 15;
- round bier No. 11;
- needle and thread;
- double-sided cabochon.
The work must be constantly tried on the cabochon as it is weaving. The first row is strung on the thread in the usual manner in one layer, while the ring is closed with a knot, both edges of the thread remain: one for one side of the braid, the other for the opposite.
Related article: Weaving a tea cup and saucer from newspapers
After this, you need to weave the second row on one side and the other in a mosaic manner, threading the thread through the bead of the first row, stringing one bead each time.
In the same way we make another row on each side. The work should fit tightly to the stone.
The next two rows are made in the same way using smaller beads.
The next row is made of beads No. 15 - 2 beads are strung, first between the beads of the previous row, and then between three, repeating the steps in a circle.
The third type of bead is strung through two beads two rows earlier to fill in the empty spaces.
A set of five beads are attached to the tops of the second bead used.
The top is decorated with the first beads used, placing one bead between the tops of the previous row.
The second side must be completed in the same way.
Both methods of cabochon braiding can be considered in more detail in the videos offered at the end of the article.
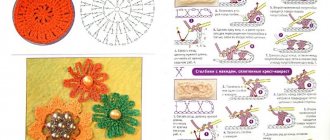
Weaving beads
This master class will look at a fairly simple method by which you can make beads from seed beads and subsequently turn them into luxurious beads.
Prepare:
- honey-colored beads (use glass material for a spectacular look);
- small caliber gray beads;
- beads: lilac, violet and golden tones.
- We string five honey and gray beads onto a needle and thread, using alternating shades.
We form a ring and make a couple of knots.
We pass through a honey-colored bead, string two lilac ones, one gray one, and again a couple of lilac ones. We pass the thread again into the honey-colored bead and form a petal.
In order to make another, the same detail, we make a similar low from two lilac beads, one gray and two lilac. Next, we thread the thread into the honey-colored material on the main ring.
Read
Studying different patterns and options for weaving bead chains
We get two petal-shaped details on honey beads.
We go to the next one and form the petals in a circle in the same way. In total we make 10 similar parts, two for each bead.
We draw a thread from gray beads in one of the petals, string golden-colored beads and thread a needle with gray beads into the petal next in the circle. Then put the gold beads back into the bead of the adjacent petal and repeat this set. As a result, we get 5 gold tone beads among the five. The thread is drawn from the initial gray thread.
We tighten the thread, forming a ring. We pass the needle through the bead and the bead, and drop two purple-colored pieces into the initial ring. Here you need to go to the second thread and make several knots.
We insert the thread into the gray material in the second ring of petals and do similar manipulations described above. We tighten the braiding and then go through the beads and beads. Then we go down to the bottom and go through a large ring. These steps will help you better perform the tightening process and make several knots.
At the next stage, you can connect the purple beads on both sides. To do this, bring the thread out so that it comes out to the side in the middle of the braided bead, as in the photo:
We string purple material, purple, purple again and draw the thread into two purple pieces in the second ring of petals. Then you need to go through the gold material, turn one hundred and eighty degrees into two beads of a lilac tone, pick up one of the same beads, one violet, lilac, go through two lilac, a gray bead ring, turn into 2 lilac and so on, going around the entire product with a sine wave. We make turns alternately in gold and gray material.
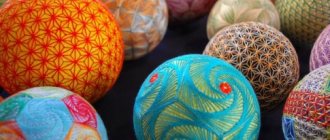
All that remains is to fix the thread, our beaded bead is ready.
Features in the frame
Cabochons can be round, oval, triangular, diamond-shaped, with jagged edges or double-sided, and their braiding is also made in different patterns.
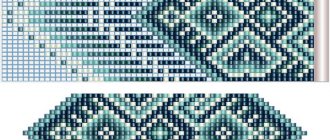
Cabochon weaving can be a checkerboard pattern, a basket pattern, a snake pattern, a flower pattern and many others. The braiding patterns can be found below:
Video MK braiding the “Sea wave” cabochon. Lesson #1
How to braid a cabochon or any other oval stone with beads?
In this lesson we will learn how to do this in 3 steps:
The first step is to create a cup for the cabochon. The cup is a ring of beads that surrounds the cabochon; it is woven using the mosaic weaving technique with beads of two sizes.
The second step is to weave “teeth” around the cabochon; they serve as a decorative element of the pendant. These are several rows of beads woven using the herringbone or Ndebele technique.
The third step is to complete the braiding of the cabochon; we add rows and thus increase the “teeth”. Additionally, we include blue beads for contrast. And fill the gaps between the “teeth” with beads of a contrasting color.
These steps will give the cabochon a complete and impressive look.
Final stage
21. Gradually cut off the felt from our necklace. You can leave no more than 0.5 mm.
22. To stiffen the necklace and cover the knots, glue one or two sheets of office paper. First, cut out a sketch from paper.
23. Next, all actions will have to be done fairly quickly. Stock up on cotton swabs and toothpicks in advance, whatever is convenient for you. This is necessary to remove excess glue.
24. Lubricate the surface of the necklace with Moment “Crystal” glue, do not forget to pay special attention to the knots. The glue soaks into the fabric and it seems to us that it is quickly disappearing. Cover the surface with glue with a paper sketch.
25. Then we move on to gluing the gray leather.
I usually approach the last stage in the evening, so the necklace dries and the smell of glue disappears until the next morning.
And there are only a few manipulations left: cut the necklace from the leather, trim the edge of the leather with beads and make a chain. And then the most interesting thing will happen - a photo shoot!
I hope that the master class was interesting and, most importantly, useful. If you have any questions, be sure to ask.
Working with cabochons
3. The first thing to start embroidery with is the location of the large elements of the necklace. You need to glue and braid the cabochons. But in my case, it turned out that the Rivoli rhinestones, when embroidered, would be higher than the largest serpentine cabochon.
4.To level the height of large elements, we will increase the backing for the stones using felt. Let's degrease the stones (for example, with cheap nail polish remover with acetone or acetone itself). And glue the stones onto pieces of felt.
5. After the cabochons are glued, cut off the excess felt. We received a pile of stones with backings.
6. We make notches with a pencil only to orient the stones.
7. Afterwards, we glue the cabochons themselves. And while they are glued, we embroider the outline of the necklace with Czech matte coral beads No. 8.
8. We braid the cabochons with Japanese beads. Central element – miyuki round 11/0 #4209, coral; side cabochons - miyuki round 11/0 #4204, gold champagne, two unakite cabochons - alternating coral and gold. The weaving ends with white miyuki round 15/0 #402 beads.