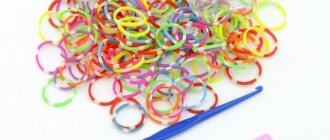
What types of devices are there for weaving from rubber bands?
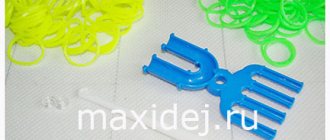
The weaving process is performed in different ways. The latest hit is a special machine. It is a small platform with several protrusions for putting elastic bands on them. The dimensions of such machines are different.
For beginners, small, 8-column mini Monster Tail machines are suitable. To create complex three-dimensional figures, machines with a large number of protrusions are used.
There are also combined options. In these cases, several elements are connected to each other and form a larger structure.
If you don’t have a machine, you can weave a figure using different colors of elastic bands in other ways:
- On your own fingers. In this case, you will get figures made according to the simplest patterns. For weaving, elastic bands of no more than 2 - 3 colors will be used.
- An ordinary table fork. Simple products are woven on its teeth. A regular bracelet made of silicone rubber bands would work great on it.
- Pencils. They are also successfully used for weaving simple products.
- Hook for elastic bands. With its help, even three-dimensional figures are created.
- A slingshot is one of the types of weaving machines. Consists of two columns connected to each other in the shape of a semi-oval.
The master classes presented below will show you how to weave a figure out of rubber bands in various ways. Including imagination, products are given an original design. To do this, use accessories: beads, plastic rings, etc. You can also diversify the product through color combinations.
Machine Features
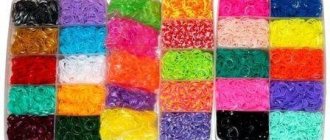
The American Monster Tail machine is a mini version of the standard needlework set. It is convenient to take it with you, because it does not take up much space. The set along with the machine includes a thin plastic hook (usually metal tools are found in sets) and 600 rubber bands of different colors. For jewelry, you can use clips that serve as clasps.
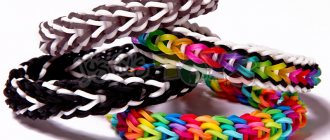
The machine is a stand with pegs. Elastic bands are thrown over them and intertwined with a hook. All weaving from rubber bands on the Monster Tail machine takes place in one direction , otherwise the pattern on the finished product will turn out tangled. Bright wicker bracelets, necklaces, and hair ornaments will become the favorite accessories of young girls.
Master class for beginners
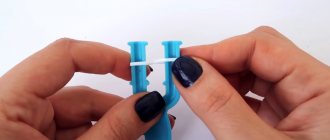
For those who have picked up rubber bands for the first time, here is a master class on how to make the “Spider” ring. It is performed on two columns of the machine or a mini-slingshot, using a hook. Black rubber bands are used.
Further actions are performed according to the instructions:
- One elastic band is placed on the left column of the slingshot. The second - on the right, winding it four turns. The third is put on in two turns on both columns.
- Using a hook, an element created from four turns is removed from the right column and thrown into the middle of the machine so that it ends up on a double elastic band.
- Spider legs are formed. To do this, take two elements, put them on top of each other, and intertwine them so that they are connected to each other. In this way one pair of legs is obtained. In total you will need three pairs of legs.
- Place the blanks one by one on the machine, each ring on a separate post. The knot is located in the middle of the slingshot, and the rings are lowered as far as possible. Then an elastic band is put on two columns simultaneously in two turns.
- Using a hook, remove the first double element from the right column and throw it into the middle of the slingshot. On the left there is a single ring, put on first, followed by a double loop.
- At the top of the slingshot there are two double loops on each column and loops that play the role of spider legs. From the right side, the double loop is transferred to the left, and, in turn, from the left, it is removed in the middle. The elastic legs are cut exactly in half with scissors.
- Use a crochet hook to remove the remaining double loop from the loom. She plays the role of the head. Carefully tighten it as tightly as possible. A whole rubber band is put on the finger, and a spider is formed from the remaining elements.
This makes a great Halloween accessory for kids.
Ice cream on a Monster Tail machine
The next master class presents an option for creating ice cream on a stick from silicone rubber bands using a Monster Tail machine. It is necessary to prepare rings of three colors. Machine location: its point is on the left side. The process will be carried out using three columns at the top and bottom.
The work is performed in this order:
- Form an ice cream stick. A light brown ring is placed on the column in the front row, twisting three turns. Then the pair is thrown onto both columns at the same time.
- The triple element is pulled off with a hook and placed in the middle. There are a pair of elastic bands on the machine, with a triple one located exactly in the center.
- Then the couple pounces again. Sequentially, from each column, double loops of the previous pair are dropped into the center of the work. The process is repeated several times.
- Next comes the layer. The white elastic band is placed over the same columns, and the brown ones are removed onto it.
- In the top row of the machine, one white ring is put on three columns. In the lower one, one is put on the outer ones in four turns. Next, one pair of white rings is thrown on the left and right sides. Using a crochet hook, remove the elements in four turns and the top horizontal elastic band and place them in the middle.
- In the bottom row, a pink ring is placed on three pegs. Three pairs of the same color are placed vertically. Use a crochet hook to remove the pink ring and all the white loops. Next, the process is repeated with pink-colored blanks three more times. In the last circle, the middle remains empty, and the horizontal element is thrown in two turns.
- All loops are transferred to the central posts. Then another elastic band is put on them and the remaining loops are removed from it. Tighten the noose.
Eskimo ice cream is ready.
Ice cream keychain
Even someone who has never dealt with rubber bands before will be able to weave a small two-color keychain. It is enough to repeat step by step the steps described in the master class. Number and colors of rubber bands for crafts:
- 34 pink;
- 9 white;
- 7 yellow.
Stick and interlayer
The ice cream keychain will be on a stick, and this is where weaving from rubber bands on the Monster Tail machine begins. The machine consists of 3 upper, 2 central and 3 lower columns (protrusions). The stick is woven on 2 central elements. First, the orange elastic band is placed on the ledge in the bottom row. Make a figure-eight figure (hereinafter, twist it away from you), put the bottom loop on the post and twist it again, putting on another 1 loop. Now there are 3 turns of the lumi rubber band on the ledge.
2 more lumis are put on the same ledge, without twisting and placing strictly one above the other. Stretch, the second ends are put on the central element of the top row.
Then the very first elastic band, twisted in 3 turns, is picked up with a hook and removed, but not all at once, but 1 or 2 loops at a time.
Two elastic bands are lowered lower and 2 more are thrown on. In the future, the elements are also put on in pairs, and they are located vertically. The orange elements that are located below are thrown over the top ones, first on one side, then on the other, and thus throw them off the columns. They put on the next pair and repeat everything. They weave like this for some more time. Then they proceed to the formation of the layer. Further weaving from rubber bands on the Monster Tail machine proceeds as follows:
- Place 2 white lumis on the upper and lower central protrusions.
- Throw 2 orange rubber bands towards the center.
- A white elastic band is put on 3 elements of the near row, positioned horizontally.
- The machine is turned over.
- Throw 1 white lumi onto the left and right columns and twist each one in a figure eight three times to make 4 turns.
- Put 2 white elastic bands on the left ledge and the same number on the right. Elements twisted in 4 layers are removed, grabbing 2 loops each. Hold the middle with your fingers so that the remaining rubber bands do not come off. As a result, there should be 2 rubber bands left on the columns.
- Turn the machine over, move the horizontal lumi over the 3 protrusions to the central part and release it.
Weaving the main part
The main part of the ice cream is made of pink elements. The first rubber band is thrown horizontally onto the bottom row. The next two are put on so that they surround all the protrusions. The bottom pink element is lifted and dropped, then the rest of the white ones are done in the same way. The elements remaining on the columns are moved down. They continue to weave a figure from rubber bands on the Monster Tail machine:
- Put the pink lumi horizontally on the 3 bottom pegs, then put 2 more around it, throw off the pink one, then the white ones.
- Repeat all steps three more times.
- Put 2 pink elastic bands on the outer protrusions, and another one horizontally on 3 columns, then twist it to make 2 turns.
- Two pink elements are put on on the right and left.
- The horizontal elastic band, twisted in 2 turns, is removed from the extreme protrusions, and the same is done with the bottom layer.
- Pink elastic bands are removed from the outer protrusions to the middle one.
- The lumi on the right column is pressed with a finger and transferred to the middle one. In the same way, remove elements from the left column.
- Turn the machine over.
- Starting from the left ledge, go through all the steps again.
- The remaining loops are collected into a knot. The elastic band is moved from the lower ledge to the upper one, then the lower layer is thrown off. The remaining lumi is pulled up a little, eventually forming a knot.
The result was a keychain similar to a crocheted product, only with large loops. This is an original, durable and strong craft, which also does not get dirty.
Angry Birds using a hook
The following instructions will teach you how to weave a cartoon figurine of the hero of the game “Angry Birds” from rubber bands. You need a hook and rings in 4 colors. Feathers will be formed from 2, and the remaining 2 will be for the beak and eyes.
Step-by-step instructions will tell you how to weave figurines of the cartoon characters “Angry birds” from rubber bands.
Step-by-step instruction:
- A white iris is placed on the hook in three turns. Then they take a white ring, fold it in half, hook it on the edge and throw a triple ring onto it. Move it further away onto the hook.
- Similar actions are performed with orange irises. This is the future beak. The orange element is pulled through one white loop and placed in the middle.
- All the loops formed on the hook are thrown onto a pair of red rings. Then they extend another pair.
- The next link begins to form. They put on the white iris in four turns, and on top of it they twist the black one in four turns so that it ends up in the middle of the white one. Then the very first white loop is hooked. Next, the white pair is pulled into the first loop, and then two pairs of red ones are similarly pulled.
- Again, hook the base of the first red pair and weave two more double red elastic bands. Next, an element protruding as an eye is dropped onto a loop located inside the work.
- All the loops are carefully removed from the hook, the work is unrolled and put on again. Another eye is formed in the same way. As a result, 6 loops were formed on the instrument. They are removed with a red pair and the loop is tightened.
All that remains is to straighten the product, position the eyes and beak.
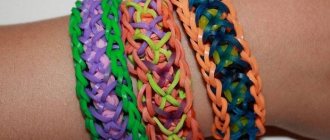
Bracelet decoration
Bracelets on the Monster Tail wall can be woven in different ways, but many of them are difficult for a beginning craftswoman to master.
There are two light techniques called the sea serpent and the fishtail.
They are recommended to beginners by the famous needlewoman Irina Protsak. Using them, you can weave beautiful flowers to decorate bracelets. To make 1 such flower, you need to prepare lumi of 3 colors :
- 2 green;
- 8 red;
- 7 white.
Formation of petals
The 6 central columns will be used to form the petals. First, throw a red elastic band over 2 protrusions in the top row and twist it to make a figure eight. You will need to twist the remaining elastic bands in the same way. Further procedure:
- a red rubber band is put on 2 adjacent columns, the same in the top row;
- the third is put on the third protrusion, and the second end - on the opposite one in the bottom row;
- in the bottom row they repeat the same thing, putting on the elements sequentially;
- if everything is done correctly, you should get a circle;
- the next red elastic band is put on all 6 columns and lowered a little down;
- put on another one in the same way, so that there is a distance between it and the previous one, otherwise the rows will get confused;
- All elements twisted in figure eights are removed with a crochet hook.
Middle of the flower
A Monster Tail machine is also used to form the center. First, 1 white elastic band is put on 6 columns of the top and bottom rows. Then they pull on the next white one. Continue weaving in this order:
- Remove the lowest red rubber band from each column one by one.
- Place 1 white lumi on all 6 protrusions.
- All red elements are dumped into the middle.
- Again, put the white element on 6 columns and remove the lower red ones (one at a time).
- They add 1 more white rubber band, but now remove 2 red ones from each column.
- Now there are 2 red lumis left on each ledge. Put on 1 white one and remove the bottom red layer, as in the previous paragraphs.
The final stage
Now you don’t need to throw on the next rubber band, but just remove the bottom red ones from all the columns. As a result, there should be 1 element left on all protrusions. Continue weaving on 3 posts. From the rightmost peg in the nearest row, the rubber bands are removed to the middle, from the left one in the same row - up, from the top right - to the middle.
The remaining white lumi is put on 3 columns and the 2 lower elastic bands are removed from each. On the lower posts, adjacent loops are connected by moving one from the right to the left protrusion. Now 2 pieces of green color are put on 2 elements in the top row, and all white pieces are removed using a hook. Carefully remove the flower from all protrusions and slightly stretch it in different directions to give it shape. Now you can use it to decorate a bracelet or other craft woven on a Monster Tail loom.
Light figures on forks
How to weave a figure on forks from rubber bands will become clear using the example of the “Heart” keychain. The plugs should be connected in this way. Two products are placed next to each other and secured in this position. The resulting pairs are fixed with tape so that the back sides of the forks are directed towards each other.
Step-by-step master class:
- On the 4th tooth, screw the first ring 4 turns.
- They put another one on top of it and hook it onto a pair of opposite teeth. The first one is discarded and placed in the center. Place a ring horizontally on top of the three, twisting it in a figure eight. Then one pair is placed on the 3rd, 4th and 5th prongs. Drop the bottom loops and the horizontal loop.
- Throw two pairs of 5 teeth horizontally. They throw on a pair again, and then remove the horizontal ring and the last row.
- The process is repeated twice more in exactly the same way, but 7 teeth are already used.
- Next, they begin to release the teeth in this order. From the fourth cloves they are transferred to the third and fifth. Throw horizontally over three prongs on the left and right sides, and vertically over the opposite ones. Then remove as before.
- Remove elements from the 1st, 7th, 3rd, 5th teeth. Weave on the 2nd and 6th.
- At the end, the loops are removed and hidden inside.
Enderman from Minecraft
You can weave an Enderman from the popular game Minecraft. The figurine is all black with purple eyes, but this is not necessary. You can choose any shades.
If the Enderman will serve as a keychain, then select a ring or chain. The work is performed on a machine consisting of three rows. They are placed so that the middle one is shifted by one column. In the process of work, pairs of rubber bands are used.
All actions are performed according to the instructions:
- Two pairs are thrown alternately onto the middle and right column, and then onto the middle and left. There are 2 pairs for each row. To round the head to the third column of the middle and right, and then the left row.
- They form the eyes. Rings of a different color are wound three times onto the first column of the right and left rows. Then one elastic band of the main color - on the second columns of all rows.
- Transition from head to body. The 3rd and 4th columns are connected along the middle row. And then all 4ths of each row.
- Form a hand. They retreat two columns and begin to throw 7 pairs of the main color. A three-turn ring is placed on the last column. Using a crochet hook through a triple loop, a pair is pulled out and thrown onto the adjacent column. All pairs must be removed in a similar way. The last loops are thrown onto the pencil. The second hand is made in the same way.
- The torso is formed according to the plan in step 1.
- Next they make the legs. The actions are performed in the same way as for the hands, but you do not need to shoot with a pencil. The first pair connects to the body.
- The arms are attached to the upper column of the body.
- Next, remove the rubber bands from the machine. Start from the bottom points of the legs following the example of the arms. The loop from the column of the bases of the hands is thrown onto the middle row. The principle is the same - the lowest loop is pulled out and thrown onto the top column along each row.
- Finally, the figure is removed from the pins of the machine. She's ready.
Owl made of rubber bands
The following master class will show you how to weave an owl figurine from rubber bands for a keychain. To obtain an original effect, striped elastic bands of two colors are used, several white, orange and black.
Instructions:
- One iris is thrown onto the first and second pins of the machine on the left and right. In the middle row, a pair is put on the second and third columns.
- Brows. The pair is worn on the second column of the left and right rows and the third in the middle.
- Continue to form the head. To do this, pairs of irises are thrown onto the 3rd and 4th columns of the middle row. Two pairs on the outer rows, capturing the 2nd and 3rd, 3rd and 4th pins.
- Eyes. Triple black loops are put on the 2nd column of the outer rows.
- Nose. An orange iris is thrown over the 4th and 5th column in the middle. Then they round the head. Connect in pairs the 4th columns of the side rows with the 5th of the middle ones.
- Shoulders. Mirror the rounding of the head.
- Tummy. White irises are put on the middle row - 4 pairs.
- For the body on the left and right, take three pairs.
- Paws. An orange iris is wound onto a hook three turns and thrown onto rings of the main color. Place on the last pins of the outer and middle rows. The second leg is made symmetrically. A triple loop is thrown onto the last column in the middle.
- They begin to remove the loops. From the middle row, through a triple loop, remove the loops of your row one by one. From the outer columns of the upper body, the loops are folded towards the center. The head loops are removed in the same way.
- Finally, a loop is tightened at the top of the head, and the product is removed from the machine.
3D decoration for a handle made of rubber bands
Schoolchildren will be delighted with the 3D decoration for a pencil made from rubber bands. This detail resembles bright voluminous flowers. They are made from materials of the same color, and with combined shades. Especially if the material has a pearlescent color.
You need to prepare:
- irises in the amount of 50 pieces;
- clasp;
- hook for weaving with rubber bands.
The process is performed in the following way:
- The rubber bands are placed on the hook. The larger it is, the more voluminous the figure will be.
- They take another iris and pull it through everything on the hook. A loop is formed from it and tightened.
- Remove from the hook and distribute the parts evenly, forming a flower.
- The pencil is inserted into the middle of the part.
The decoration for the pencil, which is woven from rubber bands, is ready. There are many more options. By showing diligence and imagination, you can weave a simple figure or create masterpieces from rubber bands not only according to ready-made patterns, but also according to independently invented patterns.
Article design: Natalie Podolskaya
Doll Alice Weaving from rubber bands 3D doll on a Monster Tail machine
VKTwitterOK
video content
Rating: 4.0; Votes: 1 Alice doll is a wonderful 3D figurine made from rubber bands. In this lesson I will show you how to weave Dolls from rubber bands on a Monster Tail loom or a regular loom. You can make it AS A KEY RING) You will need a hook, a machine and about 120 elastic bands. In the weaving lesson, the following colors of elastic bands were used: beige - 29 white - 15 blue - 5 pink -5 light green with gold - 6 purple - 21 brown - 35 red - 1 black - 2 or eyes - beads 0.3 cm Date: 2020- 03-27
← Origami from paper How to make a CUBE with a surprise
Paper origami Maple leaf DIY autumn crafts →
Related videos
NOT JUST BORSCH! 4 simple and unusual beetroot dishes that you are unlikely to have tried
• Tsvetok
THE FIRST FEEDING OF FRUIT AND PERENNIAL PLANTS is carried out only within these periods!
• Tsvetok
Do you want to grow beautiful petunia seedlings? Repeat after us.
• Garden and Vegetable Garden - Do It Yourself
I TAKE MY WORDS BACK! THIS METHOD REALLY WORKS! CHECKED!
• In the garden or in the vegetable garden
The benefits of Datura-Herbs in the garden. Why grow the beautiful but poisonous Datura
• Garden world
That's why we have the earliest tomatoes - an ancient way of growing tomatoes.
• Garden and Vegetable Garden - Do It Yourself
Comments and reviews: 10
Alina Cool, Natasha thank you for your greetings and for the lessons, I will definitely weave, I almost honestly weaved everything on your channel, well, not counting the origami. Origami is also very cool
Yuri Hello, could you please weave a chibi version of Mikasa Ackerman (from the anime Attack on Titan) with lumigurumi? I think it would be interesting:) ps thanks in advance
Dinka Hurray, I finally found a video tutorial on how to weave a girl on a monster tail loom. Thank you very much Natasha, I love your channel. Can I please say Hello from you?
Vladislav writes to his daughter, this is the first time I have woven a person, I was a little unlucky with the dress, but I wove everything, thank you
Ksenia, it didn’t work out for me, maybe the rubber band was too small, but damn, I wanted a doll and got rubber bands
Toni Super Natasha My name is Toni and I am 11 years old. I'm Bulgarian and I don't understand Russian. Do you understand Bulgarian?
cat Natasha please say hi to everyone video My name is Veronica scarf wear Shaporeva
Andrey Says and shows everything very quickly, hard work. I just turned it off and unraveled it. Rave
snowdrop lum planets thank you, I’m currently making 2 of these at the same time, but on the LOOM BANDS machine and I have a stick
Tanya Hello Natasha, I really like your videos, toys made from rubber bands, and crafts.