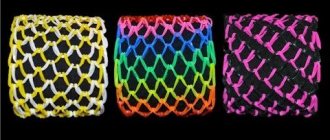
Recently, such a hobby as weaving patterns, bracelets, figurines and other crafts from small multi-colored rubber bands has gained unprecedented popularity. If you are just mastering this weaving technique, then you simply need a small or professional machine. Of course, with the help of divided cells into rows it is easier to string and intertwine elastic bands. But experienced needlewomen have improved their weaving techniques and their skills and can easily do without a machine.
Let's talk about how to weave animals from rubber bands without a machine, and also look at some simple master classes.
How to weave animals from rubber bands without a machine: basic methods
If you have just taken up this type of applied art, then you simply need to gain basic knowledge related to the technique of weaving various patterns and figures. If you do not understand the schematic representation of weaving, then watch the easiest videos for beginners on how to weave animals from rubber bands.
Experienced needlewomen are happy to share their skills and create educational master classes. Of course, in order to quickly understand and master the technique of creating masterpieces from rubber bands, the easiest way is to watch a training video and visually disassemble all the elements of weaving step by step.
If you don’t have a machine or want to learn other ways of weaving figures from rubber bands, then you definitely need to know what available tools are used by experienced needlewomen. There are several ways to weave animal figures from rubber bands without using a machine:
- on fingers;
- using a hook;
- on the fork;
- on a plastic slingshot;
- on pencils or plastic sticks.
Let's look at the most common methods of weaving animals from rubber bands without using a special machine.
Video tutorials on weaving animals with elastic bands on a machine
It’s easy to learn how to weave animals using step-by-step master classes; it is important to follow the clear instructions provided in the description. To work, you need to prepare rubber bands of the required colors in advance so that the animal looks as realistic as possible, and select tools that will facilitate the process. To learn how animals are made from rubber bands with a machine, you only need a desire and basic skills in working with Rainbow Loom, and video tutorials will help you create interesting products.
Making a dog with rubber bands
Lesson on weaving a snake figurine on a machine
Rainbow Loom Charms. Schemes of frescoes made of gums / Schemes weave frescoes of gums Video.
Recently, such a hobby as weaving patterns, bracelets, figurines and other crafts from small multi-colored rubber bands has gained unprecedented popularity. If you are just mastering this weaving technique, then you simply need a small or professional machine. Of course, with the help of divided cells into rows it is easier to string and intertwine elastic bands. But experienced needlewomen have improved their weaving techniques and their skills and can easily do without a machine.
Let's talk about how to weave animals from rubber bands without a machine, and also look at some simple master classes.
Weaving a funny spider on a slingshot
Let's learn the spider weaving technique. You can use the woven spider as a keychain or pendant for a mobile phone or tablet. To weave it, you can use black elastic bands or multi-colored ones if you want the figure to be bright and original.
Necessary materials:
- plastic slingshot with grooves;
- elastic bands of any colors;
- hook.
Step-by-step description of the process:
- Turn the slingshot so that the grooves are directed towards you. Wind the elastic band four turns onto one branch of the slingshot.
- To connect both columns, take an elastic band folded in half and put it on the slingshot.
- Then take your hook and tie the two elastic bands in a knot. You need to make three such weaving elements.
- Take the wound loops and move them to the center of the slingshot.
- Place the elastic loops on one side onto the opposite peg, then remove the bottom row and tighten the resulting knot thoroughly.
- You must secure the spider's legs with knots. To make the figure believable, carefully cut the resulting loops with scissors.
- This is the kind of unusual spider you should get. Using the upper loops, you can hang it on a bunch of keys in the form of a keychain.
How to weave a snake from rubber bands?
Many beginning needlewomen think that weaving a snake from rubber bands is quite simple. Indeed, most training workshops begin with weaving a snake figurine. But believe me, to create this masterpiece you will need certain basic skills and a little patience. To weave a snake, you can use simple pencils or plastic sticks. Experienced needlewomen can weave a snake on their fingers.
Necessary materials:
- hook;
- two pencils;
- elastic bands of any colors.
Step-by-step description of the process:
- Place the pencils parallel to each other.
- Place two rubber bands twisted in the shape of a number eight onto both pencils.
- On top of the twisted elastic bands, string two straight elastic bands of any color and carefully remove the bottom row.
- Wear subsequent elastic bands evenly without twisting. In each row, the bottom three loops must be placed over the pencil.
- If you want to get an original and bright snake figurine, then start each new row with elastic bands of a different color.
- You determine the length of the snake, that is, its body, yourself. When you have weaved a snake of the required length, carefully remove the remaining elastic bands from the pencils and move them to a special or crochet hook.
- Weave a snake head onto the hook. To do this, pull all the loops onto two elastic bands three times. By analogy, weave three rows.
- Remove the remaining loops onto a separate elastic band and form a knot.
- This is the original snake you should get from rubber bands. You can use it as a toy, pendant or keychain.
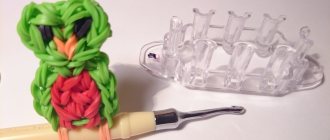
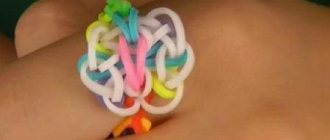
Learn to crochet a toy from rubber bands in amigurumi style
Recently, three-dimensional toys made from rubber bands have become incredibly popular. They can be stuffed with soft filling. Let's look at the step-by-step process of weaving a voluminous owl. To weave an owl, unfortunately, you can’t use just one crochet hook. You will have to resort to using the slingshot once or twice. But basically such a figure is crocheted.
Necessary materials:
- elastic bands of various colors;
- hook;
- slingshot.
Step-by-step description of the process:
- Take seven elastic bands of any color to start weaving, preferably plain ones.
- Wrap one elastic band around the hook and carefully remove it through the other.
- So knit seven elastic bands. You should end up with a kind of ring consisting of six loops.
- In the second row, use 12 elastic bands. Weave two elastic bands into each loop, similar to the first row. Insert the hook so that the loop of the first row is pulled through the elastic.
- In the third row you should knit 18 elastic loops. Then continue to increase the volume of the owl’s body by weaving one elastic band in the first column and two in the second. To make the bottom of the figure, you must have 24 elastic bands woven together.
- Continue weaving the owl's body according to the above pattern to the desired size, and then place the filling inside.
- The beak needs to be woven from rubber bands of a different color. Screw one elastic band onto the hook and remove two. Next, stretch two more pieces and put on the second end of the elastic from the first pair of weaving.
- You should have four pairs of elastic loops on your hook. The last elastic band should be tightened and tied into a knot. Weave eyes on the hook in a circular pattern.
- Carefully attach the eyes and nose using a hook and S-shaped clamps. This is the kind of wonderful owl you should get in 3D format.
We braid a voluminous cat
To learn how to weave animals from rubber bands on a machine, you need to be patient, buy rubber bands and purchase the machine itself. And then everything depends on your imagination and desire to work. Now we invite you to weave a funny pet with your own hands. First make the eyes. They are woven according to a standard pattern, so we will not focus on the process of their manufacture.
Eye color does not have to be the same as in the photo. If you wish, you can use a blue or yellow rubber band instead of a green one. Next, weave the blanks for the animal’s cheeks. Make a small pink nose and ears like a real animal.
Read also: Reversible plow for a mini tractor
Now place the “Monster-Tail” machine in front of you and, having secured 3 pairs of elastic bands on it, twist them in the form of figure eights in the same way as shown in the photo. Then attach the previously made ears to the resulting weaving. Throw the blanks made before in a circle. Add to them the nose of the future beast.
Place the eye blank on the machine and fasten it in a circle. Remove the bottom row. Place 2 more circles on top of the machine. On the last circle, add small neat ears to the woven head. Remove the resulting workpiece from the machine. Weave a tail on the machine for your beloved domestic animal, and then remove it. Weave the animal's paws using a crochet hook. For each pair you will need 14 rubber bands.
Attach the animal's head and body to the machine, and then attach the tail and legs to them. Remove the rubber band animal from the machine.
To summarize, I would like to note that basically all animals from rubber bands are made according to similar patterns. Only the color of the rubber bands themselves and the length of the animals’ tails and ears change. Having mastered the technique of weaving a three-dimensional cat from rubber bands, you can easily create animals such as a dog, a cow or a horse. You can watch the video on how to make toys from rubber bands in the shape of animals.
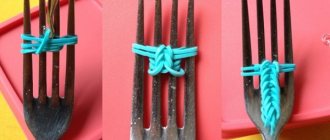
Original koala keychain on table forks
If you want to make an original keychain or decoration for your schoolchild’s writing instrument, then be sure to start weaving a koala from rubber bands.
Necessary materials:
- hook;
- two table forks;
- Silicone rubber bands – approximately 100 pcs.
Step-by-step description of the process:
- Using adhesive tape, secure the forks so that the teeth are facing in opposite directions.
- Take two elastic bands and connect the central teeth, string two more pieces diagonally onto the outer teeth.
- Twist the rubber bands into a figure eight shape and thread them onto the side teeth, connecting two forks.
- Place two more elastic bands on the same teeth without twisting. Using a hook, move the resulting bottom row to the center. Repeat this algorithm of actions three times.
- Place elastic bands on the side teeth and remove the bottom row. Do this twice, and then carefully remove the elastic loops from the side teeth.
- Place elastic bands on the central teeth of the forks and remove the resulting loops.
- Form the eyes by wrapping the elastic bands around the hook, remove them and string them onto the outermost teeth.
- String the elastic bands, simultaneously connecting two central and one side loops.
- The bottom rows need to be removed. Just like the eyes, weave the nose.
- Weave two rows to form a neck, then remove the side elastics.
- Then weave the paws together. String a figure-eight elastic band onto the side teeth, and then a pair of straight elastic bands. Carefully remove the bottom rows.
- In this way, knit a couple more rows and remove all the loops, completing the weaving. To do this, you need to remove all the loops onto a separate elastic band and tie a knot.
Cute hamster
This master class on making a cute rodent on forks is suitable for beginners; you just need a little patience.
Prepare the materials necessary for work:
- Two dinner forks;
- Multi-colored rubber bands (in our case they are brown, white, black and pink, but you can choose a different color);
- Small crochet hook.
Progress:
- Turn the table forks so that the teeth are located in different directions and fold them tightly together. Using a figure of eight, place the white elastic band over the teeth. Then place rubber bands between four pairs of teeth.
- Next, lift the resulting figure eight, holding the rubber band at both ends. We twist the next ring three turns on the two outer teeth of the fork. You need to put an elastic band on top and remove another elastic band from it. Throw it all over the left fork. Place a rubber band in the middle of the two pairs of fork teeth. Again we drag our structure upward with our fingers. We do the same action with pairs of lower and middle rubber bands.
Related article: DIY Ikebana “Autumn” for schoolchildren made from natural material
- Then we work according to the same scheme: we throw on and weave rubber bands, and move the structure to the top. When the animal figurine is ready, remove it, secure it with a clasp and straighten it to add volume. Here's what we got: