It’s easy to make a beautiful bow from satin or nylon ribbon. This accessory can be used to decorate a gift, piece of clothing or interior design.
- Every woman has her own secrets and tricks to make our lives easier and more beautiful.
- Bows made from ribbon and other materials can add a festive mood and complement an outfit, hairstyle, gift set, table setting and other interior items and clothing.
- Many women think that making a beautiful bow on their own is difficult.
- But this is not true, all people can create a beautiful masterpiece
- You just have to prepare the materials and you can start this interesting type of needlework.
How to make a simple beautiful ribbon bow with your own hands?
How to make a simple beautiful ribbon bow with your own hands?
Previously, bows and long ribbons were woven into girls' braids. Currently, ready-made lush bows made from satin or nylon ribbons are attached to first-graders.
How to make a simple beautiful ribbon bow with your own hands? The simplest and most beautiful bow is made from a two-color satin ribbon.
How to make a simple beautiful bow from a ribbon of two colors with your own hands?
To make such a decoration, you need to complete the following steps:
- Prepare 20 cm of wide tape (5 cm) in a light shade, and 40 cm of tape in a dark shade 2 or 3 cm wide
- Fold the wide ribbon and glue the ends together as shown in the picture.
- Apply 20 cm of thin tape on top and also glue the ends. Glue them to the folded ends of the wide ribbon
- Wrap the remaining 20 cm of thin tape in the middle of the resulting “sandwich” and make a loose knot
- Tuck the ends of the ribbon into the knot or leave them loose so you can tie the bow to clothing, hair, or gift wrap.
Here are some more ways to make simple bows:
Simple beautiful DIY ribbon bow
Beautiful DIY ribbon bow
Another way to make a simple bow can be seen in this video.
Decorating the neck
Have you thought about the fact that men also wear bows? It's true. Only they are called “butterflies”. How to tie such a bow? Easy, a light scarf or handkerchief will come in handy. You just need to follow the diagram:
- Wrap the scarf around your neck so that one end is longer than the other.
- Fold the long part onto the short one.
- Pull a long piece through the thread - a loop is formed.
- Fold the short part into a half-bow on the right side.
- Throw the long part to the middle of the half-bow.
- Carefully, holding it, fold the long part as shown in the photo.
- Pull the folded long loop through the knot so that it passes behind the folded half-bow.
- Tighten the bow and smooth out its details.
Related article: Removable water cooler for a laptop
This method is good for men if there is a pre-sewn blank for the butterfly. If you use the tying pattern for a light scarf around your neck, you will get a beautiful complement to a woman’s business style. Such a bow with beads will look very impressive. It can also be tied over an elastic band on your hair.
Video: How to make a RIBBON BOW of any size?
You can make a beautiful bow from thin braid by folding its pieces into a figure of eight, and then sewing them in the middle. The more details, the more beautiful the bow will be.
Simple DIY ribbon bow
How to fold a bow from a thin ribbon?
Important: Making a simple bow is not difficult. Show your imagination and in a few minutes the holiday accessory will be ready.
How to make a big fluffy bow from ribbon?
How to make a big fluffy bow from ribbon?
How to make a big fluffy ribbon bow with your own hands?
It's easy to make a bow like this:
- Buy a ribbon of the desired width. The length depends on how lush the bow should be - 1 or 2 meters
- Fold the ribbon like an accordion
- Tie in the middle with nylon thread. Leave the ends free so that the product can be tied to a gift or to your hair
- You can make a “sandwich” from individual glued elements, tying them in the middle
Another way to make a fluffy bow. Prepare 2 meters of white ribbon and small beads.
Large fluffy ribbon bow
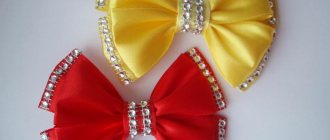
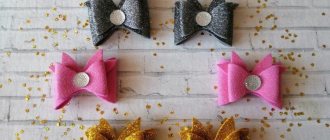
This “royal” bow is made up of separate small bow parts that are sewn to a white felt base. To make small elements, follow these steps:
- Cut the ribbon into equal sections of 10-20 cm, depending on the size of the bow you need
- Fold in half, inside out
- From the bent line, at a distance of 2 cm, you should drop a drop of glue and press this place with tweezers so that the tape sticks together.
- When the glue dries, turn the bows inside out and make a fold at the ends
- Fasten the ends with thread and sew to the base
- You can decorate such a bow with rhinestones, gluing them to the middle, or with beads of different colors. That's it - the product is ready
You can see how to make such a “royal” bow in the video.
How to make a bow from a wide ribbon?
How to make a bow from a wide ribbon?
Often you need to match a suit with a bow tie for an adult or a child. Of course, you can buy it in a store, but they don’t always have the right color in stock. Therefore, you need to make such a tie yourself.
How to make a butterfly bow from a wide ribbon?
Follow these steps:
- Prepare 20 cm ribbons 5 cm wide and 18 cm ribbons 3 cm wide
- Fold the pieces in half and glue the ends together. Fasten them with a needle so that the glue holds the edges together well.
- When the glue dries, place one element on top of the other and make stitches with thread in the middle
- Pull the thread and fasten
- In principle, this is enough, but you can bandage the seam with a thin ribbon to match. "Butterfly" is ready
A wide ribbon makes beautiful “roses”. How to make such an original bow from a wide ribbon? It's simple.
How to make a rose bow from a wide ribbon?
Follow these steps:
- Wrap the tape around your hand as shown in the picture
- Make a knot and remove the product from your hand
- Spread the rose petals, bending them inward
- Do it all down to the last petal
- The more magnificent the rose, the longer the ribbon should be
How to make a bow from thin ribbon?
How to make a bow from thin ribbon?
A bow made from a thin ribbon looks stylish and attractive on any piece of furniture or clothing. It adds sophistication and elegance. How to make a bow from thin ribbon?
The Dior bow is often used to decorate gifts, holiday tables and as a clothing accessory.
How to make a Dior bow from thin ribbon?
To make such an accessory, follow these steps:
- Prepare 1 m of tape 1-2 cm wide
- It must be cut into pieces of different lengths. The number of these sections will depend on how fluffy the bow you want to make. Make the length of the turns such that this bow fits along the entire length of the packaging box, the longer the turns, the more beautiful
- Place the finished turns on top of each other, gradually reducing the size of each turn
- The last turn should be no more than 1 cm in diameter
- Secure the resulting bow with a thin matching ribbon, threading it into the last turn
- This accessory can be attached to any surface: flat or round.
Sometimes you need to make a lot of small bows from thin ribbon. A regular fork will help with this. Follow these steps:
- Prepare a satin ribbon 0.6 cm wide and a dinner fork
- Place the tape on the fork, leaving the ends at least 4-5 cm
- Wrap the left edge of the tape around the fork and bring it forward, pushing it between the middle teeth
- The result is a loop. Without tightening this loop, insert the end of the tape, but already on top of the fork between the teeth
- Insert the end of the ribbon into the loop from below and tighten
- Remove the bow from the fork and cut off the excess ribbon around the edges
- Burn the cut ends of the tape with fire (a lighter or a match) so that the tape does not fray. You can make as many of these bows as you need - quickly and easily
More detailed instructions on how to make a bow using a fork and thin ribbon can be seen in the following video.
How to roll a blunt
Blunt can be done using the following algorithm:
- First you need to buy a few cigars; the more the better, because it may not work out the first time. It would be ideal, if finances allow, to buy original Phillies. But you can get by with products from other, but also famous, brands; it will be a little cheaper.
- Then the cigar should be cut lengthwise. For convenience and speed of the process, you can moisten it with saliva by running your tongue over the site of the future incision.
- There are special cigar knives designed just for this. It is better to use these devices, but many domestic smokers do a good job with a simple blade.
- Once the cigar is opened, you need to get rid of its contents and carefully fill it with your tobacco. Usually, you can fit a maximum of 1 gram.
- Next, you should carefully roll up the rolled piece of paper, carefully holding it with both hands.
- Then moisten the “suture” line with saliva again. This action must be performed carefully so that the filling of the rolled-up cigarette is not damaged.
- After this, the homemade cigar should be dried. You can place it in the oven, however, you can get by with exposure to direct sunlight, this will be enough. Some smokers use a lighter for this purpose.
How to make a bow from a narrow ribbon?
How to make a bow from a narrow ribbon?
Such an elegant accessory can decorate a gift, a piece of clothing, a table setting, or even your hair. A thin ribbon makes an elegant and fluffy bow. How to make a bow from a narrow ribbon?
Follow these steps:
- Prepare a narrow ribbon of two colors and cut out a circle with a diameter of 2 cm from cardboard
- It is necessary to cut the tape into pieces of 5-7 cm
- Now use a glue gun to apply a drop of glue to the cardboard circle and glue the edge of one of the pieces of tape. After 0.5 cm, apply a drop of glue again and glue the second end of the tape
- Apply glue again between the glued ends of the tape and glue the end of the tape of a different color. Glue its second edge next to the edge of the tape that was glued before
- Repeat this until several rows of such turns are glued. The last 2-3 rows can be made smaller, and attach a bead or rhinestones to the middle
Important: When you glue pieces of tape, thread each end through the previous turn. Thanks to this technique, the bow will turn out lush and beautiful.
A clear example of how to make such a bow can be seen in the video below.
How to make a hair bow?
How to make a hair bow?
A DIY bow for decorating a hairstyle turns out to be original and beautiful. You can be sure that only you will have such decoration.
How to make a hair bow? Follow these steps:
- Prepare 2 pieces of tape 5 cm wide and 25 cm long, and a thin tape for the middle
- Take one piece of tape and fold a corner at one end
- Fold the second edge also with a corner near the first folded end. Then bend the resulting corners towards each other. Fasten the folded coil with a needle
- Now next to the folded corners, make another turn and secure with a needle
- As if turning the resulting product over, make a corner again to create a “diamond”. Do this until there is only one small triangle of tape left.
- Fold the diamond in half, and in half again. Now you need to fold the remaining edge of the tape into a “corner”. The result is a triangle
- Hold it by the center so that everything we fold does not open up. Remove all the needles
- Fold the inner triangle into the center to create an original “petal”
- Fasten with a needle and thread in the place where you hold with your fingers
- You need to make two of these parts
- Sew these parts together and tie them in the middle with a thin ribbon.
- Sew this bow to an elastic band or glue it to a hairpin, and your unique hair accessory is ready.
Detailed instructions are in the video, which will make it easier for you to make a beautiful hair bow.
Knitting with knitting needles
Of course, you can use a ribbon and simply tie a bow in the right place. However, this is not always possible. A knitted bow is a more winter option. It is warm and voluminous. It can be sewn on a warm dress, on a pillow, or used as a decorative headband. A knitted bow with an elastic band will decorate the most stylish hairstyle. Let's consider several options for making such an accessory.
This simple and cute bow can be tied in a few minutes. It will look good as a decoration on a dress, hat, skirt and other knitted items. Of course, if you sew an elastic band to it, you will get an excellent hair clip.
To make it, you only need a few knitting threads and knitting needles of the appropriate size. Very easy to knit. We cast on 17 loops on the knitting needles and start knitting:
- We knit the first row alternating loops: knit 1, purl 1.
- Turn the knitting and knit 1 purl stitch, 1 knit stitch.
- Knit a rectangle of about 11 cm in this way. Fasten and cut the thread.
- We wrap the same thread around the bow in the center, forming it. You can use beads as decoration for the middle.
Having examined in detail the production of a simple version of a bow with knitting needles, we will give below examples and diagrams of more complex options. Not only a novice needlewoman, but also a professional can take them on.
An interesting option for knitting can be a pattern of bows. Below you will find an example of work and a diagram.
Related article: DIY gift for grandma for her birthday from her granddaughter with photos and videos
How to make a bow from nylon ribbon?
How to make a bow from nylon ribbon?
If your daughter is going to first grade, then she should have the most beautiful and lush bows. How to make a bow from nylon ribbon?
It’s easy to make a lush and beautiful bow. If the store doesn’t have the width of the ribbon you need, you can use a piece of organza instead.
To make a bow, follow these step-by-step steps:
- Prepare two ribbons 7.5 cm wide and 140 cm long
- Fold it in half lengthwise. Now string the folded edge onto a thread and a needle.
- When all the tape has been sewn, pull the thread until the strip turns into a product 40 cm long
- Fasten the thread and straighten the product along the entire length
- Do the same with the second tape.
- Cut a circle from felt or thick tape with a diameter of 7.5 cm
- Make two holes in the circle and insert a thin ribbon or braid into them to match the bow
- Apply glue along the edge of the base and glue the first gathered tape
- We continue to coat the base with glue and glue the tape in a spiral. When the first tape is finished, continue to apply the second tape in this way.
- When there is some space left on the base, cut off the excess tape and secure the thread
- Apply the entire tape, covering the base in the middle. Don't forget to burn the edges of the tape so it doesn't fray.
Watch how to do this in the video.
How to make a bow from paper ribbon?
How to make a bow from paper ribbon?
A paper bow can be used to effectively decorate a gift box or table setting. How to make a bow from paper ribbon?
How to make a beautiful bow from paper ribbon?
Making a paper bow step by step:
- Prepare 12 pieces of ribbon 2 cm wide and 25 cm long, and one ribbon 5 cm long for the middle
- Start folding large pieces into a figure eight, as shown in the picture. The edges can be stapled or glued with hot glue. Attach a small ribbon to make a ring
- When all the parts are ready, start assembling the bow, beautifully arranging the turns and gluing them together
- The smallest turn is glued to the middle
- On the reverse side, using a stapler, attach a thin braid or the same ribbon that was used to create the bow.
A master class on making such an accessory can be seen in the video.
Simple ways to make a bow
If you are a beginner needlewoman and you have no experience working with grosgrain ribbons, then the first step is to make the simplest product. After you get the hang of it, you can start on more complex crafts.
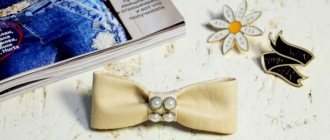
Simple bow
This bow is great for beginners. The process of creating it is simple and does not require any special skills from the needlewoman. You can decorate your clothes or hairpin with a ready-made bow from such a ribbon. If you are making a craft for a man, then you should try to make an unusual bow tie. The process of creating it is similar to a bow, and the finished result, thanks to the strength of the material, will keep its shape perfectly.
To make a bow we will need the following materials and tools:
- several rep ribbons of different widths;
- thread with a needle (instead of thread, you can use a thin fishing line. This will give the finished product even greater strength);
- glue;
- scissors;
- lighter or matches.
A simple bow made from grosgrain ribbon master class:
- We think about what size bow we want to get and cut off part of the ribbon to the required length. Using a lighter or simple matches, we process the edges of the tape.
- Using thread or fishing line, fasten the ends of the tape together.
- We wrap the central part of the workpiece with the same thread. Thus, we will have a bow formed, which will be the basis of the product.
- Take a thin grosgrain ribbon and wrap it around the workpiece. This operation is performed in order to determine the length of tape required for the product. In this case, you need to leave a few centimeters for seams and finishing edges.
- Sew a thin ribbon to the base and tie it in the middle.
- Use a small piece of fabric to hide all the seams. To do this, we wrap it around the center and secure it to the back of the workpiece.
Video: Do-it-yourself gift BOW from PAPER
You can make a paper bow in another way, as shown below.
How to make an original bow from paper ribbon?
In this method, the tape is not cut into pieces, but folded into “figure eights” into a single structure. The flower is tied in the middle with a thin paper ribbon.
A little history
Bows appeared in ancient times. In Ancient Greece and Rome, respectable matrons decorated their hairstyles with them. However, bows came into fashion during the time of Louis XV, thanks to his favorite Madame de Pompadour. A bow can be seen in almost all portraits of the king's official mistress.
True, in fairness, it should be noted that bows were also in use under the Sun King Louis XIV, but then they acted as an original form of jewelry.
In the 20th century, recognized as a style icon, actress Audrey Hepburn loved to decorate herself with the most exquisite bows. So, as you can see, the bow has been and remains one of the most popular elements of decorating a person’s toilet.
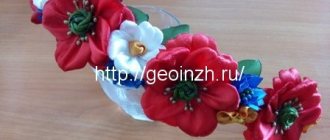
How to make a ribbon bow for discharge?
How to make a ribbon bow for discharge?
When a newborn is discharged from the hospital , this is an important event, and everything must be perfect. Therefore, you can make a bow for a newborn’s envelope with your own hands. How to make a ribbon bow for discharge?
Tip: Choose a beautiful ribbon, for example, with gold edges, to make the flower look elegant.
Execution step by step:
- Make lengths of pink or blue satin ribbon, ribbon with gold edges in the same colors, regular thin satin ribbon, and patterned braid
- Start collecting the flower with a piece of wide satin ribbon. Fold the ribbon in half and sew with thread and needle. Do the same with all the satin pieces, collecting them together in a circle. When finished, secure the thread
- Collect all the ribbons in the same way. You should get 4 flowers
- Apply hot glue to the felt base and start gluing flowers, first large, then descending
- Make petals in the middle from thin braid with a pattern, first gluing the edges of the pieces of this braid
- The last step is gluing the beads or rhinestones. The bow is ready
Watch how a girl does this in a master class in the video below
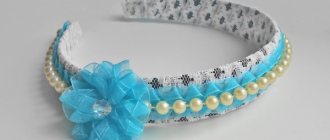
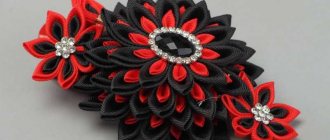
Contrast bow
The combination of white and black is a classic option for any decorative decoration. The traditional headdress for girls is no exception.
For production you will need:
- white tape;
- ribbon with black stripes or polka dots;
- black lace;
- scissors;
- rhinestones or beads.
Stages of work
- Stage No. 1. The variegated ribbon is cut into three pieces about 25 centimeters long.
- Stage No. 2. The white base is cut into shorter pieces - approximately a couple of centimeters less than the first.
- Stage No. 3. The simplest bow-loop is formed from ribbons and stitched in the center.
- Stage No. 4. A piece of black lace is sewn onto one of the white bows.
- Stage No. 5. The two remaining white bows are placed crosswise on top of each other.
- Stage No. 6. The colorful bows are folded like a snowflake and also secured in the center.
All that remains is to connect both blanks and a contrasting decoration can take its place on the girl’s head.
https://youtu.be/1iaDFXyy0Rchttps://youtu.be/mAODDH-Yzto
_