What is a bead lariat?
It is represented by a long neck decoration in the form of a large transforming cord. Fashionistas love it for its versatility and the ability to create different looks with one accessory. The lariat can become a neat necklace, an elegant sautoir, a short necklace, a belt or a bracelet.
The appearance of the decoration is determined by the pattern or techniques of making it in the form of a rope:
- openwork;
- twisted;
- spiral.
It is distinguished by a feature represented by dense, elastic weaving. The master class given in the article will help you perform a lariat from beads.
Master class for beginners on weaving lariant from beads
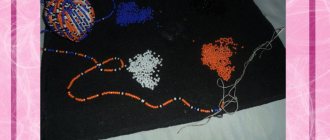
This charming decoration will consist of three colors of beads, which are intertwined with each other, and decorated with decorative material in the form of raspberry-colored clusters and green leaves. To work, you need to prepare the following materials:
- green glass of several shades;
- crimson beads and the same beads;
- nylon thread and bead needle.
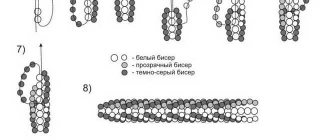
The main thing in this work will be the pattern according to which you will need to weave all the components of the lariat. It consists of a rope that should be woven using American technology. It may seem to you that it is very difficult to make such a product with your own hands, but this is absolutely not the case, because weaving it is very fast, especially if there is such a detailed drawing as in this article.
Figure No. 1-3 demonstrates the American rope beading technique. A little lower you can see how the beads are set. Once you have weaved the cord to the required length, you should decorate it with clusters and foliage. To do this, you will need drawing numbered 4-9, according to which these elements will be created. Flowers are made according to sketch No. 10-13. When all the components are ready, attach two bunches to each edge of the product.
Another example of such decoration will be made in the Gothic style from black beads. If desired, you can use beads of different colors, even combining several shades at once. But it is in this color that this accessory will look especially stylish and beautiful.
Read
We weave a hairpin from beads and beads with our own hands
To make it you will need black beads and large beads of the same tone with separated oblong edges. Also prepare a dark thread and a needle for beading. The product mainly consists of wide and narrow lace, which turns into a pendant with tassels along the edges. Start weaving with large elements following the steps of the schematic drawing. Then move on to a pendant that consists of rings and chain bundles.
What will you need?
Any lariat weaving technique involves the use of the same materials and tools in any of them. The only difference is what is used - a hook or a needle.
It is impossible to create jewelry without additional materials and tools in the form of:
- beads;
- hook (when knitting);
- scissors;
- thread (yarn) or fishing line;
- needles;
- pins;
- beads;
- small diameter wires;
- castle;
- special clamp;
- accessories, represented by carabiners, end caps, pins, rings, chains, callots, huggers, and other types of accessories.
- spinner.
Beads
Czech or Japanese beads are used. Under no circumstances should you use Chinese “Zlatka”, as they have different sizes mixed in one package, because of this the product will turn out sloppy. It tends to peel off when working, so it is better to give preference to higher quality material.
Hook
To knit a lariat you need a thin hook 0.9-1mm. It must be of good quality, have a smooth surface, and be even so that the threads do not catch.
Scissors
Designed to cut threads or fishing line to a specific length.
Linear materials
To create the decoration, the basis is a fishing line or thread. The fishing line depends on what kind of decoration will be made. If it is a lariat, a monofilament of 0, 2 or 0.3 cm is required to repeatedly pass the fishing line through the beads. The thickness of the fishing line is determined by the internal dimensions of the beads.
When knitting, the thread suitable is “Yanart”, denim, Snowflake, “Iris”. It all depends on the diameter of the hook.
Needle
For weaving you need a special bead needle. Sold in sets. If the lariat is done by knitting, you will need a long, thin needle to cast on. It should have an even ear and a smooth surface.
Pins
Required to secure elements during the creation process.
Beads
They are useful for decorating ends and are used to disguise knots and other weaving elements. Small elements can be knitted or woven into the lariat itself, which will add originality.
Wire
The purpose of thin steel wire is to weave decorative brushes in the form of complex elements created on the basis of a ready-made creation.
Locks
They are the main part of the decoration. Performs the functional role of a clasp for transformation into a necklace or other options. They are magnetic, in the form of carabiners, twisted from two halves, etc.
Clamp
Fixes the ends of an already completed tourniquet, and puts a fastener on top of it.
Limit switches
They are used for decoration; without them, the product looks unfinished. They can be solid, openwork, long, short, magnetic.
spinner
It is a device necessary for setting beads. This is a small deep container into which beads are poured, then a needle is lowered into it. When rotated, the beads themselves are strung on the needle.
How to tie a rope with beads (lariat)?
Beaded strands (lariat) look very beautiful and advantageous; they are worn as necklaces, bracelets, earrings, belts, and even used to decorate bags.
lariat itself came to us from the Indians, like many other bead techniques (for example, peyote, ogalala), it means “lasso” or “lasso”, a rope with a loop at the end. Indeed, the lariat is usually tied in various knots, braided, pendants in the form of beaded flowers are added, decorated with stones, and the ends are traditionally decorated with tassels.
Thus, having one piece of jewelry, you wear it in different ways, depending on your mood or clothing style. This unique transformable decoration is very easy to make with your own hands, choosing the desired shades of beads and coming up with a pattern yourself.
Let's start learning how to knit a beaded rope (lariat). This harness is crocheted in the round, rather than woven on a fishing line. So, we have already mastered the weaving of a beaded rope, let’s move on to knitting.
It seems to me that knitting a rope is easier and faster than weaving; most of the time will be spent preparing for the knitting process itself, but first things first.
To knit a rope (lariat) we will need:
- Beads. Most often they use No. 10 or No. 8, but it all depends on your wishes for the future decoration. For beginners, I recommend beads No. 8, it’s easier to train with it, because... the beads are larger. We also select colors according to the wishes of your soul; for starters, it is better to use 2 colors - one main, the second additional for a clear count of rows. In the future we will knit a complex lariat with a pattern according to the pattern, but more on that later. To knit the “Charm of Turquoise” rope, I used Czech beads No. 8 in two colors:
— Thread for knitting — any thin cotton thread for crocheting is suitable, Iris, DMC, Aida are very suitable. We select the thickness of the thread so that the beads pass through it freely, but do not slide too much. Fishing line is also suitable for small beads, but knitting it is a little more difficult than thread. We select the color of the thread to match the color of the main beads; the thread itself will not be visible, so deviations in shades are allowed. I have a light turquoise Iris thread:
— a hook to match the thread and beads, you can use a hook No. 1.5-2, ideally No. 1.75. The larger our beads, the larger the hook we take. It’s good to start by experimenting with different sizes of hooks and threads on the same beads, so you can select the materials most accurately. I have a hook number 2.5, it’s good for large beads, but next time I’ll take a smaller number.
— Thin beading needle for stringing. Not all needles may be suitable, so I offer an excellent option in the “hand-made” style. We will need a small piece of thin wire and pliers. We bend the edge of the wire and then fix it on the thread, check our beads - they should pass freely through our device.
— Accessories for decorating the ends of the rope and fasteners — here, too, everything depends on our imagination, you can secure the ends with ordinary caps for beads, you can beautifully finish the rope with large beads or attach a tassel. Here we use everything that harmonizes well with our lariat.
Let's get down to business!
1.) The first, and most uninteresting activity is stringing beads onto a thread in a certain order. Here it is important to follow the drawing report so as not to correct errors in the future.
There will be 6 beads at the base of our strand, which means we will use pattern 5:1. Because The strand is knitted in a spiral, our single bead of a different color will create a thin spiral line along the entire length of the strand.
Pour our beads separately into flat containers and begin stringing:
It’s good to string on a slippery surface, running a “needle” along the beads, so I adapted sour cream lids for beaded containers. To prevent mistakes in stringing, we lay the thread with the already strung beads side by side and look for any mistakes. If they are still there, you also don’t need to get too upset and unravel our ribbon; you can cut the thread at the place of the error, eliminate it and tie it with a small knot, again checking whether the beads pass freely along the thread with the knot.
The length of our chain depends on how long you want the jewelry to be. It is calculated simply, we multiply your desired length by the number of beads in a row, for example, we want a finished decoration 40 cm long, we will knit 6 beads in a row, multiply, we get the result - 240 cm. Yes, yes, we have a long and tedious the process of stringing beads onto a thread, but it doesn’t matter, the result is worth it. By the way, if you miscalculated the length a little and strung less than you need, it’s also not a big deal, after the last stringed bead has been called, we cut the thread, string the missing number of beads, carefully tie the thread in its place and continue working!
2.) We make a starting loop on our thread with beads strung and knit another air loop:
3.) We knit the first row - we knit a bead into each loop, then we close it into a ring with the first air loop:
4.) The most difficult process for beginners is knitting the second row. We pull the next 6 beads closer to the knitting and knit according to the pattern, above the bead of an additional color we knit exactly the same bead.
We insert the hook into the loop of the previous row, and move the bead that is already there back behind the hook:
We move our new bead closer, the thread is above the hook, we put the bead behind the hook and knit a loop:
5.) We knit the entire row in this way. At first it will seem that all the beads are sticking out in different directions and that this is not a string, but complete nonsense, this is normal, later all the beads will fall into place and our lariat will begin to take on the proper shape. Even if it doesn’t work out right away, don’t quit work, knit a few rows, then it will become clearer what’s what.
6.) The basic principle of knitting a rope is that only the already knitted beads lie horizontally, and the row of beads that we knit stands vertically.
7.) We continue our knitting all our free time, and soon you will receive your long-awaited lariat. When our stringed beads come to an end, we finish the work, to do this we knit the last row without beads, tighten the last loop, carefully hide the edge of the threads inside the strand:
That's it, our tourniquet is ready!
We complete the set with a bracelet:
All that remains is to arrange the ends of the tourniquet and you can wear it. But how to decorate our newly created lariat and design the clasp will be discussed in the next article.
Bead strands can not only be crocheted, but also woven; you can read about this in our article - Cords (harnesses) with beads.
You can buy beads suitable for knitting a lariat in our store, in the Preciosa Beads section of the catalog.
Methods and patterns for weaving
You can use different methods to create a product. Those who are just making their way into beadwork should work according to ready-made simple patterns. A master class for beginners will help you weave a lariat from beads. The mosaic option is ideal for beginners. It is better to carry out the first tests with only one color, and then weave multi-color works.
Using a needle
A simple way to weave a lariat is done with a needle. A detailed master class will allow even a teapot to cope.
- A thread of the required length is cut, threaded into a needle, and the end is secured with a knot.
- Begin weaving, adhering to the pattern.
- The result is a strand of seven beads. The initial option could be five.
- Weave according to the pattern to the required length. 80 cm is just right.
- put on limit switches.
- Product design – tassels at the end. A chain is made by connecting rings whose diameter is 6 mm. Beads of a similar or opposite shade to the lariat are placed on the pins. There should be a pair of beads on each of the rings. The brush looks like a bunch of grapes.
Before starting work, you should familiarize yourself with the diagram.
Using a hook
Lariat can also be created with crochet. For products with a pattern, patterns are also used. They are not needed for a single-color harness. It's better to start with this option. For strings of more than 12 beads per circle, you will need a filling tube to maintain the shape. It's called regilin.
- Beads are strung on the thread in the required quantity using a needle.
- Make one air loop without beads. The others should already be with them.
- Close the chain into a ring by connecting the first and last loops.
- Insert the tool into the first loop right in the middle, move the bead, grab the thread, and knit a half-column.
- Continue in a similar manner after reaching the required length.
- The plait is finished with two rows without beads.
The beginning of the bundle will be loose, but this is normal. When the tourniquet reaches 1-2 cm, it will become denser. It is necessary to ensure that the beads are laid horizontally.
Making a voluminous decoration
This part of the master class is presented to familiarize yourself with the beading technique, so it will be useful for beginning craftswomen.
For example, a product length of 90 centimeters is used.
To work you will need:
- hook (up to 1 mm);
- fishing line or thread in the color of the beads;
- pins;
- chipped stones;
- beads No. 10 (5 g of one color and 30 g of another).
First you need to take threads and a hook and make two air loops. String six beads on them and move them all to the loops. Make another loop, taking the first bead into it. Knit the remaining beads in this manner, trying to tighten them as tightly as possible. Form a ring. To do this you need to make a connecting post. Put on 6 beads again, then insert the hook into the loop under the first bead.
Next, move a new bead and place it on top of the first of the last row, pull the thread through the two resulting loops. To make your work easier, you can use diagrams. The same goes for knitting a tourniquet of the required length. To decorate the tip: crochet one row without beads.
To make the product look richer, do not forget about decorating the lariat. To do this, sew a piece of pebble or bead to the edge. Place beads on the needle and, stepping back a little, pass the working thread through three beads of the rope. You need to decorate the tip about 7 cm. Turn the direction of work and decorate further. Decorate the second tip of the work in the same way.
Related article: Crochet New Year's toys: master class with diagrams and videos
Now you need to position the harness so that its ends are at different heights. After this, fasten the thread at one end and string the required amount of beads. Twist the ends of the rope diagonally. After twisting a little, secure the thread and move to one of the ends. Wrap the tip itself 3-4 times. Now it's time to decorate the wrap itself. To do this, place a piece of stone on a needle, pass the needle through the chip, and pass it through 3 beads on the upholstery. You can continue to use this pattern and secure the thread at the end of the work.
Lariat is ready! You can see what it looks like in the photo:
How to arrange the ends?
Processing of the ends of the harness is presented:
- putting on tips;
- lock (for the possibility of wearing as a necklace).
- carabiner (second clasp option).
How to put on the tips?
The lariat is finished, it's time to give it a finished look. For this:
- Take a pin with a loop, bend it with a special tool, insert it into one of the loops, grabbing the parallel one.
- Coat the inside of the cap with Moment-Crystal glue and put it on, passing the pin through the hole in the tip. Press briefly for the glue to set.
- Using pliers, make a loop on the pin.
- Repeat with the second end as well.
Now you can make tassels by connecting them to loops or finishing the product with a lock.
All accessories must match the color of the finished product.
There is another mounting option:
- A bead is placed on the pin to prevent it from slipping out.
- Pull together the knitted part without beads and insert a pin.
- Apply glue and put on the end cap. Then proceed according to the previous method.
Ways to wear
By tying the lariat in different ways, you can change the shape of the decoration. It can be long or short, there are many tying options.
- The necklace is easy to make by wrapping the rope around your neck twice and fastening the clasp a third time.
- Sometimes the lariat is tied with a simple knot, leaving the ends 7-10 cm hanging, which looks nice.
- You can make a pendant necklace by folding the rope in half and bringing the loose ends through the neck.
- A twisted necklace is also easy to make. The tourniquet is placed loosely on the chest from the front side, the ends are brought behind the neck. The ends are wrapped around the part in the middle, which lies on the chest, pointing towards the center and left hanging beautifully.
For original knots, you can use the diagrams, this includes the Josephine knot, a braid necklace, and other options.
So, a beaded lariat is an ideal option for everyday wear. By changing the shape and tying method, you can create a new decoration by diversifying your outfit.
https://youtu.be/mp4p55N-nyIhttps://youtu.be/nVCUqYMEx7Y
_