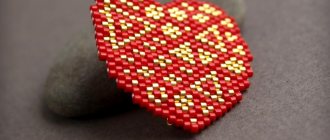
Weaving
Shows the arrangement of beads of different colors, has different densities and methods of execution. In addition to stringing on thread or fishing line, parts are attached with glue or wax, covering interior items or jewelry with patterns.
Bead craft diagrams demonstrate the movement of the thread through the beads.
Knowing the basic stitches will allow you to create your own product patterns. In brick stitch, the ends of the thread are directed in opposite directions, meeting in each bead. Other stitches add beads to the weave, reduce the number of beads in a row, or connect pieces in different ways.
Simple circuits
Crafts made from beads for beginners are simple and allow you to get your hands on one.
The butterfly, made of thin wire and beads of different sizes, is created by weaving the body and bending the wings.
To make a crocodile:
- Body parts and relief are distinguished by color changes. Collect one bead on the fishing line, starting from the tail.
- After stringing six beads, add one in a row until you have four. This is how the wide part is made. Add beads to the head, end with one piece and tie the fishing line.
- The paws are made without interrupting the line. Point the ends in different directions and add beads. 5 beads per limb. The product is used as a souvenir or brooch.
What to make from thermomosaic: ideas for crafts, diagrams
Bookmarks
Together with your child, create colorful bookmarks for books from thermomosaic and large paper clips. Lay out the thermal mosaic according to the diagram (download here), iron it through thermal paper, glue the finished figures with hot glue to paper clips.
Source: perler.com
“Fruit” bookmarks made from thermomosaic and wooden ice cream sticks (diagram here).
Source: perler.com
Accessories and decorations for children
Thermomosaic bracelets
Option 1. Place thermal beads in any color combination on the base. It is important that the ends of the future bracelet are made at different angles for proper alignment. Iron through thermal paper. Take the strip while it is still warm and wrap it around the glass, making a bracelet. Run the iron over the surface of the bracelet again to secure the ends.
Source: diycandy.com
Option 2. Even a 4-year-old child can make a simple bracelet from thermal beads. First, flatten the beads with an iron, wait until they cool down and invite your child to string them on an elastic thread.
Source: craftandcreativity.com
Option 3. Weave a bracelet from thermal beads in the same way as beaded jewelry is woven according to patterns.
Source: diycandy.com
Thermomosaic headbands for girls
Source: perler.com
To make it you will need: a simple headband (from Aliexpress), a thermal mosaic (diagram here) and a heat gun for gluing jewelry to the headband. Source: perler.com
Source: eighteen25.com
Summer earrings made of mini thermobeads
For work you will need: a thermomosaic with small beads, a diagram (download here), a base for earrings (from Aliexpress), metal rings for attaching figures (from Aliexpress).
Source: perler.com
Thermomosaic necklace
Source: thecraftedsparrow.com
Invite your child to draw their own design for a future necklace.
Source: blog.modcloth.com
Buttons for children's clothing
You can use thermomosaics to make bright buttons for a child’s outfit.
Source: makermama.com
Molten thermomosaic hairpins
Cover a baking sheet with baking paper, lay out a pattern of thermal beads and place in a preheated oven at 200 degrees. oven for about 10 minutes. When the beads are melted, remove the pan from the oven and let cool. Glue the finished figurine to the hairpin with hot glue. A bright hair accessory is ready!
Source: the36thavenue.com
Carnival masks
A thermomosaic mask for a girl (diagram here).
Source: perler.com
WE RECOMMEND
Keychains "Fruit"
Source: mypoppet.com.au
Phone case decor
Gift decoration
Creating holiday packaging is a very exciting process that will appeal to both adults and children. With thematic figures from thermomosaic, you can make original gift wrapping for any occasion.
Source: meinfeenstaub.com
Festive packaging for the New Year
Thermomosaic cards
Postcard for St. Valentine's Day (diagram here).
Source: perler.com
Home decor made from thermomosaic tiles
Pencil holder
Garland
Source: paperandpin.com
Fridge magnets
Assemble the mosaic according to the diagram (download here). Glue the finished figures onto magnetic tape (in Ozone, in My-Shop). Appetizing magnets for the kitchen are ready!
Source: perler.com
Mug stand
Source: brit.co
Thermomosaic photo frames
A child can make such a photo frame for his mother for the holiday of March 8 (diagram here)
Source: perler.com
Holiday crafts from thermomosaic
New Year's crafts for children
A New Year's wreath will decorate your door (diagram here).
Source: perler.com
Create an entire village from thermomosaics (diagram here).
Source: perler.com
Christmas decorations
Making decorations for the Christmas tree is a fun activity on the eve of the New Year (diagram here).
Source: perler.com
Volumetric Christmas trees made of thermomosaic
Download the diagrams here
Source: perler.com
Thermomosaic crafts for Easter
Elegant egg pendants (diagrams here).
Source: perler.com
Valentine's Day
A cute “Teddy Bear” craft for children for Valentine’s Day (diagram here).
Source: perler.com
Halloween Craft
A funny thermomosaic plate for sweets (diagram here).
Source: perler.com
Thermomosaic toys for children
Tetris
Source: rachelswartley.com
Labyrinth
Source: bubbledabbledo.com
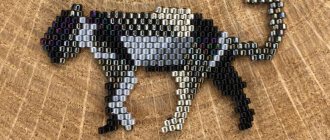
Kitten made of beads
Light crafts made from beads include flat animal figures. Use large material.
- Both ends of a thin wire are passed through the bead towards each other. They connect together and collect several parts; 12 beads are enough for a small product.
- Spread the ends in different directions and put 6 parts on each.
- The wire is inserted into the last bead again, fixing the part. Then it is passed through the fifth, fourth and third parts sequentially. The hind legs are obtained.
- 4 beads are placed on the left end of the wire. The right end is passed through them in the opposite direction. Now they will move towards each other.
- Do this in 3 rows of 4 beads. They make the paws again.
- Repeat the set of 4 beads to create the body. Cast on 3 rows.
- The next row is reduced to 3 beads.
- Collect 4 beads. Yellow beads representing eyes are added to the next row. They do this: black bead, yellow, 2 black, yellow, black part. Repeat a row of 5 black beads. One bead is attached to the end of each side and secured.
- They put the figurine on its paws and raise its head.
Variety of materials and tools
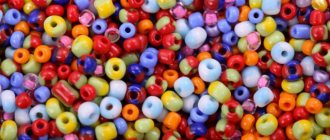
To create bead crafts with your own hands, you use different types of beads and other attributes that can be purchased in craft stores:
- The beads differ in size, color, and shape. They are round, triangular, rectangular, carved, elongated and flattened, twisted, with one or two holes of different shapes.
- You will also need straight and curved scissors. As a rule, light bead crafts can be assembled using only straight scissors, as long as they are thin and sharp.
- Beads are strung on rigid copper wire, soft braided thread or polymer monofilament.
- Wire manipulation is carried out using wire cutters and pliers.
- Additional tools: thin needle, hook, clear nail polish, instant glue, nylon thread.
As a rule, beadwork is based on patterns that you can draw yourself or use ready-made options. At the initial stages of creating beadwork, it is worth taking detailed diagrams, showing the colors and directions of the threads. It will be easy for children to work, having before their eyes a step-by-step master class that explains the sequence of actions in detail and clearly. The child will need the help of an adult.
Transparent containers or special boxes are suitable for storing beads, where the beads are sorted by shape, color, size and are not mixed with each other.
The variety of types of beads and wire allows you to create flowers of various shades, trees with beautiful trunks, almost any decoration - from a soft string bracelet to a massive necklace.
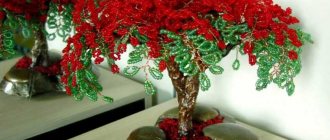
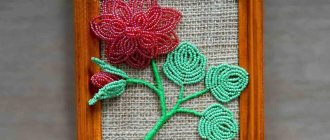
Flowers
Made from beads of different colors. For crafts, beaded flowers are collected from individual petals.
- A number of parts are put on the wire. Bend the wire, pick up a new row and pass the end through the last bead of the first row. Repeat.
- The leaves are made from an elongated loop, the subsequent rows are connected to the parts located below the top. A twig is made from several leaves.
- Fold the first petal and bend the edges. The next one is applied, a bud is formed, and secured with wire. Connected to the trunk and framed with branches.
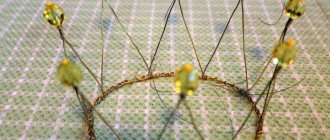
Beaded snowflakes
From the photo of beaded crafts you can see that unusual details add a special touch to the products.
- I use beads of different sizes, shapes and colors. Make rays in the shape of a cross. 3 parts and one crystal are put on the wire, through which the wire is pulled again, fixing it motionless. Thread the wire through the beads. Now it diverges on 2 sides.
- Put 2 parts and a crystal on each side, fixing it. Connect the sides and collect 4 beads.
- Repeat 5 more times, fastening the ends in the center.
Photos of bead crafts
Read here - Crafts for the interior - 95 photos of ideas for beautiful and original interior decor with your own hands
Did you like the article?
0