This master class will discuss how to weave gerdan (gaitan) from beads without using a loom. What is gerdan ( gaitan )? Most often it is a wide beaded ribbon with a flat pendant in the form of any geometric shape. This is one of the ancient chest decorations with a rich history. Gerdans are very beautiful and eye-catching, but initially they were woven as amulets. Moreover, they were worn not only by women, but also by men.
You probably noticed that I use two names for this decoration: gerdan and gaitan. What's the difference? There are several opinions on this matter. According to the first point of view, gaitan and gerdan are one and the same, it’s just that the first name is Russian, and the second is Ukrainian.
Some people believe that gerdan is a type of gaitan, which is a wide ribbon of beads, but without a medallion. By the way, it was not only the Slavs who wove such decorations.
It is known that similar amulets exist in other countries of the world: in Ethiopia, India, Bulgaria, Belarus, Romania, etc.
Most often, gerdan is woven on a loom. There is a lot of material on the Internet about this weaving method. Today we will learn how to do this without a machine, using threading beads at right angles.
When weaving at right angles, we can give the beaded fabric almost any shape by increasing and decreasing the number of beads in a row.
This is an absolute advantage, since it is more difficult to do this on a machine.
For weaving gerdan it is better to use Czech beads. Chinese beads will not work, as these beads are very uneven, differ from each other in size, and the woven fabric will warp.
- To weave gerdan according to this pattern, we need beads of 5 colors: two contrasting colors (I have dark green and white) and three colors for a smooth transition from one color to another (I have: green, blue and pale blue).
- Bead consumption: about 10 grams of white, blue, pale blue and green and 20 grams of dark green.
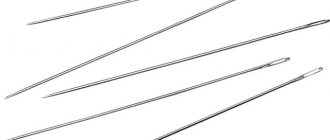
- In addition, for weaving we will need a special beading needle and monofilament.
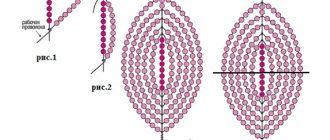
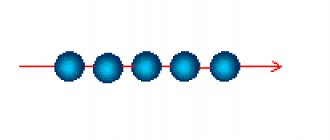
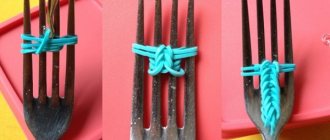
Let's start with weaving a medallion. We will weave from the top of the diagram. So, let's put the beads of the first row on the needle.
Place one bead of the second row on the needle, pull the needle through the last bead of the first row and again through the first bead of the second row.
We wove two rows. The beads still do not lie very evenly; at the beginning of lowering, this most often happens. But then the beads will be oriented in one direction.
We move on to lowering the third row. It is woven similarly to the second.
Three rows are ready:
Next we weave according to the pattern up to row 20. As you can see, the beads lie flat.
In the 20th row we begin to reduce the number of beads. To do this, attach the first bead of the 20th row to the penultimate bead of the 19th row and weave further according to the pattern.
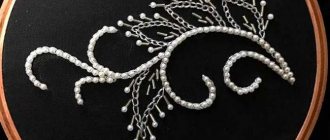
When the medallion is ready, you can attach beaded tassels to it.
Weave 2 beaded ribbons according to the pattern.
Now all that remains is to connect the parts together. This is done very simply: we stretch threads with stringed beads between them. Since the ribbons have a triangular base, the number of beads on the thread will change: it is reduced by one in each subsequent thread, and added by one from the center.
Gerdan is ready!
Happy beading! With best wishes in your creativity, author of Gerdan Anna Lavrentieva.
This master class was written specifically for the website world-hmade.ru, so copying the entire material is PROHIBITED!
When partially copying, be sure to include a link to the source.
Source: https://world-hmade.ru/mk/gerdan.php
Beaded gerdan
Materials: beads, nylon thread, needle and containers for beads, scissors.
You can use a ready-made machine, or you can make it yourself:
Let's pull the threads onto the machine. It is necessary that there be one more thread than rows of beads. In our case, this is 8 threads. Let's take the length to be approximately 1.5 m (arm span).
After the threads, we trim both sides so that their middle lies on the machine.
We secure the threads along the edges of the loom with clothespins.
Take 1.5 m of working thread and thread it into the needle. We will fasten the end of the thread -15 cm into the slot of our machine. We string 7 beads onto the needle according to the diagram.
We pass the needle and thread under the warp threads. Press the beads with your finger between the warp threads:
And we will pass the needle through the beads so that it passes over the warp threads. We watch this very carefully, as it may not turn out neatly.
Pull the needle out and lightly tighten the thread.
- We will also pick up the next 7 beads from the second row, pull the needle under the warp threads, then through the beads, over the warp threads.
- If the thread runs out, then we tie another thread to the ending one, and if there is no more space on the machine, then we simply move our product so that only threads remain on the machine again.
Next according to the scheme is the expansion of the belt. Therefore, we will add more warp threads. We take a second needle and thread a thread through it - 1.3 meters. Let's thread the needle and thread into the last row. We draw the thread so that its center is in the beads.
- We fix the threads on the machine.
- Further according to the scheme:
- Thus we will continue to expand the belt.
- Here is our result:
Remove the product from the machine and secure the other side. And we’ll do the same on the other side and again remove the product from the machine.
- Then we will begin to string the beads onto threads - the base.
- After the first beads have been strung, we begin weaving the element:
- At some stages we will connect the previous warp threads.
- We weave the pattern according to the pattern:
- We'll do the same with the other edge.
- After preparing the base of the belt, we string beads onto the remaining threads, then securing each side to each other.
Source: https://biseroplet.ru/gerdan-iz-bisera/
Patterns for weaving gaitan from beads
This beautiful decoration can be woven in various variations. For example, the first diagram will show you how you can make a gaitan with a folk pattern using brightly colored beads.
Read
Learning to weave delicate field cornflowers from beads
The following example is woven with a zigzag pattern. This combination of bead colors is the most common and goes well with each other. You need to weave a mesh with an ornament according to the pattern, and attach pendants at the end.
Here are some more options you can use.
Master class Gerdan Necklaces, beads, necklaces – Beads
Hi all! Today we will learn how to weave gerdan.
- You can purchase all materials in the online store Нandmademart.net
- We will need:
- — Czech beads white, red, black — Needle and thread — Beading machine — Printer (to print the pattern)
- — We will weave according to my author’s pattern
So let's begin.
Cut 6 warp threads approximately 150 cm long. Attach them to the machine, cut off 1 more long thread, tie it to the top thread of the warp in the very middle. We collect 5 beads on one end (1 black, 3 white, 1 black), push them under the warp threads and pass with a needle from above. This technique is called loom weaving.
So we need to weave 10 cm in one direction. Now we make additions. We cut off a long thread, insert it into a needle and pass through the last row of a narrow ribbon. We tie this thread on both sides to the loom (I use small nails).
Then we string 1 black, 2 white, 1 red, 2 white, 1 black onto the working thread, then push the working thread under the warp threads and pass from above. We repeat these steps several times, increasing the number of beads.
Beaded gerdans: diagrams, master class
Ethnic fashion has revived interest in traditional costume, everyday life, and jewelry.
Among them is a bright and original chest decoration, the popularity of which is growing today among craftsmen and handmade connoisseurs.
Beaded gerdans, patterns for them, machines and sets of ready-made colors are offered by any bead shop. Nevertheless, gerdan is far from a simple decoration, requiring knowledge of many nuances of working with beads.
What is gerdan
Are gaitan and gerdan made of beads the same thing? A discussion of this question by craftsmen led to a clear answer: these are two names for the same jewelry.
Gerdan in its classic form is a long ribbon with an ornament, the ends of which are connected by a medallion on the chest or in the solar plexus area. Traditionally, it is associated with Russian and Ukrainian folk costume, but jewelry of this type is present in the culture of many nations.
Beaded gerdans: patterns, techniques, patterns
There are two main beading techniques in which gerdans are created: openwork weaving and weaving.
Products made from beads, the patterns of which repeat the patterns for cross stitch, are usually made using weaving techniques. Bead weaving is a relatively new technique. Woven gerdans in folk costume are rare, but among the works of modern craftswomen they occupy a worthy place. There is hand and machine bead weaving.
Hand weaving is a technique that is not entirely suitable for gerdan. This is a very long and laborious process. Weaving such decoration on a machine is much faster and easier.
Openwork weaving is more demanding when it comes to choosing a pattern. Only geometric patterns are placed on the openwork mesh. Ready-made drawings and patterns for embroidery for this technique must be thoroughly reworked. Nevertheless, a simple openwork fabric is suitable for those who have just begun to master the secrets of the craft and plan to take on beaded gerdans. You can take ready-made schemes or try to create your own.
Where to start
Like any other creative thing, gerdan begins with an idea. Already finished beadwork, diagrams of finished works, descriptions from other masters can become the impetus for creating your own masterpiece. For beginners, for the first work it is better to repeat a ready-made drawing according to the diagram. To create your own ornament, you will need a grid template that you can fill in at your discretion.
Tools and materials
Let's understand a little about the materials and tools for beading before starting the master class. Gerdan made from beads using the loom weaving technique requires a little more tools and preparation than openwork weaving.
To work you will need:
- loom;
- beads of the same size;
- threads for beading;
- bead needles.
- ornament scheme.
You can buy a loom ready-made, or you can make it yourself, alternatively, on a candy box or cardboard base. An important point: for weaving it is necessary to take beads of the same size, otherwise the fabric will be distorted.
Master class: beaded gerdan using weaving technique for beginners
First of all, you need to prepare the loom. It is important to correctly tension the warp threads so that they do not sag. There is always one more thread than beads according to the pattern. Once they are secured to the machine, work can begin.
The working thread is threaded through a needle, and its end is secured to the machine. Next, the first row of beads is collected according to the drawn ornament.
A thread with collected beads is passed under the warp threads. The beads are distributed with your fingers between the stretched warp threads, one between each thread, and pushed up.
The needle with the working thread now needs to be passed through the collected beads over the warp threads, and the thread should be slightly tightened. The result is the first row of tape.
The second one is typed according to the picture. In the same way, a needle with a working thread is passed under the warp threads, and then through the beads on top of it. The next row is pulled up to the previous one so that they form a dense beaded fabric. In this way, a ribbon about a meter long is woven. It is important that the pattern on the edges of the tape matches and ends in the same row.
In this case, the medallion’s design continues the pattern on the ribbon. When it is finished, the warp threads are cut from the loom.
Along the height of the medallion, the ribbons are fastened together by adding beads in the middle according to the picture. The working thread is passed horizontally through the beads of the finished fabric.
Fringe is strung onto the remaining warp threads, then they are secured in the weave and the ends are cut off.
Beaded gerdans, the patterns of which require widening or narrowing of the ribbon, are woven with the addition of additional warp threads during the weaving process. To do this, a thread of the required length is passed through the last strung row of the ornament and secured on the machine parallel to the weaving.
Classic patterns and color combinations
Folk embroidery patterns have found a second life in modern gerdans. The traditional ornament with black and red roses, the combination of bright colors in the rhombuses of Hutsul patterns, the classic strict combination of black and gold and many other patterns are embodied in such decoration as a beaded gerdan. Gzhel, patterns with roses in blue tones on a white background, rosettes and curlicue leaves are also firmly included in the collection of beadwork patterns.
Do-it-yourself ogalala and gerdan from beads (photo and video)
The content of the article:
There are a huge number of different products that you can weave with your own hands from beads. Today we will talk about an interesting technique of weaving jewelry called ogalala, as well as such an unusual accessory as the gaitan.
The huge world of beadwork is not limited only to these jewelry; after learning the basics of weaving jewelry, you will be able to create your own, come up with an individual design and color. Then your wardrobe will be decorated with handmade beaded collars, necklaces, earrings and rings.
Weaving a bracelet using the ogalala technique
To weave such a bracelet, prepare the following materials and tools:
- fishing line or monofilament;
- Czech-made beads No. 11 in several shades.
When making such jewelry, you can use completely different color combinations of beads, which will allow you to create your own unique jewelry. This tutorial uses a combination of turquoise and beige shades of beads.
We begin the master class by stringing beige beads onto a thread. To make such an accessory, you need to string approximately twenty centimeters of beads onto a thread. You may need to add about ten centimeters more (everything will depend on how compressed the bends in the bracelet are).
We string three beige beads and collect three beads after each of the two along the entire length. Next it was the turn of turquoise beads. We collect five pieces on a needle and thread it together with the beads into all the middle beads of three pieces in the second row. We will perform such actions throughout the entire length of the product.
The next step is to remove the needle from the third bead, which is located in the center of the previous third row. There are seven pieces on the needle, and it is threaded with the bead located in the center of the five in the previous row (third). These steps must be repeated along the entire length of the bracelet.
According to the generally accepted Ogalala pattern, seven beads are the final row. In this master class, the last row is made of nine. That is, we take a needle and stretch it into the bead located in the center of the previous row. Next, we string nine beige beads and stretch the needle into the central one of the seven collected in the previous fourth row. Next comes the beige material again, this will help create a kind of stripe in openwork weaving.
At the next stage, the fringe for the bracelet will be created. The needle is pulled into the bead located on the edge in the final fifth row. We put on three things and insert a needle into the beads at number 3 here. We repeat similar actions. We collect three pieces of the main material and pull out the needle after one.
In the place where the top row and the penultimate row intersect, it is necessary to withdraw the needle into 3 beads at the same time. In this way, you need to make a fringe all over the product.
Ogalala is almost finished, all that remains is to sew the product. To do this, the needle is pulled into the bead located on the edge in the initial row. After that, we string five beads onto it. Next, the needle is placed on the sixteenth bead in the first row. This way we get a constriction. This element can consist of any number of beads, depending on the density of wavy parts you need. If you decide to make the waves denser, use fewer beads to stitch the product.
Now, you need to insert a needle into the same bead and thread it in the opposite direction through the constriction. The next step is to place the needle in bead No. 13. Here we string five more. Next, you need to count the sixteenth from where the needle came out and thread it there. Then the needle returns in the opposite direction along the constriction. It remains to repeat the described steps to complete the bracelet.
An important condition for successful stitching is that at this stage it is necessary to lay out the bracelet clearly on the wrong side, with the fringe on the other side. The result should be a wave-like element resembling a sine wave.
At this point, weaving the bracelet using the ogalala technique is completed; all that remains is to attach a special clasp.
Video: Learning ogalala weaving
Ogalala weaving patterns
Weaving gaitan according to the pattern
Currently, beaded jewelry in national themes is regaining its former popularity. Such an original accessory can decorate modern clothes. One of these types of accessories is the gaitan.
Required materials for weaving:
- black, white, bronze and red beads;
- beading needles;
- black nylon thread.
Gaitan is made up of large rosettes and eight more small ones, which are connected to one another by threads of single beads, which are woven on two needles. These elements are made with straight, dense weaving.
Let's study an example of creating a small socket. Work begins with the element located in the center. Seven beads are placed on a thread in the following sequence: white, black, white, black, bronze, black, red, black and again black, which will serve to create the next row (Figure 1). The end of the thread that is not used in the work must be of such length that upon completion of the weaving it can be threaded freely into the needle and fixed in the woven element.
Next, the thread is passed into the seventh bead from left to right and through the eighth piece. We pass through it with a needle from the right to the left side, as in Figure 2. To create the next row, you need to select a black bead and secure it to the sixth and seventh in the first. In this case, the thread is passed through them similarly to the previous case (Fig. 3). Now the thread goes to the next row (second in a row) and passes through the eighth and ninth parts (Figure 4).
The tenth bead arrives next, which is fixed behind the fifth and sixth in the initial row, as in figure No. 5.
Let's move on to the second line. Here the thread passes through the ninth and tenth beads, followed by the eleventh (Fig. 6).
When you have reached the initial bead. Continue weaving rows (first and second) at once. To do this, go to the fourteenth and fifteenth parts and string 2 pieces of beads on a thread: the sixteenth will serve as the second row, and the seventeenth will serve as the first (Figure 7). Next, we guide the needle into the first, fifteenth and sixteenth beads and again string 2 more. In this way, it is necessary to weave the line to completion, according to the diagram.
After you have woven beads No. 24 and 25, pass the needle through elements No. 23 and 22 and dial on the twenty-sixth to weave row No. 3. Having made one half of the rosette, you need to fix the working thread by passing it in a checkerboard pattern into the beads of the final few rows (Fig. 8). The second part of the rosette is woven similarly to the first.
In total, using this method, you need to make eight small-sized rosettes and one large one, to which you need to braid the fringe, according to diagram No. 1. For this we will use a long thread and fix it in the created panel according to figure No. 9, where the red line is indicated. You need to move in the opposite direction to the border of the decoration. In this case, the needle is brought out through a black bead located on the edge.
On the thread where the weaving takes place we string the following sequence of beads: one - bronze, twenty-seven - black, two - bronze and two - red. Passing the red bead located on the edge, you need to thread a thread through each of the collected ones. The thread passes through the entire panel to the bead, where the subsequent thread for the fringe will be picked up. Next, you need to repeat the previous steps.
In total, you need to collect seventeen threads with fringe and fix the thread in the product. Rosettes of large and small sizes are attached to each other using a string of single beads, according to diagram No. 2. To maintain the symmetry of the arrangement of small rosettes, you can pin them on a foam base.
Starting from the rosettes located at the top, it is necessary to weave threads with single beads of arbitrary length and combine them with each other using a small die, woven using the “cross” technique according to pattern No. 3.
Video: How to weave a gerdan from beads
vishivashka.ru
Beaded gerdan
Pin It
Hello dear master, welcome to the video lesson where you will learn how to weave gerdan from beads and learn the basic techniques of machine weaving.
What is gerdan
Undoubtedly, ethnic styles of beading are reflected in gerdans made of beads; these beautiful decorations have well-deserved popularity in many countries and peoples; sometimes these decorations can also be called tout - gaitana most often in this case means gerdan without a central pendant. In general, there are a great many options for such jewelry; you should definitely try to learn how to create such products - it’s very interesting.
Weaving technique
This product is woven using the bead weaving technique on a special machine; below in the “material” section I will introduce you to my tool. The weaving technique itself is simple and even a novice craftsman can weave a gerdan from beads.
First, we will parallelly pull the threads onto the machine, then we will tie another one to them, and with it we will form a pattern according to the diagram. Of course, this very general principle will become much clearer to you during the lesson itself.
These products can also be woven without a machine, but this is a completely different technique and we will talk about it some other time.
How to create your own diagram
You can realize almost any design on a plane by drawing up a diagram of the future gerdan yourself. We will also learn this today.
To create a pattern, you will need a program where you can draw your own pattern. I have a lesson where I show how to make a diagram, you can use it.
It’s a special pleasure to draw unique patterns of the future gerdan I recommend
Here is the link to MK: https://masterbisera.com/2014/06/blog-post_7922.html
Source: https://masterbisera.com/video-mk/gerdan-iz-bisera/
Weaving techniques
To weave a beautiful gerdan, you will need:
- special machine;
- high-quality beads (preferably Czech);
- monofilament;
- beading needle;
- scissors.
Many craftswomen prefer to weave the old fashioned way, without a machine. At the same time, the fabric turns out softer and flows. The convenience of this method lies in the fact that there is no need to hide a large number of threads.
Gerdan consists of two parts - a medallion and a beaded ribbon.
The ribbon can be made as a separate piece, consist of two parts, or be connected to the medallion during the weaving process. If the parts are woven separately from each other, they are connected using threads studded with beads.
To create a gerdan, the bead weaving technique is used. It consists of stringing a certain number of beads and their color ratio (in accordance with the chosen scheme). In the second and all subsequent rows, the beads are strung one at a time in accordance with the pattern. For weaving, craftswomen use the following low pattern.
The master class, filmed on video, will help you master this technique with ease.
You can see the step-by-step process of assembling the canvas in the photo instructions:
Beaded gerdan with patterns
Gerdan is the name given to a narrow multi-colored beaded strip with a medallion that is worn around the neck. In our master class we will look at weaving this decoration with patterns for beginners, as well as attached photos. Let's consider the weaving method both on a loom and without a loom. We will also learn how to weave a gerdan “Ukrainian motifs”.
To make gerdan, it is preferable to use Czech beads, in which all the beads are the same size, and the gerdan will look even and neat.
For hand weaving gerdan we will need:
- Czech beads of several colors;
- Needle for weaving with beads;
- Monofilament.
Gerdan made of beads by hand weaving (without a machine)
The weaving of the gerdan begins with a medallion. Beads of the first row are collected on a needle with monofilament, then they need to be pulled onto the working thread. We put one bead of the second row on the needle and thread the needle and monofilament thread through the last piece of beads of the initial row and then again through the first bead of the second row.
The third row must be woven in the same way as the second row was woven. At the beginning of stringing beads on a needle and monofilament, the beads do not lie very evenly, but then, as the work progresses, the beads are straightened in the desired direction.
So, we have already woven three rows. Then we continue to weave the medallion according to the diagram. As you can see, the beads on the future gerdan are already aligned. After we have woven the medallion, beaded tassels are attached to it.
When we have woven all the parts of the gerdan, we need to connect them together. First, we stretch threads with beads strung between the parts. The number of beads on the thread may vary, this is due to the fact that the base of the ribbons is triangular, we need to reduce one bead in each subsequent thread, and add one more from the center.
Gerdan from beads “Ukrainian motifs”
We will need:
- Czech beads (white, black and red).
- Machine for weaving with beads.
- Silk threads.
- Needle.
We cut six threads of one hundred and fifty centimeters each. Next, we need to fix all the threads on the machine. To the base of the top thread, in its middle, we attach another cut thread. We string one black bead onto one end of the thread, then three white beads and the last one black bead and thread it under the warp threads and go with the needle on top.
Using this method we weave ten centimeters in one direction. Next, we pass the needle and thread through the very last row of the tapered tape, then cut it off and fix it to the machine on both sides. Then we thread one black, two white, one red, two white, one black beads onto the working thread and carefully thread the working thread under the warp threads and pass from above.
Using this method, we continue loom weaving, each time adding the number of beads. We fix and secure the working thread well and cut it off. The final row should consist of fifteen beads.
We repeat the same on the opposite side. We weave ten centimeters of a narrowed strip and then make it larger. If the thread runs out during weaving, then thread the tip of the thread into the beads and make a knot.
And then we weave in the next thread.
After finishing weaving on both sides, remove the gerdan from the loom and secure it with a hairpin using the nails. Next we will make terry using the two-thread method. This makes for a more colorful decoration. After stringing is completed, we fix the thread in a decrease and go through the final row of terry along the top. Here we weave by hand.
In the same way, we string the terry and weave the narrowed part on the opposite side. After weaving the two parts, you need to fold them in half and put on the terry again. We fasten the thread and pass through the upper pendant.
Then we string the beads according to the pattern and do the work by hand. Having reached the decrease, we put on beads according to the ornament. At the moment of prying the needle under the base threads, we pass one upper and one lower thread.
Using this method, we continue to weave and pass one at a time until the very end until we get to the first element of beads. After weaving is finished, we fix the working thread in the beads and remove the future gerdan from the loom.
The final stage will be stringing terry. You can add beads of different colors to the terry.
Our pendants turned out to be two-strand, so at the end of each thread we tie a knot and singe it.
Now our gerdan is ready.
This decoration can not only be used in everyday wear, but it will also look like a holiday decoration. Such an original work can be given as a gift for any celebration to both men and women.
Ogalala from beads according to the pattern in photo and video master classes
Not many beginning beaders know what the word “ogalala” means. We would like to lift the veil of mystery of this unusual word. Ogalala is a beaded mesh that begins to acquire ruffles after the number of beads in each row increases. After this, the product becomes wavy, and if it is also woven from multi-colored beads, then it acquires amazing colors. Let's take a closer look at how you can weave a bracelet in the ogalala style, using a photo and a detailed description.
Step-by-step weaving of an amazing ogalala style bracelet
Prepare for work moninite and beads of several shades: turquoise and beige. So, the weaving process is very beautiful and exciting, so let's get to work immediately.
Select beige beads. To weave a bracelet you will need approximately twenty centimeters plus five centimeters of beads. The first will be beige beads in the amount of three pieces, and then the same number, but in turquoise color. Continue this alternation until there are as many centimeters as stated. After this, string five turquoise beads onto a needle and thread it into each central glass from the 3 second strip. When you repeat these manipulations along the entire length, you will see, as in the photo, what should happen.
Remove the main material from the central third bead of the third row, and thread seven more pieces of glass onto the needle. Thread it into the central one of the 5 pieces of the previous strip. Repeat similar manipulations along the entire length of the product. To make the ogalala bracelet look more interesting, we recommend that you make the last row not of seven pieces of glass, but of nine. This means that you need to pass the needle again into the central element of the previous strip and string nine new beige things. Thread the main material into the middle of the previous 7 in the fourth row. Light beads are used to create a ruffle effect with a characteristic stripe. Rest assured that the product will turn out incredible.
In the next stage of this master class, we will weave fringes. Pass the needle through the last bead of the fifth strip. Then string 3 pieces of glass and pull the material into the third element of this row. Continue to do exactly the same, picking up 3 pieces at a time and pulling the needle through 1 piece of glass. When the top strip intersects with the penultimate one, bring out the fittings immediately through 3 beads, continuing to make fringe along the entire length of the ogalala product.
Thread the fittings into the last bead of the very beginning row, and then string 5 new elements. And after that, thread the needle into the sixteenth piece of glass, also of the first strip. As a result, you should get a constriction as shown in the photo. Any number of beads can be used in the constriction. The number will vary depending on the density you want to have in this product. If you want a bracelet using this technique with a dense structure, then use much less beads. Again, insert the base material into the last bead.
Pass it through the created constriction, and then insert it into the thirteenth element in a row. After this, return the needle to its original place. Please note that it is better to sew the product only on the wrong side so that the required wave-like shape emerges. At the very end of the weaving, you will need to sew on a metal clasp, and the decoration is completely ready.
Patterns for weaving ogalala beads
Video: Master class on weaving ogalala jewelry with beads
handmadefrom.ru
Beaded jewelry in ethnic style. We weave gerdan
Beaded jewelry almost never goes out of fashion, and the secret is generally simple - versatility. Of course, a lot depends on the style, but the truth is that some types of jewelry can be worn with almost any outfit.
Beadwork is a type of needlework in which you can find something of your own. You can knit with beads, you can embroider, or you can weave. Moreover, each of these subsections is voluminous enough so that there is somewhere to find a use for our skillful pens. The ethnic style will suit any fashionista, especially if there is a gerdan in her treasured jewelry box.
The width and length of this beaded decoration can be varied during the weaving process. For example, I don’t like necklace jewelry, and I also try to visually lengthen my neck by choosing necklaces, chains and beads of the appropriate length.
Traditionally, gerdans are woven on looms or on planks , but beaded gerdans are much more beautiful.
Cross stitch patterns with geometric or floral patterns can be used as subjects.
To make the gerdan beautiful, you need to purchase high-quality and well-calibrated beads (Chinese or Taiwanese will not suit you for the job).
I have already told you about what beads are like
In order for the beads to lie evenly in the fabric, you need to use special thin needles for beads and nylon/lavsan threads for beading. You may prefer to use fishing line or monofilament, but experienced craftsmen advise trying each of these options before making a final choice in favor of one or the other.
Depending on which thread you choose, the quality of the beaded fabric, its plasticity and shape will depend.
You can weave gerdan by hand or on a beading machine , which you can buy in a store or make with your own hands from scrap materials. To ensure that the last point does not remain a “closed secret,” be sure to watch Anna Grossman’s master class or try using a simpler option.
- detailed photo instructions for making such a machine with everyone.
- Natalya Kuzma’s video master class will help you see the whole process of weaving gerdan on a homemade machine from start to finish:
- If you want to weave a gerdan with another pattern, Anna Grossman will teach you how to do it:
- And Ekaterina Kostinskaya’s master class will help you learn how to weave gerdan without having to put a lot of thread “tails” into the work:
Create with pleasure so that everything turns out better than ever! Good luck!
Source: https://www.darievna.ru/page/ukrashenija-iz-bisera-v-etnicheskom-stile-pletem-gerdan
Bead history
The cradle of beads is Ancient Egypt, where craftsmen managed to obtain glass for the first time. Over time, people learned to create small beads. They were used to decorate the clothes and household items of wealthy nobles. Initially, all products were made using a base, and after the invention of mesh binding, craftsmen had the opportunity to make independent jewelry.
Gradually, “busra”, i.e. artificial pearls, appeared in Europe. Although the uneven, cloudy beads could hardly be called pearls. Italian craftsmen have improved glass production technology, bringing it to almost perfection. It is not for nothing that Bohemia is still considered the center of glass making. They tried to hide the secret of production within the factory walls on a separate island - Murano. But even the threat of the death penalty did not keep production secrets, and glass factories gradually appeared in other European cities.
Italian, Czech and Japanese beads are considered to be of the highest quality. Manufacturers make it perfectly smooth, calibrated in size, bright and very resistant to abrasion. To create high-quality jewelry, it is better to choose material from these manufacturing countries.
Related article: DIY box for small items: master class on cardboard products
Why do craftswomen value tiny beads so much? They allow you to create unique things that are not afraid of the passage of time. This is evidenced by the records of archaeologists who discovered small green beads in almost perfect condition in ancient Egyptian tombs. At the moment, these products are over 5.5 thousand years old.