Knitting technique without knitting needles in detail
- For right-handers, the knitting should be placed on the left hand, for left-handers - vice versa.
- When tightening the loops, make them slightly looser, since they will need to be removed from your fingers.
- Choose a thread with a diameter of 3 millimeters or more. Knit the thinner one in a couple of folds.
- When knitting on fingers, the fabric will be in the shape of a narrow tube, approximately the width of the owner’s palm.
- Place one end of the thread at the back of your palm, throw the working thread over your palm, and pinch with your thumb.
- Hold the thread with your right hand and twist it in a figure eight around all your fingers.
- Wrap the little finger, make the binding in the other direction.
- Make a circle around your index finger and continue interlacing to your little finger. Repeat the weave again in the opposite direction to the index finger. There should be four passages with interlacing in total.
- The loops are cast on. There are two loops on each finger. Try not to get the loops mixed up in height. Start with your little finger, remove the bottom loop without moving the top one and throw it over your finger. On the remaining three fingers, repeat the steps with the lower loops.
- Place the free end of the thread on the back of your hand between your middle and index fingers, away from you.
- By now there is only one loop left on the fingers. Repeat the weave from the index to the little finger and back. Then move on to knitting the next row. To do this, remove the lower loops, starting with the little finger, throw them over the fingers one by one.
- In this technique, continue knitting to the required height. The finished strip will be located on the back of the hand.
- To complete knitting, there should be one loop left on your fingers. Transfer the loop from the little finger to the ring finger. On the ring finger, remove the bottom loop by moving it behind your finger. Place the top one over your middle finger. Follow the same pattern to your index finger. Pass the bottom loop over your finger, leaving one loop on your index finger. Cut the thread, leaving a small piece.
- Remove the loop from your index finger, pass the cut tail through it and tighten tightly. Also secure the end of the thread that was at the beginning of knitting.
How to knit?
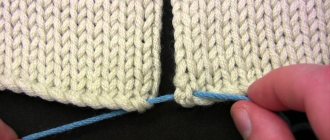
For a blanket, knitting made with knit stitches is suitable, and for this we remember how loops are knitted on knitting needles. We do the following:
- Having measured three meters of yarn, we make the first loop on the right wrist and fasten it.
- The thread is thrown over the index finger along the back of the hand and pulled away from you.
- The left hand is thrown into the loop formed between the fingers and the thread and, having grabbed the thread, we pull it towards ourselves and thread the finished loop again onto the wrist.
- We cast on the required number of loops in this manner. Be sure to align the loops, otherwise the fabric will be loose.
- The first row is performed in the opposite direction, starting from the outermost loop. The knitted loop remains without a hand, as if open. We knit this way until the end of the row, now the fabric lies in front of you on the table.
- The last row, to close the loops, makes one out of two loops, which is knitted with the next loop, and so on until the loops on the fabric are completely closed.
You should keep the rows and stitches even, because it is unusual to use your hands instead of knitting needles. Knitting such a blanket is quick and interesting.
Knitting with loops without knitting needles, step by step with photos
- Place loops on your hand. To do this, fold the thread in three and make a loop. Leave a free tail of threads of 150 cm. Throw a loop over your hand and pull. Place the next loop on the other hand, pull the loop out of the working thread that is at the back. Transfer the loop to your other hand and pull. Using this pattern, cast on ten loops.
- Start knitting the first row. Place the thread on the thumb of your right hand and pinch. Remove the last loop from your right fist to create a new loop. Transfer it to your left hand. Do the same with the remaining loops.
- Knit the next row in the opposite direction. In this way, continue to transfer the knitting from one hand to the other until you reach the required length.
- We close the loops. Knit the second loop in the usual way, then remove the first, leaving the second on the hand. Knit the next loop by slipping the previous one. Pass the cut end of the thread through the last loop and tighten well.
- To sew the ends, match the edges. The tail of the thread must be pulled through the loops of the last two rows, making a loop. Then pull a new one through the resulting loop and edge loops. Continue in the same way on all loops. Tighten the last one and hide the tip.
We knit a blanket with our hands from yarn
The question arises, how to knit a blanket with your hands, where to start? Modern yarn manufacturers never cease to amaze. Alize yarn, made in Turkey, called Puffy, is perfect for hand knitting. Yarn composition: 100% micropolyester. It is called children's yarn, which is used to produce very soft, warm, stylish blankets and blankets for children.
plaid
Skeins of Alize Puffy yarn
skein
Yarn consists of thread, in turn, thread consists of loops. Even loops of the same size. The essence of knitting is to thread each loop into the next loop with your hands. It's intricate, and that's how it is. But in any knitting, whether knitting or crocheting, there are patterns. There are not many patterns available since the yarn has not been on the market very long.
yarn
How to hand knit a blanket from puffy yarn
We knit a blanket with our hands from yarn, where to start? The yarn is soft, one might say loose, lay the yarn out on a flat surface, you need space - a working surface. A regular table, even an ironing board, will do. For a 90x90 baby blanket you will need five skeins of yarn. You need to start knitting with a layout - lay out the thread evenly, cut the first loop, cut its base to make a tail, then count 50 loops. It is advisable to align everything. The first row is the most difficult, you need to concentrate your attention. If you are knitting for the first time, you need to get used to the yarn and do a test knitting of ten loops. Be sure to correct the loops by pulling them out a little. Due to the structure of the thread, the knitting density is always the same. If the thread in the skein runs out, we simply tie it to the thread from a new skein with several knots, which we then need to try to hide.
start knitting
knitting process
formed pattern
plaid fabric
canvas at work
The process is so addictive, it’s impossible to tear yourself away. I want to knit again and again. The last row ends very simply, the loops are also closed by inserting one loop into another, only without thread, you can use a blanket edging, which is easy to crochet.
tying a blanket with your hands
Hand knitting is called knitting for the lazy. But this is not true, just a beautiful phrase. Knitters are never lazy. The structure of the yarn is such that if you do not notice the loop and do not grab it in a certain place, the product cannot be unraveled like regular yarn. You need to go back, remove a loop from each stitch, get to the right place, correct everything and continue knitting. But everything is not so scary, everything comes with experience.
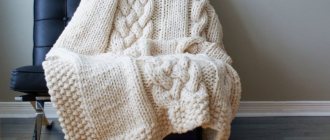
blanket made from Alize Puff yarn
A hand knitted blanket with large knitting turns out to everyone’s surprise to be very soft, pleasant, and even beautiful due to Alize Puffy yarn. Blankets can be knitted in different sizes. Sometimes it takes 20 skeins of yarn. Knitting by hand does not take much time, but the love for this technique increases with each product, I want to knit again and again, and not just blankets.
We knit a blanket by hand, where to start? Video lesson.
How to care for products made from Azize Puffi yarn, care is simple. Wash at 30-40 degrees, dry flat.
And so the hand knitted blanket is ready. Look at another blanket that is knitted in a very simple way. What will you knit next? Share your impressions.
To never miss interesting materials, subscribe to the newsletter. Thank you for reading this article. I am sure that this article will be useful to many. Share on social networks with your friends. Sincerely, Tatyana Gordeeva.
How useful is the publication?
Click on a star to rate!
Average rating 5 / 5. Number of ratings: 15
No ratings yet. Be the first to rate.
Similar articles
Knitting without knitting needles for beginners, master class
- Tie a loose loop on your index finger with a knot. Place the short end of the thread toward your palm and the long end outward.
- Wrap the long end of the thread around your finger outside the loop. The thread must be drawn from the back of the finger.
- Pull the thread through the loop around your finger. You should now have the first stitch knitted.
- Repeat steps 2 and 3, the chain will lengthen.
- Then, changing direction, slide your finger under the two chains and pull a loop through them.
- Throw the loose thread over your finger, making a loop, then pick up the two loops in front and pull the thread through them.
- Continue knitting to the required width.
Knitting a blanket without knitting needles, step by step
- You will need very thick yarn. For a blanket 100*150, 3 kilograms will be enough.
- Cast on 16 stitches on your hand. To do this, make a loop and put your hand through it. Continue adding new loops to your hand.
- Then transfer the loop to the other hand and pull the main thread through it, forming a new loop. Throw it over your hand. Repeat the same with the remaining loops until they are all moved to the other hand.
- Do the same in the opposite direction, pulling the thread and transferring the loops to your free hand.
- Knit on your hands until you get the required length. At the end there will be three loops left, you need to pull one through the other one by one so that in the end there is only one left. Pull the thread from the yarn through the last one and tighten it well.
Video: Scarf on a ruler
When casting on a ruler, you need to know how many loops together you will continue to knit - the total number of them should be a multiple of this number. The length of the scarf can be varied by removing the already cast-on loops from the bottom of the ruler.
If you want to knit a scarf of a larger width than shown in this video tutorial, add the number of interlaced rows of stripes. If you don’t yet know how to beautifully crochet a finished product, to begin with, you can leave the scarf in this form, decorating only its ends with tassels or fringe.
Having mastered these simple techniques, you can improve in knitting a scarf on a ruler while learning other patterns. This is the difference between Peruvian knitting and the other methods described above.
As you can see, in order to classify yourself as a knitter, you don’t need to master master classes on working with knitting needles or learn complex crocheting techniques. Thick yarn, the ability to use your hands or fingers, a ruler or a box - and you can knit a scarf without much difficulty.
Hand knitting without knitting needles and hook, pros and cons
Pros:
- You don't need much experience in knitting skills;
- You can learn quickly;
- The knitting process is faster;
- Lack of sharp tools, which allows you to knit almost anywhere;
- Easy to change thread color;
- Helps the nervous system calm down;
- The versatility of the yarn for knitting (mostly textured bulky thread is used).
Minuses:
- Your hands get tired;
- Yarn consumption is higher;
- It is inconvenient to take breaks, since temporarily all knitting should be transferred to auxiliary materials.
For experienced needlewomen, hand knitting takes less time than knitting. If you want to learn how to turn yarn into finished products with your own hands, take advantage of detailed master classes, stock up on yarn and patience.
Peruvian knitting - broomstick
Hand knitting, based on removing loops from a template (ruler, strip of thick cardboard) and then interlacing them with a hook, without using knitting needles, is called “broomstick”, or, in other words, Peruvian knitting. This technique will require some crochet skills.
Read
Knitting clothes for different breeds of dogs
A chain of air loops is assembled, and with the help of a hook, loops are formed on this chain, elongated around a ruler or template, which are subsequently intertwined and knitted in various ways. Brumstick workshops teach you how to knit various patterns, but it depends on the skill. If, for now, you can only crochet a chain of air loops and half-columns, then there are master classes on crocheting scarves on a ruler with simplified techniques. For example, such as in the following videos, which show the entire process in great detail.