By learning different beading techniques and techniques, any one of you can notice the huge variety of items that can be made if all of them are mastered properly. These crafts have a huge list of names that can hardly be listed in their entirety. In this lesson we will look at a fairy tale-like, colorful and shiny world inhabited by birds and beaded animals. In addition, we will look at several examples where we will talk about how to weave animals and birds using patterns and beading techniques.
It should be noted that diagrams are not always needed. Beginners and those beginning to learn the craft of bead weaving will most likely be interested in those master classes where you can weave a simple figure without a pattern. Simple crafts are in demand as gifts and souvenirs. Cute and fabulous animals made of beads can become a keychain for keys or a phone, a brooch or an original pendant. All beaded animals can be divided into two large groups.
Flat and three-dimensional figurines of animals and birds
Two large groups into which all beaded animals are divided are:
- Flat figures;
- Volumetric figures.
For children and adults starting to learn, it is recommended to make their first crafts by making simple flat figurines of animals from beads.
It is best to weave large beads into animals and birds that have few additional details. It is advisable to make flat crafts for beginning needlewomen on thin and flexible wire, because in this case the beaded figurine can be given any bend or shape. Volumetric beaded animals require a lot of experience. To make such a figurine, you need to master the technique of parallel weaving, as well as some other techniques of volumetric beading. To do a voluminous thing correctly, you must use the instructions of the corresponding diagram. Weaving is done on thin wire or on a special fishing line. The diagram will help you determine the point from which weaving of the figure begins, as well as the desired point for attaching additional parts, such as legs, horns or wings.
Let's move on to a practical analysis of the most common methods of weaving flat and three-dimensional figurines of animals and birds from beads. To do this, we will use video materials that will help you understand beading techniques. We will conduct several master classes, from which you will learn how flat and three-dimensional animals are made from beads.
Read
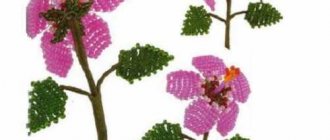
Master class on weaving rowan from beads using photo and video lessons
Beaded sea creatures
Beaded seahorse brooch
Seahorses are incredibly mysterious inhabitants of the seabed. These wonderful creatures are present in many myths. The royal nobility of the seabed traveled in carts, which, in fact, were harnessed by seahorses. The vertical method of his movement is a symbol of absolute loyalty to his principles and ideals, since, despite the terrible inconvenience of this method of movement, he easily adapted to it. In addition, it symbolizes powerful protection. Because when any kind of danger approaches, the seahorse easily mimics.
https://www.youtube.com/watch?v=DeN2Qg0exxw
Beaded dolphin brooch
The dolphin is a mammal that is characterized by both the air space and the aquatic environment. He is a friend of people. In particular, this is evidenced by the legends that the dolphin is the one who saves shipwrecked people. He is also a guide of souls. It symbolizes sea power, security and freedom. A brooch with an embroidered dolphin will decorate any summer dress and give it the romance of the sea.
How to make a flat dog from beads
To make a flat bead dog we will need:
- six black small beads,
- one large black bead,
- one pink bead,
- brown beads,
- white or cream beads,
- thin copper wire (1 meter),
- scissors,
- weaving pattern.
We begin to weave the first bottom row, which will also contain the dog’s legs. We will make it by collecting four brown beads on the long tip and moving it close to the tail detail. At this stage we need to complete the first leg of our craft. We string three white beads, moving them towards the rest. We make a ring of wire, passing the end through three brown parts, and tighten it. Next you need to collect one black bead, four more brown and three white. We form the second leg of the dog in the same way as the first.
After this, go to the second row, collect eleven beads, the first five brown, one black, and five more brown. At the end, we twist both ends and hide the short tip. Now you need to weave the third row of the same length as the second, that is, 11 beads of the same color. You need to secure this by passing the wire through all the parts of the second row, on the opposite side, bringing the end out near the third. Using the same technique, we continue to make the next rows, following the instructions of the diagram. This will allow us to make the body of the dog, up to its head. At 4, 5, 6 and 7 we collect 9, 8, 6 and 6 beads respectively. At the same time, in the fifth and sixth, the middle four beads should be white; our weaving will have a nice white breast. In the fourth there will be only two white beads. One black bead is needed in the center of it, as required by our diagram.
Now we will make the head of our craft. We will make the eighth from three parts (beads), the middle of which will be pink, imitating the mouth of a dog, and the two outer ones will be white. In the ninth there should be four white beads, and in the tenth there should be only one black one as a spout. We finish beading the figure, following the pattern and weaving technique as at the beginning of the work.
How to learn how to weave animals using beads with your own hands
Learning to make flat figures on wire
It is recommended to try your hand at beadwork by creating flat figures in the form of funny animal faces.
Required materials and equipment:
- rounded beads or beads of different colors;
- thin wire for beading;
- scissors;
- additional accessories upon request.
Operating procedure.
The work is performed using the parallel weaving technique, the diagram of which is given below.
We cut off a piece of wire and assemble the first row of beads in the given sequence according to the diagram, moving all the elements to the center. Then we weave the next row parallel to the first, passing the left part of the wire piece through the beads to the right side, and the right part to the left. In this way we weave according to the pattern, adding and subtracting beads in the given places. If the figure consists of several parts, they are woven separately and then connected in a common pattern. As you work, you can give the products a certain shape and leave them flat.
Below are patterns for beginners that allow you to weave miniature animal faces from a small amount of beads.
The resulting flat figures can be used to create keychains, decorations, Christmas tree decorations, etc. To do this, when weaving the last row, we pass the necessary accessories (a ring for a keychain, a fastener for jewelry) through the wire and secure it with several turns of fishing line and a knot.
We also learn how to make three-dimensional figures on a fishing line
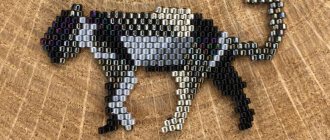
To weave three-dimensional figures from beads, you can use not only wire, but also fishing line or a special reinforced thread. Crafts on fishing line are more airy, embossed and textured. Let's try to weave a small crocodile.
To work, we will need some green beads, fishing line and thin long needles for working with beads. You can do without needles, but in this case the fishing line should be cut as evenly as possible so that it passes through the beads better. To decorate the eyes, claws and stripes on the back, you can use leftover beads in yellow, black and other colors.
The work is also carried out by parallel weaving, starting from the crocodile's mouth or tail. When weaving from the tail, we collect one bead onto a piece of fishing line, and pass the opposite ends of the fishing line into the next bead and tighten it. Each time we repeat the row twice, trying to tighten the line tightly enough. In each subsequent pair of rows, if necessary, add or subtract one bead. In order to make the crocodile's paws, you can collect 3 beads at the end of the row and continue weaving in the usual way. In our case, the legs are woven separately and secured to the sides of the figure at the end of the work. To do this, the fishing line must be passed through the corresponding row of beads on the animal’s body. To make the legs more stable, you can weave them using wire rather than fishing line. We weave the entire figurine according to the diagram below, at the end we tie the fishing line into a knot, cut it and melt it with a lighter.
Using the principle of weaving a crocodile, you can make a lizard. In this case, the body will be uniform in thickness, that is, the same amount of beads will be used in each row. When working, it is very important to tighten the fishing line with the same tension along the entire length of the figure so that it does not deform.
Using the technique of volumetric parallel weaving, you can make funny attachments on a pencil in the form of animal figures, as in the photo below.
The work begins from the bottom of the product, the rows of beads are gradually shortened to form a rounded head of the animal. The muzzle is formed on one side using beads of a contrasting color. We braid the paws, ears and tails separately. To weave a bunny from pink beads, you can use the following pattern.
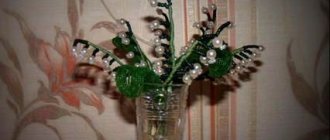
Magic birds
Various birds made of beads will brighten up not only your leisure time, but will subsequently help decorate the room. And the main thing is that weaving birds from beads is very simple. There are many patterns for weaving feathered creatures. This master class will reveal the simplicity of weaving using the example of one of them.
In order to weave a hummingbird bird in three-dimensional form, stock up on 1.2 m long wire. We start with the beak and the flat weave technique. We continue using the method of volumetric parallel weaving. The legs and wings will be the next step. To do this, a wire is pulled inside the body of the bird from beads at the rate of two for the legs, two for the wings. The wings will be made using the technique of flat weaving, and the legs - volumetric. Another segment stretched under the last row of the body will be for the tail. Using flat weaving, we string the beads and cross the ends. Starting with the finger that faces back, we string the fingers of the bird with beads. We complete the beading process by pulling the wire forward through the entire row of beads. And we continue to string beads for the remaining fingers. We twist the ends and cut off the excess.