Why are there so many different ideas?
The fact is that denim is a very durable and versatile fabric. She always looks tasteful. That’s why crafts made from old jeans look very presentable. In addition, they will serve for many years to come.
There are a lot of ideas and options for creating practical items from worn pants. You just need to think about how exactly to apply them by looking at the photos of crafts made from jeans presented below.
Denim organizer
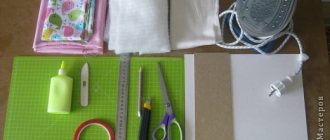
Every needlewoman has a lot of little things to work with and they all dream of getting lost. To prevent this from happening, you can buy a plastic organizer in the store with various compartments for small items. Or you can create it yourself. For these purposes we will use old jeans. To get the job done, take:
- Small cuts of denim;
- Scissors;
- Empty containers;
- Corrugated cardboard;
- Glue gun;
- Ribbons, braid and lace for decoration.
Related article: Do-it-yourself ashtray with a metal lid with photos and videos
You can take any pieces of jeans, including those where the pockets are located. Cut denim rectangles to fit the jars. Don't forget to allow for allowances.
Glue the prepared pieces of fabric to the jars with hot glue. The top and bottom are cut and tucked inside.
When all the containers are covered, you need to decorate them as you wish.
To ensure that your useful little things are always at hand, fasten the parts of the organizer. You can use hot glue or carefully sew them together. Trace the containers on corrugated cardboard and cover it with denim as shown in the photo below. Glue the jars to the bottom and decorate the gluing area with twine.
The practical organizer is ready!
Clothing and accessories
How to make crafts from jeans is clear, but you can transform trousers into interesting things.
Apron. Here you need several pairs of old jeans. We connect them with trouser legs and cut off the excess fabric. You should try to connect so that the back pockets become chest pockets.
We recommend reading:
Crafts made from epoxy resin - stylish, original and beautiful products and decorations made from epoxy (110 photos)Crafts from seeds: step-by-step instructions and tips for choosing the most beautiful ideas for crafts
Crafts from airy plasticine - ideas for creating beautiful crafts, the main steps and a description of how to make a craft correctly (100 photos)
In addition, you can transform old jeans and wear them for many years to come. This is done using appliqués, stripes, applying a unique print, embroidery, beads, and rhinestones. It is worth painting them with a special felt-tip pen or applying a unique print over the entire surface.
Ripped jeans. Made using a blade. No need to cut huge holes. It is worth carefully pulling out the threads, leaving beautiful cuts.
Butterfly. This is a wonderful accessory that will not leave any woman and even men indifferent. The butterfly is literally rolled up from a piece of denim. The middle is fixed.
From one pair of pants you can sew a bunch of such items and give them to friends. Convenient to use as a brooch or decoration, or instead of a tie.
Blue roses
The harmonious blue color of denim makes it an excellent material for creating flowers. This master class will tell you how to make a rose from jeans and what it can be used for.
Related article: Asbestos fabric: properties, application and care
To make a flower, take:
- Strips of denim 2 cm wide and 11 cm long;
- Scissors;
- Threads, needle.
Fold the strip of fabric in half. Fold the right edge into a triangle towards the base and secure with thread. Twist the fabric, tacking with threads where necessary. When you reach the end of the strip, carefully tuck the ends in and hem the bottom. Straighten the product and give it shape. Rose is ready!
This master class is perfect for children. If the child does not yet know how to sew, you can simply wrap the fabric with thread.
So, your little sun helped you make roses, but where to use them? You can use them to decorate a hair tie or headband, or sew them onto a hat. We invite you to create a topiary with blue roses. This tree of happiness will organically fit into your interior.
For topiary you will need:
- Base ball;
- Jute twine;
- Fatin;
- Walnut shell;
- A small flower pot or any container;
- Strong wire or wooden skewer for the tree trunk;
- Hot glue.
You can make the base for topiary yourself using newspaper. Form it into a ball and wrap it with twine. It will align the ball and serve for decoration.
Cut the tulle into ribbons 2.5 cm by 15 cm, and gather on a thread. It will serve as a border for the rose.
Insert the stem from the bottom side of the ball and decorate it with twine. Decorate the base with roses and walnut halves. To do this, you need to glue them to the ball with hot glue.
You can use a store-bought flower pot or decorate a small baby food jar. Cover it with a piece of children's tights. Fill with sand and strengthen the topiary.
The interior tree is ready!
How we work
Cut off half the leg. We prepare the straps. We need: with a buckle - it should be 10 cm long. Another one - with holes - 40 cm. And a couple more pieces of 3 cm each.
Turn the pant leg inside out. We sew the edge on a typewriter. We sew the corners with a triangle. And then we turn them inside out. We get a semicircle.
Using an awl, we make a hole at the end of a long lace and sew it on one side of the trouser leg.
We use the smallest belt blanks for the loops. We sew a piece of belt with a buckle at the bottom. It will be possible to fasten it. We use the second piece of belt in the same way.
Sewing technique
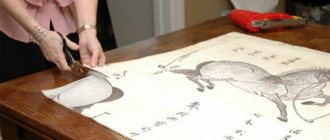
Craftswomen have been using denim in the patchwork technique for a long time. The patchwork technique will help give a second life to old denim items. From pieces of jeans you can create items that combine household and decorative purposes. These are various blankets, rugs, rugs, pillows, toys for children. You can even reupholster your furniture.
Denim bag
To sew a small bag, you need to choose old jeans in a suitable color. Let's look at the process of making a handbag step by step:
- Create a simple pattern yourself using rectangles for the base.
- Carefully unpack the product and cut off any rough seams. There is no need to remove the pockets; they will become the highlight of your handbag.
- Connect the pieces of fabric using a sewing machine so that the size of the fabric is sufficient for cutting.
- Open out the pieces of the bag and sew them on the machine. Make a lining from the fabric, insert it into the resulting denim bag and stitch the bottom.
- To hide the seams and give the product a neat look, you need to make a belt from a strip of fabric along the top of the bag.
- All that remains is to sew in handles, a lock and decorate the handbag with various decor.
Related article: DIY wedding decoration made from beads with photos
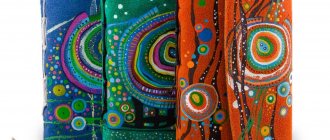
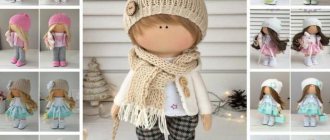
Photos of crafts made from jeans
0
3
On a pillow-thought
Small sofa thought pillows do not need simple pillowcases, but thicker ones that are easy to remove and change as needed.
Pillows in pillowcases with multi-colored appliques look very interesting and lively on upholstered furniture.
In the proposed pillowcase model for a traditional square pillow, two identical halves are used, one of which (the upper one) is assembled from a multi-colored rag, the second half can be made of solid fabric with a zipper or Velcro adhesive tape.
Manufacturing sequence:
- Make a pillow. Determine what size pillow you need and cut out two such pieces from thick fabric, not forgetting the seam allowances. Then sew along three sides, leaving unstitched space for turning. Turn out the cover and fill it with padding polyester or feather. After this, sew up the hole. The pillow is ready.
- Cut out all the details of the pillowcase. Before cutting jeans to make it, it is better to first draw a life-size pillowcase on a sheet of paper and cut out the same one from denim using this pattern. The pattern can consist of one piece with a fold in the middle or several depending on your imagination and the size of the jeans.
- Sew all the details of the pillowcase. Cutting fabric is more economical if the details of the pillowcases are cut according to pre-prepared patterns. You can cut out the back half of the denim pillowcase with your own hands using the pillow pattern, but it should be 10 cm longer than the top. To get patterns for the upper half of the pillowcase, you need to mark the location of the star on the pillow pattern and cut this pattern along the marked lines.
- Process the front side of the pillow. The assembly principle of the star proposed to decorate our pillow is called radial. A square block is divided into 8 sectors by diagonal and straight lines, and any of the sectors is divided into three geometric shapes. Next, exactly the same fragments are repeated in all sectors, and as a result, the details of the pattern converge at sharp angles in the center of the block. Then the pattern is sewn down in sectors: first, parts 1 and 2 are sewn together, their common joint seam is covered with part 3 and sewn on. Each sector is assembled in this way. After this, the two resulting triangles are stitched along the long sides - a square is obtained.
- Particular attention should be paid to the corner of the square facing the center of the main pattern. It must be strictly equal to 90°. The accuracy of the joining of parts in the center of the pattern depends on its correctness. Now the remaining quarters of the pattern are collected in the same way and sewn into a whole canvas according to the rules for assembling a canvas from squares.
- Process the back half of the pillowcase. To do this, an entrance is marked and cut on it for putting it on the pillow. Typically this is done at the bottom of the pillowcase. Both parts are folded in half along the cut edges and secured with machine stitching 2 cm from the edge. After this, you need to sew in a fastener (zipper or Velcro adhesive tape).
- Processing with lightning. Both processed parts of the back half are placed close to the teeth of the zipper, basted and machine-stitched.
- Processing with adhesive tape. Both parts of the back half are folded in half along the cut edges and secured with machine stitching 2 cm from the edge. Then one part (usually the top) is placed over the other so that they together correspond to the size of the front part of the pillowcase. Attachments are made along the edges of the entrance. Pieces of adhesive Velcro tape are placed along the seams of the entrance to the cover in two or three places, which will prevent the pillowcase from opening during use.
- Process the pillowcase. To do this, both halves are folded together face to face, cleaved or basted along the edges and sewn on a machine along the marked lines. Then turn it right side out and iron the edges.
- You can sew fringe or tassels along the edges of the pillowcases. You can buy and sew ready-made accessories, or you can make both tassels and fringe yourself from silk or wool.