Craft “Scarlet Flower” from beads
We will need:
— Beads of red (2 tones), black and green.
— 1 black bead for the middle.
— Wire for weaving and for the stem.
- Green threads.
— Green satin ribbon.
Wide petals are made in arcs. We cut the wire 1 m and make a loop with forked ends, where the short one is 10 cm smaller, and twist it by 1.5 cm.
We string 5 beads onto a short tail and make a knot so that the beads do not slip.
Next, we string the beads onto a long tail, but there is no need to count the beads here, because Then from the collected beads we make a turn around the 5 beads strung before and on top of the small tail we twist it at an angle of 90 degrees.
We string it onto a long wire and twist it at the bottom with 5 beads at an angle of 45 degrees. As a result, a rounded top and a pointed bottom were formed - these are the initial three rows. We continue similar actions, adding rows until we weave 13 rows. Next, twist the bottom wires, cut off the knot at the top and secure the wire. You need to make 7 petals.
Narrow petals - made in arcs (similar to wide petals). Only at the base there are 10 beads, 9 rows and in the end there is a rounded top. We make 5 such petals.
Middle: take a 15 centimeter wire, string a black bead, move it to the middle and twist the wire under the bead 3 times. Using red beads of a different tone using a loop technique, we make 6 continuous loops of 2 cm each. We do not twist the wire tails.
We take black beads and use the loop technique to make 12 continuous loops of 2.5 cm each, again without twisting the tails of the wire.
Leaves are made in arcs using the “reverse loops” technique.
The base is 2.5 cm of beads, 5 rows and in the end the top and bottom of the sheet turned out to be pointed. Upon completion of the 5th row, we make a pair of reverse loops on all sides of the base. We bend the ends of the reverse loops slightly. We make 3 such leaves.
Assembly
We combine 3 parts of the middle. Now we attach one wire leg of the black element to the legs of both parts. We tightly screw the black part onto the base of the middle.
We apply the finished center to the top of the wire for the trunk and secure it with a thread to one of the loops of the center. Now we attach the center to the wire.
We apply a narrow petal and wrap it with thread, thus fixing the remaining narrow petals.
We attach a wide petal and wrap it with thread in the same way, now we wrap the remaining wide petals in the same way. Then we wrap the threads around the entire stem, adding leaves along the way.
Next, take a satin ribbon and wrap it around the stem, thereby masking the wire. At the end, we fix the tape with glue so that it does not unwind.
Creating a scarlet flower step by step
1. From a bright fuchsia ribbon in the form of large rectangles 2.5*10 cm you need to make 6 large petals. Place the rectangle horizontally. Mark the middle on the top wide side. Bend one side down first, making it strictly vertical. Then fold the other side in the same way. As a result, you will get a house detail with a corner at the top. Both sides should meet clearly in the center.
2. In the resulting house, bend vertically first one side, then the other. Also meet the opposite sides in the center.
3. Turn the petal back, where you can see the angular pocket. Fold the top corner down until it meets the middle of the bottom side. Glue the petal in this position. This will be the part resembling an envelope.
4. Make 6 identical envelopes.
5. Glue them all together, inserting each subsequent petal into the previous one (use the mark in the photo as a guide).
6. Glue the flower together – bright fuchsia details will form the bottom layer of a scarlet flower.
7. On the reverse side the petals will overlap.
8. Prepare felt pieces and elastic to create the base.
9. Glue the elastic band to the felt circle, securing it with a rectangular piece.
10. Glue the resulting structure to the back.
11. For a small flower that will consist of double round petals, prepare white and pink squares with a side of 2.5 cm. Fold each of them in half.
12. Fold the squares in pairs - pink on white. Close two corners in the third right corner. Pull the sides back and glue at the base.
13. Gather 7 prepared white and pink petals onto a thread (the bottom of the petals must be trimmed first). Also prepare the pistil and stamens in the form of a hugger with a half bead.
14. When all the parts are ready, add dewdrops and proceed to assembly.
15. Glue the small center onto the large flower. At the very end, glue dewdrops - small half-beads. For convenience and accuracy, so as not to spoil the fruit of your creativity at the very end, use tweezers.
You don’t need to go to overseas countries to get such a wonderful scarlet flower. You can make it yourself - and admire its delicate grace.
Video: kanzashi “Scarlet Flower”
Scrunchies for hair “Scarlet Flower”.
You might also be interested in:
- Nine tips for choosing yarn, answers to questions from beginners
- Chamomile using the kanzashi technique on a bandage - an accessory for the baby
- DIY headband with a bow
- Hair ties with tassels
- Kanzashi for beginners, step-by-step photo lesson,…
- Mak kanzashi – step-by-step master class
- Basics of fork knitting, information for beginners
- Making an automatic hairpin in kanzashi style
- about the author
- New master classes
Svetlana Sorokina
My group VKontakte MK in Kanzashi from Svetlana Sorokina
Craft “Scarlet Flower” from paper
Materials:
— Single-sided paper red and green double-sided.
— Colored paper for letters.
— Colored cardboard.
- Pencil glue.
- Any round object for drawing - a circle or compass.
Operating procedure
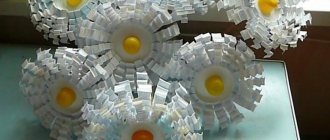
The application will be made in origami style in a circle.
To begin, draw 8 circles of 7 cm each on one-sided red paper, a circle of 6 cm for gluing the leaves of the flower, a circle with a diameter of 2 cm for the middle of the flower. From green paper we cut out 2 circles of 7 cm and a strip of 1x15 cm - the stem.
Now we fold the circles, which are 7 cm each, in half, as a result a semicircle is formed, then in half again and a triangle with a rounded bottom is formed.
When unfolding the circle, marked fold lines were formed and now we bend the edges of the circle upward. Next, turn the circle over with the other side facing you and fold the right and left sides towards the middle. An initial origami figure of circles is formed. Now we fold all the cut out circles in the same way: interesting fairy-tale petals are formed.
To assemble the flower, apply glue to a 6 cm circle and glue all the petals onto it. Next, glue the center of the flower. Glue a stem and two leaves in the middle of the base cardboard. Now we apply glue to the circle on which the leaves are glued and glue the flower onto the cardboard.
Next, cut out the letters “For Mom” and glue them on the free space.
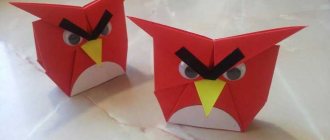
The Scarlet Flower
You can start a master class on making this craft with your own hands by choosing paper. This can be plain red or dark orange paper. If you can find a double-sided one, it will be even better.
A master class and step-by-step instructions on how to make a “scarlet flower” with your own hands will look like this:
- To make a “scarlet flower”, select a square blank as the base.
- Fold it in half and connect the corners.
- We also fold the side corners inward.
- Then we unfold the corners so that the double fold is visible.
- We connect the corners so that the folds are on the inside.
- We glue several of these blanks together and get a flower.
- You can use glitter or rain as the middle.
Several of these flowers can be combined into a bouquet and given to your loved ones. Look at the photo to see what this flower looks like.
Another variant
Rose
The master class on making a rose is very similar to the instructions on how to make a tulip with your own hands. The differences will be in the shape of the petals and their preliminary preparation.
- Prepare petals from corrugated paper, giving them the shape of an oval, widened on one side. You can use scissors to make small teeth in the petals. This is what it looks like in the photo
- Wind each petal lengthwise onto a pencil and hold in this position for a while. Without opening the petal, remove the pencil.
- It is necessary to start forming a rose from the inner petals, which should be more curled and pressed tightly to the stem. Secure the petals wrapped around the stem with glue.
- We attach all the petals in a checkerboard pattern, making them gradually more unfolded and curved outward. The degree of curvature of the petals can be varied.
A master class on how to make paper flowers with your own hands, in a simplified form, is perfect for kindergarten or primary school. Children will not only develop fine motor skills, but also aesthetic taste and show creative interest. The flowers can then be used to decorate the classroom.
You can easily conduct such a master class at home. You just have to stock up on scissors, paper, glue and patience, and the skill will come with practice.