Storing bulk grains in special containers is a great way to keep your kitchen drawers clutter-free and to be able to easily find what you need. Stores offer a huge variety of boxes that differ in material, design, and, as a result, cost. However, it is very easy to make such jars for cereals quickly and easily with your own hands; you don’t even need special materials. Any container and various decorative elements that are likely to be found on everyone’s shelves will do.
Step-by-step master classes on making such useful kitchen appliances can be found in this article.
We make jars for cereals with our own hands from glass containers
Each of us probably buys some product in a store packaged in glass containers. This could be coffee, tea, mayonnaise or jam. It’s often a pity to throw away such containers, so they go on the shelf in the pantry to wait in the wings.
Perhaps their time has come. After all, from these glass jars you can make stylish containers for storing cereals, which are best decorated in the same style. One of the possible decoration methods will be presented in this master class.
You will need:
1) Glass containers with lids;
2) Paint in a can;
3) Wooden small handles;
4) Glue (preferably “Moment”).
Step-by-step instruction:
1) First of all, apply a small amount of glue to the wooden handles and attach them to the center of the lids.
2) Cover the work surface with unnecessary newspapers or paper. Place the dried lids with the handles facing up. We spray paint from a can on top of them. One layer will be enough, but if you need to reapply the paint, it is better to do this after 15-20 minutes, when the first layer has dried. The main thing is that the paint does not get on the inside of the lid.
That's all. We fill the jars with bulk products and close them with decorated lids. The result is very simple, but at the same time stylish containers for storing cereals.
Introduction to decoupage
Let's present a master class on making cereal jars using the decoupage technique.
Necessary materials and tools: glass jars, napkins with a pattern for decoration, white napkins, PVA and Moment glue, gouache, brushes, ribbon, scissors.
Let's start decorating. At the bottom of the can we draw a semicircle. This is done for convenience - through such a window the contents of the jar will be visible.
We glue the rest of the jar with white napkins and PVA glue. After drying, you can cover the top of the napkins with white gouache or acrylic paint. This is done so that in the future the applied pattern will not be translucent.
Related article: Paper swans for a wedding cake
From the napkins with a pattern that were selected and prepared, we cut out the necessary fragments. Carefully remove the two bottom balls of napkins from them.
You can begin the decorating process only after the prepared jar has completely dried. Lubricate the area where the fragment will be glued generously with PVA glue and carefully glue the pattern. Smooth it with a brush liberally moistened with PVA glue.
Using these sequential steps we cover the entire prepared surface of the jar.
We decorate the window. To do this, lubricate the border line with Moment glue and glue the tape.
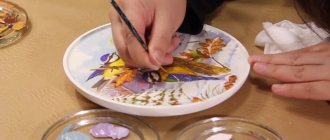
Let the work dry completely. Of course, you can complete the decorating process here, but we suggest continuing. Using acrylic paints we give the drawing more “life” - we draw the petals and centers of the flowers, as in the photo below.
Again, wait until the jar is completely dry. We finish the work - open it with varnish, preferably acrylic, but construction grade can also be used. After the varnish has completely dried, the jar is ready for use! The lid can be chosen to match the color of the picture! We leave it unchanged, but using imagination, it can also be decorated.
You can also use tin cans of coffee or, for example, baby food for decoupage.
The decoupage technology will not change; you just need to cover them well with white napkins and be sure to paint them on top.
But in this case there is one drawback - there is no way to leave a “window” so that the contents of the jar can be seen. However, there is a way out! You can buy stickers and sign the contents. Or simply print them from the Internet. Below we provide several templates.
The simplest decor for a jar with a metal lid can be simply a beautiful decor with ribbon, braid or fabric around the neck. It will be most effective if the jar is glass. Then we paint the lid with acrylic paint. And the jar is ready!
Related article: Crochet summer booties for girls: master class with photos and videos
Making containers using wine bottles
If you don’t find unnecessary jars, you can get by with bottles. The result will be unusual kitchen devices that do not allow ultraviolet rays to pass through and will protect cereals.
You will need:
1) Wine bottles;
2) Cork sheet;
3) Glass cutter.
Stages of work:
1) Using a glass cutter or grinder with a special disc, we saw off the neck of the bottle, obtaining an even container. Sand the edges.
2) Cut out even circles from a cork sheet, the diameter of which will be equal to the size of the resulting bottle holes. We insert the improvised lids into the container, tightly closing the hole.
The cereal jar is ready! During production, you can use bottles of unusual shape or with a pattern, which will give the finished product even more originality and beauty.
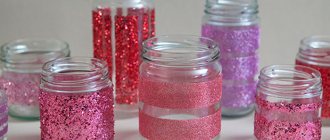
Below are photos that will demonstrate decor options for cereal jars and inspire you to create your own original helpers in the kitchen.
In the style of minimalism
This decor will allow you to view the contents of the jar in full. If this is not necessary, they can be decorated in any color. This decor does not require much effort and does not imply any skills or abilities.
Materials: required number of jars with lids, spray paint, paper, cardboard, lettering templates, black chalkboard paint, PVA glue, scissors, chalk and pencil.
If you couldn’t find slate paint, there is no need to despair. You can make it yourself by simply mixing black paint and tile grout. For a glass of paint you need 2 tablespoons of grout and a little PVA glue. Stir the mixture thoroughly. If everything is ready, let's start decorating.
Turn clean and dry jars upside down during the day. This needs to be done on old newspapers or unnecessary paper. Then we cover them completely in one tone with spray paint. In our case, white. This way the can will look most impressive in combination with a black sticker. If you decided to leave the jar transparent, skip this point.
Another example of a simple decor for spice jars can be prepared jars with inscriptions on the ropes. But the inscription needs to be processed. This can be done using construction or acrylic varnish, or pasted over with wide tape on both sides.
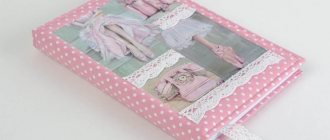
Decorating a spice jar with textiles can be an original and beautiful decor. The fabric should be dense, you can simply glue it to the jar, make inscriptions and open it with varnish.
Another beautiful and original solution could be decorating a jar with decoupage.
Materials: glass jars for spices, PVA glue, scissors, brush, acrylic paints and varnish, beautiful decorative napkins, white napkins.
The manufacturing process is very simple. Using PVA glue, glue several balls of napkins onto a clean jar. Let it dry. Meanwhile, remove the 2 inner balls from the decorative napkins and cut out the decorative elements. Carefully cover the jar with elements and smooth it with a brush with glue. Let the jar dry completely and cover it with glue. The spice jar using the decoupage technique is ready.
Article on the topic: Crochet ribbon lace: master class with a description of the work
There are many decor options. From simple painting of lids, gluing stickers to decorating with textiles, artificial flowers, polymer clay, strands, ropes, beads, pearls and everything you can imagine.
We will provide several examples of varying complexity for inspiration.
It’s very easy to create beauty and comfort with your own hands from simple materials! The main thing is not to be afraid of experiments. Everything will definitely work out!